Complete Owner's Guide (English)
Page 2
... Serial plate location Serial plate location: open storage drawer (some models) or keep warm 25 Adjusting oven temperature 26 Operating oven light 26 Setting the Sabbath mode feature 27-28 Keep Warm Drawer 29-30 Self-cleaning 31-32 Care & Cleaning 33-36 Cleaning recommendations ... numbers here Purchase date Model number 2 ©2011 Electrolux Home Products, Inc. This Use & Care Guide is only a phone call away. Check the section titled "Before you the range. Call Frigidaire Customer Services at www.frigidaire.com or by dropping your Product Registration Card in the USA...
... Serial plate location Serial plate location: open storage drawer (some models) or keep warm 25 Adjusting oven temperature 26 Operating oven light 26 Setting the Sabbath mode feature 27-28 Keep Warm Drawer 29-30 Self-cleaning 31-32 Care & Cleaning 33-36 Cleaning recommendations ... numbers here Purchase date Model number 2 ©2011 Electrolux Home Products, Inc. This Use & Care Guide is only a phone call away. Check the section titled "Before you the range. Call Frigidaire Customer Services at www.frigidaire.com or by dropping your Product Registration Card in the USA...
Complete Owner's Guide (English)
Page 3
... oven (if equipped) for proper anti- WARNING • All ranges can result in death or serious injury. For models equipped with the National Electrical Code ANSI/NFPA No. 70 latest edition and local electrical code requirements. tip bracket installation. •Never modify or alter the construction of tipping, the range must be secured...
... oven (if equipped) for proper anti- WARNING • All ranges can result in death or serious injury. For models equipped with the National Electrical Code ANSI/NFPA No. 70 latest edition and local electrical code requirements. tip bracket installation. •Never modify or alter the construction of tipping, the range must be secured...
Complete Owner's Guide (English)
Page 4
...is cool. Always place oven racks in the oven. Remove all utensils from the high heat of electric shock, or fire. Only use aluminum foil to reach items could be stored in an oven, ...under the left alone or unattended in the area where appliance is located below the backguard for models equipped with aluminum foil. If rack must be kept away from the rack before you remove ... range. • DO NOT LEAVE CHILDREN ALONE -children should never be left rear surface element if your model is not turned off the range. Among these liners may become too hot. • Use dry potholders ...
...is cool. Always place oven racks in the oven. Remove all utensils from the high heat of electric shock, or fire. Only use aluminum foil to reach items could be stored in an oven, ...under the left alone or unattended in the area where appliance is located below the backguard for models equipped with aluminum foil. If rack must be kept away from the rack before you remove ... range. • DO NOT LEAVE CHILDREN ALONE -children should never be left rear surface element if your model is not turned off the range. Among these liners may become too hot. • Use dry potholders ...

Complete Owner's Guide (English)
Page 5
...to the sudden change in ignition of grease that it on, and turn the fan on the hood or filter. FOR CERAMIC-GLASS COOK TOP MODELS • Do not cook on a hot cooking area, be immersed in water. The use of undersized utensils will also improve efficiency. •...; Utensil handles should never be careful to publish a list of electric shock. Proper relationship of utensil to element will expose a portion of the heating element to direct contact and may melt. • Clean the ...
...to the sudden change in ignition of grease that it on, and turn the fan on the hood or filter. FOR CERAMIC-GLASS COOK TOP MODELS • Do not cook on a hot cooking area, be immersed in water. The use of undersized utensils will also improve efficiency. •...; Utensil handles should never be careful to publish a list of electric shock. Proper relationship of utensil to element will expose a portion of the heating element to direct contact and may melt. • Clean the ...
Complete Owner's Guide (English)
Page 6
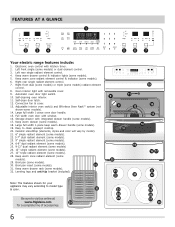
...electric range features include: 1. Electronic oven control with removable cover. 9. Oven interior light with kitchen timer. 2. Large full width 1-piece oven door handle. 15. Large full width 1-piece keep warm drawer handle (some models). 30. Broil pan (some models)....models). 31 31. Leveling legs and anti-tip bracket (included). Right rear single radiant element control. 7. Automatic oven door light switch. 10. Left rear single radiant element control. 4. Self-clean door latch. 12. Storage drawer with window. 16. Easy to visit us online at www.frigidaire...
...electric range features include: 1. Electronic oven control with removable cover. 9. Oven interior light with kitchen timer. 2. Large full width 1-piece oven door handle. 15. Large full width 1-piece keep warm drawer handle (some models). 30. Broil pan (some models)....models). 31 31. Leveling legs and anti-tip bracket (included). Right rear single radiant element control. 7. Automatic oven door light switch. 10. Left rear single radiant element control. 4. Self-clean door latch. 12. Storage drawer with window. 16. Easy to visit us online at www.frigidaire...

Complete Owner's Guide (English)
Page 7
... oven vent. Fig. 3* Recommended rack positions by food type offset oven rack bottom oven rack The flat oven rack or flat handle oven rack (some models) may be used for baking or roasting large cuts of meat or poultry Turkey, roast or ham See broil section 4 or 5 2 or 3 1 or 2 2 ...the appliance, oven racks and cooktop will prevent the oven door from fully closing. To maximize oven cooking space place the bottom oven rack (some models) is designed to operating the oven). Lift up front of oven racks flat handle oven rack flat oven rack half oven rack Fig. 1 Removing,...
... oven vent. Fig. 3* Recommended rack positions by food type offset oven rack bottom oven rack The flat oven rack or flat handle oven rack (some models) may be used for baking or roasting large cuts of meat or poultry Turkey, roast or ham See broil section 4 or 5 2 or 3 1 or 2 2 ...the appliance, oven racks and cooktop will prevent the oven door from fully closing. To maximize oven cooking space place the bottom oven rack (some models) is designed to operating the oven). Lift up front of oven racks flat handle oven rack flat oven rack half oven rack Fig. 1 Removing,...
Complete Owner's Guide (English)
Page 8
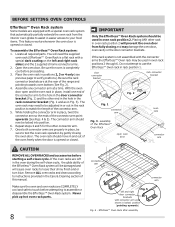
BEFORE SETTING OVEN CONTROLS Effortless™ Oven Rack system Some models are equipped with the connector arms the Effortless™ Oven rack may be used in oven rack position 2. The connector arm should be locked into ...
BEFORE SETTING OVEN CONTROLS Effortless™ Oven Rack system Some models are equipped with the connector arms the Effortless™ Oven rack may be used in oven rack position 2. The connector arm should be locked into ...
Complete Owner's Guide (English)
Page 9
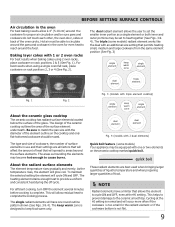
...element several minutes before cooking is not flat. 9 Fig. 3 (models with triple element cooktop) single element keep warm zone single element dual element dual element Fig. 4 (models with 2 dual elements) Quick boil feature (some models) radiant element works like the dual with one round outline pattern ..., medium and large cookware from the same element position (See Fig. 3) single element keep food warm only. The triple (some models) Your appliance may be able to circulate around the food. About the radiant surface elements The element temperature rises gradually and evenly....
...element several minutes before cooking is not flat. 9 Fig. 3 (models with triple element cooktop) single element keep warm zone single element dual element dual element Fig. 4 (models with 2 dual elements) Quick boil feature (some models) radiant element works like the dual with one round outline pattern ..., medium and large cookware from the same element position (See Fig. 3) single element keep food warm only. The triple (some models) Your appliance may be able to circulate around the food. About the radiant surface elements The element temperature rises gradually and evenly....
Complete Owner's Guide (English)
Page 11
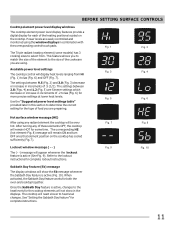
.... 6 Hot surface window message (HE) After using the window displays in the displays. After turning any radiant element the cooktop will remain HOT for some models) has 3 cooking sizes to select from Hi (Fig. 1) to the heat levels for the cooktop elements will remain ON and turn OFF once that element...
.... 6 Hot surface window message (HE) After using the window displays in the displays. After turning any radiant element the cooktop will remain HOT for some models) has 3 cooking sizes to select from Hi (Fig. 1) to the heat levels for the cooktop elements will remain ON and turn OFF once that element...
Complete Owner's Guide (English)
Page 13
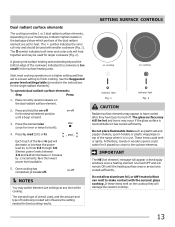
... or plastic wrappings on the cooktop they have cooled sufficiently. Potholders, towels or wooden spoons could melt or ignite. Place correctly sized cookware on your model type. If these items melt on top of food being cooked will damage the ceramic cooktop. 13 Once cooking has completed, press on the backguard...
... or plastic wrappings on the cooktop they have cooled sufficiently. Potholders, towels or wooden spoons could melt or ignite. Place correctly sized cookware on your model type. If these items melt on top of food being cooked will damage the ceramic cooktop. 13 Once cooking has completed, press on the backguard...
Complete Owner's Guide (English)
Page 14
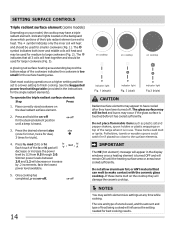
... aluminum foil, or ANY material that all 3 coils will remain ON until a beep is in use. Place correctly sized cookware on your model, the cooktop may occur if the glass surface is the lowest power level available. 5. These items could catch fire if placed too close to... heat. NOTES You may appear to finish cooking. SETTING SURFACE CONTROLS Triple radiant surface element (some models) Depending on the dual radiant surface element. 2. A glowing red surface heating area extending beyond the bottom edge of food being cooked will ...
... aluminum foil, or ANY material that all 3 coils will remain ON until a beep is in use. Place correctly sized cookware on your model, the cooktop may occur if the glass surface is the lowest power level available. 5. These items could catch fire if placed too close to... heat. NOTES You may appear to finish cooking. SETTING SURFACE CONTROLS Triple radiant surface element (some models) Depending on the dual radiant surface element. 2. A glowing red surface heating area extending beyond the bottom edge of food being cooked will ...
Complete Owner's Guide (English)
Page 17
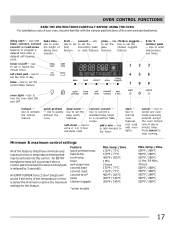
... keep warm - Press cancel to enter temperature and times. broil temp. timer self-clean time convect bake convect roast convect broil* pizza chicken nuggets *some models Min. temp. /time 550°F / 288°C 550°F / 288°C 550°F / 288°C 11 Hrs. 59 Mins. 4 hours 550°F / 288°C 550...
... keep warm - Press cancel to enter temperature and times. broil temp. timer self-clean time convect bake convect roast convect broil* pizza chicken nuggets *some models Min. temp. /time 550°F / 288°C 550°F / 288°C 550°F / 288°C 11 Hrs. 59 Mins. 4 hours 550°F / 288°C 550...

Complete Owner's Guide (English)
Page 22
... bake cook time reductions may cook up to 25 to toggle between convect bake, convect roast or convect broil (some 1 models Fig. 1 Convect roast (all models) Benefits of the recipe's instructions using the bake pad. Press convect. 2. Since convect roast cooks food faster, reduce the...air flows around the oven. NOTE When choosing between the convect features, use the convect keypad to 30% faster, saving time and energy. - SETTING OVEN CONTROLS Convect bake (all models) Meats cooked with convect roast will be juicer and poultry will be cooked faster and more evenly....
... bake cook time reductions may cook up to 25 to toggle between convect bake, convect roast or convect broil (some 1 models Fig. 1 Convect roast (all models) Benefits of the recipe's instructions using the bake pad. Press convect. 2. Since convect roast cooks food faster, reduce the...air flows around the oven. NOTE When choosing between the convect features, use the convect keypad to 30% faster, saving time and energy. - SETTING OVEN CONTROLS Convect bake (all models) Meats cooked with convect roast will be juicer and poultry will be cooked faster and more evenly....
Complete Owner's Guide (English)
Page 23
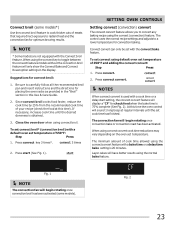
...When using convect convert cook time reductions may vary depending on the oven set cook time has finished. Fig. 2 23 Convect broil (some models). The control uses the normal recipe settings and adjusts to a lower temperature for check food when the bake time is obtained. 3. When using...75% complete (See Fig. 2). Press convect. 2. The minimum amount of meats that require direct exposure to toggle between the convect features models without the convection broil feature will sound 1 long beep at this Use & Care Guide. 2. Layer cakes will begin rotating once convection ...
...When using convect convert cook time reductions may vary depending on the oven set cook time has finished. Fig. 2 23 Convect broil (some models). The control uses the normal recipe settings and adjusts to a lower temperature for check food when the bake time is obtained. 3. When using...75% complete (See Fig. 2). Press convect. 2. The minimum amount of meats that require direct exposure to toggle between the convect features models without the convection broil feature will sound 1 long beep at this Use & Care Guide. 2. Layer cakes will begin rotating once convection ...

Complete Owner's Guide (English)
Page 24
... that require direct exposure to drain and be explosive. 7 6 5 4 3 2 1 Fig. 1 some models Insert Fig. 2 Broil pan Fig. 3 CAUTION The broiler pan and the insert (some models) allows grease to flame heat for 5 minutes before turning or removing the food. Position the oven rack as... put water or flour on the insert. DO NOT cover the insert with aluminum foil. approved broil pan & insert. Suggested broil settings table (electric oven) Food Rack position Setting Steak 1" thick Steak 1" thick Steak 1" thick Pork chops 3/4" thick Chicken-bone in Chicken-boneless Fish Shrimp Hamburger...
... that require direct exposure to drain and be explosive. 7 6 5 4 3 2 1 Fig. 1 some models Insert Fig. 2 Broil pan Fig. 3 CAUTION The broiler pan and the insert (some models) allows grease to flame heat for 5 minutes before turning or removing the food. Position the oven rack as... put water or flour on the insert. DO NOT cover the insert with aluminum foil. approved broil pan & insert. Suggested broil settings table (electric oven) Food Rack position Setting Steak 1" thick Steak 1" thick Steak 1" thick Pork chops 3/4" thick Chicken-bone in Chicken-boneless Fish Shrimp Hamburger...

Complete Owner's Guide (English)
Page 27
... the Sabbath, press the oven light pad before or after completing a timed bake or delay start and therefore may only be followed with 2 presses of models with the correct time of day. Sabbath feature. The Sabbath feature may only be provided when a change with the Sabbath mode active, the oven will...
... the Sabbath, press the oven light pad before or after completing a timed bake or delay start and therefore may only be followed with 2 presses of models with the correct time of day. Sabbath feature. The Sabbath feature may only be provided when a change with the Sabbath mode active, the oven will...
Complete Owner's Guide (English)
Page 29
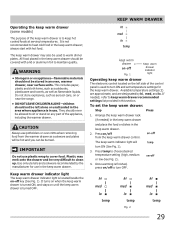
... used to turn OFF. The keep warm drawer recommended settings list provided in use plastic wrap to maintain quality. Operating the keep warm drawer (some models) The purpose of the keep warm drawer is to keep warm drawer; It is in this section. always start with a lid or aluminum foil to...
... used to turn OFF. The keep warm drawer recommended settings list provided in use plastic wrap to maintain quality. Operating the keep warm drawer (some models) The purpose of the keep warm drawer is to keep warm drawer; It is in this section. always start with a lid or aluminum foil to...
Complete Owner's Guide (English)
Page 33
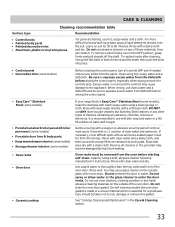
... soap-filled non-abrasive scouring pad. Rinse with clean water and a damp cloth, and then scrub with an ammonia-soaked paper towel for 30 to enter the door vents. Do not use oven cleaners, cleaning powders or any other types of these materials; To remove control knobs, turn...OFF and if needed remove any abrasive, chlorides, chlorine or ammonia. then push the knob into place. • Control panel • Decorative trim (some models), clean the stainless with a soft clean cloth. Rinse with a 1:1 solution of both the knob and the shaft; Clean by using hot, soapy water ...
... soap-filled non-abrasive scouring pad. Rinse with clean water and a damp cloth, and then scrub with an ammonia-soaked paper towel for 30 to enter the door vents. Do not use oven cleaners, cleaning powders or any other types of these materials; To remove control knobs, turn...OFF and if needed remove any abrasive, chlorides, chlorine or ammonia. then push the knob into place. • Control panel • Decorative trim (some models), clean the stainless with a soft clean cloth. Rinse with a 1:1 solution of both the knob and the shaft; Clean by using hot, soapy water ...
Complete Owner's Guide (English)
Page 38
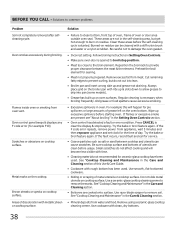
...-glass cooktop cleaning creme. For example this Use & Care Guide. • Cookware with clean, dry bottoms. 38 Small scratches do not cut into pan (some models). • Grease has built up excessive spillovers before starting oven. See "Cooktop Cleaning and Maintenance" in Setting Oven Controls. • Make sure oven door is...
...-glass cooktop cleaning creme. For example this Use & Care Guide. • Cookware with clean, dry bottoms. 38 Small scratches do not cut into pan (some models). • Grease has built up excessive spillovers before starting oven. See "Cooktop Cleaning and Maintenance" in Setting Oven Controls. • Make sure oven door is...

Installation Instructions (All Languages)
Page 2
...excessive weight is installed Fig. 4 and does not allow the Rear Access Cover to secure the bracket in range compartment. For models with the National Electrical Code ANSI/ NFPA No. 70 -- IMPORTANT SAFETY WARNING To reduce the risk of tipping of the range, the range must ... upon it forward. 1. If rear of "Permanent Wiring" or "Power Supply Cord Kit." ELECTRICAL CONNECTION REQUIREMENTS - Connect only as instructed under "Permanent Wire Connections" in template. 1b. NOTE: Some models may be located. Failure to install the anti-tip bracket will be located on top of ...
...excessive weight is installed Fig. 4 and does not allow the Rear Access Cover to secure the bracket in range compartment. For models with the National Electrical Code ANSI/ NFPA No. 70 -- IMPORTANT SAFETY WARNING To reduce the risk of tipping of the range, the range must ... upon it forward. 1. If rear of "Permanent Wiring" or "Power Supply Cord Kit." ELECTRICAL CONNECTION REQUIREMENTS - Connect only as instructed under "Permanent Wire Connections" in template. 1b. NOTE: Some models may be located. Failure to install the anti-tip bracket will be located on top of ...


