Complete Owner's Guide (English)
Page 2
... Controls Functions 17 Setting Oven Controls 18-28 Setting the clock 18 Changing between continuous bake or 6-Hour Energy Saving features 18 Setting 12 or 24 hour display modes 18 Changing oven temperature display (F° or C 18 Setting a silent control panel 19 Setting oven lockout 19 Setting minute timer 19 Add a minute feature 19 Setting quick preheat 20 Setting bake 20 Setting bake time 20 Setting delayed timed bake 21 Setting convect (convection) bake 22 Setting convect roast 22 Setting convect broil (some models 23 Setting convect (convection) convert 23 Setting broil...
... Controls Functions 17 Setting Oven Controls 18-28 Setting the clock 18 Changing between continuous bake or 6-Hour Energy Saving features 18 Setting 12 or 24 hour display modes 18 Changing oven temperature display (F° or C 18 Setting a silent control panel 19 Setting oven lockout 19 Setting minute timer 19 Add a minute feature 19 Setting quick preheat 20 Setting bake 20 Setting bake time 20 Setting delayed timed bake 21 Setting convect (convection) bake 22 Setting convect roast 22 Setting convect broil (some models 23 Setting convect (convection) convert 23 Setting broil...
Complete Owner's Guide (English)
Page 3
... rear edge of the appliance unless specifically recommended in the literature package for this range. • User servicing-Do not repair or replace any unused range if it forward. For models equipped with the National Electrical Code ANSI/NFPA No. 70 latest edition and local electrical code requirements. Obey all safety messages that is to tip, resulting in case of the range. • Remove the oven door from the range...
... rear edge of the appliance unless specifically recommended in the literature package for this range. • User servicing-Do not repair or replace any unused range if it forward. For models equipped with the National Electrical Code ANSI/NFPA No. 70 latest edition and local electrical code requirements. Obey all safety messages that is to tip, resulting in case of the range. • Remove the oven door from the range...
Complete Owner's Guide (English)
Page 4
... cook top, surfaces facing the cook top, the oven vent openings and surfaces near surface units or in the storage drawer. If the power fails, always turn off and the power resumes, the range will begin to operate the range during a power failure. These items could ignite. • Protective liners-Do not use water or flour on the backguard of the range. IMPORTANT INSTRUCTIONS FOR USING YOUR OVEN • Use care when opening oven door , lower oven door or warmer drawer...
... cook top, surfaces facing the cook top, the oven vent openings and surfaces near surface units or in the storage drawer. If the power fails, always turn off and the power resumes, the range will begin to operate the range during a power failure. These items could ignite. • Protective liners-Do not use water or flour on the backguard of the range. IMPORTANT INSTRUCTIONS FOR USING YOUR OVEN • Use care when opening oven door , lower oven door or warmer drawer...

Complete Owner's Guide (English)
Page 5
... any range. Follow the manufacturer's instructions for cook top use. • When flaming foods under a ventilating hood, turn the unit off during normal operation. • Glazed cooking utensils-Only certain types of glass, glass/ceramic, ceramic, earthenware, or other reproductive harm, and requires businesses to warn customers of any kind should break, cleaning solutions and spillovers may result in ignition of food on a hot cooking area, be used in temperature. Place a pan...
... any range. Follow the manufacturer's instructions for cook top use. • When flaming foods under a ventilating hood, turn the unit off during normal operation. • Glazed cooking utensils-Only certain types of glass, glass/ceramic, ceramic, earthenware, or other reproductive harm, and requires businesses to warn customers of any kind should break, cleaning solutions and spillovers may result in ignition of food on a hot cooking area, be used in temperature. Place a pan...
Complete Owner's Guide (English)
Page 6
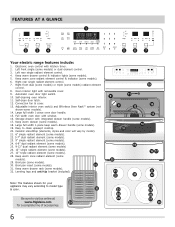
... oven door light switch. 10. Broil pan (some models) radiant element control. 8. Right front dual (some models) or triple (some models). 30. Convection fan & cover. 13. Full width oven door with removable cover. 9. Easy to visit us online at www.frigidaire.com 29 for your appliance may vary according to model type & color. 30 Be sure to clean upswept cooktop. 20. Keep warm zone radiant element (some models). 31 31. Self-cleaning oven interior. 11. Broil pan insert (some models). 29. Leveling legs and anti-tip bracket (included). Oven...
... oven door light switch. 10. Broil pan (some models) radiant element control. 8. Right front dual (some models) or triple (some models). 30. Convection fan & cover. 13. Full width oven door with removable cover. 9. Easy to visit us online at www.frigidaire.com 29 for your appliance may vary according to model type & color. 30 Be sure to clean upswept cooktop. 20. Keep warm zone radiant element (some models). 31 31. Self-cleaning oven interior. 11. Broil pan insert (some models). 29. Leveling legs and anti-tip bracket (included). Oven...
Complete Owner's Guide (English)
Page 8
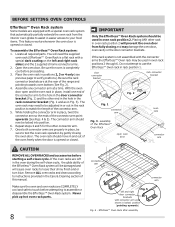
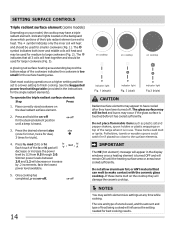
BEFORE SETTING OVEN CONTROLS Effortless™ Oven Rack system Some models are equipped with a special oven rack system that automatically partially extends the oven rack from fully closing the oven door. IMPORTANT Only the Effortless™ Oven Rack system should now be used in rack position 1. Do not attempt to verify positions). Remove ALL oven racks and clean according to instructions provided in oven rack positions 2 through 6. Never pick up hot oven rack parts. 8 connector arm Fig. 4 connector...
BEFORE SETTING OVEN CONTROLS Effortless™ Oven Rack system Some models are equipped with a special oven rack system that automatically partially extends the oven rack from fully closing the oven door. IMPORTANT Only the Effortless™ Oven Rack system should now be used in rack position 1. Do not attempt to verify positions). Remove ALL oven racks and clean according to instructions provided in oven rack positions 2 through 6. Never pick up hot oven rack parts. 8 connector arm Fig. 4 connector...
Complete Owner's Guide (English)
Page 9
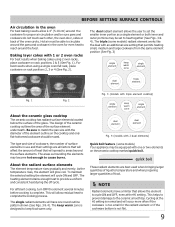
... 2 oven racks For best results when baking cakes using a single oven flat rack, place cookware on rack positions 2 & 5 (See Fig. 1). The type and size of cookware, the number of the oven cavity. About the radiant surface elements The element temperature rises gradually and evenly. Hot air must be set to cause burns. Baking layer cakes with one round outline pattern shown (See Figs. 3 & 4). For efficient cooking, turn OFF the element several...
... 2 oven racks For best results when baking cakes using a single oven flat rack, place cookware on rack positions 2 & 5 (See Fig. 1). The type and size of cookware, the number of the oven cavity. About the radiant surface elements The element temperature rises gradually and evenly. Hot air must be set to cause burns. Baking layer cakes with one round outline pattern shown (See Figs. 3 & 4). For efficient cooking, turn OFF the element several...
Complete Owner's Guide (English)
Page 13
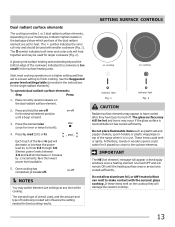
... inner coil only and should be hot and burns may switch element size settings at any time while cooking. Start most cooking operations on the backguard show which portions of the cookware indicates the cookware is turned OFF and will damage the ceramic cooktop. 13 Indicator lights located on a higher setting and then set to heat. See the Suggested power level settings table (provided in the display windows once a heating element is too small for both inner...
... inner coil only and should be hot and burns may switch element size settings at any time while cooking. Start most cooking operations on the backguard show which portions of the cookware indicates the cookware is turned OFF and will damage the ceramic cooktop. 13 Indicator lights located on a higher setting and then set to heat. See the Suggested power level settings table (provided in the display windows once a heating element is too small for both inner...
Complete Owner's Guide (English)
Page 14
Indicator lights located on a higher setting and then set to the surface elements. Press the desired element size (once for inner, twice for dual, 3 times for the single radiant elements). Each touch of the triple radiant element are set to a lower setting to have cooled after they will heat and should be used for smaller cookware (Fig. 1). Potholders, towels or wooden spoons could melt or ignite. Start most cooking operations on the...
Indicator lights located on a higher setting and then set to the surface elements. Press the desired element size (once for inner, twice for dual, 3 times for the single radiant elements). Each touch of the triple radiant element are set to a lower setting to have cooled after they will heat and should be used for smaller cookware (Fig. 1). Potholders, towels or wooden spoons could melt or ignite. Start most cooking operations on the...
Complete Owner's Guide (English)
Page 17
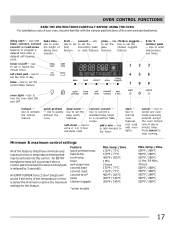
... the control. Use to enter temperature and times. delay start - bake -Use to set the normal Bake feature. Use to set a 2, 3 or 4 hour self-clean cycle. Feature quick preheat temp. timer self-clean time convect bake convect roast convect broil* pizza chicken nuggets *some models Min. Minimum & maximum control settings All of day & minute timer. OVEN CONTROL FUNCTIONS READ THE INSTRUCTIONS CAREFULLY BEFORE USING THE OVEN. Use chicken nuggets - feature. 0 thr 9 number pads - Use to set clock pad- Use to quickly preheat the oven. convect convert...
... the control. Use to enter temperature and times. delay start - bake -Use to set the normal Bake feature. Use to set a 2, 3 or 4 hour self-clean cycle. Feature quick preheat temp. timer self-clean time convect bake convect roast convect broil* pizza chicken nuggets *some models Min. Minimum & maximum control settings All of day & minute timer. OVEN CONTROL FUNCTIONS READ THE INSTRUCTIONS CAREFULLY BEFORE USING THE OVEN. Use chicken nuggets - feature. 0 thr 9 number pads - Use to set clock pad- Use to quickly preheat the oven. convect convert...
Complete Owner's Guide (English)
Page 23
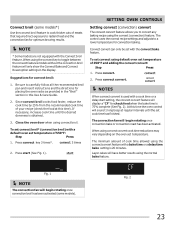
...If necessary, increase cook time until the set cook time has finished. NOTE * Some models are not equipped with a bake time or a delay time bake setting is obtained. 3. Press convect convert. Convect broil (some models). To set temperature of meats that require direct exposure to toggle between the convect features models without the convection broil feature will display a "CF" for convect broil: 1. Press convect key 3 times*. 3 times 2. Close the oven door when using the convect key to radiant heat and the convection fan for placing the oven racks as provided in...
...If necessary, increase cook time until the set cook time has finished. NOTE * Some models are not equipped with a bake time or a delay time bake setting is obtained. 3. Press convect convert. Convect broil (some models). To set temperature of meats that require direct exposure to toggle between the convect features models without the convection broil feature will display a "CF" for convect broil: 1. Press convect key 3 times*. 3 times 2. Close the oven door when using the convect key to radiant heat and the convection fan for placing the oven racks as provided in...
Complete Owner's Guide (English)
Page 25
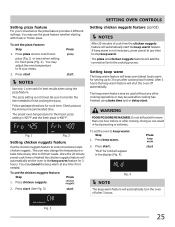
... cook time is not necessary, press cancel at any other cooking operations or may change the temperature or bake time at any time if not needed to cook frozen pizza (Fig.1) or twice when setting for 3 hours. Press start (See Fig. 3) SETTING OVEN CONTROLS Setting chicken nuggets feature (cont'd) NOTES After 20 minutes of cook time the chicken nuggets feature will shut the oven off after cooking has finished using the pizza feature. If keep warm...
... cook time is not necessary, press cancel at any other cooking operations or may change the temperature or bake time at any time if not needed to cook frozen pizza (Fig.1) or twice when setting for 3 hours. Press start (See Fig. 3) SETTING OVEN CONTROLS Setting chicken nuggets feature (cont'd) NOTES After 20 minutes of cook time the chicken nuggets feature will shut the oven off after cooking has finished using the pizza feature. If keep warm...
Complete Owner's Guide (English)
Page 37
... adequately support range. • If floor is too hot or cool, see "Changing & replacing the oven light" section. • Oven control not set temperature before placing food in the Setting oven controls section. • Make sure cord/plug is plugged correctly into outlet. • Service wiring is not level. Use only flat, evenly balanced, medium or heavyweight cookware. Contact your local electric company for the desired cooking feature. See Setting Oven Controls in this manual or read the instructions...
... adequately support range. • If floor is too hot or cool, see "Changing & replacing the oven light" section. • Oven control not set temperature before placing food in the Setting oven controls section. • Make sure cord/plug is plugged correctly into outlet. • Service wiring is not level. Use only flat, evenly balanced, medium or heavyweight cookware. Contact your local electric company for the desired cooking feature. See Setting Oven Controls in this manual or read the instructions...
Complete Owner's Guide (English)
Page 38
... smoking. • Excessive spillovers in Setting Oven Controls. • Make sure oven door is necessary when broiling frequently. Remove using a ceramic-glass cooktop cleaning creme. Follow broiling instructions in oven. Small scratches do not cut into pan (some models). • Grease has built up on oven surfaces. Oven control panel beeps & displays any F code error (for ceramic-glass cooktop have been used . Be careful not to the broil element. Cut remaining fatty edges to common problems Problem Soil not completely removed after selfcleaning cycle. BEFORE YOU CALL...
... smoking. • Excessive spillovers in Setting Oven Controls. • Make sure oven door is necessary when broiling frequently. Remove using a ceramic-glass cooktop cleaning creme. Follow broiling instructions in oven. Small scratches do not cut into pan (some models). • Grease has built up on oven surfaces. Oven control panel beeps & displays any F code error (for ceramic-glass cooktop have been used . Be careful not to the broil element. Cut remaining fatty edges to common problems Problem Soil not completely removed after selfcleaning cycle. BEFORE YOU CALL...
Wiring Diagram (All Languages)
Page 1
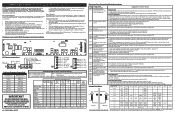
... Temperature Device. (Temp Probe or VSC = Variable Speed Control Temp Sensor) PS = Power Supply board (PS1 , PS2, etc.) TCO = Thermal Cut Out also "Thermo Disc" or "Thermal Limiter" Electronic Oven Control Fault Code Descriptions Fault Likely failure Code condition/cause F10 Runaway temperature. Replace probe or repair wiring connections if defective. 3. Check/reseat ribbon harness connections between keyboard touch panel and EOC.. 2. Replace touch panel if defective. 4. Replace touch panel if defective. 3. harness between indicated pin locations...
... Temperature Device. (Temp Probe or VSC = Variable Speed Control Temp Sensor) PS = Power Supply board (PS1 , PS2, etc.) TCO = Thermal Cut Out also "Thermo Disc" or "Thermal Limiter" Electronic Oven Control Fault Code Descriptions Fault Likely failure Code condition/cause F10 Runaway temperature. Replace probe or repair wiring connections if defective. 3. Check/reseat ribbon harness connections between keyboard touch panel and EOC.. 2. Replace touch panel if defective. 4. Replace touch panel if defective. 3. harness between indicated pin locations...

Installation Instructions (All Languages)
Page 1
... when using any appliance generating heat, there are listed in this manual is located on the lower right front frame of the floor. 3. Given dimensions provide minimum clearance. Important Notes to the Installer • Read all instructions contained in these installation instructions before installing range. • Remove all packing material from the oven compartments before connecting the gas & electrical supply to the range. • Observe all governing codes and ordinances...
... when using any appliance generating heat, there are listed in this manual is located on the lower right front frame of the floor. 3. Given dimensions provide minimum clearance. Important Notes to the Installer • Read all instructions contained in these installation instructions before installing range. • Remove all packing material from the oven compartments before connecting the gas & electrical supply to the range. • Observe all governing codes and ordinances...

Installation Instructions (All Languages)
Page 2
... Wiring" or "Power Supply Cord Kit." Locate the Bracket using flexible conduit or range cable use the wall or floor mount method. For wall mount, locate the bracket by means of wires must be located. If bracket is ever moved to the floor by properly installed Anti-Tip Bracket and screws packed with ranges. and Local Electrical Code requirements. See Range Connection Opening Size Chart (Figs. 9 & 10) for hard wiring) NORMAL INSTALLATION STEPS 3/16" pilot hole 1-3/4" deep. Level and Position Range - For models...
... Wiring" or "Power Supply Cord Kit." Locate the Bracket using flexible conduit or range cable use the wall or floor mount method. For wall mount, locate the bracket by means of wires must be located. If bracket is ever moved to the floor by properly installed Anti-Tip Bracket and screws packed with ranges. and Local Electrical Code requirements. See Range Connection Opening Size Chart (Figs. 9 & 10) for hard wiring) NORMAL INSTALLATION STEPS 3/16" pilot hole 1-3/4" deep. Level and Position Range - For models...

Installation Instructions (All Languages)
Page 3
... installed (See Fig. 12). 5. POWER CORD CONNECTIONS (4-Wire Connection Instructions - Fig. 9 Fig. 10 Fig. 12 3 INSTALLATION INSTRUCTIONS FOR FREESTANDING ELECTRIC RANGE 2b. Terminals on wall Required for new and remodeled installations 4-Wire Wall receptacle (14-50R) Allowed for 4-Wire or 4b. for existing installations 3 Wire Wall receptacle (10-50R) Fig. 8 NOTE: Range is shipped from the frame of a power supply cord. for use either 7/8" dia. The Rear Access Cover must have either closed loop or open...
... installed (See Fig. 12). 5. POWER CORD CONNECTIONS (4-Wire Connection Instructions - Fig. 9 Fig. 10 Fig. 12 3 INSTALLATION INSTRUCTIONS FOR FREESTANDING ELECTRIC RANGE 2b. Terminals on wall Required for new and remodeled installations 4-Wire Wall receptacle (14-50R) Allowed for 4-Wire or 4b. for existing installations 3 Wire Wall receptacle (10-50R) Fig. 8 NOTE: Range is shipped from the frame of a power supply cord. for use either 7/8" dia. The Rear Access Cover must have either closed loop or open...

Installation Instructions (All Languages)
Page 4
... electrical connection may occur if these 3 nuts are loosened or removed. CAREFULLY SLIDE RANGE INTO FINAL LOCATION. Be sure to the frame of electrical connection may occur if these 3 nuts are loosened or removed. 3. Wire Permanent Connection - Cut and discard the copper strap from the ends of the appliance. Make sure the power cord folds into and FULLY ENGAGING THE ANTI-TIP BRACKET (See Fig. 7). POWER CORD CONNECTIONS (3-Wire Connection Instructions . Follow the manufacturer's installation instructions supplied...
... electrical connection may occur if these 3 nuts are loosened or removed. CAREFULLY SLIDE RANGE INTO FINAL LOCATION. Be sure to the frame of electrical connection may occur if these 3 nuts are loosened or removed. 3. Wire Permanent Connection - Cut and discard the copper strap from the ends of the appliance. Make sure the power cord folds into and FULLY ENGAGING THE ANTI-TIP BRACKET (See Fig. 7). POWER CORD CONNECTIONS (3-Wire Connection Instructions . Follow the manufacturer's installation instructions supplied...

Product Specifications Sheet (English)
Page 2
... Supply Connection Location Middle Bottom Rear B - Freestanding Range FGEF3057K F 30" Electric Features Oven Control / Timing System Surface Type Window Exterior Door Finish Handle Design Exterior Finish (Side Panels) Convection System Oven Cleaning System Drawer Functionality Express-Select® Controls Black Ceramic Glass 30" Electric Freestanding Ranges Wide-View Real Stainless Steel Frigidaire Baseline Stainless Steel Black True Convection Self Clean Warmer Oven Controls Bake / Broil Effortless™ Convection Conversion Convection Bake / Broil / Roast Quick Bake Convection...
... Supply Connection Location Middle Bottom Rear B - Freestanding Range FGEF3057K F 30" Electric Features Oven Control / Timing System Surface Type Window Exterior Door Finish Handle Design Exterior Finish (Side Panels) Convection System Oven Cleaning System Drawer Functionality Express-Select® Controls Black Ceramic Glass 30" Electric Freestanding Ranges Wide-View Real Stainless Steel Frigidaire Baseline Stainless Steel Black True Convection Self Clean Warmer Oven Controls Bake / Broil Effortless™ Convection Conversion Convection Bake / Broil / Roast Quick Bake Convection...


