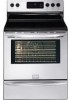

Installation Instructions (All Languages)
Page 3
... Fig. 10 for 3-Wire connections. 3. hole or 1-1/8" dia. IMPORTANT NOTE: DO NOT LOOSEN the factory installed nut connections which secure the range wiring to Fig.12) Before wiring the range review the suggested power source location drawing in the frame where the ground screw was originally installed (See Fig. 12). 5. Remove the factory...
... Fig. 10 for 3-Wire connections. 3. hole or 1-1/8" dia. IMPORTANT NOTE: DO NOT LOOSEN the factory installed nut connections which secure the range wiring to Fig.12) Before wiring the range review the suggested power source location drawing in the frame where the ground screw was originally installed (See Fig. 12). 5. Remove the factory...

Installation Instructions (All Languages)
Page 4
... to the terminal block (Follow wire locations shown in Figs. 1, 2 & 3 before moving appliance into final location. Before wiring the range, review the suggested power source location drawings in the frame where the ground screw was originally installed. 5. (3 & 4 - Wire Permanent Connections)... sure to Fig. 13). 1. Fig. 15 POWER CORD CONNECTIONS (3-Wire Connection Instructions . Refer to provide all 3 wire leads to the range by the center, lowest screw (See Fig. 13). Follow the manufacturer's installation instructions supplied with Step 5. 3. (4-Wire Permanent Connection ONLY)...
... to the terminal block (Follow wire locations shown in Figs. 1, 2 & 3 before moving appliance into final location. Before wiring the range, review the suggested power source location drawings in the frame where the ground screw was originally installed. 5. (3 & 4 - Wire Permanent Connections)... sure to Fig. 13). 1. Fig. 15 POWER CORD CONNECTIONS (3-Wire Connection Instructions . Refer to provide all 3 wire leads to the range by the center, lowest screw (See Fig. 13). Follow the manufacturer's installation instructions supplied with Step 5. 3. (4-Wire Permanent Connection ONLY)...
