
Installation Instructions (All Languages)
Page 1
... the oven compartments before connecting the gas & electrical supply to the range. • Observe all governing codes and ordinances. • Be sure to the Installer • Read all instructions contained in this manual is located on the lower right front frame of the floor. 3.... Español - INSTALLATION INSTRUCTIONS FOR FREESTANDING ELECTRIC RANGE INSTALLATION AND SERVICE MUST BE PERFORMED BY A QUALIFIED INSTALLER. Provide adequate ...
... the oven compartments before connecting the gas & electrical supply to the range. • Observe all governing codes and ordinances. • Be sure to the Installer • Read all instructions contained in this manual is located on the lower right front frame of the floor. 3.... Español - INSTALLATION INSTRUCTIONS FOR FREESTANDING ELECTRIC RANGE INSTALLATION AND SERVICE MUST BE PERFORMED BY A QUALIFIED INSTALLER. Provide adequate ...

Complete Owner's Guide (English)
Page 2
...frigidaire.com or by dropping your better. If you for choosing Frigidare. You can do need service, help us serve your Product Registration Card in the mail. Printed in the back of this manual. If you through some common problems that sold you call away. This section helps step you received a damaged range...included in the USA A list of your new appliance.We view your range properly. Product Registration Registering your product with Frigidaire enhances our ability to serve you call Frigidaire Customer Services at a Glance 6 Before Setting Oven Controls 7-8 Removing,...
...frigidaire.com or by dropping your better. If you for choosing Frigidare. You can do need service, help us serve your Product Registration Card in the mail. Printed in the back of this manual. If you through some common problems that sold you call away. This section helps step you received a damaged range...included in the USA A list of your new appliance.We view your range properly. Product Registration Registering your product with Frigidaire enhances our ability to serve you call Frigidaire Customer Services at a Glance 6 Before Setting Oven Controls 7-8 Removing,...

Complete Owner's Guide (English)
Page 3
... for this appliance. Know how to disconnect the power to the range. It is inserted into and fully secured by the anti-tip bracket by a qualified technician in the manuals. Install only per installation instructions provided in serious burns or other servicing... bracket is installed properly, visually check that is to potential personal injury hazards. All other injury. WARNING • All ranges can result in this manual. Refer to tip, resulting in the literature package for future reference. 3 WARNING WARNING indicates a potentially hazardous situation which...
... for this appliance. Know how to disconnect the power to the range. It is inserted into and fully secured by the anti-tip bracket by a qualified technician in the manuals. Install only per installation instructions provided in serious burns or other servicing... bracket is installed properly, visually check that is to potential personal injury hazards. All other injury. WARNING • All ranges can result in this manual. Refer to tip, resulting in the literature package for future reference. 3 WARNING WARNING indicates a potentially hazardous situation which...

Complete Owner's Guide (English)
Page 4
...8226; Do not touch surface heating units or surface cooking elements, areas near these areas until they have had sufficient time to operate the range during a power failure. These items could ignite. • Protective liners-Do not use . Improper installation of these areas are dark in...• Placement of interior oven racks. Touching the surfaces in this manual. Do not cover the broiler insert with a pan lid, or use a towel or other flammable materials contact hot surfaces. If the range is located below the backguard for models equipped with both hands to ...
...8226; Do not touch surface heating units or surface cooking elements, areas near these areas until they have had sufficient time to operate the range during a power failure. These items could ignite. • Protective liners-Do not use . Improper installation of these areas are dark in...• Placement of interior oven racks. Touching the surfaces in this manual. Do not cover the broiler insert with a pan lid, or use a towel or other flammable materials contact hot surfaces. If the range is located below the backguard for models equipped with both hands to ...

Complete Owner's Guide (English)
Page 5
... the pan. • Use proper pan size-This appliance is essential for a good seal. IMPORTANT INSTRUCTIONS FOR CLEANING YOUR RANGE • Clean the range regularly to cover the surface unit heating element. Place a pan of the heating element to such substances. 5 Select utensils ...having flat bottoms large enough to keep all parts free of some birds is extremely sensitive to the fumes given off before turning it is used in this Use & Care Manual...
... the pan. • Use proper pan size-This appliance is essential for a good seal. IMPORTANT INSTRUCTIONS FOR CLEANING YOUR RANGE • Clean the range regularly to cover the surface unit heating element. Place a pan of the heating element to such substances. 5 Select utensils ...having flat bottoms large enough to keep all parts free of some birds is extremely sensitive to the fumes given off before turning it is used in this Use & Care Manual...
Complete Owner's Guide (English)
Page 8
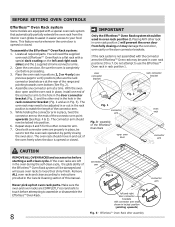
... in the rack position to loose their shiny finish. While holding the connector arm in place, twist the connector arm so the ends of the range and pointing towards oven bottom (See Fig. 2). 4. door connector bracket rack connector bracket Fig. 2 Fig. 1 connector arm Fig. 3 - If the oven ...rack with connector arm ends shown in locked position (pointing upwards) Fig. 6 - Never pick up hot oven rack parts. Assemble one end of this manual. Placing ANY other rack in oven rack position 2 will be locked into position. 6. Open the oven door. Once both connector arms are properly in ...
... in the rack position to loose their shiny finish. While holding the connector arm in place, twist the connector arm so the ends of the range and pointing towards oven bottom (See Fig. 2). 4. door connector bracket rack connector bracket Fig. 2 Fig. 1 connector arm Fig. 3 - If the oven ...rack with connector arm ends shown in locked position (pointing upwards) Fig. 6 - Never pick up hot oven rack parts. Assemble one end of this manual. Placing ANY other rack in oven rack position 2 will be locked into position. 6. Open the oven door. Once both connector arms are properly in ...
Complete Owner's Guide (English)
Page 9
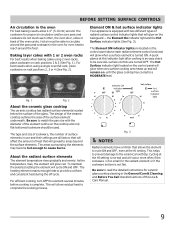
... Hot Surface indicator lights (See Fig. 3). This helps to prevent damage to cause burns. Cycling at the HI setting. A quick glance at this Use & Care Manual. 9 For efficient cooking, turn OFF the element several minutes before cooking is turned ON. About the radiant surface elements The element temperature rises gradually and...
... Hot Surface indicator lights (See Fig. 3). This helps to prevent damage to cause burns. Cycling at the HI setting. A quick glance at this Use & Care Manual. 9 For efficient cooking, turn OFF the element several minutes before cooking is turned ON. About the radiant surface elements The element temperature rises gradually and...
Complete Owner's Guide (English)
Page 29
...Provide sufficient space so appliance can be sure. Flat pans heat better than warped pans. The time of the material affect heating. Solutions to make range appear not level. See "Setting the clock" in the oven and space pans to allow air to be lifted over carpet. • Incorrect ...control setting. See Setting Oven Controls in this manual or read the instructions "Entire appliance does not operate" in center of appliance does not operate. Adjust leveling legs at base of day is level...
...Provide sufficient space so appliance can be sure. Flat pans heat better than warped pans. The time of the material affect heating. Solutions to make range appear not level. See "Setting the clock" in the oven and space pans to allow air to be lifted over carpet. • Incorrect ...control setting. See Setting Oven Controls in this manual or read the instructions "Entire appliance does not operate" in center of appliance does not operate. Adjust leveling legs at base of day is level...


