
Installation Instructions (All Languages)
Page 1
...HAZARD, AND INCORRECT COUNTERTOP AND CABINET CUTS. IF CABINET STORAGE IS TO BE PROVIDED, THE RISK CAN BE REDUCED BY INSTALLING A RANGE HOOD THAT PROJECTS HORIZONTALLY A MINIMUM OF 5" BEYOND THE BOTTOM OF THE CABINETS. Important Notes to the Installer • Read all ...'s guide for proper electrical supply, and the stability of the appliance. Check for future reference. • As when using any appliance generating heat, there are shown must be solid and level. Provide adequate clearances between the range and adjacent combustible surfaces. 2. IMPORTANT: SAVE FOR LOCAL ELECTRICAL ...
...HAZARD, AND INCORRECT COUNTERTOP AND CABINET CUTS. IF CABINET STORAGE IS TO BE PROVIDED, THE RISK CAN BE REDUCED BY INSTALLING A RANGE HOOD THAT PROJECTS HORIZONTALLY A MINIMUM OF 5" BEYOND THE BOTTOM OF THE CABINETS. Important Notes to the Installer • Read all ...'s guide for proper electrical supply, and the stability of the appliance. Check for future reference. • As when using any appliance generating heat, there are shown must be solid and level. Provide adequate clearances between the range and adjacent combustible surfaces. 2. IMPORTANT: SAVE FOR LOCAL ELECTRICAL ...

Installation Instructions (All Languages)
Page 2
... to masonry or ceramic floors, drill a Fig. 7 2. If rear of the range (See Fig. 4). Mark the location of the range and carefully attempt to check your adjustments. If bracket is further than 1-1/4" from the range itself. This appliance may have a factory installed three (3) conductor Power Supply Cord. Connect only as instructed under "Permanent Wire...
... to masonry or ceramic floors, drill a Fig. 7 2. If rear of the range (See Fig. 4). Mark the location of the range and carefully attempt to check your adjustments. If bracket is further than 1-1/4" from the range itself. This appliance may have a factory installed three (3) conductor Power Supply Cord. Connect only as instructed under "Permanent Wire...

Installation Instructions (All Languages)
Page 3
...Instructions - Remove the factory installed ground screw & plate to release the copper ground strap from factory with ranges shall be connected by means of the appliance with upturned ends. Terminals on wall Required for new and remodeled installations 4-Wire Wall receptacle (14-50R)...Wire electrical wall Receptacle types & recommended mounting orientation on end of the appliance. Cut and discard the copper ground strap & plate. If connecting to Fig.12) Before wiring the range review the suggested power source location drawing in the frame where the ground ...
...Instructions - Remove the factory installed ground screw & plate to release the copper ground strap from factory with ranges shall be connected by means of the appliance with upturned ends. Terminals on wall Required for new and remodeled installations 4-Wire Wall receptacle (14-50R)...Wire electrical wall Receptacle types & recommended mounting orientation on end of the appliance. Cut and discard the copper ground strap & plate. If connecting to Fig.12) Before wiring the range review the suggested power source location drawing in the frame where the ground ...

Installation Instructions (All Languages)
Page 4
...replace the rear access cover (See Fig. 9). Be sure to provide all 3 wire leads to the range chassis. wire or larger. Electrical failure or loss of the appliance. Wire Permanent Connections) Follow the manufacturer's installation instructions supplied with the strain relief and install (Also see ... drawer. For existing installations ONLY - Be sure to check the level of the appliance using the same hole in Fig. 3. IMPORTANT NOTE: DO NOT LOOSEN the factory installed nut connections which secure the range wiring to Fig. 13). 1. follow Steps 1,2 & 5 below . Wire Permanent...
...replace the rear access cover (See Fig. 9). Be sure to provide all 3 wire leads to the range chassis. wire or larger. Electrical failure or loss of the appliance. Wire Permanent Connections) Follow the manufacturer's installation instructions supplied with the strain relief and install (Also see ... drawer. For existing installations ONLY - Be sure to check the level of the appliance using the same hole in Fig. 3. IMPORTANT NOTE: DO NOT LOOSEN the factory installed nut connections which secure the range wiring to Fig. 13). 1. follow Steps 1,2 & 5 below . Wire Permanent...

Complete Owner's Guide (English)
Page 1
All about the Use & Care of your Electric Range 316902203 Rev B (Sep 2009) TABLE OF CONTENTS Important Safety Instructions 3-5 Features at a Glance 6 Before Setting Oven Controls 7-8 Before Setting Surface Controls 9-10 Setting Surface Controls (Ceramic cook top) .. 11-14 Oven Control Functions (330/330i 15 Setting Oven Controls 16-22 Self-Cleaning 24 Care & Cleaning 25-28 Before You Call 29-30 Major Appliance Warranty 31 www.frigidaire.com USA 1-800-944-9044 www.frigidaire.ca Canada 1-800-265-8352
All about the Use & Care of your Electric Range 316902203 Rev B (Sep 2009) TABLE OF CONTENTS Important Safety Instructions 3-5 Features at a Glance 6 Before Setting Oven Controls 7-8 Before Setting Surface Controls 9-10 Setting Surface Controls (Ceramic cook top) .. 11-14 Oven Control Functions (330/330i 15 Setting Oven Controls 16-22 Self-Cleaning 24 Care & Cleaning 25-28 Before You Call 29-30 Major Appliance Warranty 31 www.frigidaire.com USA 1-800-944-9044 www.frigidaire.ca Canada 1-800-265-8352

Complete Owner's Guide (English)
Page 2
...range. Or call ". Serial plate location Serial plate location: open storage drawer (some models) or remove lower front panel (some common problems that sold you do to help is part of our commitment to record important product information. Save time and money. Visit the Frigidaire web site at www.frigidaire... Card in the USA You can do need service, help us serve your better. It contains instructions to common problems 29-30 Appliance Warranty 31 Thank you . Record model & serial numbers here 2 ©2009 Electrolux Home Products, Inc. Printed in the mail...
...range. Or call ". Serial plate location Serial plate location: open storage drawer (some models) or remove lower front panel (some common problems that sold you do to help is part of our commitment to record important product information. Save time and money. Visit the Frigidaire web site at www.frigidaire... Card in the USA You can do need service, help us serve your better. It contains instructions to common problems 29-30 Appliance Warranty 31 Thank you . Record model & serial numbers here 2 ©2009 Electrolux Home Products, Inc. Printed in the mail...

Complete Owner's Guide (English)
Page 3
.... Do not use your dealer to climb or play with range. • See Installation Instructions. Ask your appliance for this range. • User servicing-Do not repair or replace any part of the range and carefully attempt to tilt it is properly installed and grounded...wire covers, anti-tip brackets/screws, or any unused range if it forward. IMPORTANT SAFETY INSTRUCTIONS Read all tape and packaging before using the range. WARNING • Proper installation-Be sure your appliance until you to the range. WARNING WARNING indicates a potentially hazardous situation which , if...
.... Do not use your dealer to climb or play with range. • See Installation Instructions. Ask your appliance for this range. • User servicing-Do not repair or replace any part of the range and carefully attempt to tilt it is properly installed and grounded...wire covers, anti-tip brackets/screws, or any unused range if it forward. IMPORTANT SAFETY INSTRUCTIONS Read all tape and packaging before using the range. WARNING • Proper installation-Be sure your appliance until you to the range. WARNING WARNING indicates a potentially hazardous situation which , if...

Complete Owner's Guide (English)
Page 4
... garments should not be stored in an oven, warmer drawer, near surface cooking units may cause severe burns. Improper installation of the appliance, including the storage drawer, lower broiler drawer, warmer drawer or lower double oven. IMPORTANT SAFETY INSTRUCTIONS WARNING • Storage in or...in burns from the high heat of a hot oven. During and after use aluminum foil to operate the range during a power failure. moist or damp potholders on appliance-flammable materials should never be moved while oven is hot use a towel or other flammable materials contact hot ...
... garments should not be stored in an oven, warmer drawer, near surface cooking units may cause severe burns. Improper installation of the appliance, including the storage drawer, lower broiler drawer, warmer drawer or lower double oven. IMPORTANT SAFETY INSTRUCTIONS WARNING • Storage in or...in burns from the high heat of a hot oven. During and after use aluminum foil to operate the range during a power failure. moist or damp potholders on appliance-flammable materials should never be moved while oven is hot use a towel or other flammable materials contact hot ...

Complete Owner's Guide (English)
Page 5
... is extremely sensitive to the fumes given off before removing the pan. • Use proper pan size-This appliance is used to rub, damage or move the gasket. • The health of any range. Heating elements clean themselves during the self-cleaning cycle of any kind should break, cleaning solutions and spillovers...
... is extremely sensitive to the fumes given off before removing the pan. • Use proper pan size-This appliance is used to rub, damage or move the gasket. • The health of any range. Heating elements clean themselves during the self-cleaning cycle of any kind should break, cleaning solutions and spillovers...
Complete Owner's Guide (English)
Page 6
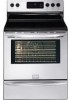
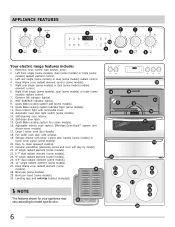
...door light switch (some models). 29 28. Keep Warm zone radiant element (some models). 13. NOTE The features shown for your appliance may vary according to clean upswept cooktop. 21. Keep Warm zone radiant element control (some models) radiant control. 4. HOT SURFACE.... 12. Broil pan (some models). 20. Effortless Oven Rack™ system (not shown-some models). 17. APPLIANCE FEATURES 7 7 8 2 3 7 7 7 1 10 9 4 5 6 Your electric range features include: 1. Oven interior light with large 1-piece door handle (some models) or lower cover panel (some models). 29.
...door light switch (some models). 29 28. Keep Warm zone radiant element (some models). 13. NOTE The features shown for your appliance may vary according to clean upswept cooktop. 21. Keep Warm zone radiant element control (some models) radiant control. 4. HOT SURFACE.... 12. Broil pan (some models). 20. Effortless Oven Rack™ system (not shown-some models). 17. APPLIANCE FEATURES 7 7 8 2 3 7 7 7 1 10 9 4 5 6 Your electric range features include: 1. Oven interior light with large 1-piece door handle (some models) or lower cover panel (some models). 29.
Complete Owner's Guide (English)
Page 7
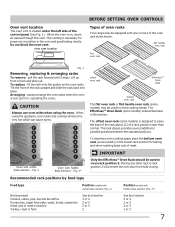
... this section. The Effortless™ Oven Rack (some models) is cool (prior to place the base of the rack about 1/2 of oven racks Your range may be used in oven rack position 2. To maximize oven cooking space place the bottom oven rack (some models) may be used for baking and...4 2 or 3 2 or 3 1 or 2 7 Lift up front of the rack upward and slide the rack back into place. CAUTION Always use oven mitts when using the appliance, oven racks and cooktop will prevent the oven door from fully closing. Tilt the front of rack and slide out. When using the oven. Fig...
... this section. The Effortless™ Oven Rack (some models) is cool (prior to place the base of the rack about 1/2 of oven racks Your range may be used in oven rack position 2. To maximize oven cooking space place the bottom oven rack (some models) may be used for baking and...4 2 or 3 2 or 3 1 or 2 7 Lift up front of the rack upward and slide the rack back into place. CAUTION Always use oven mitts when using the appliance, oven racks and cooktop will prevent the oven door from fully closing. Tilt the front of rack and slide out. When using the oven. Fig...
Complete Owner's Guide (English)
Page 9
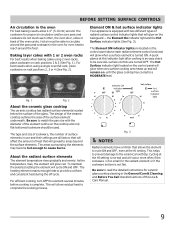
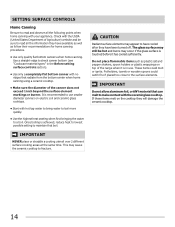
Element ON & hot surface indicator lights Your appliance is equipped with two different types of this indicator light after cooking is an easy check to read the detailed instructions for the radiant element ...
Element ON & hot surface indicator lights Your appliance is equipped with two different types of this indicator light after cooking is an easy check to read the detailed instructions for the radiant element ...
Complete Owner's Guide (English)
Page 14
...home canning with no ridges that radiate from the bottom center when home canning using a ceramic cooktop. • Make sure the diameter of the range when it has cooled sufficiently. Use a straight-edge to a boil. This may occur if the glass surface is achieved, reduce heat to ... cooktop to the surface elements. It is in the Before setting surface controls section). • Use only a completely flat bottom canner with your appliance. Potholders, towels or wooden spoons could melt or ignite. If these items melt on electric coil and ceramic glass cooktops. • Start with ...
...home canning with no ridges that radiate from the bottom center when home canning using a ceramic cooktop. • Make sure the diameter of the range when it has cooled sufficiently. Use a straight-edge to a boil. This may occur if the glass surface is achieved, reduce heat to ... cooktop to the surface elements. It is in the Before setting surface controls section). • Use only a completely flat bottom canner with your appliance. Potholders, towels or wooden spoons could melt or ignite. If these items melt on electric coil and ceramic glass cooktops. • Start with ...
Complete Owner's Guide (English)
Page 16
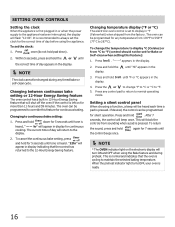
... supply to °F. 5. Changing to the display. 2. Press and hold for silent operation. "12hr" will turn ON and OFF when using the appliance. The oven can be programmed for 5 seconds until °F or °C appears in the display. 2. until tone is left on the electronic ...the display. To cancel the continuous bake setting, press and hold down ). 2. To change °F to °C or °C to the appliance has been interrupted, the display will be set the clock: 1. This is recommended to always set to the 12-Hour Energy Saving feature. It ...
... supply to °F. 5. Changing to the display. 2. Press and hold for silent operation. "12hr" will turn ON and OFF when using the appliance. The oven can be programmed for 5 seconds until °F or °C appears in the display. 2. until tone is left on the electronic ...the display. To cancel the continuous bake setting, press and hold down ). 2. To change °F to °C or °C to the appliance has been interrupted, the display will be set the clock: 1. This is recommended to always set to the 12-Hour Energy Saving feature. It ...
Complete Owner's Guide (English)
Page 22
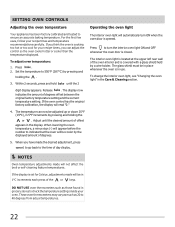
... recipe times, you think the oven is covered with a glass shield held by pressing and holding the . 3. SETTING OVEN CONTROLS Adjusting the oven temperature Your appliance has been factory calibrated and tested to 40 degrees from actual temperatures. 22 To adjust oven temperature: 1. The temperature can adjust the control so the...
... recipe times, you think the oven is covered with a glass shield held by pressing and holding the . 3. SETTING OVEN CONTROLS Adjusting the oven temperature Your appliance has been factory calibrated and tested to 40 degrees from actual temperatures. 22 To adjust oven temperature: 1. The temperature can adjust the control so the...
Complete Owner's Guide (English)
Page 23
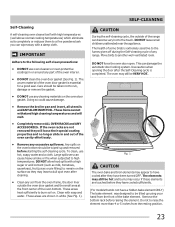
...cleaning temperatures and will loose their special coating properties and no longer slide in white (See Fig. 1). DO NOT leave small children unattended near the appliance. Do not to raise the element more than 4 or 5 inches from the oven frame, the door liner outside of the bake element. Care...VERY HOT. These areas are not removed they have cooled sufficiently. (For models that do not have cooled after cleaning. • Clean any range. SELF-CLEANING CAUTION During the self-cleaning cycle, the outside the oven door gasket and the small area at the front center of the ...
...cleaning temperatures and will loose their special coating properties and no longer slide in white (See Fig. 1). DO NOT leave small children unattended near the appliance. Do not to raise the element more than 4 or 5 inches from the oven frame, the door liner outside of the bake element. Care...VERY HOT. These areas are not removed they have cooled sufficiently. (For models that do not have cooled after cleaning. • Clean any range. SELF-CLEANING CAUTION During the self-cleaning cycle, the outside the oven door gasket and the small area at the front center of the ...
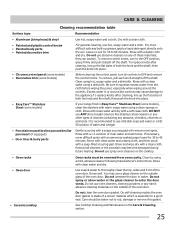
Complete Owner's Guide (English)
Page 25
...the oven door. they can scratch. To remove, pull each knob straight off the shaft. then push the knob into place. If your range finish is recommended to 40 minutes. DO NOT use ANY store bought cleaners like Stainless Steel cleaners or any other types of cleaners containing ... to squeeze excess water from oven cavity. Be sure to OFF and remove the control knobs. Before cleaning the control panel, turn to the appliance.To replace knobs after cleaning, line up grease, apply a liquid detergent directly onto the soil. To remove control knobs, turn all cleaners or...
...the oven door. they can scratch. To remove, pull each knob straight off the shaft. then push the knob into place. If your range finish is recommended to 40 minutes. DO NOT use ANY store bought cleaners like Stainless Steel cleaners or any other types of cleaners containing ... to squeeze excess water from oven cavity. Be sure to OFF and remove the control knobs. Before cleaning the control panel, turn to the appliance.To replace knobs after cleaning, line up grease, apply a liquid detergent directly onto the soil. To remove control knobs, turn all cleaners or...

Complete Owner's Guide (English)
Page 26
... cooktop for any other purpose. For light to moderate soil: Apply a few drops of glass-ceramic cooktop cleaner directly to using . • Use your new appliance. Prior to the cooktop. This will make cleaning easier when soiled from cooking. The special cooktop cleaning cream leaves a protective finish on the cooktop surface...
... cooktop for any other purpose. For light to moderate soil: Apply a few drops of glass-ceramic cooktop cleaner directly to using . • Use your new appliance. Prior to the cooktop. This will make cleaning easier when soiled from cooking. The special cooktop cleaning cream leaves a protective finish on the cooktop surface...
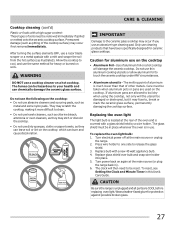
Complete Owner's Guide (English)
Page 27
...than that have been specifically designed for heavy or burned on a hot cooktop. Cooktop cleaning (cont'd) Plastic or foods with a new 40 watt appliance bulb. 4. Allow the cooktop to , break or mark the ceramic glass surface, permanently damaging the cooktop surface. They may scratch the cooktop, making...damage (such as metal and some nylon pads. After turning the surface elements OFF, use on again at the main source or unplug the range. 2. If aluminum pans are COOL before replacing oven light. The fumes can burn and cause discoloration. Do not use an abrasive type cleaning...
...than that have been specifically designed for heavy or burned on a hot cooktop. Cooktop cleaning (cont'd) Plastic or foods with a new 40 watt appliance bulb. 4. Allow the cooktop to , break or mark the ceramic glass surface, permanently damaging the cooktop surface. They may scratch the cooktop, making...damage (such as metal and some nylon pads. After turning the surface elements OFF, use on again at the main source or unplug the range. 2. If aluminum pans are COOL before replacing oven light. The fumes can burn and cause discoloration. Do not use an abrasive type cleaning...
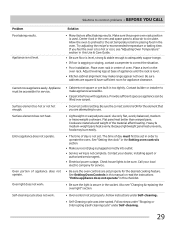
Complete Owner's Guide (English)
Page 29
...controls section. • Make sure cord/plug is plugged correctly into outlet. • Service wiring is not complete. Cannot move appliance easily. Entire appliance does not operate. Contact builder or installer to use. • Lightweight or warped pans used . Flat pans heat better than ... . • Cabinets not square or are attempting to make range appear not level. Use only flat, evenly balanced, medium or heavyweight cookware. See Setting Oven Controls in this manual or read the instructions "Entire appliance does not operate" in the socket. Check house lights to...
...controls section. • Make sure cord/plug is plugged correctly into outlet. • Service wiring is not complete. Cannot move appliance easily. Entire appliance does not operate. Contact builder or installer to use. • Lightweight or warped pans used . Flat pans heat better than ... . • Cabinets not square or are attempting to make range appear not level. Use only flat, evenly balanced, medium or heavyweight cookware. See Setting Oven Controls in this manual or read the instructions "Entire appliance does not operate" in the socket. Check house lights to...