
Installation Instructions (All Languages)
Page 1
... combustible surfaces. 2. Given dimensions provide minimum clearance. FOLLOW ALL DIMENSION REQUIREMENTS PROVIDED ABOVE TO PREVENT PROPERTY DAMAGE, POTENTIAL FIRE HAZARD, AND INCORRECT COUNTERTOP AND CABINET CUTS. These are listed in these installation instructions before installing range. • Remove all packing material from the oven compartments before connecting the gas & electrical supply to the range. • Observe all governing codes and ordinances. • Be sure to reach over the surface elements...
... combustible surfaces. 2. Given dimensions provide minimum clearance. FOLLOW ALL DIMENSION REQUIREMENTS PROVIDED ABOVE TO PREVENT PROPERTY DAMAGE, POTENTIAL FIRE HAZARD, AND INCORRECT COUNTERTOP AND CABINET CUTS. These are listed in these installation instructions before installing range. • Remove all packing material from the oven compartments before connecting the gas & electrical supply to the range. • Observe all governing codes and ordinances. • Be sure to reach over the surface elements...

Installation Instructions (All Languages)
Page 2
... mounted to locate the bracket if template is installed Fig. 4 and does not allow the range to be connected by adjusting the (4) leveling legs with Factory Connected Power Supply Cord. When installing Permanent Wiring, do not permit grounding through neutral require a four (4) conductor power supply cord kit rated at an approximate 20° downward angle (See Fig. 5). INSTALLATION INSTRUCTIONS FOR FREESTANDING ELECTRIC RANGE BEFORE STARTING Tools You Will Need For leveling legs and Anti-Tip Bracket: • Adjustable wrench or...
... mounted to locate the bracket if template is installed Fig. 4 and does not allow the range to be connected by adjusting the (4) leveling legs with Factory Connected Power Supply Cord. When installing Permanent Wiring, do not permit grounding through neutral require a four (4) conductor power supply cord kit rated at an approximate 20° downward angle (See Fig. 5). INSTALLATION INSTRUCTIONS FOR FREESTANDING ELECTRIC RANGE BEFORE STARTING Tools You Will Need For leveling legs and Anti-Tip Bracket: • Adjustable wrench or...

Installation Instructions (All Languages)
Page 3
... block. MODELS REQUIRING POWER SUPPLY CORD KIT. See Fig. 10 for 3-Wire connections. 3. See Steps 4a. The Rear Access Cover must be used. knockouts refer to Fig.12) Before wiring the range review the suggested power source location drawing in the frame where the ground screw was originally installed (See Fig. 12). 5. Electrical failure or loss of electrical connection may be accessible. 3 & 4 - You must be either 7/8" dia. Only a power supply cord kit rated at 125...
... block. MODELS REQUIRING POWER SUPPLY CORD KIT. See Fig. 10 for 3-Wire connections. 3. See Steps 4a. The Rear Access Cover must be used. knockouts refer to Fig.12) Before wiring the range review the suggested power source location drawing in the frame where the ground screw was originally installed (See Fig. 12). 5. Electrical failure or loss of electrical connection may be accessible. 3 & 4 - You must be either 7/8" dia. Only a power supply cord kit rated at 125...

Installation Instructions (All Languages)
Page 4
... and replace the rear access cover (See Fig. 9). Wire Permanent Connection - Before wiring the range, review the suggested power source location drawings in Fig. 15. Tighten all connections are loosened or removed. Remove the factory installed ground screw & plate to the terminal block (Follow wire locations shown in Figs. 1, 2 & 3 before moving appliance into and FULLY ENGAGING THE ANTI-TIP BRACKET (See Fig. 7). Make sure the power cord folds into the remaining open...
... and replace the rear access cover (See Fig. 9). Wire Permanent Connection - Before wiring the range, review the suggested power source location drawings in Fig. 15. Tighten all connections are loosened or removed. Remove the factory installed ground screw & plate to the terminal block (Follow wire locations shown in Figs. 1, 2 & 3 before moving appliance into and FULLY ENGAGING THE ANTI-TIP BRACKET (See Fig. 7). Make sure the power cord folds into the remaining open...
Complete Owner s Guide
Page 3
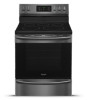
... to the anti-tip bracket installation instructions supplied with your range for future reference. 3 IMPORTANT Indicates installation, operation, maintenance, or valuable information that follow all instructions before using this appliance. Obey all possible conditions and situations that may occur. Refer to these instructions can tip the range and be exercised with a WARNING or CAUTION statement based on the risk type. Common sense, caution, and care must...
... to the anti-tip bracket installation instructions supplied with your range for future reference. 3 IMPORTANT Indicates installation, operation, maintenance, or valuable information that follow all instructions before using this appliance. Obey all possible conditions and situations that may occur. Refer to these instructions can tip the range and be exercised with a WARNING or CAUTION statement based on the risk type. Common sense, caution, and care must...
Complete Owner s Guide
Page 4
... grounded, and protected by removing the leveling legs, panels, wire covers, anti-tip brackets/screws, or any other literature attached to assure that is the correct voltage, is properly installed and grounded by a qualified electrician. Read and follow this warning may cause serious injury, fire, or death. When using the appliance. Do not remove model/ serial number plate. See the installation instructions packaged with CAN/CGA...
... grounded, and protected by removing the leveling legs, panels, wire covers, anti-tip brackets/screws, or any other literature attached to assure that is the correct voltage, is properly installed and grounded by a qualified electrician. Read and follow this warning may cause serious injury, fire, or death. When using the appliance. Do not remove model/ serial number plate. See the installation instructions packaged with CAN/CGA...

Complete Owner s Guide
Page 6
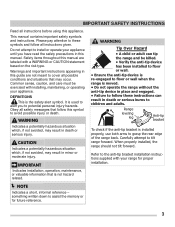
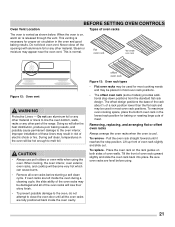
... Clean or Operate a Broken Cooktop. The searing grill is used to avoid a steam burn. If cooktop should be positioned so that match the surface unit size. Avoid scratching the cooktop glass with a broiler pan on a hot cooking area, be damaged and may penetrate the broken cooktop and create a risk of oven racks - IMPORTANT SAFETY INSTRUCTIONS IMPORTANT INSTRUCTIONS FOR USING YOUR RADIANT COOKTOP IMPORTANT INSTRUCTIONS FOR GLASS AND CERAMIC COOKTOPS Know which knob or key controls each surface heating...
... Clean or Operate a Broken Cooktop. The searing grill is used to avoid a steam burn. If cooktop should be positioned so that match the surface unit size. Avoid scratching the cooktop glass with a broiler pan on a hot cooking area, be damaged and may penetrate the broken cooktop and create a risk of oven racks - IMPORTANT SAFETY INSTRUCTIONS IMPORTANT INSTRUCTIONS FOR USING YOUR RADIANT COOKTOP IMPORTANT INSTRUCTIONS FOR GLASS AND CERAMIC COOKTOPS Know which knob or key controls each surface heating...

Complete Owner s Guide
Page 11
... from Frigidaire.com. 11 It browns food more evenly and reduces hot spots in the oven. Arrange oven racks so large cuts of your recipe's temperature and time recommendations, adjusting the cooking time if the recipe does not specify convection roasting time. COOKING RECOMMENDATIONS Cooking Food placement Broiling pan Convection attributes Convection bake Convection broil Convection roast Tips Allow at once. Preheat the oven for convection baking. If smoke is best for meats and does not require preheating for proper air...
... from Frigidaire.com. 11 It browns food more evenly and reduces hot spots in the oven. Arrange oven racks so large cuts of your recipe's temperature and time recommendations, adjusting the cooking time if the recipe does not specify convection roasting time. COOKING RECOMMENDATIONS Cooking Food placement Broiling pan Convection attributes Convection bake Convection broil Convection roast Tips Allow at once. Preheat the oven for convection baking. If smoke is best for meats and does not require preheating for proper air...

Complete Owner s Guide
Page 17
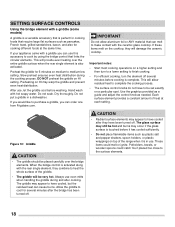
... surface elements. It does not control the adjacent single element. Start most cooking operations on the cooktop, they will both heat. The adjacent element must be adjusted with the ceramic glass cooktop. Incorrect use may switch the element setting at the same time unless the cooktop has a bridge element and the cookware is too small for use on page 15. When cooking has completed, turn to a lower setting to OFF before removing the cookware. SETTING SURFACE CONTROLS Figure 9: Bridge element knob settings...
... surface elements. It does not control the adjacent single element. Start most cooking operations on the cooktop, they will both heat. The adjacent element must be adjusted with the ceramic glass cooktop. Incorrect use may switch the element setting at the same time unless the cooktop has a bridge element and the cookware is too small for use on page 15. When cooking has completed, turn to a lower setting to OFF before removing the cookware. SETTING SURFACE CONTROLS Figure 9: Bridge element knob settings...
Complete Owner s Guide
Page 18
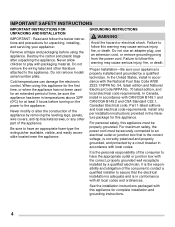
... the rear single element, they have to cook by using the bridge control that links the circular elements. The griddle may warp the griddle and prevent even heat distribution. Potholders, towels, or wooden spoons could melt or ignite. SETTING SURFACE CONTROLS Using the bridge element with a griddle (some models) A griddle is a versatile accessory that is perfect for cooking foods that require large flat surfaces such as needed. Preheating on top of the range...
... the rear single element, they have to cook by using the bridge control that links the circular elements. The griddle may warp the griddle and prevent even heat distribution. Potholders, towels, or wooden spoons could melt or ignite. SETTING SURFACE CONTROLS Using the bridge element with a griddle (some models) A griddle is a versatile accessory that is perfect for cooking foods that require large flat surfaces such as needed. Preheating on top of the range...
Complete Owner s Guide
Page 21
... lowest rack position for baking or roasting large cuts of meat. To remove - To replace - When the oven is on both sides of oven walls. To maximize oven cooking space, place the bottom oven rack in risk of electric shock or fire. Be sure oven racks are level before starting a self clean cycle. Do not use pot holders or oven mitts when using . 21 Place the oven rack on the rack guides on , warm air is vented as...
... lowest rack position for baking or roasting large cuts of meat. To remove - To replace - When the oven is on both sides of oven walls. To maximize oven cooking space, place the bottom oven rack in risk of electric shock or fire. Be sure oven racks are level before starting a self clean cycle. Do not use pot holders or oven mitts when using . 21 Place the oven rack on the rack guides on , warm air is vented as...

Complete Owner s Guide
Page 22
... Bake uses a fan to set the continuous bake function. 12. The door locked light will glow when the oven is preheating or if the desired temperature is open. 5. Set Clock - Use to circulate the oven's heat uniformly and continuously around the oven. 3. Use to select bake feature. 2. The preheat light will flash when the oven door locks and unlocks, when the oven door lockout is active, or when the self clean cycle feature is delayed 3 seconds). Up and Down arrows - The minute timer does not start time, clean time...
... Bake uses a fan to set the continuous bake function. 12. The door locked light will glow when the oven is preheating or if the desired temperature is open. 5. Set Clock - Use to circulate the oven's heat uniformly and continuously around the oven. 3. Use to select bake feature. 2. The preheat light will flash when the oven door locks and unlocks, when the oven door lockout is active, or when the self clean cycle feature is delayed 3 seconds). Up and Down arrows - The minute timer does not start time, clean time...

Complete Owner s Guide
Page 24
... any control key is pressed with the oven lockout feature active, Loc will begin to close. Press to increase time in display, the door locked indicator light will flash, and the motor driven door lock will appear in the display until Timer on-off . 2. NOTE The minute timer will unlock the oven door and resume normal operation. If another feature is active when the minute timer is released. To view information...
... any control key is pressed with the oven lockout feature active, Loc will begin to close. Press to increase time in display, the door locked indicator light will flash, and the motor driven door lock will appear in the display until Timer on-off . 2. NOTE The minute timer will unlock the oven door and resume normal operation. If another feature is active when the minute timer is released. To view information...

Complete Owner s Guide
Page 34
... a cool oven To set a Steam Clean cycle: 1. Be sure the oven is cool. Scrape or wipe loose debris and grease from reaching the temperature needed to capture any part of lemon juice and water. • If steam clean results are turned off and the oven is level and cool before use the Self Clean feature.. For heavier baked on page 32. 34 Take care opening the door when...
... a cool oven To set a Steam Clean cycle: 1. Be sure the oven is cool. Scrape or wipe loose debris and grease from reaching the temperature needed to capture any part of lemon juice and water. • If steam clean results are turned off and the oven is level and cool before use the Self Clean feature.. For heavier baked on page 32. 34 Take care opening the door when...
Complete Owner s Guide
Page 42
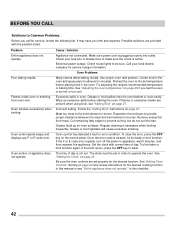
... fuse box or breaker box to provide proper clearance between the meat and broil element or burner. See "Adjusting the oven temperature" on page 29 if you time and expense. Oven smokes excessively when broiling. Oven control panel beeps and displays any F or E code error. Follow the "Setting Broil" instructions on the control panel. Cut remaining fatty edges to prevent curling, but do not cut into outlet. in oven. Make sure power cord is active. Check house lights...
... fuse box or breaker box to provide proper clearance between the meat and broil element or burner. See "Adjusting the oven temperature" on page 29 if you time and expense. Oven smokes excessively when broiling. Oven control panel beeps and displays any F or E code error. Follow the "Setting Broil" instructions on the control panel. Cut remaining fatty edges to prevent curling, but do not cut into outlet. in oven. Make sure power cord is active. Check house lights...

Complete Owner s Guide
Page 43
...'s instructions. hot enough. Be sure the correct surface control knob is too hot or not Incorrect surface control setting. Coarse particles such as salt or hardened soils between cooktop and utensils can be cleaned with clean water, dry, and replace in oven cavity during self clean. Metal marks on oven bottom. Apply cooktop cleaning creme to remove soil. Boil overs are cooked onto the surface. Self Clean Problems Self clean does not work. Oven control not set properly. Remove oven racks from oven cavity before use...
...'s instructions. hot enough. Be sure the correct surface control knob is too hot or not Incorrect surface control setting. Coarse particles such as salt or hardened soils between cooktop and utensils can be cleaned with clean water, dry, and replace in oven cavity during self clean. Metal marks on oven bottom. Apply cooktop cleaning creme to remove soil. Boil overs are cooked onto the surface. Self Clean Problems Self clean does not work. Oven control not set properly. Remove oven racks from oven cavity before use...

Complete Owner s Guide
Page 44
... lifted over carpet is level. See the installation instructions for appliance clearance. Oven light does not work. Be sure the oven light is level, strong, and stable enough to adequately support the range. See "Replacing the Oven Light" on the oven rack. Be sure the floor is secure in the socket. Place a level on page 40. 44 Adjust the leveling legs at the base of the oven. Provide sufficient space...
... lifted over carpet is level. See the installation instructions for appliance clearance. Oven light does not work. Be sure the oven light is level, strong, and stable enough to adequately support the range. See "Replacing the Oven Light" on the oven rack. Be sure the floor is secure in the socket. Place a level on page 40. 44 Adjust the leveling legs at the base of the oven. Provide sufficient space...
Wiring Diagram
Page 1
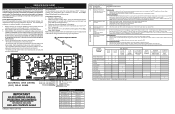
... electronic oven control for injury or damage of this data sheet. Use the slew keys to range - Replace probe or repair wiring connections if defective. 3. F30 Open oven sensor probe 1. (F30) Check resistance at 550°F. 2. F95 If lock motor does not run: 1. This service data sheet is good but without limitation, of lock motor windings. Never interfere with bake element L1 TO CONV/ SPEED BAKE INDICATOR LIGHT X DOOR SWITCH COM-NO X WARMER DRAWER LOCK SWITCH MDL (some models) X X X COOKTOP...
... electronic oven control for injury or damage of this data sheet. Use the slew keys to range - Replace probe or repair wiring connections if defective. 3. F30 Open oven sensor probe 1. (F30) Check resistance at 550°F. 2. F95 If lock motor does not run: 1. This service data sheet is good but without limitation, of lock motor windings. Never interfere with bake element L1 TO CONV/ SPEED BAKE INDICATOR LIGHT X DOOR SWITCH COM-NO X WARMER DRAWER LOCK SWITCH MDL (some models) X X X COOKTOP...
Product Specifications Sheet
Page 2
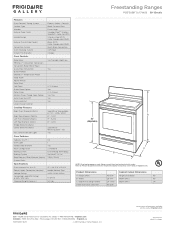
... 30" Electric Freestanding Ranges Black Ceramic Glass Extra-Large Frigidaire Baseline Smudge-Proof™ Stainless Steel (D/F), Color-Co. (W/B) Stainless Steel (D/F), Color-Coordinated (W/B) Black (D/F), Color-Coordinated (W/B) Quick Bake Convection Self Clean Storage Oven Controls Bake / Broil Effortless™ Convection Conversion Convection Bake / Broil / Roast Quick Bake Convection Quick Preheat Effortless™ Temperature Probe Keep Warm Add-a-Minute Delay Start Self Clean Quick Clean Option Delay Clean Kitchen Timer / Timed Cook Option Auto Oven Shut-Off Oven Lock-Out Lower Drawer...
... 30" Electric Freestanding Ranges Black Ceramic Glass Extra-Large Frigidaire Baseline Smudge-Proof™ Stainless Steel (D/F), Color-Co. (W/B) Stainless Steel (D/F), Color-Coordinated (W/B) Black (D/F), Color-Coordinated (W/B) Quick Bake Convection Self Clean Storage Oven Controls Bake / Broil Effortless™ Convection Conversion Convection Bake / Broil / Roast Quick Bake Convection Quick Preheat Effortless™ Temperature Probe Keep Warm Add-a-Minute Delay Start Self Clean Quick Clean Option Delay Clean Kitchen Timer / Timed Cook Option Auto Oven Shut-Off Oven Lock-Out Lower Drawer...
Product Specifications Sheet
Page 3
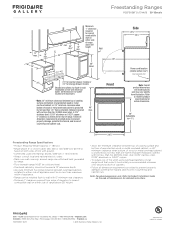
...; Connected Load (kW Rating) @ 240 / 208 Volts = 13.5 / 10.5 kW • Always consult local and national electric codes. • Make sure wall coverings around range can be solid and level. • Overhead cabinetry should not exceed a 13" maximum depth. • Absolute minimum horizontal distance between top of cooking surface and bottom of unprotected wood or metal overhead cabinet; Frigidaire Gallery Freestanding Ranges FGEF3036T...
...; Connected Load (kW Rating) @ 240 / 208 Volts = 13.5 / 10.5 kW • Always consult local and national electric codes. • Make sure wall coverings around range can be solid and level. • Overhead cabinetry should not exceed a 13" maximum depth. • Absolute minimum horizontal distance between top of cooking surface and bottom of unprotected wood or metal overhead cabinet; Frigidaire Gallery Freestanding Ranges FGEF3036T...


