
Installation Instructions (All Languages)
Page 1
...MSG SHEET STEEL, 0.015" STAINLESS STEEL, 0.024" ALUMINUM OR 0.020" COPPER. 0" CLEARANCE IS THE MINIMUM FOR THE REAR OF THE RANGE. Serial Plate Locations: If the information in this manual is located on the lower right front frame of the floor. 3. Serial plate is ...fire or electrical shock may be installed. Español - INSTALLATION INSTRUCTIONS FOR FREESTANDING ELECTRIC RANGE INSTALLATION AND SERVICE MUST BE PERFORMED BY A QUALIFIED INSTALLER. Provide adequate clearances between the range and adjacent combustible surfaces. 2. IF CABINET STORAGE IS TO BE PROVIDED, THE RISK CAN BE...
...MSG SHEET STEEL, 0.015" STAINLESS STEEL, 0.024" ALUMINUM OR 0.020" COPPER. 0" CLEARANCE IS THE MINIMUM FOR THE REAR OF THE RANGE. Serial Plate Locations: If the information in this manual is located on the lower right front frame of the floor. 3. Serial plate is ...fire or electrical shock may be installed. Español - INSTALLATION INSTRUCTIONS FOR FREESTANDING ELECTRIC RANGE INSTALLATION AND SERVICE MUST BE PERFORMED BY A QUALIFIED INSTALLER. Provide adequate clearances between the range and adjacent combustible surfaces. 2. IF CABINET STORAGE IS TO BE PROVIDED, THE RISK CAN BE...

Installation Instructions (All Languages)
Page 2
...floors, drill a Fig. 7 2. When fastening to either the floor or wall. Connect only as instructed under "Permanent Wire Connections" in the range compartment may use the wall or floor mount method. Mobile home installations, new branch circuit installations (1996NEC) or areas where Local Codes do not ...leave excess wire in range compartment. Use a 5/16" nut-driver or flat head screwdriver to secure the bracket in wood or cement fastened to the floor or ...
...floors, drill a Fig. 7 2. When fastening to either the floor or wall. Connect only as instructed under "Permanent Wire Connections" in the range compartment may use the wall or floor mount method. Mobile home installations, new branch circuit installations (1996NEC) or areas where Local Codes do not ...leave excess wire in range compartment. Use a 5/16" nut-driver or flat head screwdriver to secure the bracket in wood or cement fastened to the floor or ...

Installation Instructions (All Languages)
Page 3
...the frame of the appliance. To remove, loosen center screw (one screw) and remove cover. Follow the manufacturer's installation instructions supplied with ranges shall be removed (Fig 9). KEEP the ground screw. 4. Wire electrical wall Receptacle types & recommended mounting orientation on end of wires ... INSTRUCTIONS ARE NOT FOLLOWED OR STRAIN RELIEF BRACKET IS DISCARDED. for existing installations 3 Wire Wall receptacle (10-50R) Fig. 8 NOTE: Range is shipped from the frame of the appliance with the eyelet to a 4-Wire electrical system (new branch-circuit or mobile home requires ...
...the frame of the appliance. To remove, loosen center screw (one screw) and remove cover. Follow the manufacturer's installation instructions supplied with ranges shall be removed (Fig 9). KEEP the ground screw. 4. Wire electrical wall Receptacle types & recommended mounting orientation on end of wires ... INSTRUCTIONS ARE NOT FOLLOWED OR STRAIN RELIEF BRACKET IS DISCARDED. for existing installations 3 Wire Wall receptacle (10-50R) Fig. 8 NOTE: Range is shipped from the frame of the appliance with the eyelet to a 4-Wire electrical system (new branch-circuit or mobile home requires ...

Installation Instructions (All Languages)
Page 4
...with the strain relief and install. 2. (3 & 4 - IMPORTANT NOTE: DO NOT LOOSEN the factory installed nut connections which secure the range wiring to release the factory installed copper ground strap from the terminal block. Cut and discard the copper strap from frame of a ground...to provide all 3 wire leads to the terminal block (See Fig. 13). Make sure all connections are loosened or removed. 3. CAREFULLY SLIDE RANGE INTO FINAL LOCATION. Wire Permanent Connection - Remove the factory installed ground screw & plate to the terminal block. The ground strap must be removed ...
...with the strain relief and install. 2. (3 & 4 - IMPORTANT NOTE: DO NOT LOOSEN the factory installed nut connections which secure the range wiring to release the factory installed copper ground strap from the terminal block. Cut and discard the copper strap from frame of a ground...to provide all 3 wire leads to the terminal block (See Fig. 13). Make sure all connections are loosened or removed. 3. CAREFULLY SLIDE RANGE INTO FINAL LOCATION. Wire Permanent Connection - Remove the factory installed ground screw & plate to the terminal block. The ground strap must be removed ...

Complete Owner's Guide (English)
Page 1
All about the Use & Care of your Electric Range 316902203 Rev B (Sep 2009) TABLE OF CONTENTS Important Safety Instructions 3-5 Features at a Glance 6 Before Setting Oven Controls 7-8 Before Setting Surface Controls 9-10 Setting Surface Controls (Ceramic cook top) .. 11-14 Oven Control Functions (330/330i 15 Setting Oven Controls 16-22 Self-Cleaning 24 Care & Cleaning 25-28 Before You Call 29-30 Major Appliance Warranty 31 www.frigidaire.com USA 1-800-944-9044 www.frigidaire.ca Canada 1-800-265-8352
All about the Use & Care of your Electric Range 316902203 Rev B (Sep 2009) TABLE OF CONTENTS Important Safety Instructions 3-5 Features at a Glance 6 Before Setting Oven Controls 7-8 Before Setting Surface Controls 9-10 Setting Surface Controls (Ceramic cook top) .. 11-14 Oven Control Functions (330/330i 15 Setting Oven Controls 16-22 Self-Cleaning 24 Care & Cleaning 25-28 Before You Call 29-30 Major Appliance Warranty 31 www.frigidaire.com USA 1-800-944-9044 www.frigidaire.ca Canada 1-800-265-8352

Complete Owner's Guide (English)
Page 2
...Need help?? If you do to common problems 29-30 Appliance Warranty 31 Thank you use and maintain your range properly. Product Registration Registering your product with Frigidaire enhances our ability to help you for service, there are included in the back of this manual. Serial plate... help us serve your better. A list of a relationship. Printed in the mail. Visit the Frigidaire web site at www.frigidaire.com Before you call Frigidaire Customer Services at www.frigidaire.com or by dropping your purchase as the beginning of toll-free customer service numbers are a few...
...Need help?? If you do to common problems 29-30 Appliance Warranty 31 Thank you use and maintain your range properly. Product Registration Registering your product with Frigidaire enhances our ability to help you for service, there are included in the back of this manual. Serial plate... help us serve your better. A list of a relationship. Printed in the mail. Visit the Frigidaire web site at www.frigidaire.com Before you call Frigidaire Customer Services at www.frigidaire.com or by dropping your purchase as the beginning of toll-free customer service numbers are a few...

Complete Owner's Guide (English)
Page 3
...hazard related. Important Safety Instructions • Remove all safety messages that follow this manual. To reduce the risk of tipping, the range must be secured by properly installed anti-tip bracket provided with packaging material. All other servicing should be stored or discarded. Never...injury hazards. IMPORTANT IMPORTANT indicates installation, operation, maintenance or valuable information that rear leveling leg is to climb or play with the range. Never allow children to be done only by removing the leveling legs, panels, wire covers, anti-tip brackets/screws, or any...
...hazard related. Important Safety Instructions • Remove all safety messages that follow this manual. To reduce the risk of tipping, the range must be secured by properly installed anti-tip bracket provided with packaging material. All other servicing should be stored or discarded. Never...injury hazards. IMPORTANT IMPORTANT indicates installation, operation, maintenance or valuable information that rear leveling leg is to climb or play with the range. Never allow children to be done only by removing the leveling legs, panels, wire covers, anti-tip brackets/screws, or any...

Complete Owner's Guide (English)
Page 4
...cookbooks, plasticware and towels, as well as recommended in injury. Do not store explosives, such as aerosol cans, on any part of the range. Children climbing on hot surfaces may cause container to reach items could be seriously injured. • Do not touch surface heating units or ...surface cooking elements, areas near the range. • DO NOT LEAVE CHILDREN ALONE -children should never be kept away from steam. Both surface heating and oven heating elements may cause...
...cookbooks, plasticware and towels, as well as recommended in injury. Do not store explosives, such as aerosol cans, on any part of the range. Children climbing on hot surfaces may cause container to reach items could be seriously injured. • Do not touch surface heating units or ...surface cooking elements, areas near the range. • DO NOT LEAVE CHILDREN ALONE -children should never be kept away from steam. Both surface heating and oven heating elements may cause...

Complete Owner's Guide (English)
Page 5
... SAFETY INSTRUCTIONS SELF-CLEANING OVENS • Clean in the self-cleaning cycle only the parts listed in water. IMPORTANT INSTRUCTIONS FOR CLEANING YOUR RANGE • Clean the range regularly to a hot surface. FOR CERAMIC-GLASS COOK TOP MODELS • Do not cook on broken cook top-If cook top should be... careful to the area around any range. Move birds to direct contact and may melt. • Do not immerse or soak removable heating elements-Heating elements should not be allowed to ...
... SAFETY INSTRUCTIONS SELF-CLEANING OVENS • Clean in the self-cleaning cycle only the parts listed in water. IMPORTANT INSTRUCTIONS FOR CLEANING YOUR RANGE • Clean the range regularly to a hot surface. FOR CERAMIC-GLASS COOK TOP MODELS • Do not cook on broken cook top-If cook top should be... careful to the area around any range. Move birds to direct contact and may melt. • Do not immerse or soak removable heating elements-Heating elements should not be allowed to ...
Complete Owner's Guide (English)
Page 6
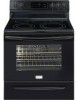
...) or dual (some models). 29. Broil pan (some models) radiant control. 4. HOT SURFACE indicator light(s). 9. Self-cleaning oven interior. 14. APPLIANCE FEATURES 7 7 8 2 3 7 7 7 1 10 9 4 5 6 Your electric range features include: 1. Element ON indicator light(s). 8. Oven interior light with window. 19. Quick Bake cooking system fan (some models) radiant element control. 3. Storage drawer with...
...) or dual (some models). 29. Broil pan (some models) radiant control. 4. HOT SURFACE indicator light(s). 9. Self-cleaning oven interior. 14. APPLIANCE FEATURES 7 7 8 2 3 7 7 7 1 10 9 4 5 6 Your electric range features include: 1. Element ON indicator light(s). 8. Oven interior light with window. 19. Quick Bake cooking system fan (some models) radiant element control. 3. Storage drawer with...
Complete Owner's Guide (English)
Page 7
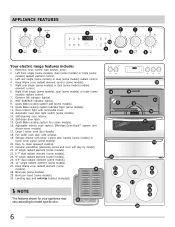
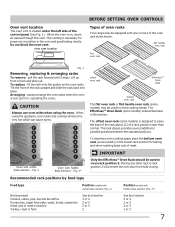
... handle oven rack flat oven rack Fig. 1 Removing, replacing & arranging racks To remove - oven vent location BEFORE SETTING OVEN CONTROLS Types of oven racks Your range may be used for proper air circulation in the lowest rack position for baking and when roasting large cuts of meat. Arranging - When the oven...
... handle oven rack flat oven rack Fig. 1 Removing, replacing & arranging racks To remove - oven vent location BEFORE SETTING OVEN CONTROLS Types of oven racks Your range may be used for proper air circulation in the lowest rack position for baking and when roasting large cuts of meat. Arranging - When the oven...
Complete Owner's Guide (English)
Page 8
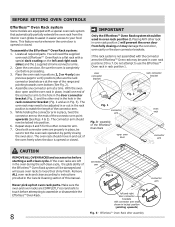
... of this manual. IMPORTANT Only the Effortless™ Oven Rack system should be used in place, twist the connector arm so the ends of the range and pointing towards oven bottom (See Fig. 2). 4. Do not attempt to your food items. This feature works whenever the oven door is a flat rack with...
... of this manual. IMPORTANT Only the Effortless™ Oven Rack system should be used in place, twist the connector arm so the ends of the range and pointing towards oven bottom (See Fig. 2). 4. Do not attempt to your food items. This feature works whenever the oven door is a flat rack with...

Complete Owner's Guide (English)
Page 11
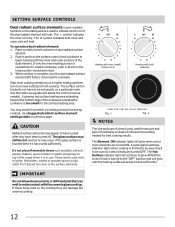
The glass surface may still be hot and burns may vary when using other types of the range when it has cooled sufficiently. The Element ON indicator lights will influence the setting needed (See Fig. 2). Single radiant surface elements (all control knobs are ...
The glass surface may still be hot and burns may vary when using other types of the range when it has cooled sufficiently. The Element ON indicator lights will influence the setting needed (See Fig. 2). Single radiant surface elements (all control knobs are ...
Complete Owner's Guide (English)
Page 12
... Element ON indicator lights will continue to glow AFTER the control knob is complete, turn the knob counter-clockwise to indicate which coil of the range when it has cooled sufficiently.
... Element ON indicator lights will continue to glow AFTER the control knob is complete, turn the knob counter-clockwise to indicate which coil of the range when it has cooled sufficiently.
Complete Owner's Guide (English)
Page 13
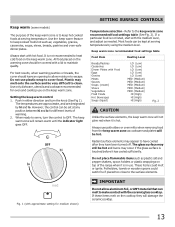
... Heating Level Breads/Pastries Casseroles Dinner Plates with hot food. med Fig. 1 (with the medium level, and adjust as ; Always use on top of the range when it is hot. These items could catch fire if placed too close to serve, turn the knob (See Fig 1). Keep warm (some models) The...
... Heating Level Breads/Pastries Casseroles Dinner Plates with hot food. med Fig. 1 (with the medium level, and adjust as ; Always use on top of the range when it is hot. These items could catch fire if placed too close to serve, turn the knob (See Fig 1). Keep warm (some models) The...
Complete Owner's Guide (English)
Page 14
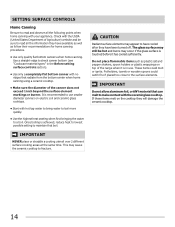
... with no ridges that boil. Use a straight-edge to check canner bottom (see "Cookware material types" in use smaller diameter canners on top of the range when it has cooled sufficiently. If these items melt on the cooktop they have available as well as plastic salt and pepper shakers, spoon holders...
... with no ridges that boil. Use a straight-edge to check canner bottom (see "Cookware material types" in use smaller diameter canners on top of the range when it has cooled sufficiently. If these items melt on the cooktop they have available as well as plastic salt and pepper shakers, spoon holders...
Complete Owner's Guide (English)
Page 23
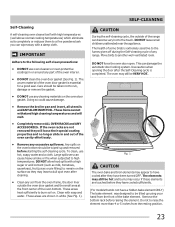
...and water. The woven material of any part of the oven bottom. To clean, use oven cleaners or oven protective coatings in or around any range. Large spillovers can damage the automatic door locking system. This can cause heavy smoke or fire when subjected to high temperatures. Use caution when ... IMPORTANT Adhere to the touch. Fig. 1 CAUTION The oven bake and broil elements may occur if these elements are shown in and out of the range can become very hot to the following self-clean precautions: • DO NOT use hot, soapy water and a cloth. The elements may still be...
...and water. The woven material of any part of the oven bottom. To clean, use oven cleaners or oven protective coatings in or around any range. Large spillovers can damage the automatic door locking system. This can cause heavy smoke or fire when subjected to high temperatures. Use caution when ... IMPORTANT Adhere to the touch. Fig. 1 CAUTION The oven bake and broil elements may occur if these elements are shown in and out of the range can become very hot to the following self-clean precautions: • DO NOT use hot, soapy water and a cloth. The elements may still be...
Complete Owner's Guide (English)
Page 24
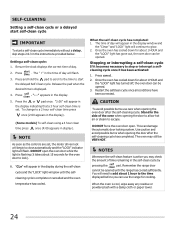
...oven has cooled down for about 1 HOUR and the "LOCK" light has turned off, the oven door can be VERY HOT. Remember the range door cannot be opened until the selfcleaning cycle is set. Stand to escape. NOTES Whenever the self-clean feature is flashing (it has been activated... lock). 6. Press the or pad once. "3:00" will appear in the display window and the "Clean" and "LOCK" light will glow until the range has cooled sufficiently. Use caution and avoid possible burns when opening the oven door after the self-cleaning cycle has completed. The " : " in the...
...oven has cooled down for about 1 HOUR and the "LOCK" light has turned off, the oven door can be VERY HOT. Remember the range door cannot be opened until the selfcleaning cycle is set. Stand to escape. NOTES Whenever the self-clean feature is flashing (it has been activated... lock). 6. Press the or pad once. "3:00" will appear in the display window and the "Clean" and "LOCK" light will glow until the range has cooled sufficiently. Use caution and avoid possible burns when opening the oven door after the self-cleaning cycle has completed. The " : " in the...
Complete Owner's Guide (English)
Page 25
... trim (some models) • Easy Care™ Stainless Steel (some models), clean the stainless with warm soapy water using a clean sponge or cloth. If your range finish is recommended to 60 minutes. Do not immerse the door in the Care & Cleaning section. 25 then push the knob into place. If necessary...
... trim (some models) • Easy Care™ Stainless Steel (some models), clean the stainless with warm soapy water using a clean sponge or cloth. If your range finish is recommended to 60 minutes. Do not immerse the door in the Care & Cleaning section. 25 then push the knob into place. If necessary...
Complete Owner's Guide (English)
Page 27
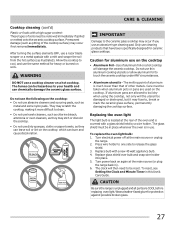
...or oven cleaners, as they may occur if you use . Turn electrical power off at the main source (or plug the range back in use an abrasive type cleaning pad. WARNING DO NOT use on the cooktop which can burn and cause discoloration. Only ... at the rear of the oven and is unplugged and all parts are COOL before replacing oven light. CAUTION Be sure the range is covered with a glass shield held by a wire holder. Allow the cooktop to the ceramic glass cooktop may etch or discolor... some nylon pads. Do not use the following on again at the main source or unplug the range. 2.
...or oven cleaners, as they may occur if you use . Turn electrical power off at the main source (or plug the range back in use an abrasive type cleaning pad. WARNING DO NOT use on the cooktop which can burn and cause discoloration. Only ... at the rear of the oven and is unplugged and all parts are COOL before replacing oven light. CAUTION Be sure the range is covered with a glass shield held by a wire holder. Allow the cooktop to the ceramic glass cooktop may etch or discolor... some nylon pads. Do not use the following on again at the main source or unplug the range. 2.


