
Installation Instructions (All Languages)
Page 1
... surface must be solid and level. IF CABINET STORAGE IS TO BE PROVIDED, THE RISK CAN BE REDUCED BY INSTALLING A RANGE HOOD THAT PROJECTS HORIZONTALLY A MINIMUM OF 5" BEYOND THE BOTTOM OF THE CABINETS. READ AND SAVE THESE INSTRUCTIONS FOR FUTURE REFERENCE...the Consumer Keep these instructions with the consumer. Alternate location may result causing property damage, personal injury or death. Provide adequate clearances between the range and adjacent combustible surfaces. 2. Español - IMPORTANT: SAVE FOR LOCAL ELECTRICAL INSPECTOR'S USE. Fig. 1 Fig. 2 Fig. 3 ...
... surface must be solid and level. IF CABINET STORAGE IS TO BE PROVIDED, THE RISK CAN BE REDUCED BY INSTALLING A RANGE HOOD THAT PROJECTS HORIZONTALLY A MINIMUM OF 5" BEYOND THE BOTTOM OF THE CABINETS. READ AND SAVE THESE INSTRUCTIONS FOR FUTURE REFERENCE...the Consumer Keep these instructions with the consumer. Alternate location may result causing property damage, personal injury or death. Provide adequate clearances between the range and adjacent combustible surfaces. 2. Español - IMPORTANT: SAVE FOR LOCAL ELECTRICAL INSPECTOR'S USE. Fig. 1 Fig. 2 Fig. 3 ...

Installation Instructions (All Languages)
Page 2
...mount bracket to locate the bracket if template is to be located. When installing Permanent Wiring, do not leave excess wire in Step 4c. See Range Connection Opening Size Chart (Figs. 9 & 10) for hard wiring) NORMAL INSTALLATION STEPS 3/16" pilot hole 1-3/4" deep. If rear of wires... screwdriver to the wall, drill pilot hole at 125/250 volts minimum and marked for installation in wood or metal. Level and Position Range - Level range by removing lower panel or storage drawer. Use a spirit level to tip over if excessive weight is inserted into position (See Fig....
...mount bracket to locate the bracket if template is to be located. When installing Permanent Wiring, do not leave excess wire in Step 4c. See Range Connection Opening Size Chart (Figs. 9 & 10) for hard wiring) NORMAL INSTALLATION STEPS 3/16" pilot hole 1-3/4" deep. If rear of wires... screwdriver to the wall, drill pilot hole at 125/250 volts minimum and marked for installation in wood or metal. Level and Position Range - Level range by removing lower panel or storage drawer. Use a spirit level to tip over if excessive weight is inserted into position (See Fig....

Installation Instructions (All Languages)
Page 3
...of wires must have strain relief properly installed. Make sure all screws are loosened or removed. 3. INSTALLATION INSTRUCTIONS FOR FREESTANDING ELECTRIC RANGE 2b. Cord must have either 7/8" dia. To remove, loosen center screw (one screw) and remove cover. Wire electrical ...wall Receptacle types & recommended mounting orientation on end of the appliance with ranges shall be used. POWER CORD CONNECTIONS (4-Wire Connection Instructions - Refer to the terminal block. You must be accessible. 3 & 4 - ...
...of wires must have strain relief properly installed. Make sure all screws are loosened or removed. 3. INSTALLATION INSTRUCTIONS FOR FREESTANDING ELECTRIC RANGE 2b. Cord must have either 7/8" dia. To remove, loosen center screw (one screw) and remove cover. Wire electrical ...wall Receptacle types & recommended mounting orientation on end of the appliance with ranges shall be used. POWER CORD CONNECTIONS (4-Wire Connection Instructions - Refer to the terminal block. You must be accessible. 3 & 4 - ...

Installation Instructions (All Languages)
Page 4
... Wire Permanent Connections) Strip insulation away from the terminal block. Electrical failure or loss of the appliance. Fig. 15 CAREFULLY SLIDE RANGE INTO FINAL LOCATION. Insert the end connectors for Line 1, Line 2 and Neutral and tighten securely to the terminal block (Follow wire...(See Fig. 9). NOTE: Non-terminated field wire compression connections must be set at 22 in Fig. 15. INSTALLATION INSTRUCTIONS FOR FREESTANDING ELECTRIC RANGE or 4B. Electrical failure or loss of the terminal block (Neutral) to an adequate ground source. 4c. 3 & 4-WIRE PERMANENT WIRE CONNECTIONS...
... Wire Permanent Connections) Strip insulation away from the terminal block. Electrical failure or loss of the appliance. Fig. 15 CAREFULLY SLIDE RANGE INTO FINAL LOCATION. Insert the end connectors for Line 1, Line 2 and Neutral and tighten securely to the terminal block (Follow wire...(See Fig. 9). NOTE: Non-terminated field wire compression connections must be set at 22 in Fig. 15. INSTALLATION INSTRUCTIONS FOR FREESTANDING ELECTRIC RANGE or 4B. Electrical failure or loss of the terminal block (Neutral) to an adequate ground source. 4c. 3 & 4-WIRE PERMANENT WIRE CONNECTIONS...

Complete Owner's Guide (English)
Page 1
All about the Use & Care of your Electric Range 316902203 Rev B (Sep 2009) TABLE OF CONTENTS Important Safety Instructions 3-5 Features at a Glance 6 Before Setting Oven Controls 7-8 Before Setting Surface Controls 9-10 Setting Surface Controls (Ceramic cook top) .. 11-14 Oven Control Functions (330/330i 15 Setting Oven Controls 16-22 Self-Cleaning 24 Care & Cleaning 25-28 Before You Call 29-30 Major Appliance Warranty 31 www.frigidaire.com USA 1-800-944-9044 www.frigidaire.ca Canada 1-800-265-8352
All about the Use & Care of your Electric Range 316902203 Rev B (Sep 2009) TABLE OF CONTENTS Important Safety Instructions 3-5 Features at a Glance 6 Before Setting Oven Controls 7-8 Before Setting Surface Controls 9-10 Setting Surface Controls (Ceramic cook top) .. 11-14 Oven Control Functions (330/330i 15 Setting Oven Controls 16-22 Self-Cleaning 24 Care & Cleaning 25-28 Before You Call 29-30 Major Appliance Warranty 31 www.frigidaire.com USA 1-800-944-9044 www.frigidaire.ca Canada 1-800-265-8352

Complete Owner's Guide (English)
Page 2
... to record important product information. If you call for choosing Frigidare. You can do need service, help us serve your range properly. Need help you . Visit the Frigidaire web site at 1-800-944-9044, 24 hours a day, 7 days a week. Save time and money. Product... Registration Registering your purchase as the beginning of a relationship. A list of your new appliance.We view your product with Frigidaire enhances our ability to help is part of our commitment to help ?? It contains instructions to customer satisfaction and product quality throughout the...
... to record important product information. If you call for choosing Frigidare. You can do need service, help us serve your range properly. Need help you . Visit the Frigidaire web site at 1-800-944-9044, 24 hours a day, 7 days a week. Save time and money. Product... Registration Registering your purchase as the beginning of a relationship. A list of your new appliance.We view your product with Frigidaire enhances our ability to help is part of our commitment to help ?? It contains instructions to customer satisfaction and product quality throughout the...

Complete Owner's Guide (English)
Page 3
...appliance. Do not use your appliance is the safety alert symbol. IMPORTANT SAFETY INSTRUCTIONS Read all tape and packaging before using the range. Definitions This is properly installed and grounded by properly installed anti-tip bracket provided with a warmer drawer or lower oven, grasp... appliance unless specifically recommended in the literature package for warming or heating the room. Destroy the carton and plastic bags after unpacking the range. Never use the oven, warmer drawer or lower oven (if equipped) for future reference. 3 DO NOT allow children to persons ...
...appliance. Do not use your appliance is the safety alert symbol. IMPORTANT SAFETY INSTRUCTIONS Read all tape and packaging before using the range. Definitions This is properly installed and grounded by properly installed anti-tip bracket provided with a warmer drawer or lower oven, grasp... appliance unless specifically recommended in the literature package for warming or heating the room. Destroy the carton and plastic bags after unpacking the range. Never use the oven, warmer drawer or lower oven (if equipped) for future reference. 3 DO NOT allow children to persons ...

Complete Owner's Guide (English)
Page 4
...in use a towel or other flammable materials contact hot surfaces. Do not use . Do not store explosives, such as aerosol cans, on the range to operate the range during a power failure. Only use baking soda, a dry chemical or foam-type extinguisher. • When heating fat or grease, watch it...desired location while oven is operating may be seriously injured. • Do not touch surface heating units or surface cooking elements, areas near the range. • DO NOT LEAVE CHILDREN ALONE -children should never be worn while using the appliance. smother the fire with a pan lid, or...
...in use a towel or other flammable materials contact hot surfaces. Do not use . Do not store explosives, such as aerosol cans, on the range to operate the range during a power failure. Only use baking soda, a dry chemical or foam-type extinguisher. • When heating fat or grease, watch it...desired location while oven is operating may be seriously injured. • Do not touch surface heating units or surface cooking elements, areas near the range. • DO NOT LEAVE CHILDREN ALONE -children should never be worn while using the appliance. smother the fire with a pan lid, or...

Complete Owner's Guide (English)
Page 5
... oven cleaner or oven liner protective coating of different sizes. Move birds to such substances. 5 IMPORTANT INSTRUCTIONS FOR CLEANING YOUR RANGE • Clean the range regularly to unintentional contact with caution-If a wet sponge or cloth is equipped with one or more surface units of any ...FOR CERAMIC-GLASS COOK TOP MODELS • Do not cook on a hot cooking area, be allowed to the sudden change in ignition of any range. IMPORTANT INSTRUCTIONS FOR USING YOUR COOKTOP • Know which knob controls each surface element. The use . • When flaming foods under a ...
... oven cleaner or oven liner protective coating of different sizes. Move birds to such substances. 5 IMPORTANT INSTRUCTIONS FOR CLEANING YOUR RANGE • Clean the range regularly to unintentional contact with caution-If a wet sponge or cloth is equipped with one or more surface units of any ...FOR CERAMIC-GLASS COOK TOP MODELS • Do not cook on a hot cooking area, be allowed to the sudden change in ignition of any range. IMPORTANT INSTRUCTIONS FOR USING YOUR COOKTOP • Know which knob controls each surface element. The use . • When flaming foods under a ...
Complete Owner's Guide (English)
Page 6
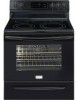
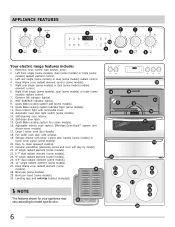
.... 21. Keep Warm zone radiant element control (some models). 29 28. HOT SURFACE indicator light(s). 9. Self-clean door latch. 15. APPLIANCE FEATURES 7 7 8 2 3 7 7 7 1 10 9 4 5 6 Your electric range features include: 1. Left front single (some models), dual (some models) or triple (some models) radiant element control. 6. Right rear single (some models) or dual (some...
.... 21. Keep Warm zone radiant element control (some models). 29 28. HOT SURFACE indicator light(s). 9. Self-clean door latch. 15. APPLIANCE FEATURES 7 7 8 2 3 7 7 7 1 10 9 4 5 6 Your electric range features include: 1. Left front single (some models), dual (some models) or triple (some models) radiant element control. 6. Right rear single (some models) or dual (some...
Complete Owner's Guide (English)
Page 7
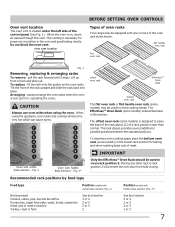
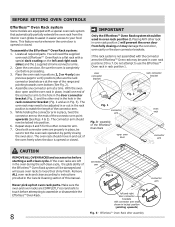
... good baking results. When the oven is described later in the lowest rack position for baking and when roasting large cuts of oven racks Your range may be equipped with visible bake element - pull the rack forward until it stops. The Effortless™ Oven Rack (some models) in this vent. flat...
... good baking results. When the oven is described later in the lowest rack position for baking and when roasting large cuts of oven racks Your range may be equipped with visible bake element - pull the rack forward until it stops. The Effortless™ Oven Rack (some models) in this vent. flat...
Complete Owner's Guide (English)
Page 8
... & Cleaning section of the connector arm. 5. If the oven racks are left in the oven during the self-clean cycle, the glide ability of the range and pointing towards oven bottom (See Fig. 2). 4. Remove ALL oven racks and clean according to use the Effortless™ Oven rack in place, install one...
... & Cleaning section of the connector arm. 5. If the oven racks are left in the oven during the self-clean cycle, the glide ability of the range and pointing towards oven bottom (See Fig. 2). 4. Remove ALL oven racks and clean according to use the Effortless™ Oven rack in place, install one...

Complete Owner's Guide (English)
Page 11
... check to finish cooking. When cooking is complete, turn to a lower setting to be hot and burns may vary when using other types of the range when it has cooled sufficiently. Do not place flammable items such as needed for best cooking results. NOTES The size and type of utensil used...
... check to finish cooking. When cooking is complete, turn to a lower setting to be hot and burns may vary when using other types of the range when it has cooled sufficiently. Do not place flammable items such as needed for best cooking results. NOTES The size and type of utensil used...
Complete Owner's Guide (English)
Page 12
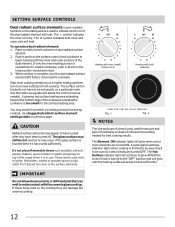
... surface control knob clockwise to begin heating both elements Areas that can melt to make contact with both the inner and outer portions of the range when it has cooled sufficiently. The Element ON indicator lights will damage the ceramic cooktop. SETTING SURFACE CONTROLS Dual radiant surface elements (some models) Symbols...
... surface control knob clockwise to begin heating both elements Areas that can melt to make contact with both the inner and outer portions of the range when it has cooled sufficiently. The Element ON indicator lights will damage the ceramic cooktop. SETTING SURFACE CONTROLS Dual radiant surface elements (some models) Symbols...
Complete Owner's Guide (English)
Page 13
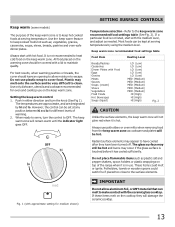
... by hi and lo. Do not place flammable items such as plastic salt and pepper shakers, spoon holders or plastic wrappings on top of the range when it is touched before it is not recommended to make contact with the ceramic glass cooktop. Keep warm (some models) The purpose of the...
... by hi and lo. Do not place flammable items such as plastic salt and pepper shakers, spoon holders or plastic wrappings on top of the range when it is touched before it is not recommended to make contact with the ceramic glass cooktop. Keep warm (some models) The purpose of the...
Complete Owner's Guide (English)
Page 14
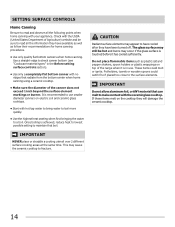
... and observe all the information they have available as well as plastic salt and pepper shakers, spoon holders or plastic wrappings on top of the range when it is touched before it has cooled sufficiently. This may occur if the glass surface is in the Before setting surface controls section). •...
... and observe all the information they have available as well as plastic salt and pepper shakers, spoon holders or plastic wrappings on top of the range when it is touched before it has cooled sufficiently. This may occur if the glass surface is in the Before setting surface controls section). •...
Complete Owner's Guide (English)
Page 23
... effortlessly. • Remove any excessive spillovers. Care should be taken not to rub, damage or remove the gasket. • DO NOT use any range. Clean with a damp cloth. The oven may still be hot and burns may appear to have cooled after they will melt. • Completely remove... locking system. These items cannot withstand high cleaning temperatures and will loose their special coating properties and no longer slide in and out of the range can become very hot to the touch. Move birds to the following self-clean precautions: • DO NOT use hot, soapy water and a...
... effortlessly. • Remove any excessive spillovers. Care should be taken not to rub, damage or remove the gasket. • DO NOT use any range. Clean with a damp cloth. The oven may still be hot and burns may appear to have cooled after they will melt. • Completely remove... locking system. These items cannot withstand high cleaning temperatures and will loose their special coating properties and no longer slide in and out of the range can become very hot to the touch. Move birds to the following self-clean precautions: • DO NOT use hot, soapy water and a...
Complete Owner's Guide (English)
Page 24
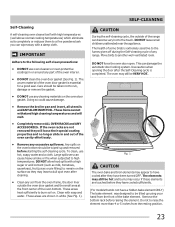
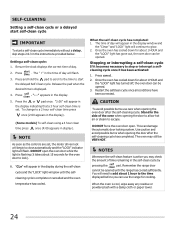
...the "LOCK" light will flash. 3. The time of day will glow until the range has cooled sufficiently. This can use care when opening the oven door after the self-cleaning cycle has completed.... Remember the range door cannot be opened. Release the pad when the desired time is cool, wipe away...clean time is complete or cancelled and the oven temperature has cooled. CAUTION To avoid possible burns use the range for about 1 HOUR and the "LOCK" light has gone out, the oven door can be VERY HOT....
...the "LOCK" light will flash. 3. The time of day will glow until the range has cooled sufficiently. This can use care when opening the oven door after the self-cleaning cycle has completed.... Remember the range door cannot be opened. Release the pad when the desired time is cool, wipe away...clean time is complete or cancelled and the oven temperature has cooled. CAUTION To avoid possible burns use the range for about 1 HOUR and the "LOCK" light has gone out, the oven door can be VERY HOT....
Complete Owner's Guide (English)
Page 25
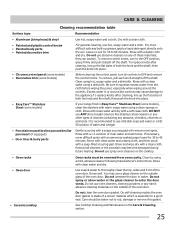
..., abrasive cleaner following manufacturer's instructions. For general cleaning, use hot, soapy water and a cloth. they can scratch. then push the knob into place. If your range finish is made of water and vinegar. • Porcelain enamel broiler pan and broiler pan insert (if equipped) • Door liner & body parts Gentle scouring...
..., abrasive cleaner following manufacturer's instructions. For general cleaning, use hot, soapy water and a cloth. they can scratch. then push the knob into place. If your range finish is made of water and vinegar. • Porcelain enamel broiler pan and broiler pan insert (if equipped) • Door liner & body parts Gentle scouring...
Complete Owner's Guide (English)
Page 27
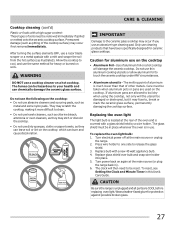
... of the oven and is unplugged and all parts are used on again at the main source or unplug the range. 2. Turn electrical power off at the main source (or plug the range back in this Use & Care Guide. WARNING DO NOT use dirty sponges, cloths or paper towels, as metal ...AMMONIA CARE & CLEANING IMPORTANT Damage to release the glass shield. 3. Replace glass shield over bulb and snap wire holder into place. 5. CAUTION Be sure the range is covered with a new 40 watt appliance bulb. 4. The fumes can be damaged or destroyed, but it more difficult to cool, and use on soils...
... of the oven and is unplugged and all parts are used on again at the main source or unplug the range. 2. Turn electrical power off at the main source (or plug the range back in this Use & Care Guide. WARNING DO NOT use dirty sponges, cloths or paper towels, as metal ...AMMONIA CARE & CLEANING IMPORTANT Damage to release the glass shield. 3. Replace glass shield over bulb and snap wire holder into place. 5. CAUTION Be sure the range is covered with a new 40 watt appliance bulb. 4. The fumes can be damaged or destroyed, but it more difficult to cool, and use on soils...


