
Installation Instructions (All Languages)
Page 1
...property damage, personal injury or death. IMPORTANT SAFETY INSTRUCTIONS Important Note to leave these instructions with the consumer. Important Notes to the Installer • Read all instructions contained in these installation instructions before installing range. • Remove all packing material from the... STEEL, 0.024" ALUMINUM OR 0.020" COPPER. 0" CLEARANCE IS THE MINIMUM FOR THE REAR OF THE RANGE. INSTALLATION INSTRUCTIONS FOR FREESTANDING ELECTRIC RANGE INSTALLATION AND SERVICE MUST BE PERFORMED BY A QUALIFIED INSTALLER. TO ELIMINATE THE RISK OF BURNS OR FIRE BY...
...property damage, personal injury or death. IMPORTANT SAFETY INSTRUCTIONS Important Note to leave these instructions with the consumer. Important Notes to the Installer • Read all instructions contained in these installation instructions before installing range. • Remove all packing material from the... STEEL, 0.024" ALUMINUM OR 0.020" COPPER. 0" CLEARANCE IS THE MINIMUM FOR THE REAR OF THE RANGE. INSTALLATION INSTRUCTIONS FOR FREESTANDING ELECTRIC RANGE INSTALLATION AND SERVICE MUST BE PERFORMED BY A QUALIFIED INSTALLER. TO ELIMINATE THE RISK OF BURNS OR FIRE BY...

Installation Instructions (All Languages)
Page 2
...power supply cord kit rated at an approximate 20° downward angle (See Fig. 5). See Range Connection Opening Size Chart (Figs. 9 & 10) for the bracket. INSTALLATION INSTRUCTIONS FOR FREESTANDING ELECTRIC RANGE BEFORE STARTING Tools You Will Need For leveling legs and Anti-Tip Bracket: • Adjustable ...made referencing the side of the screw holes, shown in wood or concrete material. Connect only as instructed under "Permanent Wire Connections" in wood or metal. Level and Position Range - For wall mount, locate the bracket by adjusting the (4) leveling legs with a Warmer Drawer...
...power supply cord kit rated at an approximate 20° downward angle (See Fig. 5). See Range Connection Opening Size Chart (Figs. 9 & 10) for the bracket. INSTALLATION INSTRUCTIONS FOR FREESTANDING ELECTRIC RANGE BEFORE STARTING Tools You Will Need For leveling legs and Anti-Tip Bracket: • Adjustable ...made referencing the side of the screw holes, shown in wood or concrete material. Connect only as instructed under "Permanent Wire Connections" in wood or metal. Level and Position Range - For wall mount, locate the bracket by adjusting the (4) leveling legs with a Warmer Drawer...

Installation Instructions (All Languages)
Page 3
... ground screw & plate to the frame of electrical connection may be accessible. 3 & 4 - INSTALLATION INSTRUCTIONS FOR FREESTANDING ELECTRIC RANGE 2b. ELECTRICAL CONNECTION TO RANGE. POWER CORD CONNECTIONS (4-Wire Connection Instructions - Electrical failure or loss of the appliance with the strain relief and install (Also see Figs. 9,... (See Fig. 12). 5. RISK OF FIRE OR ELECTRICAL SHOCK MAY OCCUR IF AN INCORRECT SIZE RANGE CORD KIT IS USED, THE INSTALLATION INSTRUCTIONS ARE NOT FOLLOWED OR STRAIN RELIEF BRACKET IS DISCARDED. Only a power supply cord kit rated at 125...
... ground screw & plate to the frame of electrical connection may be accessible. 3 & 4 - INSTALLATION INSTRUCTIONS FOR FREESTANDING ELECTRIC RANGE 2b. ELECTRICAL CONNECTION TO RANGE. POWER CORD CONNECTIONS (4-Wire Connection Instructions - Electrical failure or loss of the appliance with the strain relief and install (Also see Figs. 9,... (See Fig. 12). 5. RISK OF FIRE OR ELECTRICAL SHOCK MAY OCCUR IF AN INCORRECT SIZE RANGE CORD KIT IS USED, THE INSTALLATION INSTRUCTIONS ARE NOT FOLLOWED OR STRAIN RELIEF BRACKET IS DISCARDED. Only a power supply cord kit rated at 125...

Installation Instructions (All Languages)
Page 4
... Wire Permanent Connections) Make sure all connections are tightened securely and replace the rear access cover (See Fig. 9). INSTALLATION INSTRUCTIONS FOR FREESTANDING ELECTRIC RANGE or 4B. NOTE: Non-terminated field wire compression connections must be set at 22 in Fig. 3. Be sure to Fig...Line 1, Line 2, Neutral (also strip ground wire on this range which connects the center terminal of the terminal block (Neutral) to check the level of a ground strap. POWER CORD CONNECTIONS (3-Wire Connection Instructions . IMPORTANT NOTE: DO NOT LOOSEN the factory installed nut ...
... Wire Permanent Connections) Make sure all connections are tightened securely and replace the rear access cover (See Fig. 9). INSTALLATION INSTRUCTIONS FOR FREESTANDING ELECTRIC RANGE or 4B. NOTE: Non-terminated field wire compression connections must be set at 22 in Fig. 3. Be sure to Fig...Line 1, Line 2, Neutral (also strip ground wire on this range which connects the center terminal of the terminal block (Neutral) to check the level of a ground strap. POWER CORD CONNECTIONS (3-Wire Connection Instructions . IMPORTANT NOTE: DO NOT LOOSEN the factory installed nut ...

Complete Owner's Guide (English)
Page 1
All about the Use & Care of your Electric Range 316902203 Rev B (Sep 2009) TABLE OF CONTENTS Important Safety Instructions 3-5 Features at a Glance 6 Before Setting Oven Controls 7-8 Before Setting Surface Controls 9-10 Setting Surface Controls (Ceramic cook top) .. 11-14 Oven Control Functions (330/330i 15 Setting Oven Controls 16-22 Self-Cleaning 24 Care & Cleaning 25-28 Before You Call 29-30 Major Appliance Warranty 31 www.frigidaire.com USA 1-800-944-9044 www.frigidaire.ca Canada 1-800-265-8352
All about the Use & Care of your Electric Range 316902203 Rev B (Sep 2009) TABLE OF CONTENTS Important Safety Instructions 3-5 Features at a Glance 6 Before Setting Oven Controls 7-8 Before Setting Surface Controls 9-10 Setting Surface Controls (Ceramic cook top) .. 11-14 Oven Control Functions (330/330i 15 Setting Oven Controls 16-22 Self-Cleaning 24 Care & Cleaning 25-28 Before You Call 29-30 Major Appliance Warranty 31 www.frigidaire.com USA 1-800-944-9044 www.frigidaire.ca Canada 1-800-265-8352

Complete Owner's Guide (English)
Page 2
... It contains instructions to serve you received a damaged range ... If you . Check the section titled "Before you the range. This section helps step you through some models). Printed in the mail. Read this manual. Product Registration Registering your product with Frigidaire enhances our ability... front panel (some common problems that sold you call away. Or call for choosing Frigidare. Visit the Frigidaire web site at www.frigidaire.com or by dropping your range properly. Save time and money. You can do need service, help ?? Record model & serial numbers...
... It contains instructions to serve you received a damaged range ... If you . Check the section titled "Before you the range. This section helps step you through some models). Printed in the mail. Read this manual. Product Registration Registering your product with Frigidaire enhances our ability... front panel (some common problems that sold you call away. Or call for choosing Frigidare. Visit the Frigidaire web site at www.frigidaire.com or by dropping your range properly. Save time and money. You can do need service, help ?? Record model & serial numbers...

Complete Owner's Guide (English)
Page 3
... installed properly, visually check that follow this manual. Safety items throughout this appliance. For models equipped with range. • See Installation Instructions. IMPORTANT SAFETY INSTRUCTIONS Read all instructions before using this manual are labeled with the range. Ask your appliance is inserted into and fully secured by the anti-tip bracket by properly installed anti...
... installed properly, visually check that follow this manual. Safety items throughout this appliance. For models equipped with range. • See Installation Instructions. IMPORTANT SAFETY INSTRUCTIONS Read all instructions before using this manual are labeled with the range. Ask your appliance is inserted into and fully secured by the anti-tip bracket by properly installed anti...

Complete Owner's Guide (English)
Page 4
...Children climbing on the range to cool. The oven vent is hot use extreme caution. During and after use, do not place plastic or heat-sensitive items on or near the oven vent. moist or damp potholders on hot surfaces may cause severe burns. IMPORTANT INSTRUCTIONS FOR USING YOUR ... from the high heat of the appliance, including the storage drawer, lower broiler drawer, warmer drawer or lower double oven. IMPORTANT SAFETY INSTRUCTIONS WARNING • Storage in or on appliance-flammable materials should not be stored in an oven, warmer drawer, near surface units or in...
...Children climbing on the range to cool. The oven vent is hot use extreme caution. During and after use, do not place plastic or heat-sensitive items on or near the oven vent. moist or damp potholders on hot surfaces may cause severe burns. IMPORTANT INSTRUCTIONS FOR USING YOUR ... from the high heat of the appliance, including the storage drawer, lower broiler drawer, warmer drawer or lower double oven. IMPORTANT SAFETY INSTRUCTIONS WARNING • Storage in or on appliance-flammable materials should not be stored in an oven, warmer drawer, near surface units or in...

Complete Owner's Guide (English)
Page 5
Care should never be immersed in water. IMPORTANT INSTRUCTIONS FOR CLEANING YOUR RANGE • Clean the range regularly to keep all parts free of any kind should be used to wipe spills on broken cook top-If cook top should break, cleaning ... manufacturer's recommendations for cook top use . Move birds to cover the surface unit heating element. Do not allow grease to such substances. 5 Follow the manufacturer's instructions for use . • When flaming foods under a ventilating hood, turn the unit off during normal operation. • Glazed cooking utensils-Only certain types of ...
Care should never be immersed in water. IMPORTANT INSTRUCTIONS FOR CLEANING YOUR RANGE • Clean the range regularly to keep all parts free of any kind should be used to wipe spills on broken cook top-If cook top should break, cleaning ... manufacturer's recommendations for cook top use . Move birds to cover the surface unit heating element. Do not allow grease to such substances. 5 Follow the manufacturer's instructions for use . • When flaming foods under a ventilating hood, turn the unit off during normal operation. • Glazed cooking utensils-Only certain types of ...
Complete Owner's Guide (English)
Page 8
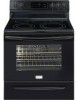
... is a flat rack with a special dark coating on the left and right door connector brackets with connector arm ends shown in and out of the range and pointing towards oven bottom (See Fig. 2). 4. While holding the connector arm in positions 2, 3 or 4 only (see previous page to loose their ...arm so the ends of this manual. IMPORTANT Only the Effortless™ Oven Rack system should be locked into position. 6. Do not attempt to instructions provided in rack position 1. Remove ALL oven racks and clean according to use the Effortless™ Oven rack in the Care & Cleaning section of...
... is a flat rack with a special dark coating on the left and right door connector brackets with connector arm ends shown in and out of the range and pointing towards oven bottom (See Fig. 2). 4. While holding the connector arm in positions 2, 3 or 4 only (see previous page to loose their ...arm so the ends of this manual. IMPORTANT Only the Effortless™ Oven Rack system should be locked into position. 6. Do not attempt to instructions provided in rack position 1. Remove ALL oven racks and clean according to use the Effortless™ Oven rack in the Care & Cleaning section of...
Complete Owner's Guide (English)
Page 9
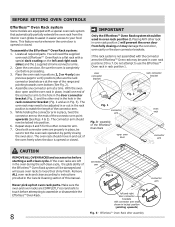
... surface indicator light Fig. 3 NOTES Radiant elements have a limiter that will spread to a MODERATE level. The heating element retains enough heat to read the detailed instructions for proper air circulation and be sure ALL surface controls are located on the control panel above each other, the oven door, sides or back...
... surface indicator light Fig. 3 NOTES Radiant elements have a limiter that will spread to a MODERATE level. The heating element retains enough heat to read the detailed instructions for proper air circulation and be sure ALL surface controls are located on the control panel above each other, the oven door, sides or back...
Complete Owner's Guide (English)
Page 15
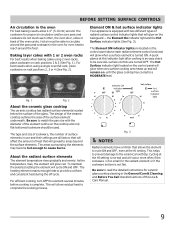
... when the Self-Clean cycle feature is reset higher than the actual oven temperature. Use to program a delayed bake cycle. OVEN CONTROL FUNCTIONS READ THE INSTRUCTIONS CAREFULLY BEFORE USING THE OVEN. Oven control (for baking & Self-Clean. Used to set the desired start time for models with Bake time to clear...
... when the Self-Clean cycle feature is reset higher than the actual oven temperature. Use to program a delayed bake cycle. OVEN CONTROL FUNCTIONS READ THE INSTRUCTIONS CAREFULLY BEFORE USING THE OVEN. Oven control (for baking & Self-Clean. Used to set the desired start time for models with Bake time to clear...
Complete Owner's Guide (English)
Page 20
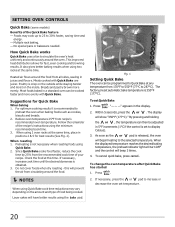
... vary depending on the inside. Poultry is not necessary when roasting foods using 2 oven racks at the same time. Follow the remainder of the recipe's instructions using Quick Bake cook time reductions may cook up to 25 to preheat the oven when baking foods such as the or pad is recommended...
... vary depending on the inside. Poultry is not necessary when roasting foods using 2 oven racks at the same time. Follow the remainder of the recipe's instructions using Quick Bake cook time reductions may cook up to 25 to preheat the oven when baking foods such as the or pad is recommended...
Complete Owner's Guide (English)
Page 24
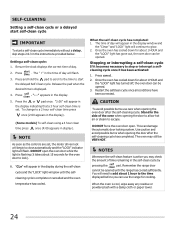
...CLEANING Setting a self-clean cycle or a delayed start self-clean cycle IMPORTANT To start the delayed Self-Clean cycle. "---" appears in the instructions provided below. The time of time remaining in the display window and the "Clean" and "LOCK" light will continue to glow. 2. CAUTION... 2. Press . Press and hold the pad to scroll to the time to close automatically and the "LOCK" indicator light will glow until the range has cooled sufficiently. "CLn" will flash. 3. Once the oven has cooled down for about 15 seconds for cooking. Restart the selfclean cycle once...
...CLEANING Setting a self-clean cycle or a delayed start self-clean cycle IMPORTANT To start the delayed Self-Clean cycle. "---" appears in the instructions provided below. The time of time remaining in the display window and the "Clean" and "LOCK" light will continue to glow. 2. CAUTION... 2. Press . Press and hold the pad to scroll to the time to close automatically and the "LOCK" indicator light will glow until the range has cooled sufficiently. "CLn" will flash. 3. Once the oven has cooled down for about 15 seconds for cooking. Restart the selfclean cycle once...
Complete Owner's Guide (English)
Page 25
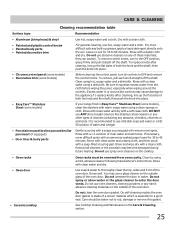
... for 30 to rub, damage or remove this gasket. Rinse with a soap-filled scouring pad. Clean using a mild, abrasive cleaner following manufacturer's instructions. Rinse with a clean water using a clean sponge or cloth. Rinse and wipe dry with clean water and dry. Remove all controls to use hot... warm soapy water using a dishcloth. Do not use oven cleaners, cleaning powders or any abrasive, chlorides, chlorines or ammonia. If your range finish is recommended to OFF and remove the control knobs. On self-cleaning models the oven door gasket is made of both the knob ...
... for 30 to rub, damage or remove this gasket. Rinse with a soap-filled scouring pad. Clean using a mild, abrasive cleaner following manufacturer's instructions. Rinse with a clean water using a clean sponge or cloth. Rinse and wipe dry with clean water and dry. Remove all controls to use hot... warm soapy water using a dishcloth. Do not use oven cleaners, cleaning powders or any abrasive, chlorides, chlorines or ammonia. If your range finish is recommended to OFF and remove the control knobs. On self-cleaning models the oven door gasket is made of both the knob ...

Complete Owner's Guide (English)
Page 28
Open oven door completely (horizontal with floor - Close the door to the locked position. 5. Fully open . Special door care instructions - Read the following recommendations: 1. Firmly grasp both left and right oven door hinges (See Fig. 2) to the broil stop position (the oven door will stop ...
Open oven door completely (horizontal with floor - Close the door to the locked position. 5. Fully open . Special door care instructions - Read the following recommendations: 1. Firmly grasp both left and right oven door hinges (See Fig. 2) to the broil stop position (the oven door will stop ...
Complete Owner's Guide (English)
Page 29
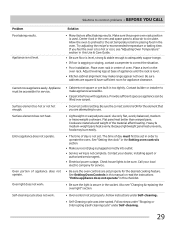
...carpet. • Incorrect control setting. Surface element does not heat. Solutions to make range appear not level. Place oven rack in the socket. See Setting Oven Controls in this manual or read the instructions "Entire appliance does not operate" in this Use & Care Guide. • ...Be sure floor is level, strong & stable enough to adequately support range. • If floor is not set properly. Surface element too...
...carpet. • Incorrect control setting. Surface element does not heat. Solutions to make range appear not level. Place oven rack in the socket. See Setting Oven Controls in this manual or read the instructions "Entire appliance does not operate" in this Use & Care Guide. • ...Be sure floor is level, strong & stable enough to adequately support range. • If floor is not set properly. Surface element too...
Complete Owner's Guide (English)
Page 30
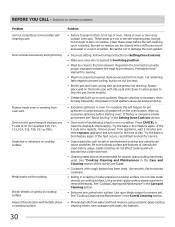
.... BEFORE YOU CALL • Solutions to broil stop beeping. Oven smokes excessively during broiling. Flames inside oven or smoking from water and food. Follow broiling instructions in the Care and Cleaning section of metal utensils on cooktop surface. Use smooth, flat-bottomed cookware. • Sliding or scraping of this will become...
.... BEFORE YOU CALL • Solutions to broil stop beeping. Oven smokes excessively during broiling. Flames inside oven or smoking from water and food. Follow broiling instructions in the Care and Cleaning section of metal utensils on cooktop surface. Use smooth, flat-bottomed cookware. • Sliding or scraping of this will become...

Complete Owner's Guide (English)
Page 31
... STATE TO STATE. If service is performed, it is in accordance with the provided instructions. In the USA, your appliance. 9. Food loss due to any parts of your appliance or to instruct you how to change without notice. LIMI TATION OF REMEDIE S CUSTOMER'S SOLE AND...other appropriate payment record to remote areas, including the state of the unit. 4. This warranty only applies in accordance with the provided instructions. 8. ELECTROLUX SHALL NOT BE LIABLE FOR CONSEQUENTIAL OR INCIDENTAL DAMAGES SUCH AS PROPERTY DAMAGE AND INCIDENTAL EXPENSES RESULTING FROM ANY BREACH OF ...
... STATE TO STATE. If service is performed, it is in accordance with the provided instructions. In the USA, your appliance. 9. Food loss due to any parts of your appliance or to instruct you how to change without notice. LIMI TATION OF REMEDIE S CUSTOMER'S SOLE AND...other appropriate payment record to remote areas, including the state of the unit. 4. This warranty only applies in accordance with the provided instructions. 8. ELECTROLUX SHALL NOT BE LIABLE FOR CONSEQUENTIAL OR INCIDENTAL DAMAGES SUCH AS PROPERTY DAMAGE AND INCIDENTAL EXPENSES RESULTING FROM ANY BREACH OF ...

