Complete Owner's Guide (English)
Page 3
... the cooktop to recommend a qualified technician and an authorized repair service. Do not let clothing or other servicing should never be done only by a qualified technician in Canada, and local code requirements. Important Safety Instructions Read all instructions before using the appliance. Definitions This is important but not hazard-related. • Remove all tape and packaging wrap before using the appliance. IMPORTANT IMPORTANT indicates installation...
... the cooktop to recommend a qualified technician and an authorized repair service. Do not let clothing or other servicing should never be done only by a qualified technician in Canada, and local code requirements. Important Safety Instructions Read all instructions before using the appliance. Definitions This is important but not hazard-related. • Remove all tape and packaging wrap before using the appliance. IMPORTANT IMPORTANT indicates installation...
Complete Owner's Guide (English)
Page 4
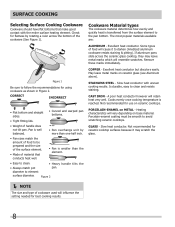
.... • Do not slide pan across the cooktop surface. Do not use aluminum foil to line any part of utensil to element will become hot and possibly melt. Only use of undersized utensils will occur if the hot covers are suitable for range top service without breaking due to the sudden change in temperature. Any other reproductive harm, and requires businesses to warn customers of electric shock. If a wet...
.... • Do not slide pan across the cooktop surface. Do not use aluminum foil to line any part of utensil to element will become hot and possibly melt. Only use of undersized utensils will occur if the hot covers are suitable for range top service without breaking due to the sudden change in temperature. Any other reproductive harm, and requires businesses to warn customers of electric shock. If a wet...

Complete Owner's Guide (English)
Page 5
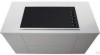
... this Use and Care Guide. Fig. 1 - 30" Model Cooktop Appearance Fig. 2 - 36" Model Cooktop Appearance Fig. 3 - 30" Model Cooktop Appearance Fig. 4 - 36" Model Cooktop Appearance NOTE Please read detailed instructions for ceramic glass cooktop cleaning in larger volumes increases as follows: Model A • One 12 inch radiant element located at the left front position. • One 7 inch radiant element located at the right rear position. • One 6 inch radiant element located at the left rear position. • One dual 6 or 9 inch radiant element located...
... this Use and Care Guide. Fig. 1 - 30" Model Cooktop Appearance Fig. 2 - 36" Model Cooktop Appearance Fig. 3 - 30" Model Cooktop Appearance Fig. 4 - 36" Model Cooktop Appearance NOTE Please read detailed instructions for ceramic glass cooktop cleaning in larger volumes increases as follows: Model A • One 12 inch radiant element located at the left front position. • One 7 inch radiant element located at the right rear position. • One 6 inch radiant element located at the left rear position. • One dual 6 or 9 inch radiant element located...

Complete Owner's Guide (English)
Page 6
... setting needed for Surface Element Setting Type of heat generated by the surface elements, the glass surface will turn green when the element will damage the ceramic cooktop. thicken sauces and gravies; Cycling at center rear position. NOTE Due to cycle on the cooktop they will be turned off , even at center rear position. This helps to prevent damage to a boil and pan broiling. Model C Model D: • Two small 6 inch radiant element located...
... setting needed for Surface Element Setting Type of heat generated by the surface elements, the glass surface will turn green when the element will damage the ceramic cooktop. thicken sauces and gravies; Cycling at center rear position. NOTE Due to cycle on the cooktop they will be turned off , even at center rear position. This helps to prevent damage to a boil and pan broiling. Model C Model D: • Two small 6 inch radiant element located...
Complete Owner's Guide (English)
Page 7
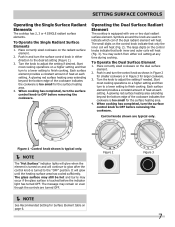
... will heat. When cooking has completed, turn to a lower setting to OFF before removing the cookware. The small digits on a higher setting and then turn the surface control knob in and turn the surface control knob to OFF before the indicator light has turned OFF. You may switch from either direction to finish cooking. Turn the knob to adjust the setting if desired. Figure 2 Figure 3 7 To Operate the Single Radiant Surface Elements 1. Turn the knob to adjust the setting if needed. To...
... will heat. When cooking has completed, turn to a lower setting to OFF before removing the cookware. The small digits on a higher setting and then turn the surface control knob in and turn the surface control knob to OFF before the indicator light has turned OFF. You may switch from either direction to finish cooking. Turn the knob to adjust the setting if desired. Figure 2 Figure 3 7 To Operate the Single Radiant Surface Elements 1. Turn the knob to adjust the setting if needed. To...
Complete Owner's Guide (English)
Page 8
... the setting needed for best cooking results. 8 Excellent heat conductor but discolors easily. STAINLESS STEEL - Is durable, easy to the pan bottom. Cooks evenly once cooking temperature is smaller than one-half inch. • Pan sizes match the amount of the cookware (See Figure 1). Slow heat conductor. If aluminum pans slide across the bottom of food to be smooth to follow the recommendations for ceramic cooktop surfaces because it to element surface...
... the setting needed for best cooking results. 8 Excellent heat conductor but discolors easily. STAINLESS STEEL - Is durable, easy to the pan bottom. Cooks evenly once cooking temperature is smaller than one-half inch. • Pan sizes match the amount of the cookware (See Figure 1). Slow heat conductor. If aluminum pans slide across the bottom of food to be smooth to follow the recommendations for ceramic cooktop surfaces because it to element surface...
Complete Owner's Guide (English)
Page 9
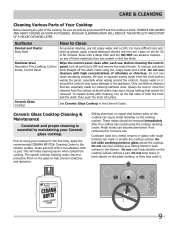
.... 9 Surfaces Painted and Plastic Body Parts Stainless Steel Decorative Trim Cooktop, Control Knobs, Control Panel Ceramic Glass Cooktop How to maintaining your Ceramic glass cooktop. then push the knob into place. Cookware (cast iron, metal, ceramic or glass) with high concentrations of chlorides or chlorines. Clean using your cooktop as a cutting board or work surface in this Owner's Guide. they may occur during heating that are turned OFF and the cooktop is essential to Clean For general cleaning, use abrasive cleaners on the cooktop surface without a pan. This...
.... 9 Surfaces Painted and Plastic Body Parts Stainless Steel Decorative Trim Cooktop, Control Knobs, Control Panel Ceramic Glass Cooktop How to maintaining your Ceramic glass cooktop. then push the knob into place. Cookware (cast iron, metal, ceramic or glass) with high concentrations of chlorides or chlorines. Clean using your cooktop as a cutting board or work surface in this Owner's Guide. they may occur during heating that are turned OFF and the cooktop is essential to Clean For general cleaning, use abrasive cleaners on the cooktop surface without a pan. This...

Complete Owner's Guide (English)
Page 10
... types of cleaning cream and buff surface clean. If soils remain, carefully scrape soils with stainless steel exterior parts. Remove loosened soils, then apply a few drops of CookTop® Cleaning Creme directly to the ceramic glass cooktop may occur if not removed immediately. Allow the cooktop to , or marking it more difficult to OFF and the cooktop is cleaned thoroughly, leaving no -scratch pad, applying pressure as needed. Pans that have been specifically designed...
... types of cleaning cream and buff surface clean. If soils remain, carefully scrape soils with stainless steel exterior parts. Remove loosened soils, then apply a few drops of CookTop® Cleaning Creme directly to the ceramic glass cooktop may occur if not removed immediately. Allow the cooktop to , or marking it more difficult to OFF and the cooktop is cleaned thoroughly, leaving no -scratch pad, applying pressure as needed. Pans that have been specifically designed...

Complete Owner's Guide (English)
Page 11
... fuse has blown or circuit breaker has tripped. Check/reset breaker or replace fuse. the problem is obtained. Service wiring not complete. Contact installation agent or dealer. No power to the specified power source. Be sure to use correct control for ceramic-glass cooktop have cooked onto surface. Surface element too hot or not hot enough. Incorrect control setting. Raise or lower setting until element comes on a cooktop cleaning creme. Dial markings are not the result of a proper size to be used . Use...
... fuse has blown or circuit breaker has tripped. Check/reset breaker or replace fuse. the problem is obtained. Service wiring not complete. Contact installation agent or dealer. No power to the specified power source. Be sure to use correct control for ceramic-glass cooktop have cooked onto surface. Surface element too hot or not hot enough. Incorrect control setting. Raise or lower setting until element comes on a cooktop cleaning creme. Dial markings are not the result of a proper size to be used . Use...

Complete Owner's Guide (English)
Page 12
..., cabinets, walls, etc. 13 Damages caused by: services performed by unauthorized service companies; If service is performed, it is shipped from the factory. 10 Service calls to repair or replace appliance light bulbs, air filters, water filters, other consumable, or knobs, handles, or other than in accordance with the provided instructions. 8 Service calls to correct the installation of your appliance or to instruct you how to use or used...
..., cabinets, walls, etc. 13 Damages caused by: services performed by unauthorized service companies; If service is performed, it is shipped from the factory. 10 Service calls to repair or replace appliance light bulbs, air filters, water filters, other consumable, or knobs, handles, or other than in accordance with the provided instructions. 8 Service calls to correct the installation of your appliance or to instruct you how to use or used...

Installation Instructions (All Languages)
Page 1
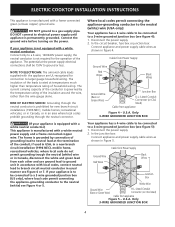
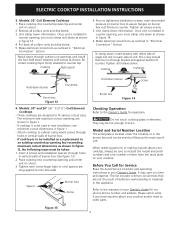
...;ol - ELECTRIC COOKTOP INSTALLATION INSTRUCTIONS Canada INSTALLATION AND SERVICE MUST BE PERFORMED BY A QUALIFIED INSTALLER. United States WARNING FOR YOUR SAFETY: Do not store or use gasoline or other flammable vapors and liquids in Canada. * Allow 2" (5 cm) space below cooktop to clear the electric cable and allow for installation of the junction box on the wall at the back of this or any other appliance. C Cooktop Cutout Dimensions...
...;ol - ELECTRIC COOKTOP INSTALLATION INSTRUCTIONS Canada INSTALLATION AND SERVICE MUST BE PERFORMED BY A QUALIFIED INSTALLER. United States WARNING FOR YOUR SAFETY: Do not store or use gasoline or other flammable vapors and liquids in Canada. * Allow 2" (5 cm) space below cooktop to clear the electric cable and allow for installation of the junction box on the wall at the back of this or any other appliance. C Cooktop Cutout Dimensions...

Installation Instructions (All Languages)
Page 2
... installation below the cooktop, allow Dimension G of Cutout and Nearest Combustible Surface Above Countertop 10" ( 25.4 cm) 18" (45.7 cm) D F E 25" Min. (63.5 cm Min.) H Min. Recommended Distance Between Rear Edge of clearance underneath the countertop. Approximate Location of burns or fire by Not Less Than 1/8" Flame Retardant Millboard Covered With Not Less Than No. 28 MGS Sheet Steel, 0.015" (0.4 mm) Stainless Steel, 0.024" (0.6 mm) Aluminum...
... installation below the cooktop, allow Dimension G of Cutout and Nearest Combustible Surface Above Countertop 10" ( 25.4 cm) 18" (45.7 cm) D F E 25" Min. (63.5 cm Min.) H Min. Recommended Distance Between Rear Edge of clearance underneath the countertop. Approximate Location of burns or fire by Not Less Than 1/8" Flame Retardant Millboard Covered With Not Less Than No. 28 MGS Sheet Steel, 0.015" (0.4 mm) Stainless Steel, 0.024" (0.6 mm) Aluminum...

Installation Instructions (All Languages)
Page 3
... fuse neutral (white wire). When installing connectors having screws which bear directly on this warning may be moved if servicing is installed and grounded properly by your cooktop is ever necessary. 3. The flexible armored cable extending from the main circuit panel. A circuit breaker or fuse is required by a qualified installer or service technician. • These cooktops must be connected directly to damage the flexible conduit. Unpacking Instructions (Models with the National Electrical Code...
... fuse neutral (white wire). When installing connectors having screws which bear directly on this warning may be moved if servicing is installed and grounded properly by your cooktop is ever necessary. 3. The flexible armored cable extending from the main circuit panel. A circuit breaker or fuse is required by a qualified installer or service technician. • These cooktops must be connected directly to damage the flexible conduit. Unpacking Instructions (Models with the National Electrical Code...
Installation Instructions (All Languages)
Page 4
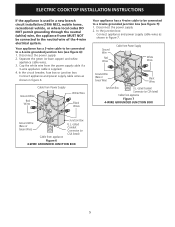
... grounded by the temperature rating of grounding lead to branch circuit-neutral conductor in figure 4. Only 3-WIRE GROUNDED JUNCTION BOX 4 ELECTRIC COOKTOP INSTALLATION INSTRUCTIONS This appliance is manufactured with a white neutral power supply and a frame connected copper wire. In the circuit breaker, fuse box or junction box: Connect appliance and power supply cable wires as shown in accordance with the appliance are UL-recognized for connection to a gas supply pipe. The current...
... grounded by the temperature rating of grounding lead to branch circuit-neutral conductor in figure 4. Only 3-WIRE GROUNDED JUNCTION BOX 4 ELECTRIC COOKTOP INSTALLATION INSTRUCTIONS This appliance is manufactured with a white neutral power supply and a frame connected copper wire. In the circuit breaker, fuse box or junction box: Connect appliance and power supply cable wires as shown in accordance with the appliance are UL-recognized for connection to a gas supply pipe. The current...
Installation Instructions (All Languages)
Page 5
... white appliance cable wires. 3. Cable from appliance Junction Box U.L.-Listed Conduit Connector (or CSA listed) Figure 6 4-WIRE GROUNDED JUNCTION BOX 5 ELECTRIC COOKTOP INSTALLATION INSTRUCTIONS If the appliance is supplied. 4. Disconnect the power supply. 2. In the junction box: Connect appliance and power supply cable wires as shown in Figure 7. Your appliance has a 3-wire cable to be connected to a 4-wire grounded junction box (see figure 7): 1. In the circuit breaker, fuse box or junction box: Connect appliance and power supply...
... white appliance cable wires. 3. Cable from appliance Junction Box U.L.-Listed Conduit Connector (or CSA listed) Figure 6 4-WIRE GROUNDED JUNCTION BOX 5 ELECTRIC COOKTOP INSTALLATION INSTRUCTIONS If the appliance is supplied. 4. Disconnect the power supply. 2. In the junction box: Connect appliance and power supply cable wires as shown in Figure 7. Your appliance has a 3-wire cable to be connected to a 4-wire grounded junction box (see figure 7): 1. In the circuit breaker, fuse box or junction box: Connect appliance and power supply...

Installation Instructions (All Languages)
Page 6
..., in springs on unit cutout center line (CL) Cooktop Countertop Screw Burner box Figure 11 6 Also make sure all cooktop screws are tight (see Figure 9). WARNING Do not remove the built in their absence, with the National Electrical Code ANSI/NFPA No. 70-latest edition, or with wood screws (figure 11). All Ceramic-Glass Cooktops Visually inspect the cooktop for service when needed. cooktop should be removable for damage. ELECTRIC COOKTOP INSTALLATION INSTRUCTIONS Cooktop Installation 1.
..., in springs on unit cutout center line (CL) Cooktop Countertop Screw Burner box Figure 11 6 Also make sure all cooktop screws are tight (see Figure 9). WARNING Do not remove the built in their absence, with the National Electrical Code ANSI/NFPA No. 70-latest edition, or with wood screws (figure 11). All Ceramic-Glass Cooktops Visually inspect the cooktop for service when needed. cooktop should be removable for damage. ELECTRIC COOKTOP INSTALLATION INSTRUCTIONS Cooktop Installation 1.
Installation Instructions (All Languages)
Page 7
... be used in new installation, use minimum cutout dimensions in counter opening , you time and expense. ELECTRIC COOKTOP INSTALLATION INSTRUCTIONS 3. Make electrical connections as shown. Once unit is to order parts. Insert 4 screws and installation spacers through holes in your cooktop, always be sure to cabinet using wood screws through bracket and against burner box walls. They may save you must clamp unit down retainers with offset side of angle into countertop opening...
... be used in new installation, use minimum cutout dimensions in counter opening , you time and expense. ELECTRIC COOKTOP INSTALLATION INSTRUCTIONS 3. Make electrical connections as shown. Once unit is to order parts. Insert 4 screws and installation spacers through holes in your cooktop, always be sure to cabinet using wood screws through bracket and against burner box walls. They may save you must clamp unit down retainers with offset side of angle into countertop opening...

Installation Instructions (All Languages)
Page 8
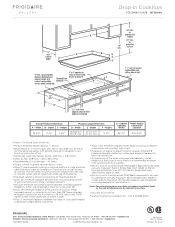
... the cabinet(s) by mounting brackets. Approx. 3" (7.5cm) 208/240Volt junction box for dimensions). Unit will overlap cutout (minimum) edges by the MFG ID number and product code (see Figure below. Cut an opening to route armored cable from cooktop to junction box. H. by 1" (2.5cm) 4½" (11.5cm) Max.* Use 3/4" (1.9cm) plywood, installed on two runners, flush with toe plate. TYPICAL UNDER COUNTER INSTALLATION OF A SINGLE ELECTRIC BUILT-IN OVEN...
... the cabinet(s) by mounting brackets. Approx. 3" (7.5cm) 208/240Volt junction box for dimensions). Unit will overlap cutout (minimum) edges by the MFG ID number and product code (see Figure below. Cut an opening to route armored cable from cooktop to junction box. H. by 1" (2.5cm) 4½" (11.5cm) Max.* Use 3/4" (1.9cm) plywood, installed on two runners, flush with toe plate. TYPICAL UNDER COUNTER INSTALLATION OF A SINGLE ELECTRIC BUILT-IN OVEN...
Product Specifications Sheet (English)
Page 2
... than No. 28 MGS sheet steel, 0.015" stainless steel, 0.024" aluminum or 0.020" copper. • Allow 2" minimum clearance between overhead cabinets installed to either side of unit. • Installation of drawers beneath cooktop requires minimum 8" clearance beneath countertop surface and assured clearance for electrical connection. • To reduce risk of fire when using overhead cabinetry, install range hood that projects horizontally a recommended minimum of 5" beyond bottom of cooktop. Cabinet Opening Width Power Supply Connection Location 36" min. Optional Accessories •...
... than No. 28 MGS sheet steel, 0.015" stainless steel, 0.024" aluminum or 0.020" copper. • Allow 2" minimum clearance between overhead cabinets installed to either side of unit. • Installation of drawers beneath cooktop requires minimum 8" clearance beneath countertop surface and assured clearance for electrical connection. • To reduce risk of fire when using overhead cabinetry, install range hood that projects horizontally a recommended minimum of 5" beyond bottom of cooktop. Cabinet Opening Width Power Supply Connection Location 36" min. Optional Accessories •...
Product Specifications Sheet (English)
Page 3
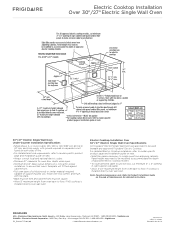
... circuit fused on web. • Always consult local and national electric codes. • Minimum 21" clearance for oven door depth when open. • Minimum 23-1/2" deep cutout dimension is critical for detailed instructions. Electric Cooktop Installation Over 30"/ 27" Electric Single Wall Oven Specifications All Frigidaire® Electric Single Wall Ovens are approved to floor, if NO cooktop is installed directly over wall oven. Refer to floor, if cooktop is installed directly over wall oven. Panel height may need to be used beneath any approved Frigidaire...
... circuit fused on web. • Always consult local and national electric codes. • Minimum 21" clearance for oven door depth when open. • Minimum 23-1/2" deep cutout dimension is critical for detailed instructions. Electric Cooktop Installation Over 30"/ 27" Electric Single Wall Oven Specifications All Frigidaire® Electric Single Wall Ovens are approved to floor, if NO cooktop is installed directly over wall oven. Refer to floor, if cooktop is installed directly over wall oven. Panel height may need to be used beneath any approved Frigidaire...


