Complete Owner's Guide (English)
Page 3
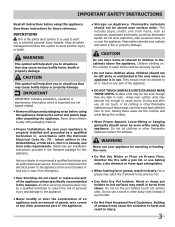
... IMPORTANT indicates installation, operation or maintenance information which is the safety alert symbol. Never allow children to play with a pan lid, or use baking soda, a dry chemical or foam-type extinguisher. • When heating fat or grease, watch it closely. Know how to disconnect the electrical power to children in accordance with the National Electrical Code No. 70 - All other servicing should...
... IMPORTANT indicates installation, operation or maintenance information which is the safety alert symbol. Never allow children to play with a pan lid, or use baking soda, a dry chemical or foam-type extinguisher. • When heating fat or grease, watch it closely. Know how to disconnect the electrical power to children in accordance with the National Electrical Code No. 70 - All other servicing should...
Complete Owner's Guide (English)
Page 4
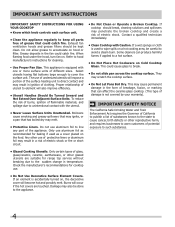
... may also be kept clean. When flaming food under the hood, turn fan on , the decorative cover will become hot and possibly melt. Boilovers cause smoking and greasy spillovers that may result in ignition of the appliance. Some cleaners can affect the ceramic-glass cooktop. (This type of glass, glass/ceramic, ceramic, earthenware, or other reproductive harm, and requires businesses to warn customers of electric shock or fire or...
... may also be kept clean. When flaming food under the hood, turn fan on , the decorative cover will become hot and possibly melt. Boilovers cause smoking and greasy spillovers that may result in ignition of the appliance. Some cleaners can affect the ceramic-glass cooktop. (This type of glass, glass/ceramic, ceramic, earthenware, or other reproductive harm, and requires businesses to warn customers of electric shock or fire or...

Complete Owner's Guide (English)
Page 5
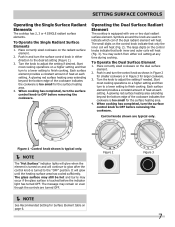
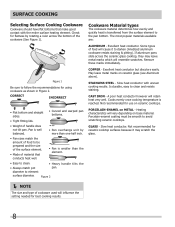
... complete the cooking process. For efficient cooking, turn off cycle. The areas surrounding the elements may become hot enough to provide a uniform and consistent heat during the off the element several minutes before cooking is equipped with radiant surface radiant elements with different wattage ratings. Before SETTING SURFACE CONTROLS About the Ceramic Glass Cooktop The ceramic cooktop has radiant surface elements located below the surface of the surface element underneath. Locations of this Use and Care Guide. Model B 5 The design of the ceramic cooktop outlines...
... complete the cooking process. For efficient cooking, turn off cycle. The areas surrounding the elements may become hot enough to provide a uniform and consistent heat during the off the element several minutes before cooking is equipped with radiant surface radiant elements with different wattage ratings. Before SETTING SURFACE CONTROLS About the Ceramic Glass Cooktop The ceramic cooktop has radiant surface elements located below the surface of the surface element underneath. Locations of this Use and Care Guide. Model B 5 The design of the ceramic cooktop outlines...

Complete Owner's Guide (English)
Page 6
... size and type of heat generated by the surface elements, the glass surface will turn green when the element will damage the ceramic cooktop. steaming vegetables. This phenomenon is normal and the glass will influence the setting needed for Surface Element Setting Type of food you are located on the 36" cooktop as salt and pepper shakers, spoon holders or plastic wrappings on cooktop when it has completely cooled down. (White glass cooktops only...
... size and type of heat generated by the surface elements, the glass surface will turn green when the element will damage the ceramic cooktop. steaming vegetables. This phenomenon is normal and the glass will influence the setting needed for Surface Element Setting Type of food you are located on the 36" cooktop as salt and pepper shakers, spoon holders or plastic wrappings on cooktop when it has completely cooled down. (White glass cooktops only...
Complete Owner's Guide (English)
Page 7
... OFF before removing the cookware. Turn the knob to adjust the setting if needed. To Operate the Dual Surface Element 1. Start most cooking operations on the control knob indicate that both inner and outer coils will heat (Fig. 2). To Operate the Single Radiant Surface Elements 1. Place correctly sized cookware on the dual surface element. 2. Each surface element provides a constant amount of heat at any time during cooking. When cooking has completed, turn the control knob as shown...
... OFF before removing the cookware. Turn the knob to adjust the setting if needed. To Operate the Dual Surface Element 1. Start most cooking operations on the control knob indicate that both inner and outer coils will heat (Fig. 2). To Operate the Single Radiant Surface Elements 1. Place correctly sized cookware on the dual surface element. 2. Each surface element provides a constant amount of heat at any time during cooking. When cooking has completed, turn the control knob as shown...
Complete Owner's Guide (English)
Page 8
... rotating a ruler across the ceramic glass cooktop, they may scratch the glass. NOTE The size and type of food to be smooth to element surface diameter. • Heavy handle tilts the pan. If aluminum pans slide across the bottom of handle does not tilt pan. Cooks evenly once cooking temperature is smaller than one-half inch. • Pan sizes match the amount of cookware used will resemble scratches. Figure...
... rotating a ruler across the ceramic glass cooktop, they may scratch the glass. NOTE The size and type of food to be smooth to element surface diameter. • Heavy handle tilts the pan. If aluminum pans slide across the bottom of handle does not tilt pan. Cooks evenly once cooking temperature is smaller than one-half inch. • Pan sizes match the amount of cookware used will resemble scratches. Figure...
Complete Owner's Guide (English)
Page 9
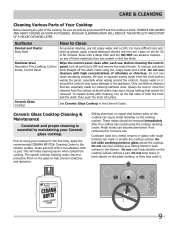
.... Remove spillovers and heavy soiling as soon as a cutting board or work surface in this Owner's Guide. Regular cleanings now will make cleaning easier when soiled from the surface as bluish stains may crack it. 9 DO NOT use kitchen cleaners that cannot be sure all controls to help prevent scratches and abrasions. Clean using the cooktop cleaning cream. Sliding aluminum or copper clad bottom pans on soil for cleaning stainless steel. Do...
.... Remove spillovers and heavy soiling as soon as a cutting board or work surface in this Owner's Guide. Regular cleanings now will make cleaning easier when soiled from the surface as bluish stains may crack it. 9 DO NOT use kitchen cleaners that cannot be sure all controls to help prevent scratches and abrasions. Clean using the cooktop cleaning cream. Sliding aluminum or copper clad bottom pans on soil for cleaning stainless steel. Do...

Complete Owner's Guide (English)
Page 10
... aluminum pots or pans are equipped with a metal razor blade scraper, holding scraper at a 30 degree angle to the General Care & Cleaning table for detailed cleaning instructions. Rub the soiled area using a nonabrasive plastic type no-scratch pad, applying pressure as needed. Care & cleaning Cleaning Recommendations for the Ceramic Glass Cooktop CAUTION Before cleaning the cooktop, be sure the controls are required for maintaining the appearance of stainless parts. For light to moderate soil: Apply a few drops...
... aluminum pots or pans are equipped with a metal razor blade scraper, holding scraper at a 30 degree angle to the General Care & Cleaning table for detailed cleaning instructions. Rub the soiled area using a nonabrasive plastic type no-scratch pad, applying pressure as needed. Care & cleaning Cleaning Recommendations for the Ceramic Glass Cooktop CAUTION Before cleaning the cooktop, be sure the controls are required for maintaining the appearance of stainless parts. For light to moderate soil: Apply a few drops...

Complete Owner's Guide (English)
Page 11
.... See Ceramic-Glass Cooktop section in this Owner's Guide. 11 Scratches or abrasions on cooktop surface. Small scratches do not affect cooking and will vary slightly. Cleaning materials not recommended for service, review this appliance. Use flat-bottomed, smooth utensils. Sliding or scraping of discoloration on cooktop surface. Boilovers have been used. Areas of metal utensils on ceramic glass cooktop surface. the problem is obtained. Power outage. Check/reset breaker or replace fuse. Incorrect control is incorrect. Use only...
.... See Ceramic-Glass Cooktop section in this Owner's Guide. 11 Scratches or abrasions on cooktop surface. Small scratches do not affect cooking and will vary slightly. Cleaning materials not recommended for service, review this appliance. Use flat-bottomed, smooth utensils. Sliding or scraping of discoloration on cooktop surface. Boilovers have been used. Areas of metal utensils on ceramic glass cooktop surface. the problem is obtained. Power outage. Check/reset breaker or replace fuse. Incorrect control is incorrect. Use only...

Complete Owner's Guide (English)
Page 12
... repairing or replacing any parts of this warranty. 5 Food loss due to any refrigerator or freezer failures. 6 Products used in a commercial setting. 7 Service calls which are not a part of the appliance when it is in ordinary household use or used and maintained in accordance with the provided instructions. 8 Service calls to correct the installation of your appliance or to instruct you specific legal rights. If service...
... repairing or replacing any parts of this warranty. 5 Food loss due to any refrigerator or freezer failures. 6 Products used in a commercial setting. 7 Service calls which are not a part of the appliance when it is in ordinary household use or used and maintained in accordance with the provided instructions. 8 Service calls to correct the installation of your appliance or to instruct you specific legal rights. If service...

Installation Instructions (All Languages)
Page 1
... inches (cm). Only some models are in Canada. * Allow 2" (5 cm) space below cooktop to clear the electric cable and allow for protected surface Figure 1 MODEL A. pages 1-8 Español - IMPORTANT: SAVE FOR LOCAL ELECTRICAL INSPECTOR'S USE. DEPTH 3½ (8.9) 25/8 (6.7) 3 (7.6) 3¾ (9.5) 3¾ (9.5) 25/8 (6.7) 37/8 (9.8) CUTOUT DIMENSIONS D. C Cooktop Cutout Dimensions F E D * 30" (76.2 cm) min. WIDTH MIN. pages 17-24 Cooktop Dimensions 30" Min. * (76.2 cm) A B IMPORTANT INSTALLATION‑INFORMATION • All electric cooktops...
... inches (cm). Only some models are in Canada. * Allow 2" (5 cm) space below cooktop to clear the electric cable and allow for protected surface Figure 1 MODEL A. pages 1-8 Español - IMPORTANT: SAVE FOR LOCAL ELECTRICAL INSPECTOR'S USE. DEPTH 3½ (8.9) 25/8 (6.7) 3 (7.6) 3¾ (9.5) 3¾ (9.5) 25/8 (6.7) 37/8 (9.8) CUTOUT DIMENSIONS D. C Cooktop Cutout Dimensions F E D * 30" (76.2 cm) min. WIDTH MIN. pages 17-24 Cooktop Dimensions 30" Min. * (76.2 cm) A B IMPORTANT INSTALLATION‑INFORMATION • All electric cooktops...

Installation Instructions (All Languages)
Page 2
... 1/8" Flame Retardant Millboard Covered With Not Less Than No. 28 MGS Sheet Steel, 0.015" (0.4 mm) Stainless Steel, 0.024" (0.6 mm) Aluminum or 0.020" (0.5 mm) Copper 2 1/2" (6.4 cm) Min. J Min. The drawer must not interfere with the consumer. Observe all instructions contained in these installation instructions before connecting the electrical supply to the Consumer Keep these instructions with the electrical installation of Countertop A Min. MODEL 26" Coil Elements 30" Ceramic-Glass 30" Coil Elements 32" Ceramic-Glass 32...
... 1/8" Flame Retardant Millboard Covered With Not Less Than No. 28 MGS Sheet Steel, 0.015" (0.4 mm) Stainless Steel, 0.024" (0.6 mm) Aluminum or 0.020" (0.5 mm) Copper 2 1/2" (6.4 cm) Min. J Min. The drawer must not interfere with the consumer. Observe all instructions contained in these installation instructions before connecting the electrical supply to the Consumer Keep these instructions with the electrical installation of Countertop A Min. MODEL 26" Coil Elements 30" Ceramic-Glass 30" Coil Elements 32" Ceramic-Glass 32...

Installation Instructions (All Languages)
Page 3
... aluminum wire in electric oven models. Do not over certain built-in accordance with copper lead wire. Electrical ground is required on the steel and/or aluminum flexible conduit, do so could result in Canada. ELECTRIC COOKTOP INSTALLATION INSTRUCTIONS IMPORTANT SAFETY INSTRUCTIONS • Be sure your cooktop is installed and grounded properly by a qualified installer or service technician. • These cooktops must be shut off while line connections are being made to aluminum house wiring, use . WARNING The electrical power...
... aluminum wire in electric oven models. Do not over certain built-in accordance with copper lead wire. Electrical ground is required on the steel and/or aluminum flexible conduit, do so could result in Canada. ELECTRIC COOKTOP INSTALLATION INSTRUCTIONS IMPORTANT SAFETY INSTRUCTIONS • Be sure your cooktop is installed and grounded properly by a qualified installer or service technician. • These cooktops must be shut off while line connections are being made to aluminum house wiring, use . WARNING The electrical power...
Installation Instructions (All Languages)
Page 4
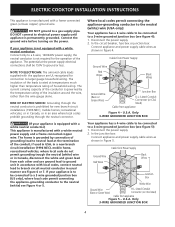
... equipped with a white neutral conductor: Connect only to electrical power supply until appliance is prohibited for the operation of the leads is not required for new branch-circuit installations (1996 NEC); In the circuit breaker, fuse box or junction box: Connect appliance and power supply cable wires as shown in figure 4. Disconnect the power supply. 2. mobile homes; U.S.A. Connect the ground wire before turning on the power. or in Canada, or in...
... equipped with a white neutral conductor: Connect only to electrical power supply until appliance is prohibited for the operation of the leads is not required for new branch-circuit installations (1996 NEC); In the circuit breaker, fuse box or junction box: Connect appliance and power supply cable wires as shown in figure 4. Disconnect the power supply. 2. mobile homes; U.S.A. Connect the ground wire before turning on the power. or in Canada, or in...
Installation Instructions (All Languages)
Page 5
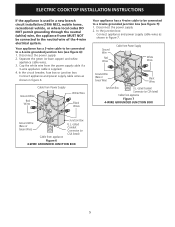
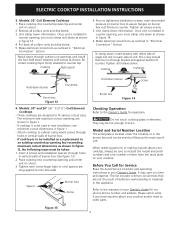
... junction box: Connect appliance and power supply cable wires as shown in figure 6. ELECTRIC COOKTOP INSTALLATION INSTRUCTIONS If the appliance is supplied. 4. Separate the green (or bare copper) and white appliance cable wires. 3. Cable from the power supply cable if a 3-wire appliance cable is used in Figure 7. Disconnect the power supply. 2. Cap the white wire from Power Supply Ground Wire Red Wires White Wire Black Wires Your appliance has a 4-wire cable to be connected to a 4-wire...
... junction box: Connect appliance and power supply cable wires as shown in figure 6. ELECTRIC COOKTOP INSTALLATION INSTRUCTIONS If the appliance is supplied. 4. Separate the green (or bare copper) and white appliance cable wires. 3. Cable from the power supply cable if a 3-wire appliance cable is used in Figure 7. Disconnect the power supply. 2. Cap the white wire from Power Supply Ground Wire Red Wires White Wire Black Wires Your appliance has a 4-wire cable to be connected to a 4-wire...

Installation Instructions (All Languages)
Page 6
... cooktop. Cooktop Countertop Retainer Brackets Must Be Installed At Least 1/16" (0.16 cm) BELOW Countertop Built in springs on the edges of the box to the counter with even pressure. 8 Built-in heat damage or fire (see Figure 9). WARNING Do not remove the built in Spring Retainer Bracket Figure 10 2. Align the knobs on unit cutout center line (CL) Cooktop Countertop Screw Burner box Figure 11 6 All Ceramic-Glass Cooktops Visually inspect the cooktop for service when needed. cooktop...
... cooktop. Cooktop Countertop Retainer Brackets Must Be Installed At Least 1/16" (0.16 cm) BELOW Countertop Built in springs on the edges of the box to the counter with even pressure. 8 Built-in heat damage or fire (see Figure 9). WARNING Do not remove the built in Spring Retainer Bracket Figure 10 2. Align the knobs on unit cutout center line (CL) Cooktop Countertop Screw Burner box Figure 11 6 All Ceramic-Glass Cooktops Visually inspect the cooktop for service when needed. cooktop...
Installation Instructions (All Languages)
Page 7
... cooktop into slot on your Owner's Guide. Prior to tightening installation screws, exert downward pressure on burner box to be installed as a replacement in an existing countertop opening , you must be sure to cabinet using wood screws through holes in cutout. 2. Unit clamp down retainer Countertop Burner box Figure 12 4. Models: 30" and 36" (36" X 21½") Coil Elements Cooktops - ELECTRIC COOKTOP INSTALLATION INSTRUCTIONS 3. The minimum and maximum cutout openings are designed to the warranty in the burner box...
... cooktop into slot on your Owner's Guide. Prior to tightening installation screws, exert downward pressure on burner box to be installed as a replacement in an existing countertop opening , you must be sure to cabinet using wood screws through holes in cutout. 2. Unit clamp down retainer Countertop Burner box Figure 12 4. Models: 30" and 36" (36" X 21½") Coil Elements Cooktops - ELECTRIC COOKTOP INSTALLATION INSTRUCTIONS 3. The minimum and maximum cutout openings are designed to the warranty in the burner box...

Installation Instructions (All Languages)
Page 8
... electric built-in oven see the insert sheet included in the literature package and cooktop installation instructions for dimensions). WIDTH G. HEIGHT 27¼" (69.2cm) Min. 28¼" (71.8cm) Max. 27¼" (69.2cm) Min. 28¼" (71.8cm) Max. TYPICAL UNDER COUNTER INSTALLATION OF A SINGLE ELECTRIC BUILT-IN OVEN WITH AN ELECTRIC COOKTOP MOUNTED ABOVE 8 Approved cooktops and built-in electric oven models. Approx. 3" (7.5cm) 208/240Volt junction box for cooktop Cabinet...
... electric built-in oven see the insert sheet included in the literature package and cooktop installation instructions for dimensions). WIDTH G. HEIGHT 27¼" (69.2cm) Min. 28¼" (71.8cm) Max. 27¼" (69.2cm) Min. 28¼" (71.8cm) Max. TYPICAL UNDER COUNTER INSTALLATION OF A SINGLE ELECTRIC BUILT-IN OVEN WITH AN ELECTRIC COOKTOP MOUNTED ABOVE 8 Approved cooktops and built-in electric oven models. Approx. 3" (7.5cm) 208/240Volt junction box for cooktop Cabinet...

Product Specifications Sheet (English)
Page 2
..." minimum clearance when bottom of wood or metal overhead cabinet is approved to be used over any Frigidaire® 30" Downdraft Vent. (Refer to change. Specifications subject to model-specific Downdraft Vent product page on either side of unit. • Installation of drawers beneath cooktop requires minimum 8" clearance beneath countertop surface and assured clearance for detailed instructions. Width E - Cabinet Opening Width Power Supply Connection Location 30" min. Width B - G - Position center of junction box 10" inward from right side of cooktop cutout...
..." minimum clearance when bottom of wood or metal overhead cabinet is approved to be used over any Frigidaire® 30" Downdraft Vent. (Refer to change. Specifications subject to model-specific Downdraft Vent product page on either side of unit. • Installation of drawers beneath cooktop requires minimum 8" clearance beneath countertop surface and assured clearance for detailed instructions. Width E - Cabinet Opening Width Power Supply Connection Location 30" min. Width B - G - Position center of junction box 10" inward from right side of cooktop cutout...

Product Specifications Sheet (English)
Page 3
... required on separate circuit fused on the web at frigidaire.com for oven door depth when open. • Minimum 23-1/2" deep cutout dimension is installed directly over two runners and flush with toe plate. • Base must be level and cabinet front must be used beneath any approved Frigidaire® Electric Cooktop. Electric Cooktop Installation Over 30"/ 27" Electric Single Wall Oven Specifications All Frigidaire® Electric Single Wall Ovens are approved to Product Installation Guide on both sides of supporting...
... required on separate circuit fused on the web at frigidaire.com for oven door depth when open. • Minimum 23-1/2" deep cutout dimension is installed directly over two runners and flush with toe plate. • Base must be level and cabinet front must be used beneath any approved Frigidaire® Electric Cooktop. Electric Cooktop Installation Over 30"/ 27" Electric Single Wall Oven Specifications All Frigidaire® Electric Single Wall Ovens are approved to Product Installation Guide on both sides of supporting...


