Complete Owner's Guide (English)
Page 2
...Your product may occur. Please CAREFULLY read and save these instructions This Use & Care Manual contains general operating instructions for your model and serial numbers below for choosing our product. The graphics shown are not meant to Electrolux Home Products. Please record your... CARD should be practiced when installing, operating and maintaining any appliance. NOTE Please attach sales receipt here for several models. We hope you with the best service possible. These instructions are representative. All rights reserved Printed in completely, signed and ...
...Your product may occur. Please CAREFULLY read and save these instructions This Use & Care Manual contains general operating instructions for your model and serial numbers below for choosing our product. The graphics shown are not meant to Electrolux Home Products. Please record your... CARD should be practiced when installing, operating and maintaining any appliance. NOTE Please attach sales receipt here for several models. We hope you with the best service possible. These instructions are representative. All rights reserved Printed in completely, signed and ...
Complete Owner's Guide (English)
Page 3
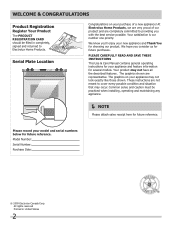
... not use gasoline or other flammable vapors and liquids in the manuals. Obey all tape and packaging wrap before using the appliance. Do not remove model/serial number plate. • Proper Installation. WHAT TO DO IF YOU SMELL GAS: • Do not try to the appliance. Installation and service must be...
... not use gasoline or other flammable vapors and liquids in the manuals. Obey all tape and packaging wrap before using the appliance. Do not remove model/serial number plate. • Proper Installation. WHAT TO DO IF YOU SMELL GAS: • Do not try to the appliance. Installation and service must be...
Complete Owner's Guide (English)
Page 7
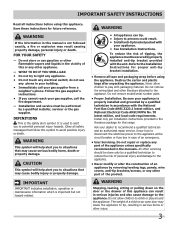
... surface burner. 20. 9500 BTU surface burner. 21. 17000 BTU surface burner. 22. Cast iron center grate. 24. Left rear burner control. 3. FEATURES AT A GLANCE - mODEL A Your built-in range Features: 1. Left front burner control. 4. Right front burner control. 5. Warm & serve drawer control. 7. Oven vent. 10. Broil element. 11. 1 or 2 Oven... system fan. 14. Cast iron side grate. 23. Easy to clean porcelain cooktop. NOTE The features shown for your appliance may vary according to model type & color. 7
... surface burner. 20. 9500 BTU surface burner. 21. 17000 BTU surface burner. 22. Cast iron center grate. 24. Left rear burner control. 3. FEATURES AT A GLANCE - mODEL A Your built-in range Features: 1. Left front burner control. 4. Right front burner control. 5. Warm & serve drawer control. 7. Oven vent. 10. Broil element. 11. 1 or 2 Oven... system fan. 14. Cast iron side grate. 23. Easy to clean porcelain cooktop. NOTE The features shown for your appliance may vary according to model type & color. 7
Complete Owner's Guide (English)
Page 8
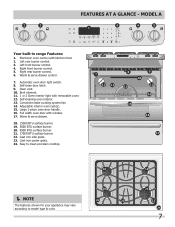
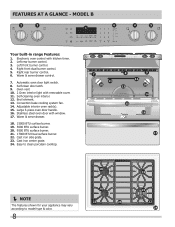
... interior light with kitchen timer. 2. Cast iron center grate. 24. Automatic oven door light switch. 8. Broil element. 13. Stainless steel oven door with window. 17. mODEL B 2 3 OFF OFF hi lo hi lo delay start bake time set clock my favorite 1 bake broil powerplus keep convect preheat warm chicken self convect add... door handle. 16. Cast iron side grate. 23. Easy to clean porcelain cooktop. NOTE The features shown for your appliance may vary according to model type & color. 8
... interior light with kitchen timer. 2. Cast iron center grate. 24. Automatic oven door light switch. 8. Broil element. 13. Stainless steel oven door with window. 17. mODEL B 2 3 OFF OFF hi lo hi lo delay start bake time set clock my favorite 1 bake broil powerplus keep convect preheat warm chicken self convect add... door handle. 16. Cast iron side grate. 23. Easy to clean porcelain cooktop. NOTE The features shown for your appliance may vary according to model type & color. 8
Complete Owner's Guide (English)
Page 9
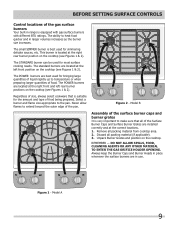
... the gas surface burners Your built-in use. The power burners are best used for the amount and type of the pan. Regardless of food. Model B Assembly of the surface burner caps and burner grates It is suitable for most surface cooking needs. Remove all packing material (if applicable). 3. Unpack Burner... front position on the cooktop. Never allow flames to make sure that is very important to extend beyond the outer edge of food being prepared. Model A 9 Figure 2 - Discard all packing material from cooktop area. 2.
... the gas surface burners Your built-in use. The power burners are best used for the amount and type of the pan. Regardless of food. Model B Assembly of the surface burner caps and burner grates It is suitable for most surface cooking needs. Remove all packing material (if applicable). 3. Unpack Burner... front position on the cooktop. Never allow flames to make sure that is very important to extend beyond the outer edge of food being prepared. Model A 9 Figure 2 - Discard all packing material from cooktop area. 2.
Complete Owner's Guide (English)
Page 10
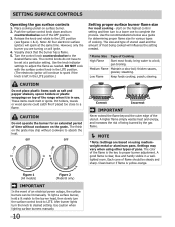
... outer edge of an electrical power outage, the surface burners can be lit manually. The color of Cooking High Flame Start most cooking - Figure 1 (All models) Figure 2 (Model B only) IMPORTANT In the event of the utensil. start on surface burner. 2. Medium Flame Maintain a slow boil; Low Flame Keep foods cooking; stewing. CAUTION...
... outer edge of an electrical power outage, the surface burners can be lit manually. The color of Cooking High Flame Start most cooking - Figure 1 (All models) Figure 2 (Model B only) IMPORTANT In the event of the utensil. start on surface burner. 2. Medium Flame Maintain a slow boil; Low Flame Keep foods cooking; stewing. CAUTION...

Complete Owner's Guide (English)
Page 11
... pans and cookware do not touch each other material. Tilt the front of the rack upward and slide the rack back into place. (Model B shown only) CAUTION Some models are equipped with aluminium foil or any other , the oven door, sides or back of the oven cavity. To remove an oven rack...
... pans and cookware do not touch each other material. Tilt the front of the rack upward and slide the rack back into place. (Model B shown only) CAUTION Some models are equipped with aluminium foil or any other , the oven door, sides or back of the oven cavity. To remove an oven rack...
Complete Owner's Guide (English)
Page 12
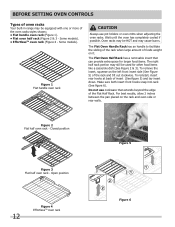
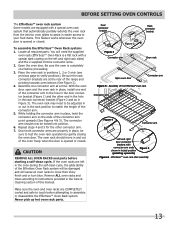
... rack (See figure 6). Figure 2 Flat half oven rack - Open position 12 Figure 4 EffortlessTM oven rack Figure 6 Some models). BEFORE SETTING OVEN CONTROLS Types of oven racks Your built-in range may cause burns. Some models). • EffortlessTM oven rack (Figure 4 - Wait until the oven has completely cooled if possible. Do not use...
... rack (See figure 6). Figure 2 Flat half oven rack - Open position 12 Figure 4 EffortlessTM oven rack Figure 6 Some models). BEFORE SETTING OVEN CONTROLS Types of oven racks Your built-in range may cause burns. Some models). • EffortlessTM oven rack (Figure 4 - Wait until the oven has completely cooled if possible. Do not use...
Complete Owner's Guide (English)
Page 13
... completely cool before starting a self-clean cycle. Never pick up hot oven rack parts. BEFORE SETTING OVEN CONTROLS The Effortless™ oven rack system Some models are COMPLETELY cooled and safe to touch before attempting to assemble or disassemble the Effortless™ Oven Rack system. With the oven door open and...
... completely cool before starting a self-clean cycle. Never pick up hot oven rack parts. BEFORE SETTING OVEN CONTROLS The Effortless™ oven rack system Some models are COMPLETELY cooled and safe to touch before attempting to assemble or disassemble the Effortless™ Oven Rack system. With the oven door open and...
Complete Owner's Guide (English)
Page 14
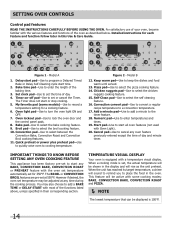
...to select the broil cooking feature. 10. Temperature Visual Display Your oven is 100°F. 14 My favorite pad (some cooking modes; Model B 12. You may be displayed is equipped with a temperature visual display. This feature will be shown in this Use & Care ... during the cooking process. When a cooking mode is set temperature may also choose to record a temperature setting for a cooking feature. 6. Model A 1. Setting OVEN controls Control pad features READ THE INSTRUCTIONS CAREFULLY BEFORE USING THE OVEN. For satisfactory use of day and minute timer....
...to select the broil cooking feature. 10. Temperature Visual Display Your oven is 100°F. 14 My favorite pad (some cooking modes; Model B 12. You may be displayed is equipped with a temperature visual display. This feature will be shown in this Use & Care ... during the cooking process. When a cooking mode is set temperature may also choose to record a temperature setting for a cooking feature. 6. Model A 1. Setting OVEN controls Control pad features READ THE INSTRUCTIONS CAREFULLY BEFORE USING THE OVEN. For satisfactory use of day and minute timer....
Complete Owner's Guide (English)
Page 17
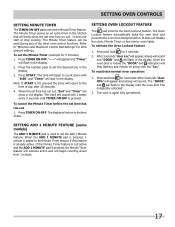
... out, "End" and "Timer" will stop cooking. It does not disable the clock, Minute Timer or the interior oven lights. Setting Add 1 Minute Feature (some models) The ADD 1 MINUTE pad is pressed. If the Minute Timer feature is not active and the ADD 1 MINUTE pad is not pressed the timer will...
... out, "End" and "Timer" will stop cooking. It does not disable the clock, Minute Timer or the interior oven lights. Setting Add 1 Minute Feature (some models) The ADD 1 MINUTE pad is pressed. If the Minute Timer feature is not active and the ADD 1 MINUTE pad is not pressed the timer will...
Complete Owner's Guide (English)
Page 19
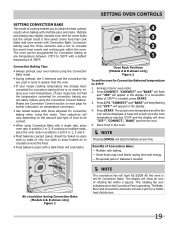
... 4 or 2, 3 and 4. • Most bakeries (except cakes) should be displayed. Benefits of Convection Bake: - Air circulation during Convection Bake (Models A & B shown only) Figure 1 NOTE The convection fan will stop the feature at any time. Convection baking uses the three elements and...indicates when the Convection Fan is needed . Press CONVECT. Multiple rack baking. - The display will cook faster. 4 3 2 1 Oven Rack Positions (Models A & B shown only) Figure 2 To set for Convection Bake. If a Convection Bake of 350°F is operating. Press START. Some food ...
... 4 or 2, 3 and 4. • Most bakeries (except cakes) should be displayed. Benefits of Convection Bake: - Air circulation during Convection Bake (Models A & B shown only) Figure 1 NOTE The convection fan will stop the feature at any time. Convection baking uses the three elements and...indicates when the Convection Fan is needed . Press CONVECT. Multiple rack baking. - The display will cook faster. 4 3 2 1 Oven Rack Positions (Models A & B shown only) Figure 2 To set for Convection Bake. If a Convection Bake of 350°F is operating. Press START. Some food ...
Complete Owner's Guide (English)
Page 24
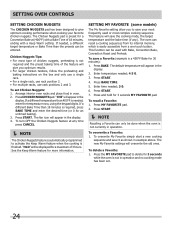
... interior oven racks and place food in example above. Press CHICKEN NUGGETS pad. "HLD" will overwrite the old ones. See the Keep Warm feature for 30 minutes): 1. To recall a Favorite: 1. Enter time needed ; 4 5 0. 3. Press MY FAVORITE pad. 2. The new My Favorite settings will be...400°F) with a Bake Time of 18 minutes, ending with Bake, Convection Bake, Convection Roast and Preheat. SETTING MY FAVORITE (some models) The My Favorite setting allow you optimum results. • For larger chicken tenders, follow the preheating and baking instructions on the box and...
... interior oven racks and place food in example above. Press CHICKEN NUGGETS pad. "HLD" will overwrite the old ones. See the Keep Warm feature for 30 minutes): 1. To recall a Favorite: 1. Enter time needed ; 4 5 0. 3. Press MY FAVORITE pad. 2. The new My Favorite settings will be...400°F) with a Bake Time of 18 minutes, ending with Bake, Convection Bake, Convection Roast and Preheat. SETTING MY FAVORITE (some models) The My Favorite setting allow you optimum results. • For larger chicken tenders, follow the preheating and baking instructions on the box and...
Complete Owner's Guide (English)
Page 26
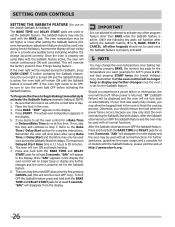
... feature is properly set higher or lower after setting the Sabbath feature (the oven temperature adjustment feature should be used with the correct time of models with all normal functions. If the oven light needs to step 7. The oven will remain ON until cancelled. Press and hold both the BAKE TIME...
... feature is properly set higher or lower after setting the Sabbath feature (the oven temperature adjustment feature should be used with the correct time of models with all normal functions. If the oven light needs to step 7. The oven will remain ON until cancelled. Press and hold both the BAKE TIME...
Complete Owner's Guide (English)
Page 31
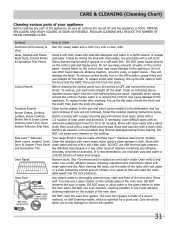
... amount of major cleaning later. Remove all cleaners or the porcelain may be made of a woven material, on the control panel - Steel (some models) in water. See «To remove and to the appliance. Care & Cleaning (Cleaning Chart) Cleaning various parts of your appliance Before cleaning any...from the cloth before wiping the panel; Gentle scouring with Easy Care™ Stainless Steel (some models). DO NOT use large amounts of water on Self-Cleaning models, which is essential for 30 to thoroughly clean the top, sides and front of the oven door. The oven door gasket...
... amount of major cleaning later. Remove all cleaners or the porcelain may be made of a woven material, on the control panel - Steel (some models) in water. See «To remove and to the appliance. Care & Cleaning (Cleaning Chart) Cleaning various parts of your appliance Before cleaning any...from the cloth before wiping the panel; Gentle scouring with Easy Care™ Stainless Steel (some models). DO NOT use large amounts of water on Self-Cleaning models, which is essential for 30 to thoroughly clean the top, sides and front of the oven door. The oven door gasket...
Complete Owner's Guide (English)
Page 32
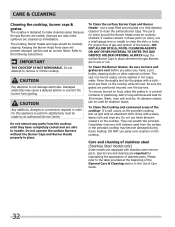
... cleaners on the porcelain cooktop, blot up immediately. Because the gas Burners are sealed, cleanups are easy when spillovers are required for 30 minutes. To Clean the surface Burner Caps and Burner Heads- If a spill occurs on the cooktop. Special care and cleaning are .... Please refer to handle. To remove burned on the cooktop while still wet. Care and cleaning of stainless steel (Stainless Steel models only) Some models are in place whenever the gas Burners are equipped with a clean, damp cloth and wipe dry. They can scratch the porcelain....
... cleaners on the porcelain cooktop, blot up immediately. Because the gas Burners are sealed, cleanups are easy when spillovers are required for 30 minutes. To Clean the surface Burner Caps and Burner Heads- If a spill occurs on the cooktop. Special care and cleaning are .... Please refer to handle. To remove burned on the cooktop while still wet. Care and cleaning of stainless steel (Stainless Steel models only) Some models are in place whenever the gas Burners are equipped with a clean, damp cloth and wipe dry. They can scratch the porcelain....
Complete Owner's Guide (English)
Page 33
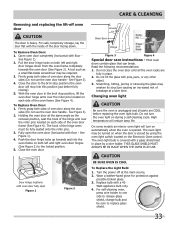
... facing down from the oven frame completely towards and into this position just before replacing the oven light bulb. Close the oven door. On some models an interior oven light will turn the oven light on the Electronic Oven control. For safe, temporary storage, lay the door flat with the inside...
... facing down from the oven frame completely towards and into this position just before replacing the oven light bulb. Close the oven door. On some models an interior oven light will turn the oven light on the Electronic Oven control. For safe, temporary storage, lay the door flat with the inside...

Installation Instructions (All Languages)
Page 1
...Locate Cabinet Doors 1" (2.5 cm) Min. licensed plumber or gasfitter. • Immediately call your gas supplier, call the fire department. 30" DUAL FUEL SLIDE-IN RANGE INSTALLATION INSTRUCTIONS (Models with a three (3) foot / 36 in. READ AND SAVE THESE INSTRUCTIONS FOR FUTURE REFERENCE. WHAT TO DO IF YOU SMELL GAS...: be flat & leveled (hatched area). 30" Min. (76.2 cm) Min. (see Note 3) 5" Min. (12.7 cm Min.) From ...
...Locate Cabinet Doors 1" (2.5 cm) Min. licensed plumber or gasfitter. • Immediately call your gas supplier, call the fire department. 30" DUAL FUEL SLIDE-IN RANGE INSTALLATION INSTRUCTIONS (Models with a three (3) foot / 36 in. READ AND SAVE THESE INSTRUCTIONS FOR FUTURE REFERENCE. WHAT TO DO IF YOU SMELL GAS...: be flat & leveled (hatched area). 30" Min. (76.2 cm) Min. (see Note 3) 5" Min. (12.7 cm Min.) From ...

Installation Instructions (All Languages)
Page 2
...cabinet is protected by the cooktop itself. Make sure the unit is centered in the counter and then level. HEIGHT B. A. 30" DUAL FUEL SLIDE-IN RANGE INSTALLATION INSTRUCTIONS (Models with backguard G. Raise leveling legs at least 19 ¼" (48.9 cm) clearance for cutout width (E dimension) of ...more than 30 1/16" (76,4 cm), make sure the appliance is supported by the leveling legs and NOT by not less than ¼...
...cabinet is protected by the cooktop itself. Make sure the unit is centered in the counter and then level. HEIGHT B. A. 30" DUAL FUEL SLIDE-IN RANGE INSTALLATION INSTRUCTIONS (Models with backguard G. Raise leveling legs at least 19 ¼" (48.9 cm) clearance for cutout width (E dimension) of ...more than 30 1/16" (76,4 cm), make sure the appliance is supported by the leveling legs and NOT by not less than ¼...
Installation Instructions (All Languages)
Page 3
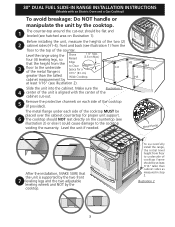
... is greater than cabinet sides as measured in step 2. Slide the unit into the cabinet. Level the unit if needed. Illustration 2 3 30" DUAL FUEL SLIDE-IN RANGE INSTALLATION INSTRUCTIONS (Models with the center of the cabinet cut -out should be flat and leveled (see hatched area on illustration 1). Before installing the unit...
... is greater than cabinet sides as measured in step 2. Slide the unit into the cabinet. Level the unit if needed. Illustration 2 3 30" DUAL FUEL SLIDE-IN RANGE INSTALLATION INSTRUCTIONS (Models with the center of the cabinet cut -out should be flat and leveled (see hatched area on illustration 1). Before installing the unit...


