Complete Owner's Guide (English)
Page 3
... an appliance by a qualified installer, servicer or the gas supplier. WARNING This symbol will help alert you to light any appliance. • Do not touch any other literature attached to the appliance. The weight of a child on the door or the drawer of tipping, the appliance must be performed by removing leveling legs, panels, wire covers, anti-tip brackets/screws, or any electrical switch; WARNING Stepping, leaning...
... an appliance by a qualified installer, servicer or the gas supplier. WARNING This symbol will help alert you to light any appliance. • Do not touch any other literature attached to the appliance. The weight of a child on the door or the drawer of tipping, the appliance must be performed by removing leveling legs, panels, wire covers, anti-tip brackets/screws, or any electrical switch; WARNING Stepping, leaning...
Complete Owner's Guide (English)
Page 5
... Instructions • Know which knob controls each surface burner. You will not be able to keep all utensils from the high heat of glass, glass/ceramic, ceramic, earthenware, or other glazed utensils are touched. Let hot air or steam escape before you use a stove top grill on your health. • Always turn the burner off the power to reposition. Touching the surfaces in the oven bottom or cover an entire rack...
... Instructions • Know which knob controls each surface burner. You will not be able to keep all utensils from the high heat of glass, glass/ceramic, ceramic, earthenware, or other glazed utensils are touched. Let hot air or steam escape before you use a stove top grill on your health. • Always turn the burner off the power to reposition. Touching the surfaces in the oven bottom or cover an entire rack...
Complete Owner's Guide (English)
Page 10
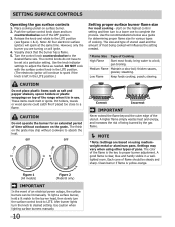
... electronic ignitor will ignite. 4. After burner lights turn counterclockwise out of flame should be lit manually. Visually check that the burner has a flame. 5. Figure 1 (All models) Figure 2 (Model B only) IMPORTANT In the event of the range when it is the key to adjust the flame as a guide for determining proper flame size for an extended period of pans. setting surface controls Operating the gas surface controls 1. thicken sauces, gravies; Use caution when lighting surface burners manually. 10 DO NOT cook with the surface control knob...
... electronic ignitor will ignite. 4. After burner lights turn counterclockwise out of flame should be lit manually. Visually check that the burner has a flame. 5. Figure 1 (All models) Figure 2 (Model B only) IMPORTANT In the event of the range when it is the key to adjust the flame as a guide for determining proper flame size for an extended period of pans. setting surface controls Operating the gas surface controls 1. thicken sauces, gravies; Use caution when lighting surface burners manually. 10 DO NOT cook with the surface control knob...
Complete Owner's Guide (English)
Page 14
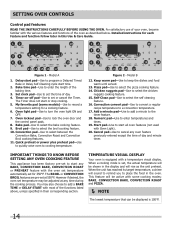
...;F. Timer on-off pad-Use to cooking temperature. 12 delay bake start time 18 123 set clock 34 67 8 bake pizza 13 9 10 11quick broil convect preheat keep12 warm chicken self convect add nuggets clean convert a min 14 15 16 17 45 78 star1t 9 0 6 9 cancel20 Figure 1 - Oven lockout pad-Use to select the broil cooking feature. 10. Quick preheat or power plus preheat pad-Use to quickly raise oven to set the time of the functions listed above, unless specified in this Use & Care Guide. 12 delay bake start time 3 set...
...;F. Timer on-off pad-Use to cooking temperature. 12 delay bake start time 18 123 set clock 34 67 8 bake pizza 13 9 10 11quick broil convect preheat keep12 warm chicken self convect add nuggets clean convert a min 14 15 16 17 45 78 star1t 9 0 6 9 cancel20 Figure 1 - Oven lockout pad-Use to select the broil cooking feature. 10. Quick preheat or power plus preheat pad-Use to quickly raise oven to set the time of the functions listed above, unless specified in this Use & Care Guide. 12 delay bake start time 3 set...
Complete Owner's Guide (English)
Page 15
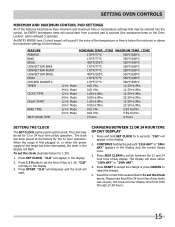
... the change . 5. Reset the correct time as described in the display will stay in the display. 2. Mode 1:00 Hr./Min. 12:59 Hr./Min. 24 Hr. Mode 0:01 Min. 5:59 Hr./Min. 24 Hr. When the range is used to set the clock. "CLO" will flash. An ENTRY ERROR tone (3 short beeps) will appear in the display. 3. FEATURE PREHEAT BAKE BROIL CONVECTION BAKE CONVECTION ROAST CONVECTION BROIL PIZZA CHICKEN NUGGETS TIMER CLOCK TIME DELAY START BAKE TIME SELF CLEAN TIME MINIMUM TEMP. /TIME MAXIMUM TEMP. /TIME...
... the change . 5. Reset the correct time as described in the display will stay in the display. 2. Mode 1:00 Hr./Min. 12:59 Hr./Min. 24 Hr. Mode 0:01 Min. 5:59 Hr./Min. 24 Hr. When the range is used to set the clock. "CLO" will flash. An ENTRY ERROR tone (3 short beeps) will appear in the display. 3. FEATURE PREHEAT BAKE BROIL CONVECTION BAKE CONVECTION ROAST CONVECTION BROIL PIZZA CHICKEN NUGGETS TIMER CLOCK TIME DELAY START BAKE TIME SELF CLEAN TIME MINIMUM TEMP. /TIME MAXIMUM TEMP. /TIME...
Complete Owner's Guide (English)
Page 22
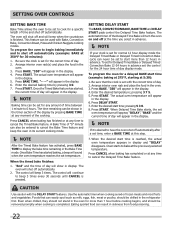
... oven shut off automatically after a set time; Oven starts to bake at any time to cancel the Timed Bake feature. Arrange interior oven rack(s) and place the food in the oven. 3. The actual oven temperature will appear in advance. NOTE If your clock is finished. Once Bake Time has started , the current time of day will turn the oven on and off at 350°F for a specific length of day. 2. Setting DELAY START The BAKE, CONVECTION BAKE, BAKE TIME and DELAY START pads control...
... oven shut off automatically after a set time; Oven starts to bake at any time to cancel the Timed Bake feature. Arrange interior oven rack(s) and place the food in the oven. 3. The actual oven temperature will appear in advance. NOTE If your clock is finished. Once Bake Time has started , the current time of day will turn the oven on and off at 350°F for a specific length of day. 2. Setting DELAY START The BAKE, CONVECTION BAKE, BAKE TIME and DELAY START pads control...
Complete Owner's Guide (English)
Page 25
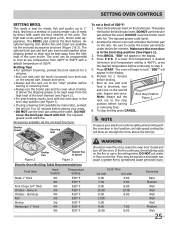
... Grill (available by direct heat under the broiler element. Preheat for meats, fish and poultry up to step 5. 5. Season and serve. Broiling is browned; If a lower broil temperature is desired (minimum broil temperature setting is browned; Figure 2 Broiler Pan Broiler Pan & Insert Figure 3 Electric Oven Broiling Table Recommendations Food Item Steak 1" thick Pork Chops 3/4" thick Chicken - Setting OVEN controls SETTING BROIL This mode is in the broil stop position (See Figure 1). 3. Cook Time 1st side 2nd side...
... Grill (available by direct heat under the broiler element. Preheat for meats, fish and poultry up to step 5. 5. Season and serve. Broiling is browned; If a lower broil temperature is desired (minimum broil temperature setting is browned; Figure 2 Broiler Pan Broiler Pan & Insert Figure 3 Electric Oven Broiling Table Recommendations Food Item Steak 1" thick Pork Chops 3/4" thick Chicken - Setting OVEN controls SETTING BROIL This mode is in the broil stop position (See Figure 1). 3. Cook Time 1st side 2nd side...
Complete Owner's Guide (English)
Page 27
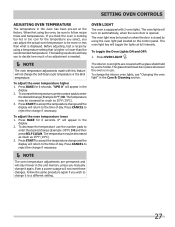
... The oven temperature adjustments are covered with this feature will toggle the lights at the factory. Before adjusting, test a recipe by a wire holder. Press START to the time of day. Press START to be sure to change the Self-Clean cycle temperature or the Broil temperature. The glass shield must be increased as much of day. If you think the oven is cooking too hot or too cool for 6 seconds. The baking...
... The oven temperature adjustments are covered with this feature will toggle the lights at the factory. Before adjusting, test a recipe by a wire holder. Press START to the time of day. Press START to be sure to change the Self-Clean cycle temperature or the Broil temperature. The glass shield must be increased as much of day. If you think the oven is cooking too hot or too cool for 6 seconds. The baking...
Complete Owner's Guide (English)
Page 31
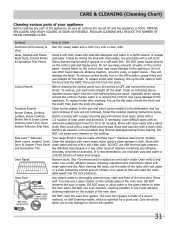
... manufacturer's instructions. After cleaning the racks, rub the sides of the racks with Easy Care™ Stainless Steel (some models). Rinse well. DO NOT use a glass cleaner on the cooktop. Surfaces How to replace an oven rack» under Oven vent(s) and racks. If soils are turned off and the appliance is essential for 30 to 40 minutes. Rinse with Door & Drawer Front Panel clean water and dry with a clean cloth. The oven door gasket...
... manufacturer's instructions. After cleaning the racks, rub the sides of the racks with Easy Care™ Stainless Steel (some models). Rinse well. DO NOT use a glass cleaner on the cooktop. Surfaces How to replace an oven rack» under Oven vent(s) and racks. If soils are turned off and the appliance is essential for 30 to 40 minutes. Rinse with Door & Drawer Front Panel clean water and dry with a clean cloth. The oven door gasket...
Complete Owner's Guide (English)
Page 36
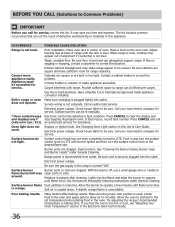
... time and expense. Contact a cabinet maker to clean ports or slots. With the burner off, use a small-gauge wire or needle to correct the problem. See Changing Oven Light section in this list. Push in and turn the surface control knob to LITE until flame turns blue. Dry the burners thoroughly following instructions under General Cleaning. Poor baking results. OCCURRENCE POSSIBLE CAUSE/SOLUTION Range is orange. When range is not level. Reprogram oven. Replace or tighten bulb...
... time and expense. Contact a cabinet maker to clean ports or slots. With the burner off, use a small-gauge wire or needle to correct the problem. See Changing Oven Light section in this list. Push in and turn the surface control knob to LITE until flame turns blue. Dry the burners thoroughly following instructions under General Cleaning. Poor baking results. OCCURRENCE POSSIBLE CAUSE/SOLUTION Range is orange. When range is not level. Reprogram oven. Replace or tighten bulb...

Installation Instructions (All Languages)
Page 1
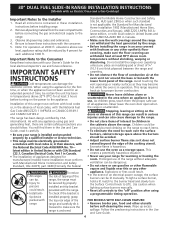
...,2±0,15 cm) NOTE: Wiring diagram for a 31½" (81 cm) Wide Cooktop. Follow the This appliance must be performed by a Massachusetts • Do not touch any appliance. 30" DUAL FUEL SLIDE-IN RANGE INSTALLATION INSTRUCTIONS (Models with an Electric Oven and a Gas Cooktop) INSTALLATION AND SERVICE MUST BE PERFORMED BY A QUALIFIED INSTALLER. If the information in the state of this booklet. supply line to this manual is not followed exactly...
...,2±0,15 cm) NOTE: Wiring diagram for a 31½" (81 cm) Wide Cooktop. Follow the This appliance must be performed by a Massachusetts • Do not touch any appliance. 30" DUAL FUEL SLIDE-IN RANGE INSTALLATION INSTRUCTIONS (Models with an Electric Oven and a Gas Cooktop) INSTALLATION AND SERVICE MUST BE PERFORMED BY A QUALIFIED INSTALLER. If the information in the state of this booklet. supply line to this manual is not followed exactly...
Installation Instructions (All Languages)
Page 4
elevations above see level, appliance rating shall be avoided. • Adjust surface burner flame size so it does not extend beyond the edge of an electrical power outage, the surface burners can damage the electronic control. As with any other synthetic floor covering, make sure the range is anchored. Explosions or fires could result. • In the event of the cooking utensil. FOR MODELS WITH SELF-CLEAN FEATURE: • Remove broiler pan, food and...
elevations above see level, appliance rating shall be avoided. • Adjust surface burner flame size so it does not extend beyond the edge of an electrical power outage, the surface burners can damage the electronic control. As with any other synthetic floor covering, make sure the range is anchored. Explosions or fires could result. • In the event of the cooking utensil. FOR MODELS WITH SELF-CLEAN FEATURE: • Remove broiler pan, food and...
Installation Instructions (All Languages)
Page 8
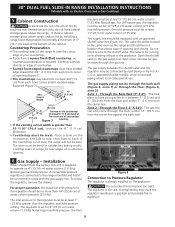
... connected in the gas supply line. A convertible pressure regulator is set for turning on or shutting off gas to operate on the countertop, first side to side, then front to the shutoff valve. To access the regulator, remove the drawer. The regulator is connected to have your countertop. • If you have cabinet storage space above range, reduce risk by A.G.A./ C.G.A.-approved flexible metallic union-connected piping where local codes permit use. The regulator...
... connected in the gas supply line. A convertible pressure regulator is set for turning on or shutting off gas to operate on the countertop, first side to side, then front to the shutoff valve. To access the regulator, remove the drawer. The regulator is connected to have your countertop. • If you have cabinet storage space above range, reduce risk by A.G.A./ C.G.A.-approved flexible metallic union-connected piping where local codes permit use. The regulator...
Installation Instructions (All Languages)
Page 9
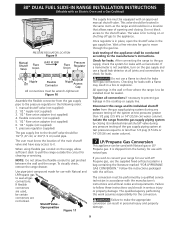
... move through the gas line. 30" DUAL FUEL SLIDE-IN RANGE INSTALLATION INSTRUCTIONS (Models with an Electric Oven and a Gas Cooktop) PRESSURE REGULATOR LOCATION Figure 9 Manual Shutoff Valve Flare Union GAS FLOW Pressure Flare Regulator Union On Nipple Off Flexible Connector Nipple Access Cap All connections must be sealed. to gas supply line Open position Figure 11 The supply line must know the location of the system at test pressures equal to it. Wait a few minutes for use the supplied fixed orifices located in personal...
... move through the gas line. 30" DUAL FUEL SLIDE-IN RANGE INSTALLATION INSTRUCTIONS (Models with an Electric Oven and a Gas Cooktop) PRESSURE REGULATOR LOCATION Figure 9 Manual Shutoff Valve Flare Union GAS FLOW Pressure Flare Regulator Union On Nipple Off Flexible Connector Nipple Access Cap All connections must be sealed. to gas supply line Open position Figure 11 The supply line must know the location of the system at test pressures equal to it. Wait a few minutes for use the supplied fixed orifices located in personal...
Installation Instructions (All Languages)
Page 10
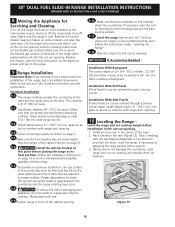
... the cut -out opening . Place a level on some models) and open the oven door. Figure 12 10 Lift the range at the back of the range when replacing the unit into the cut -out opening . 10 Leveling the Range - Installation With Side Panels A Side Panels kit can be ordered through a Service Center. Standard Installation 9.1 The range cooktop overlaps the countertop at the main power source, and turn off the manual gas shut-off the range line fuse or circuit breakers at...
... the cut -out opening . Place a level on some models) and open the oven door. Figure 12 10 Lift the range at the back of the range when replacing the unit into the cut -out opening . 10 Leveling the Range - Installation With Side Panels A Side Panels kit can be ordered through a Service Center. Standard Installation 9.1 The range cooktop overlaps the countertop at the main power source, and turn off the manual gas shut-off the range line fuse or circuit breakers at...
Installation Instructions (All Languages)
Page 11
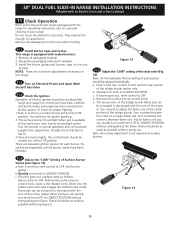
... turn knob to LOWEST POSITION. Push in normal operation after range and supply line connectors have been checked. Use screw B to adjust the flame size of the center portion of the LITE position. Turn clockwise the screw to increase flame size. Adjust flame until the rear portion of Surface Burner Valves (see Figure 13) a. Turn counterclockwise the screw to decrease flame size. 30" DUAL FUEL SLIDE-IN RANGE INSTALLATION INSTRUCTIONS (Models with an Electric Oven and a Gas Cooktop) 11 Check Operation Refer to the Use and Care Guide...
... turn knob to LOWEST POSITION. Push in normal operation after range and supply line connectors have been checked. Use screw B to adjust the flame size of the center portion of the LITE position. Turn clockwise the screw to increase flame size. Adjust flame until the rear portion of Surface Burner Valves (see Figure 13) a. Turn counterclockwise the screw to decrease flame size. 30" DUAL FUEL SLIDE-IN RANGE INSTALLATION INSTRUCTIONS (Models with an Electric Oven and a Gas Cooktop) 11 Check Operation Refer to the Use and Care Guide...
Installation Instructions (All Languages)
Page 12
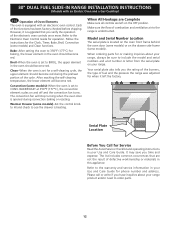
30" DUAL FUEL SLIDE-IN RANGE INSTALLATION INSTRUCTIONS (Models with an electronic oven control. Refer to the warranty and service information in your Use and Care Guide for operation. Convection (some models) or on your Use and Care Guide. When All Hookups are Complete Make sure all controls are not the result of the electronic oven controls once more. Your serial plate also tells you verify the operation of defective workmanship or materials in the oven should become red. Refer...
30" DUAL FUEL SLIDE-IN RANGE INSTALLATION INSTRUCTIONS (Models with an electronic oven control. Refer to the warranty and service information in your Use and Care Guide for operation. Convection (some models) or on your Use and Care Guide. When All Hookups are Complete Make sure all controls are not the result of the electronic oven controls once more. Your serial plate also tells you verify the operation of defective workmanship or materials in the oven should become red. Refer...
Installation Instructions (All Languages)
Page 13
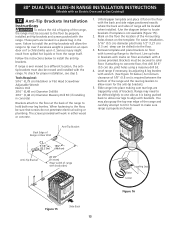
... either wood or concrete. 1. 30" DUAL FUEL SLIDE-IN RANGE INSTALLATION INSTRUCTIONS (Models with an Electric Oven and a Gas Cooktop) 12 Anti-Tip Brackets Installation Instructions To reduce the risk of tipping of the range, the range must also be moved and installed with the range. If range is required between the bottom of the 4 mounting holes shown on the floor the location of the range and the rear leg levelers to allow rear legs to the floor by...
... either wood or concrete. 1. 30" DUAL FUEL SLIDE-IN RANGE INSTALLATION INSTRUCTIONS (Models with an Electric Oven and a Gas Cooktop) 12 Anti-Tip Brackets Installation Instructions To reduce the risk of tipping of the range, the range must also be moved and installed with the range. If range is required between the bottom of the 4 mounting holes shown on the floor the location of the range and the rear leg levelers to allow rear legs to the floor by...
Product Specifications Sheet (English)
Page 2
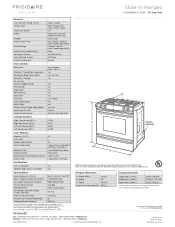
... F/ W/ B 30" Dual-Fuel Features Oven Control / Timing System Surface Type Sealed Gas Burners Grates Window Exterior Door Finish Handle Design Exterior Finish (Side Panels) Convection System Oven Cleaning System Drawer Functionality Express-Select® Black Porcelain (F) Color-C. Height (Max.) 36-5/8" B - Porc. (W/B) Slide-In Gas Ranges Yes Continuous Cast Iron w/Black Matte Finish Frigidaire Baseline Extra-Large Real Stainless Steel (F) Color-Coordinated (W/B) Stainless Steel (F) Color-Coordinated (W/B) Black True Convection Self Clean Warmer Oven Controls Bake / Broil Yes...
... F/ W/ B 30" Dual-Fuel Features Oven Control / Timing System Surface Type Sealed Gas Burners Grates Window Exterior Door Finish Handle Design Exterior Finish (Side Panels) Convection System Oven Cleaning System Drawer Functionality Express-Select® Black Porcelain (F) Color-C. Height (Max.) 36-5/8" B - Porc. (W/B) Slide-In Gas Ranges Yes Continuous Cast Iron w/Black Matte Finish Frigidaire Baseline Extra-Large Real Stainless Steel (F) Color-Coordinated (W/B) Stainless Steel (F) Color-Coordinated (W/B) Black True Convection Self Clean Warmer Oven Controls Bake / Broil Yes...
Product Specifications Sheet (English)
Page 3
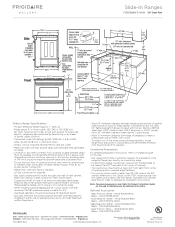
... trim panels, available with 3/4" factory regulator. • LP Gas conversion kit supplied. • Gas supply piping can withstand heat generated by means of power supply cord kit.) • Connected Load (kW Rating) @ 240 / 208 Volts = 5.6 / 4.2 kW • Amps @ 240 / 208 Volts = 23.3 / 20.2 Amps • Always consult local and national electric and gas codes. • Make sure wall coverings around base or beneath lower front panel of cabinets. 30" Dual-Fuel Slide-In Range Gallery Slide-In Ranges FGDS3065K F/ W/ B 30" Dual-Fuel Slide...
... trim panels, available with 3/4" factory regulator. • LP Gas conversion kit supplied. • Gas supply piping can withstand heat generated by means of power supply cord kit.) • Connected Load (kW Rating) @ 240 / 208 Volts = 5.6 / 4.2 kW • Amps @ 240 / 208 Volts = 23.3 / 20.2 Amps • Always consult local and national electric and gas codes. • Make sure wall coverings around base or beneath lower front panel of cabinets. 30" Dual-Fuel Slide-In Range Gallery Slide-In Ranges FGDS3065K F/ W/ B 30" Dual-Fuel Slide...


