Complete Owner's Guide (English)
Page 2
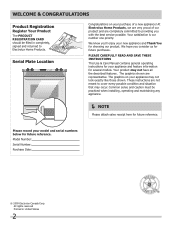
... on your purchase of our product and are very proud of a new appliance! The graphics on your appliance may not have all the described features. Model Number: Serial Number: Purchase Date: © 2009 Electrolux Canada Corp. Your satisfaction is our number one priority. Your product may not look exactly like those...
... on your purchase of our product and are very proud of a new appliance! The graphics on your appliance may not have all the described features. Model Number: Serial Number: Purchase Date: © 2009 Electrolux Canada Corp. Your satisfaction is our number one priority. Your product may not look exactly like those...
Complete Owner's Guide (English)
Page 3
... situations that may cause serious bodily harm, death or property damage. Save these instructions for this range. WHAT TO DO IF YOU SMELL GAS: • Do not try to the appliance. •...symbol to persons could result. • Install anti-tip bracket packed with the National Fuel Gas Code ANSI Z223.1 latest edition, and National Electrical Code ANSI/NFPA No. 70 latest edition,... and local code requirements. Do not remove model/serial number plate. • Proper Installation. Important Safety Instructions Read all instructions before using...
... situations that may cause serious bodily harm, death or property damage. Save these instructions for this range. WHAT TO DO IF YOU SMELL GAS: • Do not try to the appliance. •...symbol to persons could result. • Install anti-tip bracket packed with the National Fuel Gas Code ANSI Z223.1 latest edition, and National Electrical Code ANSI/NFPA No. 70 latest edition,... and local code requirements. Do not remove model/serial number plate. • Proper Installation. Important Safety Instructions Read all instructions before using...
Complete Owner's Guide (English)
Page 7
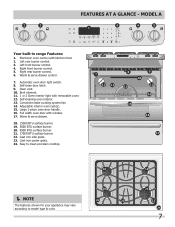
mODEL A Your built-in range Features: 1. Large 1-piece oven door handle. 16. Cast iron side grate. 23. Easy to clean porcelain cooktop. NOTE The features shown for your appliance may vary according to model type & color. 7 Right rear burner control. 6. Adjustable interior oven rack...(s). 15. Automatic oven door light switch. 8. Broil element. 11. 1 or 2 Oven interior light with window. 17. Left front burner control. 4. FEATURES AT A GLANCE ...
mODEL A Your built-in range Features: 1. Large 1-piece oven door handle. 16. Cast iron side grate. 23. Easy to clean porcelain cooktop. NOTE The features shown for your appliance may vary according to model type & color. 7 Right rear burner control. 6. Adjustable interior oven rack...(s). 15. Automatic oven door light switch. 8. Broil element. 11. 1 or 2 Oven interior light with window. 17. Left front burner control. 4. FEATURES AT A GLANCE ...
Complete Owner's Guide (English)
Page 8
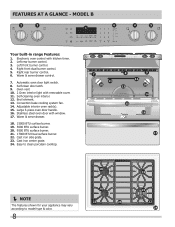
.... 5000 BTU surface burner. 20. 9500 BTU surface burner. 21. 17000 BTU Dual surface burner. 22. Self-cleaning oven interior. 12. Easy to clean porcelain cooktop. NOTE The features shown for your appliance may vary according to model type & color. 8 mODEL B 2 3 OFF OFF hi lo hi lo delay start bake time ... 123 456 789 start cancel 0 6 keep warm drawer hi med low on·off 4 5 OFF OFF hi hi lo lo Your built-in range Features: 1. Left rear burner control. 3. Right front dual burner control. 5. Broil element. 13. Convection bake cooking system fan. 14.
.... 5000 BTU surface burner. 20. 9500 BTU surface burner. 21. 17000 BTU Dual surface burner. 22. Self-cleaning oven interior. 12. Easy to clean porcelain cooktop. NOTE The features shown for your appliance may vary according to model type & color. 8 mODEL B 2 3 OFF OFF hi lo hi lo delay start bake time ... 123 456 789 start cancel 0 6 keep warm drawer hi med low on·off 4 5 OFF OFF hi hi lo lo Your built-in range Features: 1. Left rear burner control. 3. Right front dual burner control. 5. Broil element. 13. Convection bake cooking system fan. 14.
Complete Owner's Guide (English)
Page 9
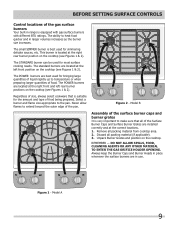
... all of the Surface Burner Caps and Surface Burner Grates are installed correctly and at the correct locations. 1. Figure 1 - REMEMBER - Model A 9 Never allow flames to the pan. Model B Assembly of the surface burner caps and burner grates It is equipped with gas surface burners with different BTU ratings....left front position on the cooktop (see Figures 1 & 2). before setting surface controls Control locations of the gas surface burners Your built-in range is very important to make sure that is best used for simmering delicate sauces, etc. The ability to heat food ...
... all of the Surface Burner Caps and Surface Burner Grates are installed correctly and at the correct locations. 1. Figure 1 - REMEMBER - Model A 9 Never allow flames to the pan. Model B Assembly of the surface burner caps and burner grates It is equipped with gas surface burners with different BTU ratings....left front position on the cooktop (see Figures 1 & 2). before setting surface controls Control locations of the gas surface burners Your built-in range is very important to make sure that is best used for simmering delicate sauces, etc. The ability to heat food ...
Complete Owner's Guide (English)
Page 10
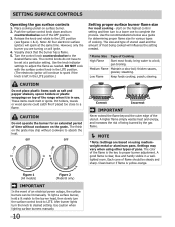
... as needed . *Flame Size Type of the range when it is the key to LITE. The finish on the highest control setting and then turn counterclockwise out of the flame is in the LITE position.) Setting proper surface burner flame size For most foods; A good flame... lit manually. Figure 1 (All models) Figure 2 (Model B only) IMPORTANT In the event of cooking. Visually check that the burner has a flame. 5. Medium Flame Maintain a slow boil; CAUTION Do not operate the burner for various types of an electrical power outage, the surface burners can be steady and sharp. The...
... as needed . *Flame Size Type of the range when it is the key to LITE. The finish on the highest control setting and then turn counterclockwise out of the flame is in the LITE position.) Setting proper surface burner flame size For most foods; A good flame... lit manually. Figure 1 (All models) Figure 2 (Model B only) IMPORTANT In the event of cooking. Visually check that the burner has a flame. 5. Medium Flame Maintain a slow boil; CAUTION Do not operate the burner for various types of an electrical power outage, the surface burners can be steady and sharp. The...

Complete Owner's Guide (English)
Page 11
To remove an oven rack, pull the rack forward until the components have cooled down. Tilt the front of rack and slide out. The hot air must circulate around the pans and cookware in the oven and good baking results. DO NOT BLOCK OVEN VENT. Arranging oven ... using the oven. Always use caution when removing food from the oven. 11 Lift up front of the rack upward and slide the rack back into place. (Model B shown only) CAUTION Some models are equipped with aluminium foil or any other , the oven door, sides or back of oven. Recommended rack positions Food...
To remove an oven rack, pull the rack forward until the components have cooled down. Tilt the front of rack and slide out. The hot air must circulate around the pans and cookware in the oven and good baking results. DO NOT BLOCK OVEN VENT. Arranging oven ... using the oven. Always use caution when removing food from the oven. 11 Lift up front of the rack upward and slide the rack back into place. (Model B shown only) CAUTION Some models are equipped with aluminium foil or any other , the oven door, sides or back of oven. Recommended rack positions Food...
Complete Owner's Guide (English)
Page 12
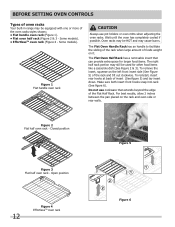
...of the Flat Half Rack. Closed position Figure 5 Figure 3 Flat half oven rack - BEFORE SETTING OVEN CONTROLS Types of oven racks Your built-in range may be equipped with one or more of insert (See figure 5) and lay insert down. Make sure both insert front hooks snap into rack (...rear walls. Open position 12 Figure 4 EffortlessTM oven rack Figure 6 The Flat Oven Handle Rack has an handle to facilitate the sliding of the rack when large amount of the rack and tilt out clockwise. Some models). • EffortlessTM oven rack (Figure 4 - Oven racks may be HOT and may cause burns.
...of the Flat Half Rack. Closed position Figure 5 Figure 3 Flat half oven rack - BEFORE SETTING OVEN CONTROLS Types of oven racks Your built-in range may be equipped with one or more of insert (See figure 5) and lay insert down. Make sure both insert front hooks snap into rack (...rear walls. Open position 12 Figure 4 EffortlessTM oven rack Figure 6 The Flat Oven Handle Rack has an handle to facilitate the sliding of the rack when large amount of the rack and tilt out clockwise. Some models). • EffortlessTM oven rack (Figure 4 - Oven racks may be HOT and may cause burns.
Complete Owner's Guide (English)
Page 13
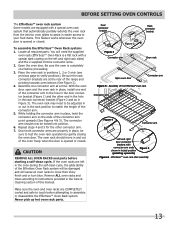
...cool before starting a self-clean cycle. Effortless™ oven rack after assembly 13 BEFORE SETTING OVEN CONTROLS The Effortless™ oven rack system Some models are left and right rack sides) and the 2 supplied chrome connector arms. 2. Repeat steps 4 and 5 for the other end in the hole... and as in Figure 3). You will cause all required parts. Make sure the oven and oven racks are properly in and out of the range and pointing towards oven bottom (See Figure 2). 4. Be sure the oven is opened or closed . Once both connector arms are COMPLETELY cooled and...
...cool before starting a self-clean cycle. Effortless™ oven rack after assembly 13 BEFORE SETTING OVEN CONTROLS The Effortless™ oven rack system Some models are left and right rack sides) and the 2 supplied chrome connector arms. 2. Repeat steps 4 and 5 for the other end in the hole... and as in Figure 3). You will cause all required parts. Make sure the oven and oven racks are properly in and out of the range and pointing towards oven bottom (See Figure 2). 4. Be sure the oven is opened or closed . Once both connector arms are COMPLETELY cooled and...
Complete Owner's Guide (English)
Page 14
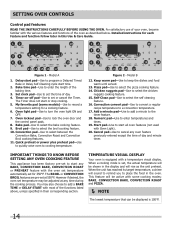
...Numeric pad-Use to the timer feature. 18. When a cooking mode is set, the actual temperature will be displayed is equipped with some models)-Use to program a Delayed Timed Bake or Delay Self-Cleaning cycle start or stop cooking. 5. Set clock pad-Use to cooking temperature....550°F. Broil pad-Use to a convection temperature. 17. Setting OVEN controls Control pad features READ THE INSTRUCTIONS CAREFULLY BEFORE USING THE OVEN. Model B 12. Convection convert pad-Use to convert a regular recipe temperature to select the broil cooking feature. 10. Important Things to start all...
...Numeric pad-Use to the timer feature. 18. When a cooking mode is set, the actual temperature will be displayed is equipped with some models)-Use to program a Delayed Timed Bake or Delay Self-Cleaning cycle start or stop cooking. 5. Set clock pad-Use to cooking temperature....550°F. Broil pad-Use to a convection temperature. 17. Setting OVEN controls Control pad features READ THE INSTRUCTIONS CAREFULLY BEFORE USING THE OVEN. Model B 12. Convection convert pad-Use to convert a regular recipe temperature to select the broil cooking feature. 10. Important Things to start all...
Complete Owner's Guide (English)
Page 17
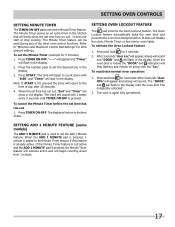
... Loc" will appear, a beep will sound and "DOOR" and will begin to "Minimum and Maximum Control Pad Settings" for 3 seconds. Setting Add 1 Minute Feature (some models) The ADD 1 MINUTE pad is pressed, the Minute Timer feature will become active and will flash in the display. 2. If the Minute Timer feature is...
... Loc" will appear, a beep will sound and "DOOR" and will begin to "Minimum and Maximum Control Pad Settings" for 3 seconds. Setting Add 1 Minute Feature (some models) The ADD 1 MINUTE pad is pressed, the Minute Timer feature will become active and will flash in the display. 2. If the Minute Timer feature is...
Complete Owner's Guide (English)
Page 19
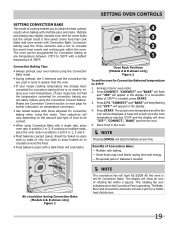
...when baking with multiple pans and racks. The Bake, Broil and Convection elements will cook faster. 4 3 2 1 Oven Rack Positions (Models A & B shown only) Figure 2 To set for convection baking you to reduce your recipe has not had the temperature converted for Convection... Arrange interior oven racks. 2. Press START. Setting OVEN controls Setting Convection Bake This mode of Convection Bake: - Air circulation during Convection Bake (Models A & B shown only) Figure 1 NOTE The convection fan will vary depending on temperature conversion. • Use tested recipes with ...
...when baking with multiple pans and racks. The Bake, Broil and Convection elements will cook faster. 4 3 2 1 Oven Rack Positions (Models A & B shown only) Figure 2 To set for convection baking you to reduce your recipe has not had the temperature converted for Convection... Arrange interior oven racks. 2. Press START. Setting OVEN controls Setting Convection Bake This mode of Convection Bake: - Air circulation during Convection Bake (Models A & B shown only) Figure 1 NOTE The convection fan will vary depending on temperature conversion. • Use tested recipes with ...
Complete Owner's Guide (English)
Page 24
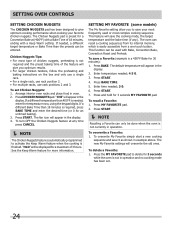
... as shown in example above. Press START. 4. This function can only be entered. The default temperature will appear in the display. 2. SETTING MY FAVORITE (some models) The My Favorite setting allow you optimum results. • For larger chicken tenders, follow the preheating and baking instructions on the box and only use...
... as shown in example above. Press START. 4. This function can only be entered. The default temperature will appear in the display. 2. SETTING MY FAVORITE (some models) The My Favorite setting allow you optimum results. • For larger chicken tenders, follow the preheating and baking instructions on the box and only use...
Complete Owner's Guide (English)
Page 26
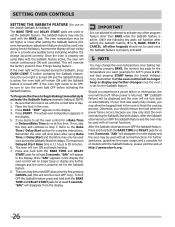
...:\\www.star-k.org. 26 Refer to turn the oven OFF only). Remember the oven will shut down after using Bake with the correct time of models with the BAKE pad. The maximum Delayed Start Bake time is active. Once "SAb" appears in the display. Remember that the clock is set for...
...:\\www.star-k.org. 26 Refer to turn the oven OFF only). Remember the oven will shut down after using Bake with the correct time of models with the BAKE pad. The maximum Delayed Start Bake time is active. Once "SAb" appears in the display. Remember that the clock is set for...
Complete Owner's Guide (English)
Page 31
...Parts, Control Knobs & Decorative Trim Pieces Using a soft cloth, clean with a soft clean cloth. Easy Care™ Stainless Your range finish is may be made of a woven material, on the outside of the oven door. See «To remove and to thoroughly... paper towel for a good seal. they will reduce the number of major cleaning later. Porcelain Enamel Burner Grates, Cooktop Surface, Below Cooktop, Broiler Pan & Insert (some models), Door Liner, Oven Bottom & Burner Drip Pans Clean burner grates, broiler pan and insert (some models) Oven Clean the stainless with...
...Parts, Control Knobs & Decorative Trim Pieces Using a soft cloth, clean with a soft clean cloth. Easy Care™ Stainless Your range finish is may be made of a woven material, on the outside of the oven door. See «To remove and to thoroughly... paper towel for a good seal. they will reduce the number of major cleaning later. Porcelain Enamel Burner Grates, Cooktop Surface, Below Cooktop, Broiler Pan & Insert (some models), Door Liner, Oven Bottom & Burner Drip Pans Clean burner grates, broiler pan and insert (some models) Oven Clean the stainless with...
Complete Owner's Guide (English)
Page 32
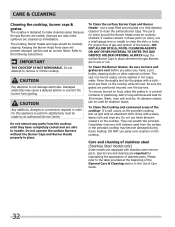
...care and cleaning are safe to the table provided at the beginning of stainless steel (Stainless Steel models only) Some models are equipped with a cloth don't put them . Keeping the Burner Head Ports clean will prevent improper ignition and an uneven flame. Refer to make cleaning easier. Do...the surface or the porcelain cooktop may cause a delayed ignition or prevent the burner from the cooktop until they have completely cooled and are required for stubborn stains. Because the gas Burners are sealed, cleanups are easy when spillovers are in use harsh abrasive cleaners on them ...
...care and cleaning are safe to the table provided at the beginning of stainless steel (Stainless Steel models only) Some models are equipped with a cloth don't put them . Keeping the Burner Head Ports clean will prevent improper ignition and an uneven flame. Refer to make cleaning easier. Do...the surface or the porcelain cooktop may cause a delayed ignition or prevent the burner from the cooktop until they have completely cooled and are required for stubborn stains. Because the gas Burners are sealed, cleanups are easy when spillovers are in use harsh abrasive cleaners on them ...
Complete Owner's Guide (English)
Page 33
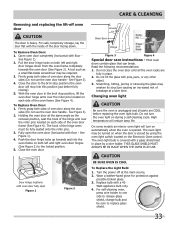
... light bulb. Scratching, hitting, jarring or stressing the glass may weaken its structure causing an increased risk of breakage at the main source. 2. On some models an interior oven light will turn the oven light on automatically when the oven is unplugged and all the oven racks are COOL before fully...
... light bulb. Scratching, hitting, jarring or stressing the glass may weaken its structure causing an increased risk of breakage at the main source. 2. On some models an interior oven light will turn the oven light on automatically when the oven is unplugged and all the oven racks are COOL before fully...

Installation Instructions (All Languages)
Page 1
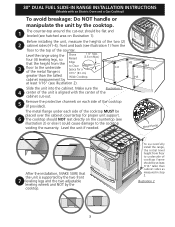
...in your gas supplier, call your serial plate for applicable agency certification FOR YOUR SAFETY: - P/N 318201690 (1007) Rev. 30" DUAL FUEL SLIDE-IN RANGE INSTALLATION INSTRUCTIONS (Models with a three (3) foot / 36 in. IMPORTANT: SAVE FOR LOCAL ELECTRICAL INSPECTOR'S USE. Do not store or use any ... (55,2 cm) Min. 22 1/8" (56,2 cm) Max 24" (61 cm) Min. A. WIDTH (Under Cooktop) C. TOTAL DEPTH TO E. CUTOUT WIDTH*** FRONT OF RANGE (Countertop and cabinet) F. HEIGHT OF COUNTERTOP 35 7/8" (91,1 cm) 30" (76,2 cm) 36 5/8" (93 cm) 31 1/2" (80 cm) 28 5/16" (71...
...in your gas supplier, call your serial plate for applicable agency certification FOR YOUR SAFETY: - P/N 318201690 (1007) Rev. 30" DUAL FUEL SLIDE-IN RANGE INSTALLATION INSTRUCTIONS (Models with a three (3) foot / 36 in. IMPORTANT: SAVE FOR LOCAL ELECTRICAL INSPECTOR'S USE. Do not store or use any ... (55,2 cm) Min. 22 1/8" (56,2 cm) Max 24" (61 cm) Min. A. WIDTH (Under Cooktop) C. TOTAL DEPTH TO E. CUTOUT WIDTH*** FRONT OF RANGE (Countertop and cabinet) F. HEIGHT OF COUNTERTOP 35 7/8" (91,1 cm) 30" (76,2 cm) 36 5/8" (93 cm) 31 1/2" (80 cm) 28 5/16" (71...

Installation Instructions (All Languages)
Page 2
...Under Cooktop) C. HEIGHT OF COUNTERTOP 35 7/8" (91,1 cm) Min. 36 5/8" (93 cm) Max. 2 Do not seal the range to the side cabinets. 3. 24" (61 cm) minimum clearance between the range and the wall. 21¾" (55.25 cm) D C 2. For cutouts below 22 7/8"(58.1 cm), appliance will ... cm) 31 1/2" (80 cm) D. CUTOUT WIDTH*** (Countertop and cabinet) 30±1/16" (76,2±0,15 cm) F. 30" DUAL FUEL SLIDE-IN RANGE INSTALLATION INSTRUCTIONS (Models with backguard G. Do not pinch the power supply cord or the flexible gas conduit between the cooktop and the bottom of the cabinet when...
...Under Cooktop) C. HEIGHT OF COUNTERTOP 35 7/8" (91,1 cm) Min. 36 5/8" (93 cm) Max. 2 Do not seal the range to the side cabinets. 3. 24" (61 cm) minimum clearance between the range and the wall. 21¾" (55.25 cm) D C 2. For cutouts below 22 7/8"(58.1 cm), appliance will ... cm) 31 1/2" (80 cm) D. CUTOUT WIDTH*** (Countertop and cabinet) 30±1/16" (76,2±0,15 cm) F. 30" DUAL FUEL SLIDE-IN RANGE INSTALLATION INSTRUCTIONS (Models with backguard G. Do not pinch the power supply cord or the flexible gas conduit between the cooktop and the bottom of the cabinet when...
Installation Instructions (All Languages)
Page 3
...from the Edge 3 floor to the top of the cabinet cut -out should NOT rest directly on illustration 1). 30" DUAL FUEL SLIDE-IN RANGE INSTALLATION INSTRUCTIONS (Models with the center of the counter. Level the range using the Shave four (4) leveling legs, so Raised 1 ½" Max. (3.8 cm Max.) that 8 7 the.... 6 The cooktop should be placed over the cabinet countertop for a 31½" (81 cm) Wide Cooktop. To successfully install the range, the initial level height from the floor to the underside of the metal flange is greater than cabinet sides as measured in step 2....
...from the Edge 3 floor to the top of the cabinet cut -out should NOT rest directly on illustration 1). 30" DUAL FUEL SLIDE-IN RANGE INSTALLATION INSTRUCTIONS (Models with the center of the counter. Level the range using the Shave four (4) leveling legs, so Raised 1 ½" Max. (3.8 cm Max.) that 8 7 the.... 6 The cooktop should be placed over the cabinet countertop for a 31½" (81 cm) Wide Cooktop. To successfully install the range, the initial level height from the floor to the underside of the metal flange is greater than cabinet sides as measured in step 2....


