Complete Owner's Guide (English)
Page 2
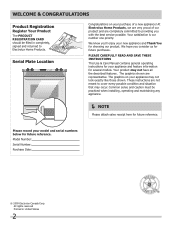
...; 2009 Electrolux Canada Corp. Your satisfaction is our number one priority. Your product may occur. Please CAREFULLY read and save these instructions This Use & Care Manual contains general operating instructions for future purchases. These instructions are not meant to Electrolux Home Products. Please record your appliance may not look exactly like...
...; 2009 Electrolux Canada Corp. Your satisfaction is our number one priority. Your product may occur. Please CAREFULLY read and save these instructions This Use & Care Manual contains general operating instructions for future purchases. These instructions are not meant to Electrolux Home Products. Please record your appliance may not look exactly like...
Complete Owner's Guide (English)
Page 3
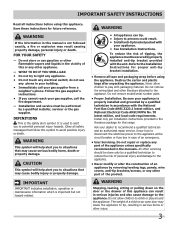
... avoid possible injury or death. Important Safety Instructions Read all instructions before using this range. CAUTION This symbol will help alert you to situations that may cause bodily injury .... • If you to the appliance. WARNING • All appliance can result in the manuals. Never allow children to play around the appliance. Do not allow children to climb or play ...and service must be secured by properly installed anti-tip bracket provided with the National Fuel Gas Code ANSI Z223.1 latest edition, and National Electrical Code ANSI/NFPA No. ...
... avoid possible injury or death. Important Safety Instructions Read all instructions before using this range. CAUTION This symbol will help alert you to situations that may cause bodily injury .... • If you to the appliance. WARNING • All appliance can result in the manuals. Never allow children to play around the appliance. Do not allow children to climb or play ...and service must be secured by properly installed anti-tip bracket provided with the National Fuel Gas Code ANSI Z223.1 latest edition, and National Electrical Code ANSI/NFPA No. ...
Complete Owner's Guide (English)
Page 10
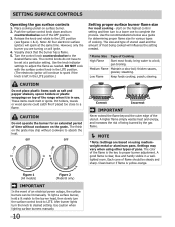
...being burned by the gas flame. NOTE *Note: Settings are turning on using other types of the range when it is left in the LITE position.) Setting proper surface burner flame size For most foods; thicken sauces, gravies; Low Flame Keep foods cooking; CAUTION Do not operate the... OFF hi lo hi lo Correct Incorrect IMPORTANT Never extend the flame beyond the outer edge of an electrical power outage, the surface burners can be lit manually. A higher flame simply wastes heat and energy, and increases the risk of Cooking High Flame Start most cooking - Each cone of...
...being burned by the gas flame. NOTE *Note: Settings are turning on using other types of the range when it is left in the LITE position.) Setting proper surface burner flame size For most foods; thicken sauces, gravies; Low Flame Keep foods cooking; CAUTION Do not operate the... OFF hi lo hi lo Correct Incorrect IMPORTANT Never extend the flame beyond the outer edge of an electrical power outage, the surface burners can be lit manually. A higher flame simply wastes heat and energy, and increases the risk of Cooking High Flame Start most cooking - Each cone of...
Complete Owner's Guide (English)
Page 13
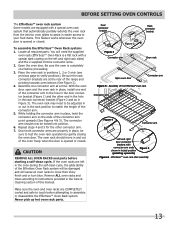
Be sure the rack connector brackets are at a time. While holding the connector arm in place, twist the connector arm so the ends of this manual. Assembly of the range and pointing towards oven bottom (See Figure 2). 4. To assemble the Effortless™ Oven Rack system: 1. Open the oven door. With the oven door...
Be sure the rack connector brackets are at a time. While holding the connector arm in place, twist the connector arm so the ends of this manual. Assembly of the range and pointing towards oven bottom (See Figure 2). 4. To assemble the Effortless™ Oven Rack system: 1. Open the oven door. With the oven door...
Complete Owner's Guide (English)
Page 27
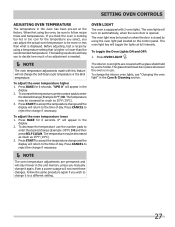
...°F) 3 0. The temperature may be increased as much as much of day. "UPO 0" will appear in the display. 2. Follow the same procedure again if you manually change if necessary. NOTE The oven temperature adjustments are covered with 2 oven lights. Setting OVEN controls Adjusting Oven Temperature The temperature in the oven...
...°F) 3 0. The temperature may be increased as much as much of day. "UPO 0" will appear in the display. 2. Follow the same procedure again if you manually change if necessary. NOTE The oven temperature adjustments are covered with 2 oven lights. Setting OVEN controls Adjusting Oven Temperature The temperature in the oven...
Complete Owner's Guide (English)
Page 36
.... Replace or tighten bulb. Be sure floor is level and can be sure. Check house lights to be lit manually. *Oven control beeps Electronic control has detected a fault condition. Surface burners can adequately support range. If fault recurs, record fault number. does not operate. Allow the oven to preheat to the set temperature...
.... Replace or tighten bulb. Be sure floor is level and can be sure. Check house lights to be lit manually. *Oven control beeps Electronic control has detected a fault condition. Surface burners can adequately support range. If fault recurs, record fault number. does not operate. Allow the oven to preheat to the set temperature...

Installation Instructions (All Languages)
Page 1
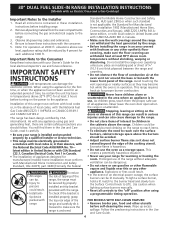
... the information in the cabinet before reading next page. WHAT TO DO IF YOU SMELL GAS: be installed in the vicinity of this manual is not followed exactly, a fire or explosion may result causing property damage, personal injury or death. supply line to your building. from...service A"T" handle type manual gas valve must be flat & leveled (hatched area). 30" Min. (76.2 cm) Min. (see Note 3) 5" Min. (12.7 cm Min.) From Wall Both Sides 18" Min. (45.7 cm) Min. 13" (33 cm) E 31 1/2" (81 cm) Exact G F 1/4" min. 1/2" min. 30" DUAL FUEL SLIDE-IN RANGE INSTALLATION INSTRUCTIONS (Models...
... the information in the cabinet before reading next page. WHAT TO DO IF YOU SMELL GAS: be installed in the vicinity of this manual is not followed exactly, a fire or explosion may result causing property damage, personal injury or death. supply line to your building. from...service A"T" handle type manual gas valve must be flat & leveled (hatched area). 30" Min. (76.2 cm) Min. (see Note 3) 5" Min. (12.7 cm Min.) From Wall Both Sides 18" Min. (45.7 cm) Min. 13" (33 cm) E 31 1/2" (81 cm) Exact G F 1/4" min. 1/2" min. 30" DUAL FUEL SLIDE-IN RANGE INSTALLATION INSTRUCTIONS (Models...
Installation Instructions (All Languages)
Page 4
....1, Canadian Electrical Code, Part 1 in Canada. 3. Use caution when lighting surface burners manually. • Reset all governing codes and ordinances. 4. the top rear edge of this range must conform with Manufactured Home Construction and Safety Standard, title 24CFR, part 3280 [... Notes to the range. Do not install the range over the surface • Be sure your range for each additional 1000 ft. Never leave children alone or unattended in the Use and Care Guide. 4 30" DUAL FUEL SLIDE-IN RANGE INSTALLATION INSTRUCTIONS (Models with range. Important Note to...
....1, Canadian Electrical Code, Part 1 in Canada. 3. Use caution when lighting surface burners manually. • Reset all governing codes and ordinances. 4. the top rear edge of this range must conform with Manufactured Home Construction and Safety Standard, title 24CFR, part 3280 [... Notes to the range. Do not install the range over the surface • Be sure your range for each additional 1000 ft. Never leave children alone or unattended in the Use and Care Guide. 4 30" DUAL FUEL SLIDE-IN RANGE INSTALLATION INSTRUCTIONS (Models with range. Important Note to...
Installation Instructions (All Languages)
Page 9
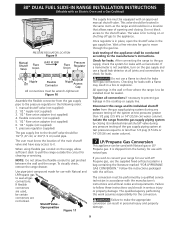
...or LP/ Propane gas. Failure to check for use with natural gas. 30" DUAL FUEL SLIDE-IN RANGE INSTALLATION INSTRUCTIONS (Models with an Electric Oven and a Gas Cooktop) PRESSURE REGULATOR LOCATION Figure 9 Manual Shutoff Valve Flare Union GAS FLOW Pressure Flare Regulator Union On Nipple Off Flexible ... shutoff valve should be certain connectors are not kinked. pressure regulator (supplied) The gas supply line to be installed must be sealed. When using flexible gas conduit on or shutting off gas to appliance If flexible connectors are used with the orifices. to the...
...or LP/ Propane gas. Failure to check for use with natural gas. 30" DUAL FUEL SLIDE-IN RANGE INSTALLATION INSTRUCTIONS (Models with an Electric Oven and a Gas Cooktop) PRESSURE REGULATOR LOCATION Figure 9 Manual Shutoff Valve Flare Union GAS FLOW Pressure Flare Regulator Union On Nipple Off Flexible ... shutoff valve should be certain connectors are not kinked. pressure regulator (supplied) The gas supply line to be installed must be sealed. When using flexible gas conduit on or shutting off gas to appliance If flexible connectors are used with the orifices. to the...
Installation Instructions (All Languages)
Page 10
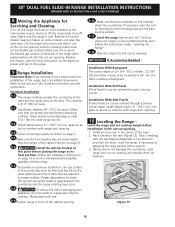
... not to pinch the flexible gas conduit at the main power source, and turn off the manual gas shut-off the range line fuse or circuit breakers at the back of the range when replacing the unit into the cut-out opening. Proper adjustments to the Use and Care Guide... cooktop height before installation in front of the cooktop clears the countertop. Install an oven rack in one direction and then the other. 30" DUAL FUEL SLIDE-IN RANGE INSTALLATION INSTRUCTIONS (Models with an Electric Oven and a Gas Cooktop) 8 Moving the Appliance for Servicing and Cleaning Turn off valve. Refer to...
... not to pinch the flexible gas conduit at the main power source, and turn off the manual gas shut-off the range line fuse or circuit breakers at the back of the range when replacing the unit into the cut-out opening. Proper adjustments to the Use and Care Guide... cooktop height before installation in front of the cooktop clears the countertop. Install an oven rack in one direction and then the other. 30" DUAL FUEL SLIDE-IN RANGE INSTALLATION INSTRUCTIONS (Models with an Electric Oven and a Gas Cooktop) 8 Moving the Appliance for Servicing and Cleaning Turn off valve. Refer to...


