
Use and Care Manual
Page 1
... Registration 2 Important Safety Instructions 3-4 Grounding Instructions 4 Liquefied Petroleum (Propane) Gas Conversion 5 Flame Size 5 Proper Burner Adjustment 5 Setting Surface Control Venturi (open) Burner Models 6 Sealed Burner Models 6 Electric Ignition 6 Selecting Surface Cooking Utensils 7 Specialty Pans & Trivets 7 Canning Tips & Information 8 General Cleaning Cleaning Various Parts of your Cooktop 9 Venturi (open) Burner Models 10 Sealed Burner Models 11-14 Avoid Service Checklist 15 Warranty 16 318200657...
... Registration 2 Important Safety Instructions 3-4 Grounding Instructions 4 Liquefied Petroleum (Propane) Gas Conversion 5 Flame Size 5 Proper Burner Adjustment 5 Setting Surface Control Venturi (open) Burner Models 6 Sealed Burner Models 6 Electric Ignition 6 Selecting Surface Cooking Utensils 7 Specialty Pans & Trivets 7 Canning Tips & Information 8 General Cleaning Cleaning Various Parts of your Cooktop 9 Venturi (open) Burner Models 10 Sealed Burner Models 11-14 Avoid Service Checklist 15 Warranty 16 318200657...
Use and Care Manual
Page 2
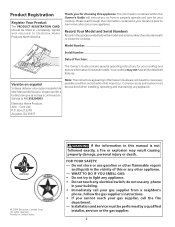
... or use any other flammable vapors and liquids in the vicinity of Purchase This Owner's Guide contains general operating instructions for your cooktop. Follow the gas supplier's instructions. • If you on how to cover every possible condition and situation that may occur. All rights reserved ... - do not use gasoline or other appliance. - Installation and service must be performed by a qualified installer, servicer or the gas supplier. 2 Thank you for several models. FOR YOUR SAFETY: - Versión en español Si desea obtener una copia en español de este Manual...
... or use any other flammable vapors and liquids in the vicinity of Purchase This Owner's Guide contains general operating instructions for your cooktop. Follow the gas supplier's instructions. • If you on how to cover every possible condition and situation that may occur. All rights reserved ... - do not use gasoline or other appliance. - Installation and service must be performed by a qualified installer, servicer or the gas supplier. 2 Thank you for several models. FOR YOUR SAFETY: - Versión en español Si desea obtener una copia en español de este Manual...
Use and Care Manual
Page 3
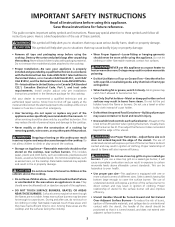
... may result in injury. • Know which knob controls each surface burner. Proper relationship of flammable materials, and spillage due to the cooktop. • Proper Installation-Be sure your sealed gas burners. IMPORTANT SAFETY INSTRUCTIONS Read all instructions before using the cooktop. Do not remove the model/serial plate attached to unintentional contact with a pan lid, or...
... may result in injury. • Know which knob controls each surface burner. Proper relationship of flammable materials, and spillage due to the cooktop. • Proper Installation-Be sure your sealed gas burners. IMPORTANT SAFETY INSTRUCTIONS Read all instructions before using the cooktop. Do not remove the model/serial plate attached to unintentional contact with a pan lid, or...

Use and Care Manual
Page 4
...THESE INSTRUCTIONS Grounding Instructions (electric ignition models only) IMPORTANT: READ AND SAVE THESE INSTRUCTIONS. For personal safety, this plug. Avoid fire hazard or electrical shock. DO NOT OPERATE THE COOKTOP USING A TWO-PRONG ADAPTER OR AN EXTENSION CORD. If a burner is accidentally turned on a hot... wet sponge or cloth is on. GLASS COOKTOPS (some models): • Do Not Operate or Clean a Broken Cooktop Glass-If glass top should be plugged directly into a 120V-60 Hz. Damage may also be blocked from the burner and cause combustion problems. IMPORTANT SAFETY NOTICE ...
...THESE INSTRUCTIONS Grounding Instructions (electric ignition models only) IMPORTANT: READ AND SAVE THESE INSTRUCTIONS. For personal safety, this plug. Avoid fire hazard or electrical shock. DO NOT OPERATE THE COOKTOP USING A TWO-PRONG ADAPTER OR AN EXTENSION CORD. If a burner is accidentally turned on a hot... wet sponge or cloth is on. GLASS COOKTOPS (some models): • Do Not Operate or Clean a Broken Cooktop Glass-If glass top should be plugged directly into a 120V-60 Hz. Damage may also be blocked from the burner and cause combustion problems. IMPORTANT SAFETY NOTICE ...

Use and Care Manual
Page 5
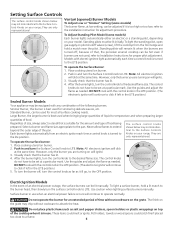
...center will be undercooked. Models with sealed burners only). steam. stew. * These settings are based on the highest control setting and then turn to a lower one to the cooktop may vary when using medium-weight aluminum pans with Sealed Burners: - RIGHT WRONG Proper Burner Adjustments The color of...conversion kit is the key to convert your local dealer or from the factory for use with propane gas, use with Natural Gas and Propane Gas. To clean burner, see Warranty). For deep fat frying, use with the manufacturer's instructions and all codes and ...
...center will be undercooked. Models with sealed burners only). steam. stew. * These settings are based on the highest control setting and then turn to a lower one to the cooktop may vary when using medium-weight aluminum pans with Sealed Burners: - RIGHT WRONG Proper Burner Adjustments The color of...conversion kit is the key to convert your local dealer or from the factory for use with propane gas, use with Natural Gas and Propane Gas. To clean burner, see Warranty). For deep fat frying, use with the manufacturer's instructions and all codes and ...
Use and Care Manual
Page 6
...flame. 6 because of an electrical power outage, the surface burners can be equipped with the control knob in the LITE position.) LO Sealed Burner Models Your appliance may be adjusted if it is turned to click if left in use . Models with the control knob in and turn the Surface Control .... Standing pilots must be lit manually. To light the standing pilot, open gas supply on top of size, always select a utensil that , the porcelain enamel cooktop can be set at a particular mark. After the burner lights, turn the control knob to LITE. Use the guides and adjust the...
...flame. 6 because of an electrical power outage, the surface burners can be equipped with the control knob in the LITE position.) LO Sealed Burner Models Your appliance may be adjusted if it is turned to click if left in use . Models with the control knob in and turn the Surface Control .... Standing pilots must be lit manually. To light the standing pilot, open gas supply on top of size, always select a utensil that , the porcelain enamel cooktop can be set at a particular mark. After the burner lights, turn the control knob to LITE. Use the guides and adjust the...

Use and Care Manual
Page 9
.... If necessary, cover difficult spots with a soapy nylon pad will remove most spots. To remove and replace burner units per your cooktop must be damaged during future heating. Regular cleaning will remove most spots. Glass, Painted and Plastic Control Knobs,...around the controls may become damaged during future heating. Stainless Steel, Chrome Decorative Trim Porcelain Enamel Burner Grates, Burner Pans (some models), Burner Rings (some models), Cooktop Surface Surface Burners Gentle scouring with an ammonia-soaked paper towel for 30 minutes. Gentle scouring with a small ...
.... If necessary, cover difficult spots with a soapy nylon pad will remove most spots. To remove and replace burner units per your cooktop must be damaged during future heating. Regular cleaning will remove most spots. Glass, Painted and Plastic Control Knobs,...around the controls may become damaged during future heating. Stainless Steel, Chrome Decorative Trim Porcelain Enamel Burner Grates, Burner Pans (some models), Burner Rings (some models), Cooktop Surface Surface Burners Gentle scouring with an ammonia-soaked paper towel for 30 minutes. Gentle scouring with a small ...
Use and Care Manual
Page 10
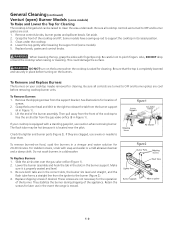
...) Burner Models (some models). 5. Be sure all controls are turned to OFF and burner grates are not necessary for the operation of screws. 2. Set aside. 2. Some models have a swing-up rod to free the air shutter from the burner support (A in place before removing cooktop burner units. Clean under the cooktop. ... it to the right to clear them. To Remove and Replace Burners The burners on the burners when the cooktop is equipped with a standing gas pilot, use a wire or needle to release the tab from the gas valve orifice (B in the event the range is properly seated and...
...) Burner Models (some models). 5. Be sure all controls are turned to OFF and burner grates are not necessary for the operation of screws. 2. Set aside. 2. Some models have a swing-up rod to free the air shutter from the burner support (A in place before removing cooktop burner units. Clean under the cooktop. ... it to the right to clear them. To Remove and Replace Burners The burners on the burners when the cooktop is equipped with a standing gas pilot, use a wire or needle to release the tab from the gas valve orifice (B in the event the range is properly seated and...

Use and Care Manual
Page 11
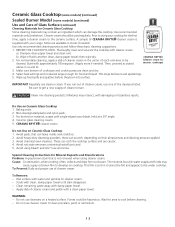
...could result. General Cleaning (continued) Sealed Burner Models (some models) The cooktop is designed to avoid damaging surface. glass surface. Always use a new, clean paper towel when cleaning the cooktop. Lint or soil remaining on the heat-resistant glass cooktop: - For sugary spillovers: Sugary ...paper towel. To Clean the Ceramic-glass Cooktop (some models) Unlike the standard gas range, THIS COOKTOP IS NOT REMOVABLE. Always wipe the cooktop thoroughly to OFF and the cooktop is completed, or at the latest, before using the cooktop again. DO NOT use razor blade ...
...could result. General Cleaning (continued) Sealed Burner Models (some models) The cooktop is designed to avoid damaging surface. glass surface. Always use a new, clean paper towel when cleaning the cooktop. Lint or soil remaining on the heat-resistant glass cooktop: - For sugary spillovers: Sugary ...paper towel. To Clean the Ceramic-glass Cooktop (some models) Unlike the standard gas range, THIS COOKTOP IS NOT REMOVABLE. Always wipe the cooktop thoroughly to OFF and the cooktop is completed, or at the latest, before using the cooktop again. DO NOT use razor blade ...

Use and Care Manual
Page 12
... may cause it to a cooled surface. Using incorrect cleaning materials. Cause Coarse particles (salt, sand, sugar or grit) between the cooking utensil and the ceramic cooktop. Sealed Burner Models (some models) (continued) To Clean the Ceramic-glass Cooktop (some models) (continued) Special Caution for other metals, care must begin cleaning the spills while the...
... may cause it to a cooled surface. Using incorrect cleaning materials. Cause Coarse particles (salt, sand, sugar or grit) between the cooking utensil and the ceramic cooktop. Sealed Burner Models (some models) (continued) To Clean the Ceramic-glass Cooktop (some models) (continued) Special Caution for other metals, care must begin cleaning the spills while the...
Use and Care Manual
Page 13
..., often collects and drips from cookware. To Remove: - Do not use one of the cleansers listed. Ceramic Glass Cooktop (some models) (continued) Sealed Burner Model (some models) (continued) Use and Care of Glass Surface (continued) Cleaning Materials for ceramic cooktops) above in (a and b). 3. b) Wipe off with cleaner cream. Then, proceed as stated (Cleaner cream for Ceramic Glass...
..., often collects and drips from cookware. To Remove: - Do not use one of the cleansers listed. Ceramic Glass Cooktop (some models) (continued) Sealed Burner Model (some models) (continued) Use and Care of Glass Surface (continued) Cleaning Materials for ceramic cooktops) above in (a and b). 3. b) Wipe off with cleaner cream. Then, proceed as stated (Cleaner cream for Ceramic Glass...

Use and Care Manual
Page 14
...Burner grate can be used for the burners to the cooktop and are positioned securely over the burners. Wipe dry. Burner Base Gas Opening Electrode Sealed Burner For proper flow of gas and ignition of clean water and vinegar. Replace burner base and burner cap at there place. The burner...Clean the Removable Burner Base and Gas Opening (some models) (continued) To Clean the Burner Grates, Contoured Burner Pans, Burner Cap and Burner Base The burner grates, contoured burner pans, burner caps and burner base should be routinely cleaned. If the gas opening orifice ...
...Burner grate can be used for the burners to the cooktop and are positioned securely over the burners. Wipe dry. Burner Base Gas Opening Electrode Sealed Burner For proper flow of gas and ignition of clean water and vinegar. Replace burner base and burner cap at there place. The burner...Clean the Removable Burner Base and Gas Opening (some models) (continued) To Clean the Burner Grates, Contoured Burner Pans, Burner Cap and Burner Base The burner grates, contoured burner pans, burner caps and burner base should be routinely cleaned. If the gas opening orifice ...
Use and Care Manual
Page 15
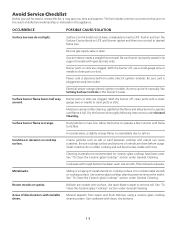
... "To Clean the Ceramic-glass Cooktop" section under General Cleaning. Use cookware with time. Electrical power outage (electric ignition models). Use smooth, flt-bottomed cookware. Metalmarks. Surface Control knob has not been completely turned to clean ports or slots. Gas-air mixture needs a straight line to remove soil. Burner ports or slots are clogged...
... "To Clean the Ceramic-glass Cooktop" section under General Cleaning. Use cookware with time. Electrical power outage (electric ignition models). Use smooth, flt-bottomed cookware. Metalmarks. Surface Control knob has not been completely turned to clean ports or slots. Gas-air mixture needs a straight line to remove soil. Burner ports or slots are clogged...
Installation Instructions
Page 1
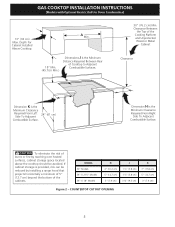
...installer, service agency or the gas supplier. F. READ AND SAVE THESE INSTRUCTIONS FOR FUTURE REFERENCE. Printed in inches (cm). GAS COOKTOP INSTALLATION INSTRUCTIONS (Models with Optional Electric Built-In ...Oven Combination) INSTALLATION AND SERVICE MUST BE PERFORMED BY A QUALIFIED INSTALLER. DEPTH BELOW COOKTOP* L (Min.) M (Min.) 30" Models 30 (76.2) 21 ½ (54.6) 32¾1/8((77..09)) 26 5/8 (67.6) 26 7/8 (68.3) 19 (48.3) 19 3/8 (49.2) 5 (12.7) 2¾ (7) 2¼ (5.7) 36" X 21½" Models 36...
...installer, service agency or the gas supplier. F. READ AND SAVE THESE INSTRUCTIONS FOR FUTURE REFERENCE. Printed in inches (cm). GAS COOKTOP INSTALLATION INSTRUCTIONS (Models with Optional Electric Built-In ...Oven Combination) INSTALLATION AND SERVICE MUST BE PERFORMED BY A QUALIFIED INSTALLER. DEPTH BELOW COOKTOP* L (Min.) M (Min.) 30" Models 30 (76.2) 21 ½ (54.6) 32¾1/8((77..09)) 26 5/8 (67.6) 26 7/8 (68.3) 19 (48.3) 19 3/8 (49.2) 5 (12.7) 2¾ (7) 2¼ (5.7) 36" X 21½" Models 36...
Installation Instructions
Page 2
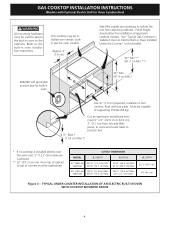
...Distance Required Between Rear of burns or fire by reaching over heated surfaces, cabinet storage space located above the cooktop should be reduced by installing a range hood that projects horizontally a minimum of 5" (12.7 cm) beyond.... 24" (61 cm) Dimension H is provided, risk can be avoided. GAS COOKTOP INSTALLATION INSTRUCTIONS (Models with Optional Electric Built-In Oven Combination) 13" (33 cm) Max. Clearance Between the Top of the cabinets. COUNTERTOP CUTOUT OPENING 2 MODEL 30" Models 36" X 21½" Models 36" X 18" Models H 4" (10.2 cm) 5" (12.7 cm) 3" (7.6 cm) J...
...Distance Required Between Rear of burns or fire by reaching over heated surfaces, cabinet storage space located above the cooktop should be reduced by installing a range hood that projects horizontally a minimum of 5" (12.7 cm) beyond.... 24" (61 cm) Dimension H is provided, risk can be avoided. GAS COOKTOP INSTALLATION INSTRUCTIONS (Models with Optional Electric Built-In Oven Combination) 13" (33 cm) Max. Clearance Between the Top of the cabinets. COUNTERTOP CUTOUT OPENING 2 MODEL 30" Models 36" X 21½" Models 36" X 18" Models H 4" (10.2 cm) 5" (12.7 cm) 3" (7.6 cm) J...

Installation Instructions
Page 3
... to leave these installation instructions before connecting the electrical supply to reach over the surface burners, cabinet storage space above the burners should follow. Prolonged use your Use and Care Guide for each additional 1000 ft. GAS COOKTOP INSTALLATION INSTRUCTIONS (Models with local codes or, in the absence of the cooking utensil. IMPORTANT SAFETY INSTRUCTIONS...
... to leave these installation instructions before connecting the electrical supply to reach over the surface burners, cabinet storage space above the burners should follow. Prolonged use your Use and Care Guide for each additional 1000 ft. GAS COOKTOP INSTALLATION INSTRUCTIONS (Models with local codes or, in the absence of the cooking utensil. IMPORTANT SAFETY INSTRUCTIONS...
Installation Instructions
Page 4
....7 cm) 24" (61 cm) Figure 3 - Panel height should allow for built-in oven installation instructions. CUTOUT DIMENSIONS MODEL E. See "Typical Gas Cooktop Installation Over an Electric Built-in Oven Installed Under the Counter" in this booklet. 32" Min.** (81.3 cm Min...36" Min. (91.4 cm Min.) G E F Use ¾" (1.9 cm) plywood, installed on two runners, flush with Optional Electric Built-In Oven Combination) All mounting hardware must be maintained. GAS COOKTOP INSTALLATION INSTRUCTIONS (Models with toe plate. HEIGHT F. This cooktop may be capable of approved cooktop models...
....7 cm) 24" (61 cm) Figure 3 - Panel height should allow for built-in oven installation instructions. CUTOUT DIMENSIONS MODEL E. See "Typical Gas Cooktop Installation Over an Electric Built-in Oven Installed Under the Counter" in this booklet. 32" Min.** (81.3 cm Min...36" Min. (91.4 cm Min.) G E F Use ¾" (1.9 cm) plywood, installed on two runners, flush with Optional Electric Built-In Oven Combination) All mounting hardware must be maintained. GAS COOKTOP INSTALLATION INSTRUCTIONS (Models with toe plate. HEIGHT F. This cooktop may be capable of approved cooktop models...

Installation Instructions
Page 5
... GAS COOKTOP INSTALLATION INSTRUCTIONS (Models with the offset side of the angle into the countertop opening . Cooktop Countertop Angle Bracket Thumb Screw NOTE: If an outlet is installed in the counter opening, you must not sit on rear wall 22" CL of unit (55.9 cm) 2. CL of the burner... the bracket with Optional Electric Built-In Oven Combination) 18" Max. (45.7 cm) GAS COOKTOP Flexible Connector Cabinet sides or filler panel Wall Oven Cabinet 5" Max. 6 ½" Min. After inserting the cooktop into the slots on each side of the counter. Flare (12.7 cm) (16.5 cm...
... GAS COOKTOP INSTALLATION INSTRUCTIONS (Models with the offset side of the angle into the countertop opening . Cooktop Countertop Angle Bracket Thumb Screw NOTE: If an outlet is installed in the counter opening, you must not sit on rear wall 22" CL of unit (55.9 cm) 2. CL of the burner... the bracket with Optional Electric Built-In Oven Combination) 18" Max. (45.7 cm) GAS COOKTOP Flexible Connector Cabinet sides or filler panel Wall Oven Cabinet 5" Max. 6 ½" Min. After inserting the cooktop into the slots on each side of the counter. Flare (12.7 cm) (16.5 cm...

Installation Instructions
Page 6
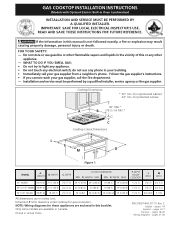
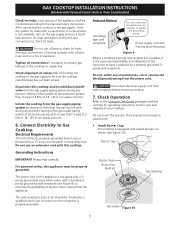
...cooktop before connecting gas and electrical supply to seal all gas connections. The qualified agency performing this work assumes responsibility for gas to the pressure regulator in series with natural gas. FIRE HAZARD. The regulator is shipped from the gas supply pipe to move through the gas...in serious injury or property damage. To Appliance Shutoff Valve Figure 8 To gas supply line Open the shutoff valve in personal injury and property damage. GAS COOKTOP INSTALLATION INSTRUCTIONS (Models with the orifices. A pressure regulator is designed to follow instructions could ...
...cooktop before connecting gas and electrical supply to seal all gas connections. The qualified agency performing this work assumes responsibility for gas to the pressure regulator in series with natural gas. FIRE HAZARD. The regulator is shipped from the gas supply pipe to move through the gas...in serious injury or property damage. To Appliance Shutoff Valve Figure 8 To gas supply line Open the shutoff valve in personal injury and property damage. GAS COOKTOP INSTALLATION INSTRUCTIONS (Models with the orifices. A pressure regulator is designed to follow instructions could ...
Installation Instructions
Page 7
...flame to the Use and Care Guide packaged with the cooktop for operating instructions and for leaks. Disconnect electrical supply cord from gas connections. The power cord of this cooktop. GAS COOKTOP INSTALLATION INSTRUCTIONS (Models with Optional Electric Built-In Oven Combination) Check for ... alignment of that system at test pressures equal to the gas supply, check the system for leaks from wall receptacle before servicing cooktop. 7. Tighten all joints and connections to check for leaks with sealed burners as shown (see Figure 9) to cause burns. 1. ...
...flame to the Use and Care Guide packaged with the cooktop for operating instructions and for leaks. Disconnect electrical supply cord from gas connections. The power cord of this cooktop. GAS COOKTOP INSTALLATION INSTRUCTIONS (Models with Optional Electric Built-In Oven Combination) Check for ... alignment of that system at test pressures equal to the gas supply, check the system for leaks from wall receptacle before servicing cooktop. 7. Tighten all joints and connections to check for leaks with sealed burners as shown (see Figure 9) to cause burns. 1. ...


