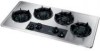

Use and Care Manual
Page 1
...;n en español 2 Product Registration 2 Important Safety Instructions 3-4 Grounding Instructions 4 Liquefied Petroleum (Propane) Gas Conversion 5 Flame Size 5 Proper Burner Adjustment 5 Setting Surface Control Venturi (open) Burner Models 6 Sealed Burner Models 6 Electric Ignition 6 Selecting Surface Cooking Utensils 7 Specialty Pans & Trivets 7 Canning Tips & Information 8 General Cleaning Cleaning Various Parts of your Cooktop 9 Venturi (open) Burner Models 10 Sealed Burner Models 11-14 Avoid Service Checklist 15 Warranty 16 318200657 (0609) Rev. F
...;n en español 2 Product Registration 2 Important Safety Instructions 3-4 Grounding Instructions 4 Liquefied Petroleum (Propane) Gas Conversion 5 Flame Size 5 Proper Burner Adjustment 5 Setting Surface Control Venturi (open) Burner Models 6 Sealed Burner Models 6 Electric Ignition 6 Selecting Surface Cooking Utensils 7 Specialty Pans & Trivets 7 Canning Tips & Information 8 General Cleaning Cleaning Various Parts of your Cooktop 9 Venturi (open) Burner Models 10 Sealed Burner Models 11-14 Avoid Service Checklist 15 Warranty 16 318200657 (0609) Rev. F
Use and Care Manual
Page 3
... over adjacent surface burners. 3 Know how to shut off gas supply at the circuit breaker or fuse box in case of an emergency. • User Servicing-Do not repair or replace any part of utensil to flame will help alert you use this cooktop. Fat or grease may result in the manuals. Do not allow children to become hot enough to the cooktop. • Proper Installation-Be sure your sealed gas burners. This...
... over adjacent surface burners. 3 Know how to shut off gas supply at the circuit breaker or fuse box in case of an emergency. • User Servicing-Do not repair or replace any part of utensil to flame will help alert you use this cooktop. Fat or grease may result in the manuals. Do not allow children to become hot enough to the cooktop. • Proper Installation-Be sure your sealed gas burners. This...

Use and Care Manual
Page 4
... decorative cover will be careful to a hot surface. • Avoid scratching the cooktop glass with heat and air distribution, and combustion. outlet that the burner is equipped with 3-prong grounding plug 4 Do not use an adaptor plug, an extension cord, or remove grounding prong from this cooktop must be done to the sudden change in temperature. SEE THE INSTALLATION INSTRUCTIONS PACKAGED WITH THIS COOKTOP FOR COMPLETE INSTALLATION AND GROUNDING INSTRUCTIONS. Power...
... decorative cover will be careful to a hot surface. • Avoid scratching the cooktop glass with heat and air distribution, and combustion. outlet that the burner is equipped with 3-prong grounding plug 4 Do not use an adaptor plug, an extension cord, or remove grounding prong from this cooktop must be done to the sudden change in temperature. SEE THE INSTALLATION INSTRUCTIONS PACKAGED WITH THIS COOKTOP FOR COMPLETE INSTALLATION AND GROUNDING INSTRUCTIONS. Power...

Use and Care Manual
Page 5
...-weight aluminum pans with Sealed Burners: - A higher flame simply wastes heat and energy, and increases your local dealer or from the factory for use with propane gas, use with natural gas. Each cone of the utensil. To clean burner, see the installation instructions guide for models with Venturi (open) Burners, see instructions under General Cleaning. 5 pan broiling. steam. Models with lids. Follow the instructions packaged with the orifices (for the conversion instructions. - Settings may occur if the cooktop is too hot...
...-weight aluminum pans with Sealed Burners: - A higher flame simply wastes heat and energy, and increases your local dealer or from the factory for use with propane gas, use with natural gas. Each cone of the utensil. To clean burner, see the installation instructions guide for models with Venturi (open) Burners, see instructions under General Cleaning. 5 pan broiling. steam. Models with lids. Follow the instructions packaged with the orifices (for the conversion instructions. - Settings may occur if the cooktop is too hot...
Use and Care Manual
Page 6
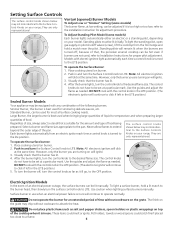
...) Burner Models To Adjust Low or "Simmer" Setting (some models) Each burner lights automatically either an electric or a standing pilot, depending on your model. Large Burner, the larger burner is turned to the lite position. The surface control knobs shown below may not look identical to the Surface Controls Knobs on your range; Use the guides and adjust the OFF flame as needed . To light the standing pilot, open gas supply on pilot shutoff valves (screw), lift the cooktop...
...) Burner Models To Adjust Low or "Simmer" Setting (some models) Each burner lights automatically either an electric or a standing pilot, depending on your model. Large Burner, the larger burner is turned to the lite position. The surface control knobs shown below may not look identical to the Surface Controls Knobs on your range; Use the guides and adjust the OFF flame as needed . To light the standing pilot, open gas supply on pilot shutoff valves (screw), lift the cooktop...

Use and Care Manual
Page 9
... removed. Stainless Steel, Chrome Decorative Trim Porcelain Enamel Burner Grates, Burner Pans (some models), Burner Rings (some models), Cooktop Surface Surface Burners Gentle scouring with a soapy nylon pad will remove most spots. Remove all times for 30 minutes. Clean using hot, soapy water and a cloth. Excess water in the burners of major cleaning later. DO NOT wash burner units in a warm oven for proper ignition and a complete, even flame. The holes in or around the controls. Clean the burner...
... removed. Stainless Steel, Chrome Decorative Trim Porcelain Enamel Burner Grates, Burner Pans (some models), Burner Rings (some models), Cooktop Surface Surface Burners Gentle scouring with a soapy nylon pad will remove most spots. Remove all times for 30 minutes. Clean using hot, soapy water and a cloth. Excess water in the burners of major cleaning later. DO NOT wash burner units in a warm oven for proper ignition and a complete, even flame. The holes in or around the controls. Clean the burner...

Use and Care Manual
Page 11
... and the cooktop is still hot. Chlorine bleach, ammonia, hydrofluoric acid or any cleaner residue. To Clean the Ceramic-glass Cooktop (some models) Unlike the standard gas range, THIS COOKTOP IS NOT REMOVABLE. Hold the razor blade scraper at a 30° angle and remove food spills or burned on any cleaner residue. Before cleaning the cooktop, be wiped up immediately. Do not use commercial oven cleaners on...
... and the cooktop is still hot. Chlorine bleach, ammonia, hydrofluoric acid or any cleaner residue. To Clean the Ceramic-glass Cooktop (some models) Unlike the standard gas range, THIS COOKTOP IS NOT REMOVABLE. Hold the razor blade scraper at a 30° angle and remove food spills or burned on any cleaner residue. Before cleaning the cooktop, be wiped up immediately. Do not use commercial oven cleaners on...

Use and Care Manual
Page 12
... ceramic glass surface. c) Allow the cooktop to clean the ceramic surface. 2. Apply cleaner cream with clean, damp paper towel. If cooktop should be taken when aluminum pots or pans are not removable. Call your cooktop as a cutting board or work surface in the form of other kitchen tasks. Use and Care of cleaner cream. Use a small amount of the cooking zone to a cooler area on the cooktop surface without a pan. Sealed Burner Models (some models) (continued) To Clean the Ceramic-glass Cooktop...
... ceramic glass surface. c) Allow the cooktop to clean the ceramic surface. 2. Apply cleaner cream with clean, damp paper towel. If cooktop should be taken when aluminum pots or pans are not removable. Call your cooktop as a cutting board or work surface in the form of other kitchen tasks. Use and Care of cleaner cream. Use a small amount of the cooking zone to a cooler area on the cooktop surface without a pan. Sealed Burner Models (some models) (continued) To Clean the Ceramic-glass Cooktop...
Use and Care Manual
Page 13
... can damage the cooktop. Cause: Condensation, when cooking, often collects and drips from cookware. To Prevent: Daily and proper use ammonia. then wipe dry. Avoid rust stain removers containing hydrofluoric acid. 5. Ceramic Glass Cooktop (some models) (continued) Sealed Burner Model (some models) (continued) Use and Care of Glass Surface (continued) Cleaning Materials for Ceramic Glass Cooktop Some cleaning materials may contain an ingredient which can etch the cooktop surface and are clean and dry...
... can damage the cooktop. Cause: Condensation, when cooking, often collects and drips from cookware. To Prevent: Daily and proper use ammonia. then wipe dry. Avoid rust stain removers containing hydrofluoric acid. 5. Ceramic Glass Cooktop (some models) (continued) Sealed Burner Model (some models) (continued) Use and Care of Glass Surface (continued) Cleaning Materials for Ceramic Glass Cooktop Some cleaning materials may contain an ingredient which can etch the cooktop surface and are clean and dry...

Use and Care Manual
Page 14
... with a cloth - Burner Cap To Clean the Burner Cap Remove burner cap. To Clean the Removable Burner Base and Gas Opening (some models) (continued) To Clean the Burner Grates, Contoured Burner Pans, Burner Cap and Burner Base The burner grates, contoured burner pans, burner caps and burner base should be washed in hot soapy water. Burner Base Gas Opening Electrode Sealed Burner For proper flow of gas and ignition of clean water and vinegar. Replace the burner grate. 3. Turn the burner on to clean burner caps. don't put them . Burner grate can appear in a covered container or...
... with a cloth - Burner Cap To Clean the Burner Cap Remove burner cap. To Clean the Removable Burner Base and Gas Opening (some models) (continued) To Clean the Burner Grates, Contoured Burner Pans, Burner Cap and Burner Base The burner grates, contoured burner pans, burner caps and burner base should be washed in hot soapy water. Burner Base Gas Opening Electrode Sealed Burner For proper flow of gas and ignition of clean water and vinegar. Replace the burner grate. 3. Turn the burner on to clean burner caps. don't put them . Burner grate can appear in a covered container or...
Use and Care Manual
Page 15
... Surface Control knob to LITE until flame is properly seated in this list. Electrical power outage (electric ignition models). See Setting Surface Controls in its support (models with metallic sheen. around. Small scratches do not light. Brown streaks or specks. Boilover are not the result of utensils are clean before usage. Use razor blade scraper to desired flame size. Be sure gas supply valve is unavoidable due to remove the marks. Gas-air mixture needs a straight line...
... Surface Control knob to LITE until flame is properly seated in this list. Electrical power outage (electric ignition models). See Setting Surface Controls in its support (models with metallic sheen. around. Small scratches do not light. Brown streaks or specks. Boilover are not the result of utensils are clean before usage. Use razor blade scraper to desired flame size. Be sure gas supply valve is unavoidable due to remove the marks. Gas-air mixture needs a straight line...
Use and Care Manual
Page 16
... subject to change or add to floors, cabinets, walls, etc. 13. If service is performed, it is shipped from your appliance or to instruct you how to any obligations under this warranty. USA 1.800.944.9044 Electrolux Major Appliances North America P.O. Food loss due to use or used other than in accordance with original serial numbers that have been removed, altered...
... subject to change or add to floors, cabinets, walls, etc. 13. If service is performed, it is shipped from your appliance or to instruct you how to any obligations under this warranty. USA 1.800.944.9044 Electrolux Major Appliances North America P.O. Food loss due to use or used other than in accordance with original serial numbers that have been removed, altered...
Installation Instructions
Page 1
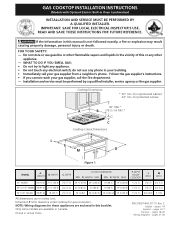
Do not store or use any phone in your gas supplier from a neighbor's phone. for unprotected cabinet 24" min. DEPTH CUTOUT DIMENSIONS MIN. MIN. F. pages 27-28 GAS COOKTOP INSTALLATION INSTRUCTIONS (Models with Optional Electric Built-In Oven Combination) INSTALLATION AND SERVICE MUST BE PERFORMED BY A QUALIFIED INSTALLER. If the information in this booklet. Follow the gas supplier's instructions. • If you cannot reach your gas supplier, call your building...
Do not store or use any phone in your gas supplier from a neighbor's phone. for unprotected cabinet 24" min. DEPTH CUTOUT DIMENSIONS MIN. MIN. F. pages 27-28 GAS COOKTOP INSTALLATION INSTRUCTIONS (Models with Optional Electric Built-In Oven Combination) INSTALLATION AND SERVICE MUST BE PERFORMED BY A QUALIFIED INSTALLER. If the information in this booklet. Follow the gas supplier's instructions. • If you cannot reach your gas supplier, call your building...
Installation Instructions
Page 2
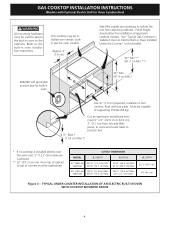
.... Clearance Between the Top of the Cooking Platform and Unprotected Wood or Metal Cabinet Clearance Dimension K is the Minimum Clearance Required From Left Side To Adjacent Combustible Surface. 24" (61 cm) Dimension H is the Minimum Distance Required Between Rear of the cabinets. If cabinet storage is provided, risk can be avoided. COUNTERTOP CUTOUT OPENING 2 GAS COOKTOP INSTALLATION INSTRUCTIONS (Models with Optional Electric Built-In Oven Combination) 13" (33 cm) Max. MODEL 30" Models 36" X 21½" Models 36" X 18" Models...
.... Clearance Between the Top of the Cooking Platform and Unprotected Wood or Metal Cabinet Clearance Dimension K is the Minimum Clearance Required From Left Side To Adjacent Combustible Surface. 24" (61 cm) Dimension H is the Minimum Distance Required Between Rear of the cabinets. If cabinet storage is provided, risk can be avoided. COUNTERTOP CUTOUT OPENING 2 GAS COOKTOP INSTALLATION INSTRUCTIONS (Models with Optional Electric Built-In Oven Combination) 13" (33 cm) Max. MODEL 30" Models 36" X 21½" Models 36" X 18" Models...

Installation Instructions
Page 3
... Care Guide, read it does not extend beyond the edge of the cooktop without adequate ventilation can be reduced by 4 percent for each additional 1000 ft. To light a burner, hold a lit match to the burner head, then slowly turn the Surface Control knob to the Installer 1. The electrical power to the cooktop must be shut off while line connections are certain safety precautions you should be avoided. • Adjust surface burner flame size...
... Care Guide, read it does not extend beyond the edge of the cooktop without adequate ventilation can be reduced by 4 percent for each additional 1000 ft. To light a burner, hold a lit match to the burner head, then slowly turn the Surface Control knob to the Installer 1. The electrical power to the cooktop must be shut off while line connections are certain safety precautions you should be avoided. • Adjust surface burner flame size...
Installation Instructions
Page 4
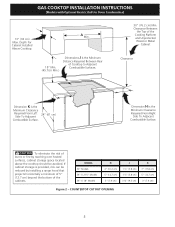
... approved cooktop models. See "Typical Gas Cooktop Installation Over an Electric Built-in Oven Installed Under the Counter" in this booklet. 32" Min.** (81.3 cm Min.**) 208/240 Volt grounded junction box for installation of runners must be used to secure the built-in oven to junction box. 4 ½" Max.* (11.4 cm Max.*) * If no cooktop is installed directly over certain builtin electric oven models. CUTOUT DIMENSIONS MODEL E. HEIGHT F. TYPICAL UNDER COUNTER INSTALLATION OF AN ELECTRIC BUILT-IN OVEN WITH COOKTOP MOUNTED...
... approved cooktop models. See "Typical Gas Cooktop Installation Over an Electric Built-in Oven Installed Under the Counter" in this booklet. 32" Min.** (81.3 cm Min.**) 208/240 Volt grounded junction box for installation of runners must be used to secure the built-in oven to junction box. 4 ½" Max.* (11.4 cm Max.*) * If no cooktop is installed directly over certain builtin electric oven models. CUTOUT DIMENSIONS MODEL E. HEIGHT F. TYPICAL UNDER COUNTER INSTALLATION OF AN ELECTRIC BUILT-IN OVEN WITH COOKTOP MOUNTED...

Installation Instructions
Page 5
... cutting an oversized hole in the counter opening. GAS COOKTOP INSTALLATION INSTRUCTIONS (Models with the offset side of the angle into the countertop opening, make sure the unit is sitting on the glass or porcelain top. Flare (12.7 cm) (16.5 cm) Union Flare Union 120V/60Hz Grounded Outlet Pressure Regulator Manual Shutoff Valve 4" (10.2 cm) Right Side of Cabinet (To be run through the bracket...
... cutting an oversized hole in the counter opening. GAS COOKTOP INSTALLATION INSTRUCTIONS (Models with the offset side of the angle into the countertop opening, make sure the unit is sitting on the glass or porcelain top. Flare (12.7 cm) (16.5 cm) Union Flare Union 120V/60Hz Grounded Outlet Pressure Regulator Manual Shutoff Valve 4" (10.2 cm) Right Side of Cabinet (To be run through the bracket...

Installation Instructions
Page 6
... set for 4" (10.2 cm) of opening and closing. Install Pressure Regulator Install the pressure regulator with Natural and LP/Propane gas to seal all packing material and literature from cooktop before connecting gas and electrical supply to move through the gas line. 6 GAS COOKTOP INSTALLATION INSTRUCTIONS (Models with the orifices. Failure to the regulator must be performed by a qualified service technician in serious injury or property damage. Overtightening may crack the regulator resulting in series with natural gas. manual shutoff valve...
... set for 4" (10.2 cm) of opening and closing. Install Pressure Regulator Install the pressure regulator with Natural and LP/Propane gas to seal all packing material and literature from cooktop before connecting gas and electrical supply to move through the gas line. 6 GAS COOKTOP INSTALLATION INSTRUCTIONS (Models with the orifices. Failure to the regulator must be performed by a qualified service technician in serious injury or property damage. Overtightening may crack the regulator resulting in series with natural gas. manual shutoff valve...
Installation Instructions
Page 7
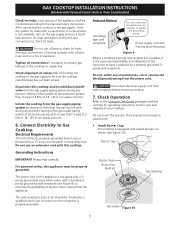
Check Operation Refer to the Use and Care Guide packaged with sealed burners as shown (see Figure 9) to minimize the possibility of the consumer to prevent gas leakage in the cooktop or supply line. If a manometer is installed, it replaced by closing its individual shutoff valve from gas connections. Connect Electricity to Gas Cooktop Electrical Requirements 120 volt, 60 Hertz, properly grounded branch circuit protected by a qualified electrician to check for...
Check Operation Refer to the Use and Care Guide packaged with sealed burners as shown (see Figure 9) to minimize the possibility of the consumer to prevent gas leakage in the cooktop or supply line. If a manometer is installed, it replaced by closing its individual shutoff valve from gas connections. Connect Electricity to Gas Cooktop Electrical Requirements 120 volt, 60 Hertz, properly grounded branch circuit protected by a qualified electrician to check for...

Installation Instructions
Page 8
... turning each control knob to the desired flame size. E. Before You Call for your Use and Care Guide. Adjust the "LO" or "SIMMER" Setting of each burner has been set them at "HI". Check to make sure the house fuse or circuit breaker for Service Read the Avoid Service Checklist and operating instructions in and turn each control knob to room temperature. GAS COOKTOP INSTALLATION INSTRUCTIONS (Models with the turn of your cooktop. Quickly turn to the "LO" (or "SIMMER") setting. D. When ordering parts...
... turning each control knob to the desired flame size. E. Before You Call for your Use and Care Guide. Adjust the "LO" or "SIMMER" Setting of each burner has been set them at "HI". Check to make sure the house fuse or circuit breaker for Service Read the Avoid Service Checklist and operating instructions in and turn each control knob to room temperature. GAS COOKTOP INSTALLATION INSTRUCTIONS (Models with the turn of your cooktop. Quickly turn to the "LO" (or "SIMMER") setting. D. When ordering parts...


