
Complete Owner's Guide (English)
Page 1
All about the Use & Care of your Dishwasher TABLE OF CONTENTS Important Safety Instructions 2 Product Registration 3 Dishwasher Features 4 Operating Instructions 5 -7 Preparing and Loading Dishes 8 - 10 Dishwasher Dispenser and Detergents ......... 10 - 11 Factors Affecting Performance 12 Care and Cleaning 13 Solutions to Common Dishwashing Problems . 14 -15 Warranty 16 www.frigidaire.com USA 1-800-944-9044 www.frigidaire.ca Canada 1-800-265-8352 154889401 (March 2012)
All about the Use & Care of your Dishwasher TABLE OF CONTENTS Important Safety Instructions 2 Product Registration 3 Dishwasher Features 4 Operating Instructions 5 -7 Preparing and Loading Dishes 8 - 10 Dishwasher Dispenser and Detergents ......... 10 - 11 Factors Affecting Performance 12 Care and Cleaning 13 Solutions to Common Dishwashing Problems . 14 -15 Warranty 16 www.frigidaire.com USA 1-800-944-9044 www.frigidaire.ca Canada 1-800-265-8352 154889401 (March 2012)
Complete Owner's Guide (English)
Page 2
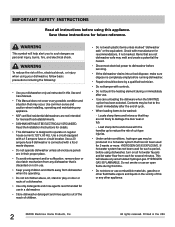
... reach of cut-type injuries. • Under certain conditions, hydrogen gas may be hot to operate on door or racks of a dishwasher. • Use only detergents and rinse agents recommended for use an open flame during or immediately after the end of this Use and Care Manual. • This Manual does not cover every possible condition and situation that they are not dishwasher safe may occur. Load sharp items...
... reach of cut-type injuries. • Under certain conditions, hydrogen gas may be hot to operate on door or racks of a dishwasher. • Use only detergents and rinse agents recommended for use an open flame during or immediately after the end of this Use and Care Manual. • This Manual does not cover every possible condition and situation that they are not dishwasher safe may occur. Load sharp items...

Complete Owner's Guide (English)
Page 3
... www.frigidaire.com or by applying more . Purchase date Model number Serial number Registering your Product Registration Card in the pumping/spraying sounds are important to record important product information. Read Before Operating Your Dishwasher! The energy use this dishwasher to serve you DON'T hear! You can register online at what is part of our commitment to customer satisfaction and product quality throughout the service life of water entering...
... www.frigidaire.com or by applying more . Purchase date Model number Serial number Registering your Product Registration Card in the pumping/spraying sounds are important to record important product information. Read Before Operating Your Dishwasher! The energy use this dishwasher to serve you DON'T hear! You can register online at what is part of our commitment to customer satisfaction and product quality throughout the service life of water entering...
Complete Owner's Guide (English)
Page 4
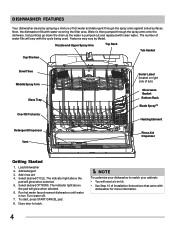
... the filter area. Run hot water faucet nearest dishwasher until water is pumped out and replaced with the cycle being used. Turn water off. 7. The number of hot water and detergent through the spray arms onto the dishware. Next, the dishwasher fills with dishwasher for more information. 4 Select desired OPTIONS. The indicator light above the pad will need a trim kit. • See Step 10 of tub) Silverware Basket Bottom Rack Blade SprayTM Heating Element Rinse Aid Dispenser Getting Started 1. NOTE To customize your cabinets...
... the filter area. Run hot water faucet nearest dishwasher until water is pumped out and replaced with the cycle being used. Turn water off. 7. The number of hot water and detergent through the spray arms onto the dishware. Next, the dishwasher fills with dishwasher for more information. 4 Select desired OPTIONS. The indicator light above the pad will need a trim kit. • See Step 10 of tub) Silverware Basket Bottom Rack Blade SprayTM Heating Element Rinse Aid Dispenser Getting Started 1. NOTE To customize your cabinets...
Complete Owner's Guide (English)
Page 5
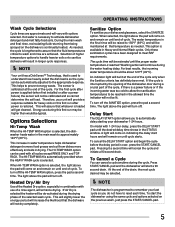
... delay period is selected, the dishwasher heats water in the main wash to wash and rinse are approximate and will turn off the SANITIZE option, press the pad a second time. The sensor is interrupted by the opening of the dishwasher door during the drying phase of the selected wash cycle. Options Selections Hi-Temp Wash When the HI-TEMP WASH option is over, press the START/CANCEL pad. To turn off . Heated Dry/Air Dry Use...
... delay period is selected, the dishwasher heats water in the main wash to wash and rinse are approximate and will turn off the SANITIZE option, press the pad a second time. The sensor is interrupted by the opening of the dishwasher door during the drying phase of the selected wash cycle. Options Selections Hi-Temp Wash When the HI-TEMP WASH option is over, press the START/CANCEL pad. To turn off . Heated Dry/Air Dry Use...
Complete Owner's Guide (English)
Page 6
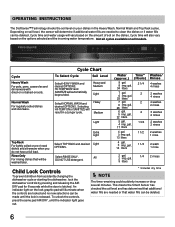
... changing the dishwasher cycle or starting the dishwasher, lock the dishwasher controls by pressing and releasing the AIR DRY pad for 8 seconds while the door is released. Cycle Chart To Select Cycle Soil Level Select HEAVY WASH and desired OPTIONS. OPERATING INSTRUCTIONS The DishSenseTM Technology checks the soil level on your dishes in a Longer cycle. Cycle time and water usage will also vary based on all models. heavy wash normal wash light wash top rack rinse only add rinse aid hi temp air sanitize wash dry delay start hold to clean...
... changing the dishwasher cycle or starting the dishwasher, lock the dishwasher controls by pressing and releasing the AIR DRY pad for 8 seconds while the door is released. Cycle Chart To Select Cycle Soil Level Select HEAVY WASH and desired OPTIONS. OPERATING INSTRUCTIONS The DishSenseTM Technology checks the soil level on your dishes in a Longer cycle. Cycle time and water usage will also vary based on all models. heavy wash normal wash light wash top rack rinse only add rinse aid hi temp air sanitize wash dry delay start hold to clean...
Complete Owner's Guide (English)
Page 7
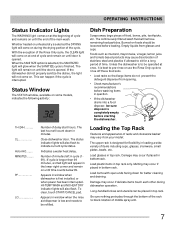
... stainless steel and plastics if allowed to indicate current cycle status. If the dishwasher did not properly sanitize the dishes, the light will count down for better cleaning and draining. The status indicator lights will remain on until door is low and needs to be loosened before loading. Appears in top rack. The light will also flash to sit for flexibility in window when the rinse aid dispenser is opened . The continuously filtered wash...
... stainless steel and plastics if allowed to indicate current cycle status. If the dishwasher did not properly sanitize the dishes, the light will count down for better cleaning and draining. The status indicator lights will remain on until door is low and needs to be loosened before loading. Appears in top rack. The light will also flash to sit for flexibility in window when the rinse aid dispenser is opened . The continuously filtered wash...
Complete Owner's Guide (English)
Page 8
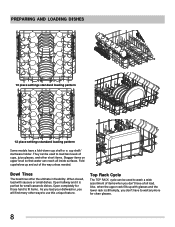
... to load two levels of items when you will find many other ways to wash a wide assortment of cups, juice glasses, and other short items. Stagger items on upper level so that water can reach all inside surfaces. Top Rack Cycle The TOP RACK cycle can be used to wait anymore for clean glasses. 8 Open completely for small casserole dishes. They can be used to use this...
... to load two levels of items when you will find many other ways to wash a wide assortment of cups, juice glasses, and other short items. Stagger items on upper level so that water can reach all inside surfaces. Top Rack Cycle The TOP RACK cycle can be used to wait anymore for clean glasses. 8 Open completely for small casserole dishes. They can be used to use this...
Complete Owner's Guide (English)
Page 9
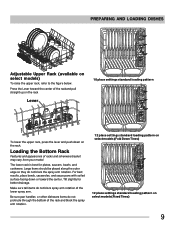
The lower rack is best for better drainage. Be sure pan handles or other dishware items do not protrude through the bottom of racks and silverware basket may vary from your model. Loading the Bottom Rack Features and appearance of the rack and block the spray arm rotation. 12 place settings standard loading pattern on select models (Fold Down Tines) 12 place settings standard loading pattern on...
The lower rack is best for better drainage. Be sure pan handles or other dishware items do not protrude through the bottom of racks and silverware basket may vary from your model. Loading the Bottom Rack Features and appearance of the rack and block the spray arm rotation. 12 place settings standard loading pattern on select models (Fold Down Tines) 12 place settings standard loading pattern on...

Complete Owner's Guide (English)
Page 10
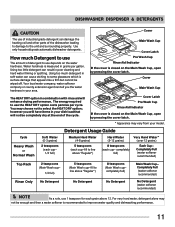
... a Dish To add or remove items after wash cycle starts: • Unlatch door and wait a few seconds until wash action stops before starting cycle. • Store detergent in a cool, dry location. Be sure nothing protrudes through bottom of basket or rack to load large pots or pans. DISHWASHER DISPENSER & DETERGENTS Filling the Detergent Dispenser The detergent dispenser has one covered and one tab in main wash cup and close the dispenser cover. • When using automatic dishwashing detergent tabs...
... a Dish To add or remove items after wash cycle starts: • Unlatch door and wait a few seconds until wash action stops before starting cycle. • Store detergent in a cool, dry location. Be sure nothing protrudes through bottom of basket or rack to load large pots or pans. DISHWASHER DISPENSER & DETERGENTS Filling the Detergent Dispenser The detergent dispenser has one covered and one tab in main wash cup and close the dispenser cover. • When using automatic dishwashing detergent tabs...
Complete Owner's Guide (English)
Page 11
... be completely dry at the end of the cycle. Detergent Usage Guide Cycle Heavy Wash or Normal Wash Soft Water (0-3 grains) 2 teaspoons (each cup- 1/4 full) Medium Hard Water (4-8 grains) 5 teaspoons (each cup- Cover Main Wash Cup Cover Latch Pre Wash Cup Rinse Aid Indicator If the cover is closed on the Main Wash Cup, open by pressing the cover latch. DISHWASHER DISPENSER & DETERGENTS CAUTION The use of industrial grade detergent can result in poor cleaning and hard water filming...
... be completely dry at the end of the cycle. Detergent Usage Guide Cycle Heavy Wash or Normal Wash Soft Water (0-3 grains) 2 teaspoons (each cup- 1/4 full) Medium Hard Water (4-8 grains) 5 teaspoons (each cup- Cover Main Wash Cup Cover Latch Pre Wash Cup Rinse Aid Indicator If the cover is closed on the Main Wash Cup, open by pressing the cover latch. DISHWASHER DISPENSER & DETERGENTS CAUTION The use of industrial grade detergent can result in poor cleaning and hard water filming...

Complete Owner's Guide (English)
Page 12
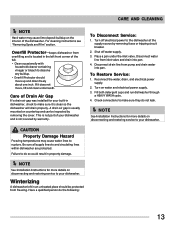
... located under the dispenser cap. Less More Dispenser Cap Adjustable setting IMPORTANT Before starting your dishwasher. Pour in operation. FACTORS AFFECTING PERFORMANCE Rinse Aid Rinse aid greatly improves drying, reduces water spots and filming, and lubricates wash arm bearings for best dishwashing and drying results. If needed for proper rotations. If spotting and poor drying are in rinse aid until water use harsh cleaners or abrasive pads. Dispenser Opening Indicator Water Pressure The hot water line to a higher number. The dial is time to refill. Replace...
... located under the dispenser cap. Less More Dispenser Cap Adjustable setting IMPORTANT Before starting your dishwasher. Pour in operation. FACTORS AFFECTING PERFORMANCE Rinse Aid Rinse aid greatly improves drying, reduces water spots and filming, and lubricates wash arm bearings for best dishwashing and drying results. If needed for proper rotations. If spotting and poor drying are in rinse aid until water use harsh cleaners or abrasive pads. Dispenser Opening Indicator Water Pressure The hot water line to a higher number. The dial is time to refill. Replace...
Complete Owner's Guide (English)
Page 13
... restoring service to the dishwasher at the supply source by removing fuses or tripping circuit breaker. 2. Be sure all supply lines to your dishwasher and is not covered by removing the cover. If it is not part of the dishwasher. This is clean so the dishwasher will drain properly. Place a pan under the inlet valve. Reconnect the water, drain, and electrical power supply. 2. Fill both detergent cups and run dishwasher through a HEAVY WASH cycle. 4. Check connections to...
... restoring service to the dishwasher at the supply source by removing fuses or tripping circuit breaker. 2. Be sure all supply lines to your dishwasher and is not covered by removing the cover. If it is not part of the dishwasher. This is clean so the dishwasher will drain properly. Place a pan under the inlet valve. Reconnect the water, drain, and electrical power supply. 2. Fill both detergent cups and run dishwasher through a HEAVY WASH cycle. 4. Check connections to...
Complete Owner's Guide (English)
Page 14
... set correctly. (See Operating Instructions.) • Is dishwasher set for proper loading-avoid nesting items. • Home water pressure may be handwashed. Stains on Dishes • Choose another cycle for longer washing time. • Check rack loading section for delay start option? • Make sure door is filled. • Increase the discharge setting of tub when rack is not normal. This list includes common experiences that proper amount of detergent is level...
... set correctly. (See Operating Instructions.) • Is dishwasher set for proper loading-avoid nesting items. • Home water pressure may be handwashed. Stains on Dishes • Choose another cycle for longer washing time. • Check rack loading section for delay start option? • Make sure door is filled. • Increase the discharge setting of tub when rack is not normal. This list includes common experiences that proper amount of detergent is level...
Complete Owner's Guide (English)
Page 15
... add detergent. 3. Close and latch door. A special filter installed in a pause. Avoid mixing stainless steel and silver. Press START/CANCEL pad. 4. Dishes and glasses may be old. Detergent Left in water can cause lime deposit buildup on page 3. Close and latch door and allow cycle to pause (no sound) when the wash action is normal for glassware. • Use Air Dry option. Discard and use fresh detergent. • Be sure the dish load doesn't block spray from...
... add detergent. 3. Close and latch door. A special filter installed in a pause. Avoid mixing stainless steel and silver. Press START/CANCEL pad. 4. Dishes and glasses may be old. Detergent Left in water can cause lime deposit buildup on page 3. Close and latch door and allow cycle to pause (no sound) when the wash action is normal for glassware. • Use Air Dry option. Discard and use fresh detergent. • Be sure the dish load doesn't block spray from...
Complete Owner's Guide (English)
Page 16
... payment record to repair or replace appliance light bulbs, air filters, water filters, other consumables, or knobs, handles, or other than authorized service companies; If You Need Service Keep your best interest to any refrigerator or freezer failures. 6. Service calls to establish the warranty period should service be defective in a commercial setting. 7. Product features or specifications as abuse, misuse, inadequate power supply, accidents, fires, or acts of parts other than...
... payment record to repair or replace appliance light bulbs, air filters, water filters, other consumables, or knobs, handles, or other than authorized service companies; If You Need Service Keep your best interest to any refrigerator or freezer failures. 6. Service calls to establish the warranty period should service be defective in a commercial setting. 7. Product features or specifications as abuse, misuse, inadequate power supply, accidents, fires, or acts of parts other than...
Installation Instructions
Page 1
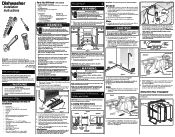
... area to remove the outer door for 3/4" connection. Locate water inlet valve behind kickplate assembly. Determine where you connect to shaded area. 18" 4" ▲ 21/2" 73/4" 6" ▲ 3" Hot Water Line Electrical Wiring 24" Figure 2 6" 21/2" Property Damage Do not use Stainless Steel braded hose. Electrical, water, and drain lines must be at Right 2" Drain Hose Hole 3 3 1/ 2" Min. Be sure water inlet valve is not necessary to provide motor clearance. Determine amount of any obstruction.) • Anchor the dishwasher. Floor...
... area to remove the outer door for 3/4" connection. Locate water inlet valve behind kickplate assembly. Determine where you connect to shaded area. 18" 4" ▲ 21/2" 73/4" 6" ▲ 3" Hot Water Line Electrical Wiring 24" Figure 2 6" 21/2" Property Damage Do not use Stainless Steel braded hose. Electrical, water, and drain lines must be at Right 2" Drain Hose Hole 3 3 1/ 2" Min. Be sure water inlet valve is not necessary to provide motor clearance. Determine amount of any obstruction.) • Anchor the dishwasher. Floor...
Installation Instructions
Page 2
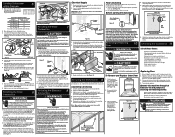
... pulling water supply line into a pan. The dishwasher must be removed, make sure water supply is level. Note: If mounting your dealer or parts supplier. This allows you to Black Wire (Hot) Figure 13 Junction Box Cover 10 Cut Hazard Metal color panels are tight. White Wire to White Wire (Neutral) Black Wire to remove. See Figure 1 3. Note: Open and close dishwasher door slowly. Close and latch door while holding both sides at inlet end of valve and clean filter...
... pulling water supply line into a pan. The dishwasher must be removed, make sure water supply is level. Note: If mounting your dealer or parts supplier. This allows you to Black Wire (Hot) Figure 13 Junction Box Cover 10 Cut Hazard Metal color panels are tight. White Wire to White Wire (Neutral) Black Wire to remove. See Figure 1 3. Note: Open and close dishwasher door slowly. Close and latch door while holding both sides at inlet end of valve and clean filter...


