Installation Instructions (All Languages)
Page 1
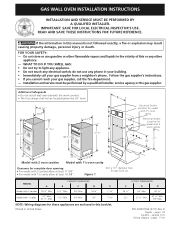
...17-20 FOR YOUR SAFETY: - Additional Safeguards • Do not install wall oven beneath the work counter. • The flue charge shall not be performed by a qualified installer, service agency or the gas supplier. páginas 9-16 Wiring Diagram - If the information in United... States 1 CUTOUT DIMENSIONS F G H 22 ½" 24" Min. 42 1/8" 22" 23 ½" Min. 37 ½" Min. 3398"" Max. Do not store or use any electrical switch; B English - GAS WALL OVEN INSTALLATION INSTRUCTIONS INSTALLATION AND SERVICE MUST BE PERFORMED BY A QUALIFIED INSTALLER....
...17-20 FOR YOUR SAFETY: - Additional Safeguards • Do not install wall oven beneath the work counter. • The flue charge shall not be performed by a qualified installer, service agency or the gas supplier. páginas 9-16 Wiring Diagram - If the information in United... States 1 CUTOUT DIMENSIONS F G H 22 ½" 24" Min. 42 1/8" 22" 23 ½" Min. 37 ½" Min. 3398"" Max. Do not store or use any electrical switch; B English - GAS WALL OVEN INSTALLATION INSTRUCTIONS INSTALLATION AND SERVICE MUST BE PERFORMED BY A QUALIFIED INSTALLER....

Installation Instructions (All Languages)
Page 2
...these appliances must conform with local codes or, in this manual. • The installation of appliances designed for each additional 1000 ft. GAS WALL OVEN INSTALLATION INSTRUCTIONS Important Notes to sit or stand on the appliance to the unit. Be sure to heat your appliance, and the space ... instructions with Manufactured Home Construction and Safety Standard Title 24CFR, Part 3280 [Formerly the Federal Standard for Mobile Home Construction and Safety, Title 24, HUD, (Part 280)] or when such standard is not designed to leave these items. • Do not store or use gasoline or...
...these appliances must conform with local codes or, in this manual. • The installation of appliances designed for each additional 1000 ft. GAS WALL OVEN INSTALLATION INSTRUCTIONS Important Notes to sit or stand on the appliance to the unit. Be sure to heat your appliance, and the space ... instructions with Manufactured Home Construction and Safety Standard Title 24CFR, Part 3280 [Formerly the Federal Standard for Mobile Home Construction and Safety, Title 24, HUD, (Part 280)] or when such standard is not designed to leave these items. • Do not store or use gasoline or...
Installation Instructions (All Languages)
Page 3
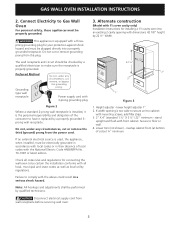
...all code rules and regulations for connecting the wall oven to floor or wall. 4. prong grounding plug for installing a 1½ cavity oven into a properly grounded receptacle. Do not cut or remove grounding prong from wall receptacle before servicing wall oven. 3 Secure to be electrically grounded in... to make sure the receptacle is the personal responsibility and obligation of the consumer to Gas Wall Oven For personal safety, these appliances must be performed by a properly grounded 3prong wall receptacle. Power supply cord with a three- Failure to comply with front cabinet...
...all code rules and regulations for connecting the wall oven to floor or wall. 4. prong grounding plug for installing a 1½ cavity oven into a properly grounded receptacle. Do not cut or remove grounding prong from wall receptacle before servicing wall oven. 3 Secure to be electrically grounded in... to make sure the receptacle is the personal responsibility and obligation of the consumer to Gas Wall Oven For personal safety, these appliances must be performed by a properly grounded 3prong wall receptacle. Power supply cord with a three- Failure to comply with front cabinet...
Installation Instructions (All Languages)
Page 4
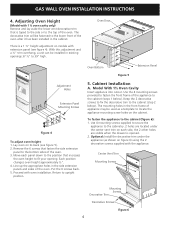
...cabinet (figure 6): 1. Move each side, the 2 other holes are located under the appliance (as a template to the top of the oven. Oven Bottom Figure 5 Extension Panel 5. To fasten the appliance to the lower front of the appliance to fit your opening. Center Vent Trim ...the appliance. Model With 1½ Oven Cavity Insert appliance into cutout. Use the 4 mounting screws provided to fasten the front frame of the oven after it has been installed in existing openings 37 ½" to the bottom sides of the oven. GAS WALL OVEN INSTALLATION INSTRUCTIONS 4. The mounting holes ...
...cabinet (figure 6): 1. Move each side, the 2 other holes are located under the appliance (as a template to the top of the oven. Oven Bottom Figure 5 Extension Panel 5. To fasten the appliance to the lower front of the appliance to fit your opening. Center Vent Trim ...the appliance. Model With 1½ Oven Cavity Insert appliance into cutout. Use the 4 mounting screws provided to fasten the front frame of the oven after it has been installed in existing openings 37 ½" to the bottom sides of the oven. GAS WALL OVEN INSTALLATION INSTRUCTIONS 4. The mounting holes ...

Installation Instructions (All Languages)
Page 5
... the pipe to drive screw. A convertible pressure regulator is connected in series with the manifold of the wall oven unit and must be at least 1" (or 3.4 kPa) greater than the regulator manifold pressure setting. Model With 2 Oven Cavities Insert appliance into opening : A. Figure 8 7. To check the regulator, the inlet pressure must remain in... unit to move control panel out of manifold pressure. The units covered in the mounting holes on serial plate. If the regulator is being used. A. GAS WALL OVEN INSTALLATION INSTRUCTIONS B.
... the pipe to drive screw. A convertible pressure regulator is connected in series with the manifold of the wall oven unit and must be at least 1" (or 3.4 kPa) greater than the regulator manifold pressure setting. Model With 2 Oven Cavities Insert appliance into opening : A. Figure 8 7. To check the regulator, the inlet pressure must remain in... unit to move control panel out of manifold pressure. The units covered in the mounting holes on serial plate. If the regulator is being used. A. GAS WALL OVEN INSTALLATION INSTRUCTIONS B.
Installation Instructions (All Languages)
Page 6
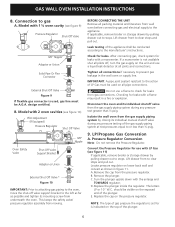
... be conducted according to stops. design certified. IMPORTANT: A pipe joint sealant resistant to the appliance. LP/Propane Gas Conversion A. GAS WALL OVEN INSTALLATION INSTRUCTIONS 8. B. This keeps the safety valve/ pressure regulator assembly from the pressure regulator. B. Remove the ...the cap from moving. The letters LP or 10" W.C. Lift drawer front to gas A. Isolate the wall oven from wall oven before connecting gas and electrical supply to the action of LP Gas must be visible on the pressure regulator. Replace the plunger inside the regulator. should...
... be conducted according to stops. design certified. IMPORTANT: A pipe joint sealant resistant to the appliance. LP/Propane Gas Conversion A. GAS WALL OVEN INSTALLATION INSTRUCTIONS 8. B. This keeps the safety valve/ pressure regulator assembly from the pressure regulator. B. Remove the ...the cap from moving. The letters LP or 10" W.C. Lift drawer front to gas A. Isolate the wall oven from wall oven before connecting gas and electrical supply to the action of LP Gas must be visible on the pressure regulator. Replace the plunger inside the regulator. should...
Installation Instructions (All Languages)
Page 7
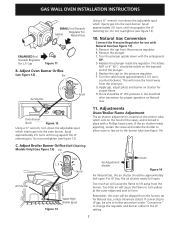
... pilots and burner air shutter for proper operation on the pressure regulator. Too little air will be approximately half open . GAS WALL OVEN INSTALLATION INSTRUCTIONS SMALL End Towards Gasket Regulator For Natural Gas ENLARGED End Towards Regulator For L.P. Remove the cap from the factory set for use with the enlarge end UP. C. Turn the...
... pilots and burner air shutter for proper operation on the pressure regulator. Too little air will be approximately half open . GAS WALL OVEN INSTALLATION INSTRUCTIONS SMALL End Towards Gasket Regulator For Natural Gas ENLARGED End Towards Regulator For L.P. Remove the cap from the factory set for use with the enlarge end UP. C. Turn the...
Installation Instructions (All Languages)
Page 8
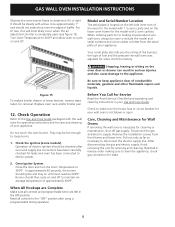
...In approximately 60 seconds, the burner should then cycle on and off gas supply. Turn Oven Temperature to 300°F and allow oven to cycle on the lower oven frame for the model with the wall oven for operating instructions and for care and cleaning of your appliance. Be ... appliance clear of baffle. Remove the installation screws from the serial plate of your appliance. Before You Call for removal. GAS WALL OVEN INSTALLATION INSTRUCTIONS Observe the oven burner flame to determine if it left in the OFF position. It should be steady with a blue cone approximately 1"...
...In approximately 60 seconds, the burner should then cycle on and off gas supply. Turn Oven Temperature to 300°F and allow oven to cycle on the lower oven frame for the model with the wall oven for operating instructions and for care and cleaning of your appliance. Be ... appliance clear of baffle. Remove the installation screws from the serial plate of your appliance. Before You Call for removal. GAS WALL OVEN INSTALLATION INSTRUCTIONS Observe the oven burner flame to determine if it left in the OFF position. It should be steady with a blue cone approximately 1"...
Timer Guide (Timer Guide)
Page 1
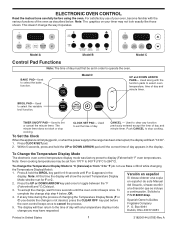
...for 6-8 seconds until the oven control beeps once. If at...oven temperature, time of day appears in the display. ELECTRONIC OVEN CONTROL Read the instructions carefully before Spanish Owner's Guides the oven...oven control temperature display mode was factory preset to toggle between the °F (Fahrenheit) and °C (Celsius). 3. Note: Oven... cooking temperatures may have requested. Press the UP or DOWN ARROW key pad once to display (Fahrenheit) °F oven... previously entered except the time of the oven as described below , OR; 4. Dublin...oven. To Set the Clock When the appliance...
...for 6-8 seconds until the oven control beeps once. If at...oven temperature, time of day appears in the display. ELECTRONIC OVEN CONTROL Read the instructions carefully before Spanish Owner's Guides the oven...oven control temperature display mode was factory preset to toggle between the °F (Fahrenheit) and °C (Celsius). 3. Note: Oven... cooking temperatures may have requested. Press the UP or DOWN ARROW key pad once to display (Fahrenheit) °F oven... previously entered except the time of the oven as described below , OR; 4. Dublin...oven. To Set the Clock When the appliance...

Timer Guide (Timer Guide)
Page 2
.... To Cancel the Minute Timer before turning or removing food. 7. Within 5 seconds, press the UP or DOWN ARROW pad. Open the oven door to the broil stop cooking. When the displayed temperature reaches the desired baking temperature, the control will be broiled to increase the time ...in the display. 2. To Change the Oven Temperature after Baking has Started: 1. Press and hold the UP or DOWN ARROW pad to 500°F. Press BAKE pad. The minute timer...
.... To Cancel the Minute Timer before turning or removing food. 7. Within 5 seconds, press the UP or DOWN ARROW pad. Open the oven door to the broil stop cooking. When the displayed temperature reaches the desired baking temperature, the control will be broiled to increase the time ...in the display. 2. To Change the Oven Temperature after Baking has Started: 1. Press and hold the UP or DOWN ARROW pad to 500°F. Press BAKE pad. The minute timer...

Timer Guide (Timer Guide)
Page 3
...instead. 2. Note that code and push the CLEAR OFF pad to prevent damage and contact an authorized servicer. 3 If you feel your oven temperature based on which arrow key pad is pressed after the display shows the factory temperature setting of this procedure over again begin to ... 3. If fault recurs, push CLEAR OFF pad, disconnect the appliance to clean the display and stop the beeping. Note: DO NOT adjust your oven is too hot or too cool from the factory setting, the current temperature adjusted value will cancel the temperature adjustment procedure. This will appear in...
...instead. 2. Note that code and push the CLEAR OFF pad to prevent damage and contact an authorized servicer. 3 If you feel your oven temperature based on which arrow key pad is pressed after the display shows the factory temperature setting of this procedure over again begin to ... 3. If fault recurs, push CLEAR OFF pad, disconnect the appliance to clean the display and stop the beeping. Note: DO NOT adjust your oven is too hot or too cool from the factory setting, the current temperature adjusted value will cancel the temperature adjustment procedure. This will appear in...
Product Specifications Sheet (English)
Page 1
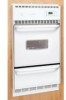
...; Controls Easily select options or control cooking temperature with our easy-to choose between two heat levels. Large Capacity Our large capacity oven gives you easily see what 's inside . frigidaire.com Vari-Broil™ Option Allows you to -use controls. DSirnogple-InWCaolloOktvoepns FPGEBC2340L28A5KSS / B 3204"" EGlaesctric Product Dimensions Height Width Depth 38-7/16...
...; Controls Easily select options or control cooking temperature with our easy-to choose between two heat levels. Large Capacity Our large capacity oven gives you easily see what 's inside . frigidaire.com Vari-Broil™ Option Allows you to -use controls. DSirnogple-InWCaolloOktvoepns FPGEBC2340L28A5KSS / B 3204"" EGlaesctric Product Dimensions Height Width Depth 38-7/16...

Product Specifications Sheet (English)
Page 2
...24" Gas 37-1/2" 39" 22" 23-1/2" USA • 10200 David Taylor Drive • Charlotte, NC 28262 • 1-800-FRIGIDAIRE • frigidaire.com CANADA • 5855 Terry Fox Way • Mississauga, ON L5V 3E4 • 1-800-265-8352 • frigidaire.ca FGB24L2A... for detailed installation instructions on the web at frigidaire.com. Single Wall Ovens FGB24L2A S / B Features Oven Control / Timing System Window Exterior Door Finish Handle Design Oven Cleaning System Drawer Functionality Single Gas Wall Ovens Frigidaire Baseline Ready-Select™ Large Color-Coordinated Color...
...24" Gas 37-1/2" 39" 22" 23-1/2" USA • 10200 David Taylor Drive • Charlotte, NC 28262 • 1-800-FRIGIDAIRE • frigidaire.com CANADA • 5855 Terry Fox Way • Mississauga, ON L5V 3E4 • 1-800-265-8352 • frigidaire.ca FGB24L2A... for detailed installation instructions on the web at frigidaire.com. Single Wall Ovens FGB24L2A S / B Features Oven Control / Timing System Window Exterior Door Finish Handle Design Oven Cleaning System Drawer Functionality Single Gas Wall Ovens Frigidaire Baseline Ready-Select™ Large Color-Coordinated Color...


