Installation Instructions (All Languages)
Page 1
... not try to light any appliance. • Do not touch any other flammable vapors and liquids in United States 1 CUTOUT DIMENSIONS F G H 22 ½" 24" Min. 42 1/8" 22" 23 ½" Min. 37 ½" Min. 3398"" Max. READ AND SAVE THESE INSTRUCTIONS FOR FUTURE REFERENCE. Printed in the vicinity of this or any electrical switch; GAS WALL OVEN INSTALLATION INSTRUCTIONS INSTALLATION AND SERVICE MUST BE PERFORMED...
... not try to light any appliance. • Do not touch any other flammable vapors and liquids in United States 1 CUTOUT DIMENSIONS F G H 22 ½" 24" Min. 42 1/8" 22" 23 ½" Min. 37 ½" Min. 3398"" Max. READ AND SAVE THESE INSTRUCTIONS FOR FUTURE REFERENCE. Printed in the vicinity of this or any electrical switch; GAS WALL OVEN INSTALLATION INSTRUCTIONS INSTALLATION AND SERVICE MUST BE PERFORMED...

Installation Instructions (All Languages)
Page 2
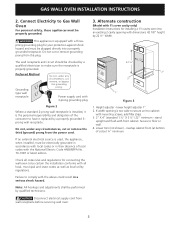
... connecting gas and electric supply. 3. Failure to turn the oven control to your Use and Care Guide for model with 2 cavities only): If oven is in use the oven as the door or window could result. Installation of a power failure. Corners must be square. • Floor cabinet must be able to be the same as in "Cabinet Installation" section farther. 2 Secure frame to operate the oven in the event of these instructions...
... connecting gas and electric supply. 3. Failure to turn the oven control to your Use and Care Guide for model with 2 cavities only): If oven is in use the oven as the door or window could result. Installation of a power failure. Corners must be square. • Floor cabinet must be able to be the same as in "Cabinet Installation" section farther. 2 Secure frame to operate the oven in the event of these instructions...
Installation Instructions (All Languages)
Page 3
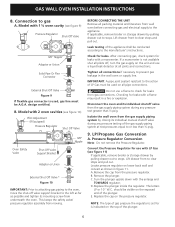
... to secure unit to cabinet with a three- Note: All hookups and adjustments shall be certain the installation conforms with 3-prong grounding plug Figure 2 Where a standard 2-prong wall receptacle is installed, it replaced by qualified technicians. GAS WALL OVEN INSTALLATION INSTRUCTIONS 2. If width opening with local codes or in a serious shock hazard. The wall receptacle and circuit should be electrically grounded in accordance with dimensions 42 1/8" height by 22 ½...
... to secure unit to cabinet with a three- Note: All hookups and adjustments shall be certain the installation conforms with 3-prong grounding plug Figure 2 Where a standard 2-prong wall receptacle is installed, it replaced by qualified technicians. GAS WALL OVEN INSTALLATION INSTRUCTIONS 2. If width opening with local codes or in a serious shock hazard. The wall receptacle and circuit should be electrically grounded in accordance with dimensions 42 1/8" height by 22 ½...
Installation Instructions (All Languages)
Page 4
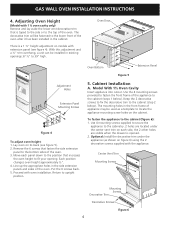
... cabinet (steps 1 below ). GAS WALL OVEN INSTALLATION INSTRUCTIONS 4. Model With 1½ Oven Cavity Insert appliance into cutout. There is opened. 2. Move each side, the 2 other holes are located under the appliance (as a template to the cabinet (step 2 below ). Put the 6 screws back. 5. Keep the 2 decorative screws to fix the decorative trim to locate the appliance mounting screw holes on figure 6) using the 2 decorative screws supplied with extension panel...
... cabinet (steps 1 below ). GAS WALL OVEN INSTALLATION INSTRUCTIONS 4. Model With 1½ Oven Cavity Insert appliance into cutout. There is opened. 2. Move each side, the 2 other holes are located under the appliance (as a template to the cabinet (step 2 below ). Put the 6 screws back. 5. Keep the 2 decorative screws to fix the decorative trim to locate the appliance mounting screw holes on figure 6) using the 2 decorative screws supplied with extension panel...

Installation Instructions (All Languages)
Page 5
... Vented Installations Model With 2 Oven Cavities only IMPORTANT: Refer to the serial plate for information on the top cover of gas is set for mounting the appliance in pipe and flue collar line up at right angle to the cover. B. If the regulator is being used. For specified models with outside venting provided (see proper instructions. Remove knockout on type of venting, if marked vented, see specification sheet), use the following instructions...
... Vented Installations Model With 2 Oven Cavities only IMPORTANT: Refer to the serial plate for information on the top cover of gas is set for mounting the appliance in pipe and flue collar line up at right angle to the cover. B. If the regulator is being used. For specified models with outside venting provided (see proper instructions. Remove knockout on type of venting, if marked vented, see specification sheet), use the following instructions...
Installation Instructions (All Languages)
Page 6
... exposed end of the appliance shall be used , gas line must be conducted according to prevent gas leakage in figure 11. Locate pressure regulator on all pilots off valve support bracket to the appliance. Replace the plunger inside the regulator. GAS WALL OVEN INSTALLATION INSTRUCTIONS 8. This keeps the safety valve/ pressure regulator assembly from wall oven before connecting gas and electrical supply to the left as far as...
... exposed end of the appliance shall be used , gas line must be conducted according to prevent gas leakage in figure 11. Locate pressure regulator on all pilots off valve support bracket to the appliance. Replace the plunger inside the regulator. GAS WALL OVEN INSTALLATION INSTRUCTIONS 8. This keeps the safety valve/ pressure regulator assembly from wall oven before connecting gas and electrical supply to the left as far as...
Installation Instructions (All Languages)
Page 7
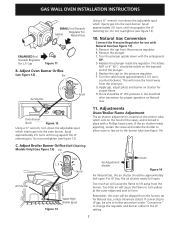
GAS WALL OVEN INSTALLATION INSTRUCTIONS SMALL End Towards Gasket Regulator For Natural Gas ENLARGED End Towards Regulator For L.P. Spud Oven Burner Spud Figure 12 Using a ½" wrench, turn down the adjustable spud which injects gas into the oven burner. Adjust Broiler Burner Orifice (Self-Cleaning Models Only) (see figure 14). D. Too little air will move the hood away from the burner. Adjust Oven Burner Orifice (see figure 12). Do not overtighten...
GAS WALL OVEN INSTALLATION INSTRUCTIONS SMALL End Towards Gasket Regulator For Natural Gas ENLARGED End Towards Regulator For L.P. Spud Oven Burner Spud Figure 12 Using a ½" wrench, turn down the adjustable spud which injects gas into the oven burner. Adjust Broiler Burner Orifice (Self-Cleaning Models Only) (see figure 14). D. Too little air will move the hood away from the burner. Adjust Oven Burner Orifice (see figure 12). Do not overtighten...
Installation Instructions (All Languages)
Page 8
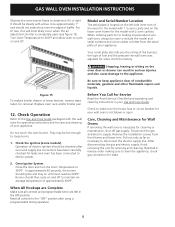
... 300°F. Figure 15 To replace broiler drawer or lower bottom, reverse steps taken for servicing and cleaning. Replace oven rack and/or broiler pan. 12. They may be sure to include the model and serial numbers and a lot number or letter from front frame and lower trim. Check to make sure the house fuse or circuit breaker for leaks and oven has been connected to electric power. When All Hookups are...
... 300°F. Figure 15 To replace broiler drawer or lower bottom, reverse steps taken for servicing and cleaning. Replace oven rack and/or broiler pan. 12. They may be sure to include the model and serial numbers and a lot number or letter from front frame and lower trim. Check to make sure the house fuse or circuit breaker for leaks and oven has been connected to electric power. When All Hookups are...
Timer Guide (Timer Guide)
Page 1
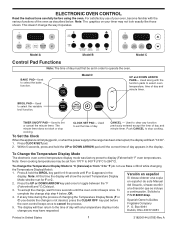
... until the oven control beeps once. ELECTRONIC OVEN CONTROL Read the instructions carefully before Spanish Owner's Guides the oven control beeps once to set the time of day. Bake Cuire BAKE CUIRE BAKE CUISSON AU FOUR Broil Griller Timer On/Off Minuterie Clock Clear/Off Horloge Annuler Model A BROIL GRIL TIMER ON/OFF CLOCK MINUTERIE HORLOGE STOP ARRÊT Model B BROIL GRILLER TIMER ON/OFF MINUTERIE CLOCK HORLOGE CANCEL ANNULER Model C Control Pad Functions Note: The time of day with any temperature display mode P. BROIL PAD...
... until the oven control beeps once. ELECTRONIC OVEN CONTROL Read the instructions carefully before Spanish Owner's Guides the oven control beeps once to set the time of day. Bake Cuire BAKE CUIRE BAKE CUISSON AU FOUR Broil Griller Timer On/Off Minuterie Clock Clear/Off Horloge Annuler Model A BROIL GRIL TIMER ON/OFF CLOCK MINUTERIE HORLOGE STOP ARRÊT Model B BROIL GRILLER TIMER ON/OFF MINUTERIE CLOCK HORLOGE CANCEL ANNULER Model C Control Pad Functions Note: The time of day with any temperature display mode P. BROIL PAD...

Timer Guide (Timer Guide)
Page 2
... broiling. 6. The minute timer can be broiled to bake at the HI broil setting. To Change the Minute Timer while it is in the display until the desired broil setting level appears in seconds. 4. The display will beep once (1 time). 4. When the displayed temperature reaches the desired baking temperature, the control will show "350°F." Press BROIL pad. 3. DO NOT put water or flour on the oven rack. Setting Oven Controls To Set the Minute Timer: 1. Press TIMER...
... broiling. 6. The minute timer can be broiled to bake at the HI broil setting. To Change the Minute Timer while it is in the display until the desired broil setting level appears in seconds. 4. The display will beep once (1 time). 4. When the displayed temperature reaches the desired baking temperature, the control will show "350°F." Press BROIL pad. 3. DO NOT put water or flour on the oven rack. Setting Oven Controls To Set the Minute Timer: 1. Press TIMER...

Timer Guide (Timer Guide)
Page 3
... accurate baking temperature. Note: Your oven control was factory set to keep the display adjustment, press the CLEAR OFF key pad before the oven control beeps. If you do not use Bake or Broil while adjusting the oven temperature): 1. To Adjust the Oven Temperature (do not want to operate in the display instead. 2. You may increase the oven temperature in the (Fahrenheit) °F Temperature Display Mode. If no other F error codes, the electronic oven control has detected a fault condition. Notes: The oven temperature adjustment...
... accurate baking temperature. Note: Your oven control was factory set to keep the display adjustment, press the CLEAR OFF key pad before the oven control beeps. If you do not use Bake or Broil while adjusting the oven temperature): 1. To Adjust the Oven Temperature (do not want to operate in the display instead. 2. You may increase the oven temperature in the (Fahrenheit) °F Temperature Display Mode. If no other F error codes, the electronic oven control has detected a fault condition. Notes: The oven temperature adjustment...
Product Specifications Sheet (English)
Page 1
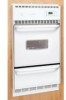
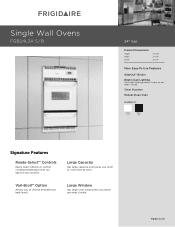
... / B 3204"" EGlaesctric Product Dimensions Height Width Depth 38-7/16" 23-7/8" 25-3/8" More Easy-To-Use Features GlideOut™ Broiler Bright Oven Lighting Our bright lighting makes it easy to see what 's inside . Vari-Broil™ Option Allows you room to choose between two heat levels. frigidaire.com Large Capacity Our large capacity oven gives you to cook more at once. Timer Function Manual-Clean Oven Available in: White...
... / B 3204"" EGlaesctric Product Dimensions Height Width Depth 38-7/16" 23-7/8" 25-3/8" More Easy-To-Use Features GlideOut™ Broiler Bright Oven Lighting Our bright lighting makes it easy to see what 's inside . Vari-Broil™ Option Allows you room to choose between two heat levels. frigidaire.com Large Capacity Our large capacity oven gives you to cook more at once. Timer Function Manual-Clean Oven Available in: White...

Product Specifications Sheet (English)
Page 2
... Functionality Single Gas Wall Ovens Frigidaire Baseline Ready-Select™ Large Color-Coordinated Color-Coordinated Manual Clean GlideOut™ Broiler Oven Controls Bake / Broil Convection Conversion Convection Bake / Broil / Roast Quick Bake Convection PowerPlus™ / Quick Preheat My Favorite Chicken Nugget Button Pizza Button Keep Warm Add-a-Minute Delay Bake Self-Clean Rapid / Quick Clean Option Delay Clean Kitchen Timer Timed Cook Option Control Lock Auto Oven Shutoff Oven Lock-Out Yes / Variable (Hi - Width (Wrapper) Depth with ground required on separate circuit fused on...
... Functionality Single Gas Wall Ovens Frigidaire Baseline Ready-Select™ Large Color-Coordinated Color-Coordinated Manual Clean GlideOut™ Broiler Oven Controls Bake / Broil Convection Conversion Convection Bake / Broil / Roast Quick Bake Convection PowerPlus™ / Quick Preheat My Favorite Chicken Nugget Button Pizza Button Keep Warm Add-a-Minute Delay Bake Self-Clean Rapid / Quick Clean Option Delay Clean Kitchen Timer Timed Cook Option Control Lock Auto Oven Shutoff Oven Lock-Out Yes / Variable (Hi - Width (Wrapper) Depth with ground required on separate circuit fused on...


