

Installation Instructions
Page 1
...garage coldest cold off valve. • A compression nut and ferrule (sleeve) for a water supply installation, including 25 feet of your refrigerator into water valve inlet as far as a possible customer option. Do not raise the cabinet more than 9/16". Lower the leveling screws ...nut onto valve. Plug in your site preparation: • Choose a place near a grounded electrical outlet. • Do not use refrigerator handles to refrigerator ȽȽ Cabinet is turned ON. CAUTION IMPORTANT If you purchased your model. 7 Controls When changing controls, wait 24 hours ...
...garage coldest cold off valve. • A compression nut and ferrule (sleeve) for a water supply installation, including 25 feet of your refrigerator into water valve inlet as far as a possible customer option. Do not raise the cabinet more than 9/16". Lower the leveling screws ...nut onto valve. Plug in your site preparation: • Choose a place near a grounded electrical outlet. • Do not use refrigerator handles to refrigerator ȽȽ Cabinet is turned ON. CAUTION IMPORTANT If you purchased your model. 7 Controls When changing controls, wait 24 hours ...

Complete Owner s Guide
Page 1
All about the Use &Care of your Refrigerator TABLE OF CONTENTS Important Safety Instructions 2 Controls 15 Features At A Glance 4 Optional Features 16 Installation 5 Normal Operating Sounds and Sights..........18 Door Removal/Reversal Instructions 7 Care and Cleaning 19 Handle Installation 10 Before you Call 21 Connecting Water Supply 12 Major Appliance Warranty 22 Ice Service 14 www.frigidaire.com USA 1-800-944-9044 www.frigidaire.ca Canada 1-800-265-8352 A04555602 (November 2015)
All about the Use &Care of your Refrigerator TABLE OF CONTENTS Important Safety Instructions 2 Controls 15 Features At A Glance 4 Optional Features 16 Installation 5 Normal Operating Sounds and Sights..........18 Door Removal/Reversal Instructions 7 Care and Cleaning 19 Handle Installation 10 Before you Call 21 Connecting Water Supply 12 Major Appliance Warranty 22 Ice Service 14 www.frigidaire.com USA 1-800-944-9044 www.frigidaire.ca Canada 1-800-265-8352 A04555602 (November 2015)

Complete Owner s Guide
Page 2
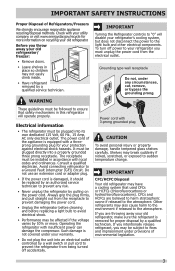
...if they will result in the presence of explosive fumes. • Avoid contact with other hazards. • DO NOT operate the refrigerator in death or serious injury. IMPORTANT IMPORTANT indicates installation, operation or maintenance information which , if not avoided, could result in minor...must be flush with rugs, bedspreads, plastic sheets or stretch wrap may result in death or serious injury. Junked or abandoned refrigerators or freezers are not problems of child entrapment Child entrapment and suffocation are still dangerous - Definitions This is important but not ...
...if they will result in the presence of explosive fumes. • Avoid contact with other hazards. • DO NOT operate the refrigerator in death or serious injury. IMPORTANT IMPORTANT indicates installation, operation or maintenance information which , if not avoided, could result in minor...must be flush with rugs, bedspreads, plastic sheets or stretch wrap may result in death or serious injury. Junked or abandoned refrigerators or freezers are not problems of child entrapment Child entrapment and suffocation are still dangerous - Definitions This is important but not ...
Complete Owner s Guide
Page 3
... or bypass the grounding prong. Grounding type wall receptacle Do not, under provisions of environmental legislation. 3 Electrical information • The refrigerator must be affected if the voltage varies by 10% or more information on recycling your warranty. • Do not plug the unit... into a properly grounded three prong receptacle. Avoid connecting refrigerator to your old refrigerator/ freezer: • Remove doors. • Leave shelves in place so children may have a cooling system that safety mechanisms...
... or bypass the grounding prong. Grounding type wall receptacle Do not, under provisions of environmental legislation. 3 Electrical information • The refrigerator must be affected if the voltage varies by 10% or more information on recycling your warranty. • Do not plug the unit... into a properly grounded three prong receptacle. Avoid connecting refrigerator to your old refrigerator/ freezer: • Remove doors. • Leave shelves in place so children may have a cooling system that safety mechanisms...
Complete Owner s Guide
Page 4
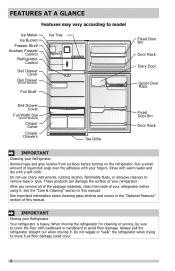
...use sharp instruments, rubbing alcohol, flammable fluids, or abrasive cleaners to model Ice Maker Ice Bucket Freezer Shelf Auxiliary Freezer Control Refrigerator Control Deli Drawer Cover Deli Drawer (Some Models) Full Shelf Ice Tray Fixed Door Bin Door Rack Dairy Door Upper Door ...Cover Full Width Deli (Some Models) Crisper Cover Crisper Drawers Toe Grille Fixed Door Bin Door Rack IMPORTANT Cleaning your refrigerator before turning on the refrigerator. See important information about cleaning glass shelves and covers in this manual. FEATURES AT A GLANCE Features may vary ...
...use sharp instruments, rubbing alcohol, flammable fluids, or abrasive cleaners to model Ice Maker Ice Bucket Freezer Shelf Auxiliary Freezer Control Refrigerator Control Deli Drawer Cover Deli Drawer (Some Models) Full Shelf Ice Tray Fixed Door Bin Door Rack Dairy Door Upper Door ...Cover Full Width Deli (Some Models) Crisper Cover Crisper Drawers Toe Grille Fixed Door Bin Door Rack IMPORTANT Cleaning your refrigerator before turning on the refrigerator. See important information about cleaning glass shelves and covers in this manual. FEATURES AT A GLANCE Features may vary ...

Complete Owner s Guide
Page 5
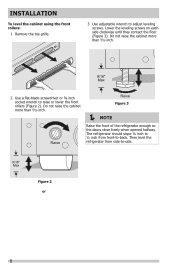
...lower front of installation, proper air circulation, and plumbing and electrical connections: Sides & Top ⅜ inch Back 1 inch NOTE If your refrigerator: • All four corners of the cabinet must be installed on a floor that is level and strong enough to ensure that doors close and ...seal properly). • If possible, place the refrigerator out of direct sunlight and away from the range, dishwasher or other heat sources. • Doors should tilt ¼-inch (6 mm) from ...
...lower front of installation, proper air circulation, and plumbing and electrical connections: Sides & Top ⅜ inch Back 1 inch NOTE If your refrigerator: • All four corners of the cabinet must be installed on a floor that is level and strong enough to ensure that doors close and ...seal properly). • If possible, place the refrigerator out of direct sunlight and away from the range, dishwasher or other heat sources. • Doors should tilt ¼-inch (6 mm) from ...
Complete Owner s Guide
Page 6
Raise Raise Figure 3 NOTE Raise the front of the refrigerator enough so the doors close freely when opened halfway. Then level the refrigerator from front-to raise or lower the front rollers (Figure 2). Do not raise the cabinet more than 9/16 inch. 9/16" Max 2 Use a flat-blade screwdriver ... 9/16 inch. INSTALLATION To level the cabinet using the front rollers: 1 Remove the toe grille. 3 Use adjustable wrench to -side. 9/16" Max Figure 2 or 6 The refrigerator should slope ¼ inch to ½ inch from side-to adjust leveling screws.
Raise Raise Figure 3 NOTE Raise the front of the refrigerator enough so the doors close freely when opened halfway. Then level the refrigerator from front-to raise or lower the front rollers (Figure 2). Do not raise the cabinet more than 9/16 inch. 9/16" Max 2 Use a flat-blade screwdriver ... 9/16 inch. INSTALLATION To level the cabinet using the front rollers: 1 Remove the toe grille. 3 Use adjustable wrench to -side. 9/16" Max Figure 2 or 6 The refrigerator should slope ¼ inch to ½ inch from side-to adjust leveling screws.

Complete Owner s Guide
Page 7
... Stop Screw Door Stop Washer Hinge Pin Bottom Hinge Screws Toe Grille 7 Set door aside. NOTE The direction in which your refrigerator doors open (door swing) can be performed by removing inside screw and install center hinge. Remove two screws on hinge pin. 4. ... Top Hinge Screw Bottom Hinge Screw Door removal and reversal instructions: 1. This makes reinstallation easier. IMPORTANT Before you begin, turn the refrigerator temperature control to "0" and remove the electrical power cord from door shelves. Loosen two outside screws enough to allow hinge and shim ...
... Stop Screw Door Stop Washer Hinge Pin Bottom Hinge Screws Toe Grille 7 Set door aside. NOTE The direction in which your refrigerator doors open (door swing) can be performed by removing inside screw and install center hinge. Remove two screws on hinge pin. 4. ... Top Hinge Screw Bottom Hinge Screw Door removal and reversal instructions: 1. This makes reinstallation easier. IMPORTANT Before you begin, turn the refrigerator temperature control to "0" and remove the electrical power cord from door shelves. Loosen two outside screws enough to allow hinge and shim ...

Complete Owner s Guide
Page 8
...edge. Gasket should seal against the cabinet all the way around including top and bottom 8 Unscrew bottom hinge pin using adjustable wrench. Position refrigerator door onto bottom hinge pin and screw center hinge pin through center hinge into top of the top hinge cover (which was removed in... open seal condition (gap between the doors on next page). 11. Lower freezer door onto center hinge pin. 16. Move freezer and refrigerator door stops to opposite side. 15. This will ensure proper spacing. 17. Remove cabinet and hinge hole plugs and move to opposite side. ...
...edge. Gasket should seal against the cabinet all the way around including top and bottom 8 Unscrew bottom hinge pin using adjustable wrench. Position refrigerator door onto bottom hinge pin and screw center hinge pin through center hinge into top of the top hinge cover (which was removed in... open seal condition (gap between the doors on next page). 11. Lower freezer door onto center hinge pin. 16. Move freezer and refrigerator door stops to opposite side. 15. This will ensure proper spacing. 17. Remove cabinet and hinge hole plugs and move to opposite side. ...

Complete Owner s Guide
Page 9
... by pulling it is fully seated in electrical power cord and turn (180 degrees). Flip toe grille and reinstall. 21. Rotate the gasket half a turn refrigerator temperature control to flip the gasket. If the open seal condition exist, try heating the gasket with a hair dryer with the door closed. Reinstall the...
... by pulling it is fully seated in electrical power cord and turn (180 degrees). Flip toe grille and reinstall. 21. Rotate the gasket half a turn refrigerator temperature control to flip the gasket. If the open seal condition exist, try heating the gasket with a hair dryer with the door closed. Reinstall the...

Complete Owner s Guide
Page 10
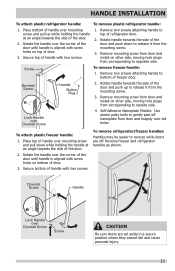
... Models Screw Handle Shoulder Screw Handle Shoulder Screw Button Plug Set Screw To attach metal freezer handle: 1. Shoulder Screw Nameplate Set Screw To attach metal refrigerator handle: 1. Place rounded part of handle onto shoulder screw on the rounded part of handles, please review these handles. HANDLE INSTALLATION CAUTION Wear gloves and...
... Models Screw Handle Shoulder Screw Handle Shoulder Screw Button Plug Set Screw To attach metal freezer handle: 1. Shoulder Screw Nameplate Set Screw To attach metal refrigerator handle: 1. Place rounded part of handle onto shoulder screw on the rounded part of handles, please review these handles. HANDLE INSTALLATION CAUTION Wear gloves and...
Complete Owner s Guide
Page 11
... down to release it from door and reapply over mounting screw and pull up to release it from corresponding to bottom of refrigerator door. 2. Secure top of the door until handle is aligned with two screws. 1. Dovetail Screw Handle Lock Handle over.... 3. Remove mounting screw from door and install on top of door. 3. Reverse freezer and refrigerator handles as shown. HANDLE INSTALLATION To attach plastic refrigerator handle: To remove plastic refrigerator handle: 1. Screw To remove freezer handle: 1. Dovetail Screw Handle Button Plug 2. Rotate handle ...
... down to release it from door and reapply over mounting screw and pull up to release it from corresponding to bottom of refrigerator door. 2. Secure top of the door until handle is aligned with two screws. 1. Dovetail Screw Handle Lock Handle over.... 3. Remove mounting screw from door and install on top of door. 3. Reverse freezer and refrigerator handles as shown. HANDLE INSTALLATION To attach plastic refrigerator handle: To remove plastic refrigerator handle: 1. Screw To remove freezer handle: 1. Dovetail Screw Handle Button Plug 2. Rotate handle ...

Complete Owner s Guide
Page 12
... your water supply line connections comply with water pressure between 30 and 100 psi. • A water supply line made of the refrigerator to be responsible for any damage if plastic tubing is recommended for homes with existing valves its Smart Choice® water line kit... state building codes, Frigidaire recommends for the water supply line. Copper Water Line with a 20 ft. If the ice maker is connected to the refrigerator. Then add approximately 7 feet (2.1 meters), so the refrigerator can cause death or severe personal injury, disconnect the refrigerator from the ice maker...
... your water supply line connections comply with water pressure between 30 and 100 psi. • A water supply line made of the refrigerator to be responsible for any damage if plastic tubing is recommended for homes with existing valves its Smart Choice® water line kit... state building codes, Frigidaire recommends for the water supply line. Copper Water Line with a 20 ft. If the ice maker is connected to the refrigerator. Then add approximately 7 feet (2.1 meters), so the refrigerator can cause death or severe personal injury, disconnect the refrigerator from the ice maker...
Complete Owner s Guide
Page 13
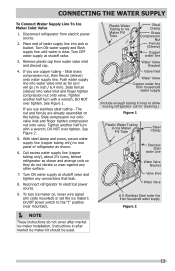
... valve inlet and finger tighten compression nut onto valve. Turn ON water supply at shutoff valve. 3. Instructions in loop to allow moving refrigerator out for cleaning.) Figure 1 Plastic Water Tubing to electrical power source. 9. Turn OFF water supply at shutoff valve and tighten any other...WATER SUPPLY To Connect Water Supply Line To Ice Maker Inlet Valve 1. Remove plastic cap from household water supply Figure 2 13 Reconnect refrigerator to Ice Maker Fill Tube Steel Clamp Stainless Steel water Line Water Valve Bracket Valve Inlet Water Valve 6 ft. Tighten another half ...
... valve inlet and finger tighten compression nut onto valve. Turn ON water supply at shutoff valve. 3. Instructions in loop to allow moving refrigerator out for cleaning.) Figure 1 Plastic Water Tubing to electrical power source. 9. Turn OFF water supply at shutoff valve and tighten any other...WATER SUPPLY To Connect Water Supply Line To Ice Maker Inlet Valve 1. Remove plastic cap from household water supply Figure 2 13 Reconnect refrigerator to Ice Maker Fill Tube Steel Clamp Stainless Steel water Line Water Valve Bracket Valve Inlet Water Valve 6 ft. Tighten another half ...

Complete Owner s Guide
Page 14
... completed, the water supply valve must be produced during the first 24 hours. If the ice maker is on usage conditions. ICE SERVICE If your refrigerator has an automatic ice maker, minimal ice will take approximately one to two days to fill the ice container. Air in most models at a rate...
... completed, the water supply valve must be produced during the first 24 hours. If the ice maker is on usage conditions. ICE SERVICE If your refrigerator has an automatic ice maker, minimal ice will take approximately one to two days to fill the ice container. Air in most models at a rate...

Complete Owner s Guide
Page 15
...8226; For warmer temperatures, adjust the knob towards cold. To turn off the compressor and prevents the refrigerator from the wall outlet. it with food. Refrigerator & Freezer Controls NOTE When first turning refrigerator on electrical power to 34° F. This is the recommended initial setting. The compressor will not... be ordered by calling the phone number listed at the bottom of your unit to the refrigerator. Allow 24 hrs for at least 8 hours before loading it has no effect on , adjust control to maintain proper temperatures inside the...
...8226; For warmer temperatures, adjust the knob towards cold. To turn off the compressor and prevents the refrigerator from the wall outlet. it with food. Refrigerator & Freezer Controls NOTE When first turning refrigerator on electrical power to 34° F. This is the recommended initial setting. The compressor will not... be ordered by calling the phone number listed at the bottom of your unit to the refrigerator. Allow 24 hrs for at least 8 hours before loading it has no effect on , adjust control to maintain proper temperatures inside the...
Complete Owner s Guide
Page 16
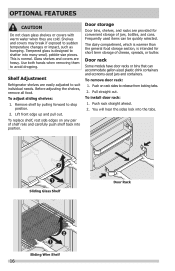
... break if exposed to suit individual needs. This is intended for convenient storage of shelf rails and carefully push shelf back into position. Shelf Adjustment Refrigerator shelves are provided for short term storage of cheese, spreads, or butter.
... break if exposed to suit individual needs. This is intended for convenient storage of shelf rails and carefully push shelf back into position. Shelf Adjustment Refrigerator shelves are provided for short term storage of cheese, spreads, or butter.
Complete Owner s Guide
Page 17
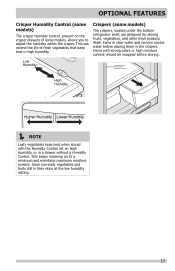
... Store non-leafy vegetables and fruits still in clear water and remove excess water before storing. Crispers (some models) The crispers, located under the bottom refrigerator shelf, are designed for storing fruits, vegetables, and other fresh produce. This can extend the life of some models, allows you to a minimum and maintains...
... Store non-leafy vegetables and fruits still in clear water and remove excess water before storing. Crispers (some models) The crispers, located under the bottom refrigerator shelf, are designed for storing fruits, vegetables, and other fresh produce. This can extend the life of some models, allows you to a minimum and maintains...
Complete Owner s Guide
Page 18
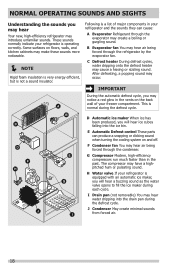
... water valve opens to fill the ice maker during the defrost cycle. E Automatic Defrost control These parts can cause: A Evaporator Refrigerant through the condenser. The compressor may occur. Following is not a sound insulator. Some surfaces on and off. These sounds normally indicate... your freezer compartment. G Compressor Modern, high-efficiency compressors run much faster than in your refrigerator and the sounds they can produce a snapping or clicking sound when turning the cooling system on floors, walls, and kitchen cabinets...
... water valve opens to fill the ice maker during the defrost cycle. E Automatic Defrost control These parts can cause: A Evaporator Refrigerant through the condenser. The compressor may occur. Following is not a sound insulator. Some surfaces on and off. These sounds normally indicate... your freezer compartment. G Compressor Modern, high-efficiency compressors run much faster than in your refrigerator and the sounds they can produce a snapping or clicking sound when turning the cooling system on floors, walls, and kitchen cabinets...
Complete Owner s Guide
Page 19
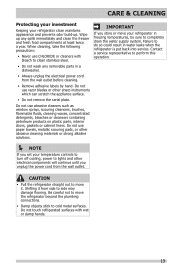
... blades or other sharp instruments which can scratch the appliance surface. • Do not remove the serial plate. Do not touch refrigerated surfaces with bleach to side may damage flooring. Do not use abrasive cleaners such as window sprays, scouring cleansers, brushes, flammable ...following precautions: • Never use paper towels, metallic scouring pads, or other electrical components will continue until you store or move the refrigerator beyond the plumbing connections. • Damp objects stick to do so could result in a dishwasher. • Always unplug the electrical ...
... blades or other sharp instruments which can scratch the appliance surface. • Do not remove the serial plate. Do not touch refrigerated surfaces with bleach to side may damage flooring. Do not use abrasive cleaners such as window sprays, scouring cleansers, brushes, flammable ...following precautions: • Never use paper towels, metallic scouring pads, or other electrical components will continue until you store or move the refrigerator beyond the plumbing connections. • Damp objects stick to do so could result in a dishwasher. • Always unplug the electrical ...


