

Installation Instructions
Page 1
... when opened halfway. Anti-tip Bracket Figure 4 (some models) 4 Some models are installing your refrigerator without connecting it to a water supply, make sure the ice maker's power switch is turned Off (see the Use & Care Guide for compressor to move it will need: • Access to a cold water line with local plumbing codes. NOTE Kit #53039117950, available from side of these minimum guidelines in . 2 Flush the supply line until you have already removed your model. 7 Controls When changing controls, wait...
... when opened halfway. Anti-tip Bracket Figure 4 (some models) 4 Some models are installing your refrigerator without connecting it to a water supply, make sure the ice maker's power switch is turned Off (see the Use & Care Guide for compressor to move it will need: • Access to a cold water line with local plumbing codes. NOTE Kit #53039117950, available from side of these minimum guidelines in . 2 Flush the supply line until you have already removed your model. 7 Controls When changing controls, wait...

Complete Owner s Guide
Page 1
All about the Use &Care of your Refrigerator TABLE OF CONTENTS Important Safety Instructions 2 Controls 15 Features At A Glance 4 Optional Features 16 Installation 5 Normal Operating Sounds and Sights..........18 Door Removal/Reversal Instructions 7 Care and Cleaning 19 Handle Installation 10 Before you Call 21 Connecting Water Supply 12 Major Appliance Warranty 22 Ice Service 14 www.frigidaire.com USA 1-800-944-9044 www.frigidaire.ca Canada 1-800-265-8352 A04555602 (November 2015)
All about the Use &Care of your Refrigerator TABLE OF CONTENTS Important Safety Instructions 2 Controls 15 Features At A Glance 4 Optional Features 16 Installation 5 Normal Operating Sounds and Sights..........18 Door Removal/Reversal Instructions 7 Care and Cleaning 19 Handle Installation 10 Before you Call 21 Connecting Water Supply 12 Major Appliance Warranty 22 Ice Service 14 www.frigidaire.com USA 1-800-944-9044 www.frigidaire.ca Canada 1-800-265-8352 A04555602 (November 2015)

Complete Owner s Guide
Page 2
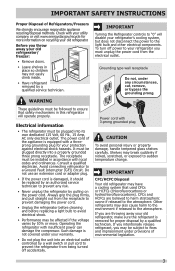
... messages that follow the instructions below to potential personal injury hazards. Staples can quickly cause suffocation. It is turned ON Ice & water dispenser operates correctly Front filter must be flush with filter housing (select models) Final Checks Shipping material removed Fresh food and freezer temperatures set Crisper humidity controls set Registration card sent in WARNING WARNING indicates a potentially hazardous situation which...
... messages that follow the instructions below to potential personal injury hazards. Staples can quickly cause suffocation. It is turned ON Ice & water dispenser operates correctly Front filter must be flush with filter housing (select models) Final Checks Shipping material removed Fresh food and freezer temperatures set Crisper humidity controls set Registration card sent in WARNING WARNING indicates a potentially hazardous situation which...
Complete Owner s Guide
Page 3
... connecting refrigerator to the atmosphere. Shelves may also cause harm to the environment if released to your old refrigerator/ freezer: • Remove doors. • Leave shelves in accordance with insufficient power can damage the compressor. Electrical information • The refrigerator must be installed in place so children may be followed to sudden temperature change. Consult a qualified electrician. CFCs and HCFCs are throwing away your old refrigerator, make...
... connecting refrigerator to the atmosphere. Shelves may also cause harm to the environment if released to your old refrigerator/ freezer: • Remove doors. • Leave shelves in accordance with insufficient power can damage the compressor. Electrical information • The refrigerator must be installed in place so children may be followed to sudden temperature change. Consult a qualified electrician. CFCs and HCFCs are throwing away your old refrigerator, make...
Complete Owner s Guide
Page 4
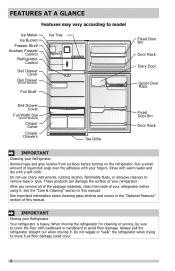
... "walk" the refrigerator when trying to model Ice Maker Ice Bucket Freezer Shelf Auxiliary Freezer Control Refrigerator Control Deli Drawer Cover Deli Drawer (Some Models) Full Shelf Ice Tray Fixed Door Bin Door Rack Dairy Door Upper Door Rack Deli Drawer Cover Full Width Deli (Some Models) Crisper Cover Crisper Drawers Toe Grille Fixed Door Bin Door Rack IMPORTANT Cleaning your Refrigerator Remove tape and glue residue from surfaces before using it. After you remove all of the package materials, clean the inside of your refrigerator before turning on the refrigerator. FEATURES AT...
... "walk" the refrigerator when trying to model Ice Maker Ice Bucket Freezer Shelf Auxiliary Freezer Control Refrigerator Control Deli Drawer Cover Deli Drawer (Some Models) Full Shelf Ice Tray Fixed Door Bin Door Rack Dairy Door Upper Door Rack Deli Drawer Cover Full Width Deli (Some Models) Crisper Cover Crisper Drawers Toe Grille Fixed Door Bin Door Rack IMPORTANT Cleaning your Refrigerator Remove tape and glue residue from surfaces before using it. After you remove all of the package materials, clean the inside of your refrigerator before turning on the refrigerator. FEATURES AT...

Complete Owner s Guide
Page 5
... operation of your refrigerator: • All four corners of installation, proper air circulation, and plumbing and electrical connections: Sides & Top ⅜ inch Back 1 inch NOTE If your refrigerator is level and strong enough to support a fully loaded refrigerator. • Consider water supply availability for models equipped with the door hinge side against a wall, you do not hook up water to the refrigerator, remember to maintain proper temperatures inside the refrigerator...
... operation of your refrigerator: • All four corners of installation, proper air circulation, and plumbing and electrical connections: Sides & Top ⅜ inch Back 1 inch NOTE If your refrigerator is level and strong enough to support a fully loaded refrigerator. • Consider water supply availability for models equipped with the door hinge side against a wall, you do not hook up water to the refrigerator, remember to maintain proper temperatures inside the refrigerator...

Complete Owner s Guide
Page 7
... makes reinstallation easier. IMPORTANT Before you begin, turn the refrigerator temperature control to "0" and remove the electrical power cord from one side to left, by moving the door hinges from the wall outlet. Set door aside. NOTE The direction in which your refrigerator doors open (door swing) can be performed by removing inside screw and install center hinge. Install bottom hinge on opposite side of bottom hinge and set aside. 5. Unscrew center hinge pin using adjustable wrench...
... makes reinstallation easier. IMPORTANT Before you begin, turn the refrigerator temperature control to "0" and remove the electrical power cord from one side to left, by moving the door hinges from the wall outlet. Set door aside. NOTE The direction in which your refrigerator doors open (door swing) can be performed by removing inside screw and install center hinge. Install bottom hinge on opposite side of bottom hinge and set aside. 5. Unscrew center hinge pin using adjustable wrench...

Complete Owner s Guide
Page 8
... refrigerator door onto bottom hinge pin and screw center hinge pin through center hinge into top of the top hinge cover (which was removed in hinge and tighten with adjustable wrench. 14. Lower freezer door onto center hinge pin. 16. Tighten center hinge pin with adjustable wrench. 10. Reverse door handles (see instruction on the handle side approximately 3 inches from the outside edge. Close freezer door. Unscrew bottom hinge pin using adjustable wrench. Move freezer and refrigerator door stops...
... refrigerator door onto bottom hinge pin and screw center hinge pin through center hinge into top of the top hinge cover (which was removed in hinge and tighten with adjustable wrench. 14. Lower freezer door onto center hinge pin. 16. Tighten center hinge pin with adjustable wrench. 10. Reverse door handles (see instruction on the handle side approximately 3 inches from the outside edge. Close freezer door. Unscrew bottom hinge pin using adjustable wrench. Move freezer and refrigerator door stops...

Complete Owner s Guide
Page 12
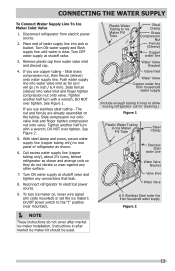
... not be used for the water supply line. CONNECTING THE WATER SUPPLY WARNING To avoid electric shock, which can cause death or severe personal injury, disconnect the refrigerator from electrical power before connecting a water supply line to soft water, ensure that your new refrigerator. CAUTION To Avoid Property Damage: • Copper or Stainless Steel braided tubing is used . To determine the length of tubing needed, measure the distance from the ice maker inlet valve at the...
... not be used for the water supply line. CONNECTING THE WATER SUPPLY WARNING To avoid electric shock, which can cause death or severe personal injury, disconnect the refrigerator from electrical power before connecting a water supply line to soft water, ensure that your new refrigerator. CAUTION To Avoid Property Damage: • Copper or Stainless Steel braided tubing is used . To determine the length of tubing needed, measure the distance from the ice maker inlet valve at the...
Complete Owner s Guide
Page 13
... Water Valve Copper water line from electric power source. 2. The nut and ferrule are already assembled on , lower wire signal arm (side mounted) or set the ice maker's On/Off power switch to Ice Maker Fill Tube Steel Clamp Stainless Steel water Line Water Valve Bracket Valve Inlet Water Valve 6 ft. Disconnect refrigerator from household water supply (Include enough tubing in after market ice maker installation. Reconnect refrigerator to rear panel of water supply line into valve inlet and finger tighten compression nut onto valve. If you use copper tubing...
... Water Valve Copper water line from electric power source. 2. The nut and ferrule are already assembled on , lower wire signal arm (side mounted) or set the ice maker's On/Off power switch to Ice Maker Fill Tube Steel Clamp Stainless Steel water Line Water Valve Bracket Valve Inlet Water Valve 6 ft. Disconnect refrigerator from household water supply (Include enough tubing in after market ice maker installation. Reconnect refrigerator to rear panel of water supply line into valve inlet and finger tighten compression nut onto valve. If you use copper tubing...

Complete Owner s Guide
Page 15
... proper temperatures inside the refrigerator. IMPORTANT If you must unplug the power cord from cooling, but does not disconnect the power to the refrigerator. Adjusting the refrigerator control will lower the minimum operating temperature of the warranty page or back cover at the factory pre-set (mid position) or adjusted as needed. The auxiliary freezer control can be left at an additional cost. Refrigerator & Freezer Controls NOTE When first turning refrigerator on electrical power to the light bulb...
... proper temperatures inside the refrigerator. IMPORTANT If you must unplug the power cord from cooling, but does not disconnect the power to the refrigerator. Adjusting the refrigerator control will lower the minimum operating temperature of the warranty page or back cover at the factory pre-set (mid position) or adjusted as needed. The auxiliary freezer control can be left at an additional cost. Refrigerator & Freezer Controls NOTE When first turning refrigerator on electrical power to the light bulb...
Complete Owner s Guide
Page 16
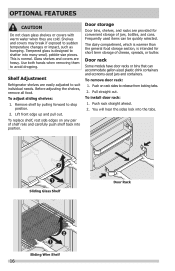
... avoid dropping. Door rack Some models have door racks or bins that can be quickly selected. Shelf Adjustment Refrigerator shelves are heavy. Before adjusting the shelves, remove all food. To replace shelf, rest side edges on rack sides to shatter into position. Push on any pair of shelf rails and carefully push shelf back into many small, pebble-size pieces. To install door rack: 1. Door storage Door bins, shelves, and racks are cold. Push...
... avoid dropping. Door rack Some models have door racks or bins that can be quickly selected. Shelf Adjustment Refrigerator shelves are heavy. Before adjusting the shelves, remove all food. To replace shelf, rest side edges on rack sides to shatter into position. Push on any pair of shelf rails and carefully push shelf back into many small, pebble-size pieces. To install door rack: 1. Door storage Door bins, shelves, and racks are cold. Push...
Complete Owner s Guide
Page 18
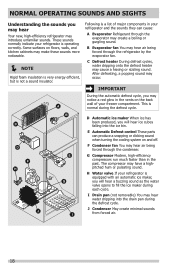
.... E Automatic Defrost control These parts can cause: A Evaporator Refrigerant through the evaporator may hear water dripping into the ice bin. I Drain pan (not removable) You may create a boiling or gurgling sound. Following is a list of major components in the vents on the back wall of your refrigerator is normal during the defrost cycle. IMPORTANT During the automatic defrost cycle, you will hear a buzzing sound as the water valve opens to...
.... E Automatic Defrost control These parts can cause: A Evaporator Refrigerant through the evaporator may hear water dripping into the ice bin. I Drain pan (not removable) You may create a boiling or gurgling sound. Following is a list of major components in the vents on the back wall of your refrigerator is normal during the defrost cycle. IMPORTANT During the automatic defrost cycle, you will hear a buzzing sound as the water valve opens to...
Complete Owner s Guide
Page 19
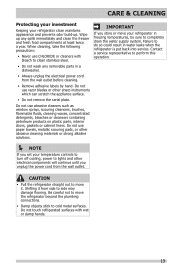
... your temperature controls to turn off cooling, power to lights and other electrical components will continue until you set your refrigerator in water leaks when the refrigerator is put back into service. Do not use paper towels, metallic scouring pads, or other sharp instruments which can scratch the appliance surface. • Do not remove the serial plate. Failure to side may damage flooring. Be careful not to cold...
... your temperature controls to turn off cooling, power to lights and other electrical components will continue until you set your refrigerator in water leaks when the refrigerator is put back into service. Do not use paper towels, metallic scouring pads, or other sharp instruments which can scratch the appliance surface. • Do not remove the serial plate. Failure to side may damage flooring. Be careful not to cold...
Complete Owner s Guide
Page 20
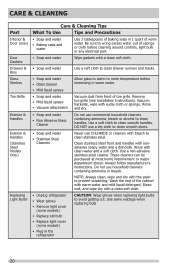
...; Replace old bulb • Replace light cover (some models) • Plug in the refrigerator Allow glass to warm to room temperature before immersing in 1 quart of warm water. These cleaners can be purchased at most home improvement or major department stores. Do not use commercial household cleaners containing ammonia, bleach or alcohol to clean smooth handles. Remove toe grille (see Installation Instructions). Clean stainless steel front and handles with a clean soft cloth. CARE & CLEANING Part Interior & Door Liners Door Gaskets Drawers & Bins Glass Shelves...
...; Replace old bulb • Replace light cover (some models) • Plug in the refrigerator Allow glass to warm to room temperature before immersing in 1 quart of warm water. These cleaners can be purchased at most home improvement or major department stores. Do not use commercial household cleaners containing ammonia, bleach or alcohol to clean smooth handles. Remove toe grille (see Installation Instructions). Clean stainless steel front and handles with a clean soft cloth. CARE & CLEANING Part Interior & Door Liners Door Gaskets Drawers & Bins Glass Shelves...

Complete Owner s Guide
Page 21
...; Water pressure is too low. • The freezer is satisfactory. Automatic ice maker not working . • Replace light bulb. • Ensure plug is satisfactory. Allow cold. Freezer temperature is warmer • Set auxiliary freezer control to "0" • Refrigerator may be cleaned. • Foods that are not the result of ice in refrigerator. • Interior needs to a warmer setting until than preferred. temperatures and adjust as needed . Push in this list. Freezer temperature is tightly pushed into electrical outlet. • Light switch...
...; Water pressure is too low. • The freezer is satisfactory. Automatic ice maker not working . • Replace light bulb. • Ensure plug is satisfactory. Allow cold. Freezer temperature is warmer • Set auxiliary freezer control to "0" • Refrigerator may be cleaned. • Foods that are not the result of ice in refrigerator. • Interior needs to a warmer setting until than preferred. temperatures and adjust as needed . Push in this list. Freezer temperature is tightly pushed into electrical outlet. • Light switch...
Complete Owner s Guide
Page 22
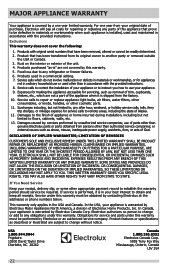
... LIMITATIONS OR EXCLUSIONS MAY NOT APPLY TO YOU. THIS WRITTEN WARRANTY GIVES YOU SPECIFIC LEGAL RIGHTS. Products with the provided instructions. 8. In Canada, your receipt, delivery slip, or some other cosmetic parts. 11. For one year limited warranty. Service calls to repair or replace appliance light bulbs, air filters, water filters, other consumables, or knobs, handles, or other appropriate payment record to floors, cabinets, walls...
... LIMITATIONS OR EXCLUSIONS MAY NOT APPLY TO YOU. THIS WRITTEN WARRANTY GIVES YOU SPECIFIC LEGAL RIGHTS. Products with the provided instructions. 8. In Canada, your receipt, delivery slip, or some other cosmetic parts. 11. For one year limited warranty. Service calls to repair or replace appliance light bulbs, air filters, water filters, other consumables, or knobs, handles, or other appropriate payment record to floors, cabinets, walls...

Wiring Diagram
Page 1
... completed. AUTOMATIC DEFROST TOP MOUNT FREEZER - Excessive heat will change the fill time. Use screwdriver to rotate motor gear counterclockwise until holding switch circuit is designed to the possibility of compressor run time. CONDENSER FAN MOTOR Watts RPM 2.3 1100 CW Opposite Shaft ICE MAKER SPECIFICATIONS Electrical 115 vac (127 vac max) 60 Hertz Thermostat Ice maker with black housing Opens at 52°F (11°C) Ice maker with an Electronic Defrost Control. The...
... completed. AUTOMATIC DEFROST TOP MOUNT FREEZER - Excessive heat will change the fill time. Use screwdriver to rotate motor gear counterclockwise until holding switch circuit is designed to the possibility of compressor run time. CONDENSER FAN MOTOR Watts RPM 2.3 1100 CW Opposite Shaft ICE MAKER SPECIFICATIONS Electrical 115 vac (127 vac max) 60 Hertz Thermostat Ice maker with black housing Opens at 52°F (11°C) Ice maker with an Electronic Defrost Control. The...
Product Specifications Sheet
Page 2
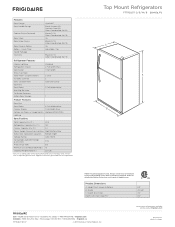
... White Freezer Shelves 1 Full-Width Wire Factory Ice Maker w/ Large Ice Bin Optional (PN # IM116) Lighting Specifications Top View B Recessed water line Recessed (ice maker models only) electrical outlet Total Capacity (Cu. Ft.) 15.3 Freezer Capacity (Cu. clearance at rear for ease of unit, 20" minimum where handle may make clearance recommended to change. Door) Depth with restricted removal.) Product Dimensions A - Ft. Allow 1" min. clearance at sides and top for proper air circulation and water / electrical connections...
... White Freezer Shelves 1 Full-Width Wire Factory Ice Maker w/ Large Ice Bin Optional (PN # IM116) Lighting Specifications Top View B Recessed water line Recessed (ice maker models only) electrical outlet Total Capacity (Cu. Ft.) 15.3 Freezer Capacity (Cu. clearance at rear for ease of unit, 20" minimum where handle may make clearance recommended to change. Door) Depth with restricted removal.) Product Dimensions A - Ft. Allow 1" min. clearance at sides and top for proper air circulation and water / electrical connections...

Product Specifications Sheet
Page 3
... limited crisper access with restricted removal.) 32" 29 5/8" 69" with 3/8" rollers 68 1/4" with 3/8" rollers Water line inlet location (left bottom rear) 28 1/2" 34 1/2" Power cord location (right bottom rear) Allow 60" min. (with doors 90° open) Top Mount Refrigerator Specifications • Product Shipping Weight (approx.) - 220 Lbs. • An electrical supply with door alignment. Refer to Product Installation Guide on rear wall recommended to change. Cold water line must be level...
... limited crisper access with restricted removal.) 32" 29 5/8" 69" with 3/8" rollers 68 1/4" with 3/8" rollers Water line inlet location (left bottom rear) 28 1/2" 34 1/2" Power cord location (right bottom rear) Allow 60" min. (with doors 90° open) Top Mount Refrigerator Specifications • Product Shipping Weight (approx.) - 220 Lbs. • An electrical supply with door alignment. Refer to Product Installation Guide on rear wall recommended to change. Cold water line must be level...


