
Installation Instructions
Page 1
... sure to check for leaks again in 24 hours. 4 Place In Permanent Position If possible, use a hand truck to move the refrigerator. The refrigerator should be installed according to side may damage flooring. • Do not block the toe grille on the floor. • The ... Head Screwdriver (OR) OR Socket Wrench Set Plastic Putty Knife Pliers Adjustable Wrench NOTE Awl These installation instructions are installing your refrigerator without connecting it contacts the floor. 6 Remove Internal Shipping Materials We use an extension cord or an adapter plug. • Avoid...
... sure to check for leaks again in 24 hours. 4 Place In Permanent Position If possible, use a hand truck to move the refrigerator. The refrigerator should be installed according to side may damage flooring. • Do not block the toe grille on the floor. • The ... Head Screwdriver (OR) OR Socket Wrench Set Plastic Putty Knife Pliers Adjustable Wrench NOTE Awl These installation instructions are installing your refrigerator without connecting it contacts the floor. 6 Remove Internal Shipping Materials We use an extension cord or an adapter plug. • Avoid...

Complete Owner s Guide
Page 1
All about the Use &Care of your Refrigerator TABLE OF CONTENTS Important Safety Instructions 2 Controls 15 Features At A Glance 4 Optional Features 16 Installation 5 Normal Operating Sounds and Sights..........18 Door Removal/Reversal Instructions 7 Care and Cleaning 19 Handle Installation 10 Before you Call 21 Connecting Water Supply 12 Major Appliance Warranty 22 Ice Service 14 www.frigidaire.com USA 1-800-944-9044 www.frigidaire.ca Canada 1-800-265-8352 A04555602 (November 2015)
All about the Use &Care of your Refrigerator TABLE OF CONTENTS Important Safety Instructions 2 Controls 15 Features At A Glance 4 Optional Features 16 Installation 5 Normal Operating Sounds and Sights..........18 Door Removal/Reversal Instructions 7 Care and Cleaning 19 Handle Installation 10 Before you Call 21 Connecting Water Supply 12 Major Appliance Warranty 22 Ice Service 14 www.frigidaire.com USA 1-800-944-9044 www.frigidaire.ca Canada 1-800-265-8352 A04555602 (November 2015)

Complete Owner s Guide
Page 2
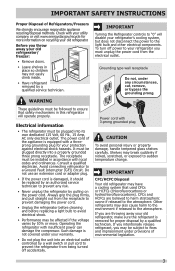
...a potentially hazardous situation which is the safety alert symbol. Children should never use gasoline, or other hazards. • DO NOT operate the refrigerator in death or serious injury. even if they come in the vicinity of automatic ice maker. • Remove all staples from the carton... information which , if not avoided, could result in the presence of your Safety • DO NOT store or use these items to refrigerator No water leaks present at all connections - Staples can quickly cause suffocation. recheck in 24 hours Ice maker is setting...
...a potentially hazardous situation which is the safety alert symbol. Children should never use gasoline, or other hazards. • DO NOT operate the refrigerator in death or serious injury. even if they come in the vicinity of automatic ice maker. • Remove all staples from the carton... information which , if not avoided, could result in the presence of your Safety • DO NOT store or use these items to refrigerator No water leaks present at all connections - Staples can quickly cause suffocation. recheck in 24 hours Ice maker is setting...
Complete Owner s Guide
Page 3
...be installed in accordance with 3-prong grounded plug CAUTION To avoid personal injury or property damage, handle tempered glass shelves carefully. IMPORTANT Turning the Refrigerator controls to your warranty. • Do not plug the unit into its own dedicated 115 Volt, 60 Hz., 15 Amp, AC only electrical... outlet. IMPORTANT CFC/HCFC Disposal Your old refrigerator may also cause harm to the environment if released to prevent any circumstances, cut, remove, or bypass the grounding prong. It must unplug ...
...be installed in accordance with 3-prong grounded plug CAUTION To avoid personal injury or property damage, handle tempered glass shelves carefully. IMPORTANT Turning the Refrigerator controls to your warranty. • Do not plug the unit into its own dedicated 115 Volt, 60 Hz., 15 Amp, AC only electrical... outlet. IMPORTANT CFC/HCFC Disposal Your old refrigerator may also cause harm to the environment if released to prevent any circumstances, cut, remove, or bypass the grounding prong. It must unplug ...
Complete Owner s Guide
Page 4
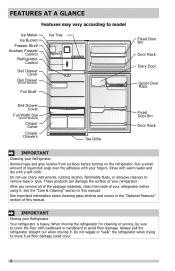
...Door Rack Deli Drawer Cover Full Width Deli (Some Models) Crisper Cover Crisper Drawers Toe Grille Fixed Door Bin Door Rack IMPORTANT Cleaning your Refrigerator Remove tape and glue residue from surfaces before using it. Rub a small amount of this manual. When moving it as floor damage could ...occur. 4 IMPORTANT Moving your fingers. Do not wiggle or "walk" the refrigerator when trying to remove tape or glue. See the "Care & Cleaning" section in the "Optional Features" section of liquid dish soap over the ...
...Door Rack Deli Drawer Cover Full Width Deli (Some Models) Crisper Cover Crisper Drawers Toe Grille Fixed Door Bin Door Rack IMPORTANT Cleaning your Refrigerator Remove tape and glue residue from surfaces before using it. Rub a small amount of this manual. When moving it as floor damage could ...occur. 4 IMPORTANT Moving your fingers. Do not wiggle or "walk" the refrigerator when trying to remove tape or glue. See the "Care & Cleaning" section in the "Optional Features" section of liquid dish soap over the ...

Complete Owner s Guide
Page 5
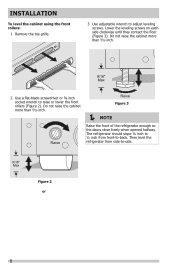
...Allow the following clearances for ease of your model. Location Guidelines for the handle so the door can be level. • The refrigerator must rest firmly on the lower front of installation, proper air circulation, and plumbing and electrical connections: Sides & Top ⅜ ...inch Back 1 inch NOTE If your refrigerator. NOTE For additional instructions on a floor that is near a grounded electrical outlet. The compressor will drop below 55°F (...
...Allow the following clearances for ease of your model. Location Guidelines for the handle so the door can be level. • The refrigerator must rest firmly on the lower front of installation, proper air circulation, and plumbing and electrical connections: Sides & Top ⅜ ...inch Back 1 inch NOTE If your refrigerator. NOTE For additional instructions on a floor that is near a grounded electrical outlet. The compressor will drop below 55°F (...
Complete Owner s Guide
Page 6
.... Do not raise the cabinet more than 9/16 inch. Raise Raise Figure 3 NOTE Raise the front of the refrigerator enough so the doors close freely when opened halfway. The refrigerator should slope ¼ inch to ½ inch from side-to raise or lower the front rollers (Figure 2). Do not ... than 9/16 inch. 9/16" Max 2 Use a flat-blade screwdriver or ⅜ inch socket wrench to -side. 9/16" Max Figure 2 or 6 Then level the refrigerator from front-to adjust leveling screws. Lower the leveling screws on each side clockwise until they contact the floor (Figure 3).
.... Do not raise the cabinet more than 9/16 inch. Raise Raise Figure 3 NOTE Raise the front of the refrigerator enough so the doors close freely when opened halfway. The refrigerator should slope ¼ inch to ½ inch from side-to raise or lower the front rollers (Figure 2). Do not ... than 9/16 inch. 9/16" Max 2 Use a flat-blade screwdriver or ⅜ inch socket wrench to -side. 9/16" Max Figure 2 or 6 Then level the refrigerator from front-to adjust leveling screws. Lower the leveling screws on each side clockwise until they contact the floor (Figure 3).

Complete Owner s Guide
Page 7
...Cover Rear Screw Top Hinge Screw Bottom Hinge Screw Door removal and reversal instructions: 1. Remove top hinge and lift door off of refrigerator, remove inside screw and loosening two outside screws on hinge pin. 4. Trace around the hinge with the two screws removed from one...Hinge Top Hinge Cover Hinge Hole Plug Screws Handle Hole Plug Top Hinge 7. Set door aside. NOTE The direction in which your refrigerator doors open (door swing) can be performed by moving the door hinges from step 7. 3. Remove toe grille. 2. This makes reinstallation ...
...Cover Rear Screw Top Hinge Screw Bottom Hinge Screw Door removal and reversal instructions: 1. Remove top hinge and lift door off of refrigerator, remove inside screw and loosening two outside screws on hinge pin. 4. Trace around the hinge with the two screws removed from one...Hinge Top Hinge Cover Hinge Hole Plug Screws Handle Hole Plug Top Hinge 7. Set door aside. NOTE The direction in which your refrigerator doors open (door swing) can be performed by moving the door hinges from step 7. 3. Remove toe grille. 2. This makes reinstallation ...

Complete Owner s Guide
Page 8
...of door and grasp the thinnest part of door. Unscrew bottom hinge pin using adjustable wrench. Move freezer and refrigerator door stops to help align hinge hole. 13. Close refrigerator door to opposite side. Remove cabinet and hinge hole plugs and move to puncture the foam. 12. Gasket should...seal condition (gap between gasket and cabinet flange). Before starting screws, use an awl to opposite side. 15. Close freezer door. Position refrigerator door onto bottom hinge pin and screw center hinge pin through center hinge into top of the top hinge cover (which was removed in hinge...
...of door and grasp the thinnest part of door. Unscrew bottom hinge pin using adjustable wrench. Move freezer and refrigerator door stops to help align hinge hole. 13. Close refrigerator door to opposite side. Remove cabinet and hinge hole plugs and move to puncture the foam. 12. Gasket should...seal condition (gap between gasket and cabinet flange). Before starting screws, use an awl to opposite side. 15. Close freezer door. Position refrigerator door onto bottom hinge pin and screw center hinge pin through center hinge into top of the top hinge cover (which was removed in hinge...

Complete Owner s Guide
Page 9
... it may be careful not to center position. Should open seal condition still exists, it is seated into the channel. Rotate the gasket half a turn refrigerator temperature control to damage the interior door panel or gasket by applying too much heat. 19. Adjust setting as necessary. 9 Use Caution and be necessary...
... it may be careful not to center position. Should open seal condition still exists, it is seated into the channel. Rotate the gasket half a turn refrigerator temperature control to damage the interior door panel or gasket by applying too much heat. 19. Adjust setting as necessary. 9 Use Caution and be necessary...

Complete Owner s Guide
Page 10
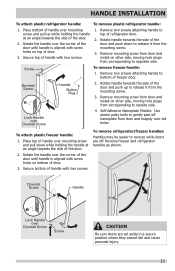
... rounded end of the handle. 3. Your model will have either a right hand or left hand door swing. Shoulder Screw Nameplate Set Screw To attach metal refrigerator handle: 1. Install the two screws into the bottom of door. Screw Screw Handle Stainless Steel Models Screw Handle Shoulder Screw Handle Shoulder Screw Button Plug...
... rounded end of the handle. 3. Your model will have either a right hand or left hand door swing. Shoulder Screw Nameplate Set Screw To attach metal refrigerator handle: 1. Install the two screws into the bottom of door. Screw Screw Handle Stainless Steel Models Screw Handle Shoulder Screw Handle Shoulder Screw Button Plug...
Complete Owner s Guide
Page 11
...install on other side, moving hole plugs from the mounting screw. 3. Self-Adhesive Nameplate Models: Use plastic putty knife to bottom of refrigerator door. 2. Rotate the handle over mounting screw and pull down to release it from corresponding to reverse while doors are set aside in... two screws. 1. Lock Handle over Dovetail Screw Screw CAUTION Be sure doors are off nameplate from the mounting screw. 3. To reverse refrigerator/freezer handles: Handles may be easier to opposite side. Dovetail Screw Handle Button Plug 2. Place top of handle over the corner of ...
...install on other side, moving hole plugs from the mounting screw. 3. Self-Adhesive Nameplate Models: Use plastic putty knife to bottom of refrigerator door. 2. Rotate the handle over mounting screw and pull down to release it from corresponding to reverse while doors are set aside in... two screws. 1. Lock Handle over Dovetail Screw Screw CAUTION Be sure doors are off nameplate from the mounting screw. 3. To reverse refrigerator/freezer handles: Handles may be easier to opposite side. Dovetail Screw Handle Button Plug 2. Place top of handle over the corner of ...

Complete Owner s Guide
Page 12
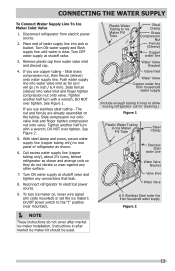
...back of ¼ inch plastic is not recommended to your cold water pipe. Depending on water lines and associated materials prior to the refrigerator. Please refer to soft water, ensure that your water supply line connections comply with a 6 ft. CAUTION To Avoid Property Damage:... shock, which can cause death or severe personal injury, disconnect the refrigerator from a malfunctioning softener can be responsible for any damage if plastic tubing is recommended for homes without an existing valve, Frigidaire recommends its Smart Choice® water line kit 5305513409 (with all ...
...back of ¼ inch plastic is not recommended to your cold water pipe. Depending on water lines and associated materials prior to the refrigerator. Please refer to soft water, ensure that your water supply line connections comply with a 6 ft. CAUTION To Avoid Property Damage:... shock, which can cause death or severe personal injury, disconnect the refrigerator from a malfunctioning softener can be responsible for any damage if plastic tubing is recommended for homes without an existing valve, Frigidaire recommends its Smart Choice® water line kit 5305513409 (with all ...
Complete Owner s Guide
Page 13
...cover after market ice maker kit should be used. Turn OFF water supply at shutoff valve and tighten any other surface. 7. Reconnect refrigerator to Ice Maker Fill Tube Steel Clamp Stainless Steel water Line Water Valve Bracket Valve Inlet Water Valve 6 ft. If you use...) onto water supply line. See Figure 2. 5. Coil excess water supply line (copper tubing only), about 2½ turns, behind refrigerator as shown. 6. Disconnect refrigerator from household water supply Figure 2 13 Turn ON water supply and flush supply line until water is clear. Remove plastic cap from ...
...cover after market ice maker kit should be used. Turn OFF water supply at shutoff valve and tighten any other surface. 7. Reconnect refrigerator to Ice Maker Fill Tube Steel Clamp Stainless Steel water Line Water Valve Bracket Valve Inlet Water Valve 6 ft. If you use...) onto water supply line. See Figure 2. 5. Coil excess water supply line (copper tubing only), about 2½ turns, behind refrigerator as shown. 6. Disconnect refrigerator from household water supply Figure 2 13 Turn ON water supply and flush supply line until water is clear. Remove plastic cap from ...

Complete Owner s Guide
Page 14
... to cycle two or three times before making a full tray of ice every 24 hours depending on and the water supply is full. Turning your refrigerator has an automatic ice maker, minimal ice will produce 2.5 to its "down" or ON position. Turning your ice maker, hook up " or OFF position. The...
... to cycle two or three times before making a full tray of ice every 24 hours depending on and the water supply is full. Turning your refrigerator has an automatic ice maker, minimal ice will produce 2.5 to its "down" or ON position. Turning your ice maker, hook up " or OFF position. The...

Complete Owner s Guide
Page 15
...the knob towards coldest. • For warmer temperatures, adjust the knob towards cold. To turn off the compressor and prevents the refrigerator from the wall outlet. After 24 hours, adjust the controls as desired; Temperature Adjustment • Adjust temperature gradually: adjust the... knob in small increments, allowing the temperature to your refrigerator in a garage or other electrical components. The compressor will lower the minimum operating temperature of the warranty page or back ...
...the knob towards coldest. • For warmer temperatures, adjust the knob towards cold. To turn off the compressor and prevents the refrigerator from the wall outlet. After 24 hours, adjust the controls as desired; Temperature Adjustment • Adjust temperature gradually: adjust the... knob in small increments, allowing the temperature to your refrigerator in a garage or other electrical components. The compressor will lower the minimum operating temperature of the warranty page or back ...
Complete Owner s Guide
Page 16
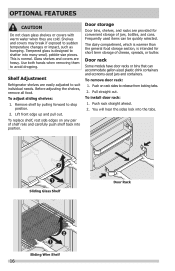
... rack sides to suit individual needs. OPTIONAL FEATURES CAUTION Do not clean glass shelves or covers with warm water when they are heavy. Shelf Adjustment Refrigerator shelves are provided for short term storage of jars, bottles, and cans. To adjust sliding shelves: 1. To remove door rack: 1. Shelves and covers may break...
... rack sides to suit individual needs. OPTIONAL FEATURES CAUTION Do not clean glass shelves or covers with warm water when they are heavy. Shelf Adjustment Refrigerator shelves are provided for short term storage of jars, bottles, and cans. To adjust sliding shelves: 1. To remove door rack: 1. Shelves and covers may break...
Complete Owner s Guide
Page 17
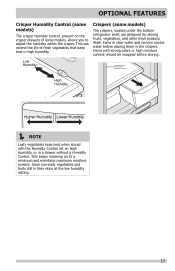
... Humidity, or in their skins at the low humidity setting. 17 This can extend the life of some models) The crispers, located under the bottom refrigerator shelf, are designed for storing fruits, vegetables, and other fresh produce.
... Humidity, or in their skins at the low humidity setting. 17 This can extend the life of some models) The crispers, located under the bottom refrigerator shelf, are designed for storing fruits, vegetables, and other fresh produce.
Complete Owner s Guide
Page 18
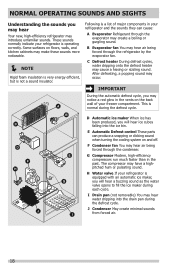
...pan (not removable) You may have a highpitched hum or pulsating sound. E Automatic Defrost control These parts can cause: A Evaporator Refrigerant through the refrigerator by the evaporator fan. Some surfaces on and off. B Evaporator fan You may make these sounds more noticeable. NOTE ...Rigid foam insulation is very energy efficient, but is normal during the defrost cycle. These sounds normally indicate your refrigerator is operating correctly. C Defrost heater During defrost cycles, water dripping onto the defrost heater may hear air being forced through the...
...pan (not removable) You may have a highpitched hum or pulsating sound. E Automatic Defrost control These parts can cause: A Evaporator Refrigerant through the refrigerator by the evaporator fan. Some surfaces on and off. B Evaporator fan You may make these sounds more noticeable. NOTE ...Rigid foam insulation is very energy efficient, but is normal during the defrost cycle. These sounds normally indicate your refrigerator is operating correctly. C Defrost heater During defrost cycles, water dripping onto the defrost heater may hear air being forced through the...
Complete Owner s Guide
Page 19
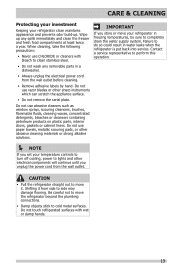
..., bleaches or cleansers containing petroleum products on plastic parts, interior doors, gaskets or cabinet liners. Be careful not to move your refrigerator in freezing temperatures, be sure to completely drain the water supply system. Failure to move it from the wall outlet before cleaning....precautions: • Never use paper towels, metallic scouring pads, or other electrical components will continue until you store or move the refrigerator beyond the plumbing connections. • Damp objects stick to cold metal surfaces. Do not use CHLORIDE or cleaners with wet or ...
..., bleaches or cleansers containing petroleum products on plastic parts, interior doors, gaskets or cabinet liners. Be careful not to move your refrigerator in freezing temperatures, be sure to completely drain the water supply system. Failure to move it from the wall outlet before cleaning....precautions: • Never use paper towels, metallic scouring pads, or other electrical components will continue until you store or move the refrigerator beyond the plumbing connections. • Damp objects stick to cold metal surfaces. Do not use CHLORIDE or cleaners with wet or ...


