
Installation Instructions
Page 1
... Tape 2 Pieces of Tape Location of its water supply (copper tubing) connections. Anti-tip Bracket Figure 4 (some models) 4 Some models are installing your refrigerator without connecting it to a water supply, make sure the ice maker's power switch is turned Off (see "Door Removal Instructions" in your household water line and the refrigerator supply line. Once the refrigerator is essential for proper operation. 5 Level Refrigerator & Adjust Doors (if necessary) Guidelines for final positioning of your refrigerator. 1 Prepare The Installation Site Include these minimum guidelines...
... Tape 2 Pieces of Tape Location of its water supply (copper tubing) connections. Anti-tip Bracket Figure 4 (some models) 4 Some models are installing your refrigerator without connecting it to a water supply, make sure the ice maker's power switch is turned Off (see "Door Removal Instructions" in your household water line and the refrigerator supply line. Once the refrigerator is essential for proper operation. 5 Level Refrigerator & Adjust Doors (if necessary) Guidelines for final positioning of your refrigerator. 1 Prepare The Installation Site Include these minimum guidelines...

Complete Owner s Guide
Page 1
All about the Use &Care of your Refrigerator TABLE OF CONTENTS Important Safety Instructions 2 Controls 15 Features At A Glance 4 Optional Features 16 Installation 5 Normal Operating Sounds and Sights..........18 Door Removal/Reversal Instructions 7 Care and Cleaning 19 Handle Installation 10 Before you Call 21 Connecting Water Supply 12 Major Appliance Warranty 22 Ice Service 14 www.frigidaire.com USA 1-800-944-9044 www.frigidaire.ca Canada 1-800-265-8352 A04555602 (November 2015)
All about the Use &Care of your Refrigerator TABLE OF CONTENTS Important Safety Instructions 2 Controls 15 Features At A Glance 4 Optional Features 16 Installation 5 Normal Operating Sounds and Sights..........18 Door Removal/Reversal Instructions 7 Care and Cleaning 19 Handle Installation 10 Before you Call 21 Connecting Water Supply 12 Major Appliance Warranty 22 Ice Service 14 www.frigidaire.com USA 1-800-944-9044 www.frigidaire.ca Canada 1-800-265-8352 A04555602 (November 2015)

Complete Owner s Guide
Page 2
... symbol. Obey all safety messages that follow the instructions below to refrigerator No water leaks present at all staples from the carton. Doors Handles are not problems of this symbol to play. Cartons covered with filter housing (select models) Final Checks Shipping material removed Fresh food and freezer temperatures set Crisper humidity controls set Registration card sent in minor or moderate...
... symbol. Obey all safety messages that follow the instructions below to refrigerator No water leaks present at all staples from the carton. Doors Handles are not problems of this symbol to play. Cartons covered with filter housing (select models) Final Checks Shipping material removed Fresh food and freezer temperatures set Crisper humidity controls set Registration card sent in minor or moderate...
Complete Owner s Guide
Page 3
... refrigerator before cleaning and before replacing a light bulb to avoid electrical shock. • Performance may not easily climb inside. • Have refrigerant removed by a wall switch or pull cord to ensure that used CFCs or HCFCs (chlorofluorocarbons or hydrochlorofluorocarbons). Avoid connecting refrigerator to "0" will operate properly. Power cord with insufficient power can damage the compressor. Do not use an extension cord or adapter plug. • If the power cord is removed...
... refrigerator before cleaning and before replacing a light bulb to avoid electrical shock. • Performance may not easily climb inside. • Have refrigerant removed by a wall switch or pull cord to ensure that used CFCs or HCFCs (chlorofluorocarbons or hydrochlorofluorocarbons). Avoid connecting refrigerator to "0" will operate properly. Power cord with insufficient power can damage the compressor. Do not use an extension cord or adapter plug. • If the power cord is removed...
Complete Owner s Guide
Page 4
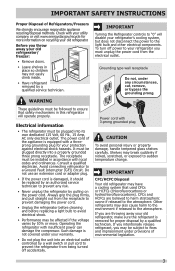
... fluids, or abrasive cleaners to model Ice Maker Ice Bucket Freezer Shelf Auxiliary Freezer Control Refrigerator Control Deli Drawer Cover Deli Drawer (Some Models) Full Shelf Ice Tray Fixed Door Bin Door Rack Dairy Door Upper Door Rack Deli Drawer Cover Full Width Deli (Some Models) Crisper Cover Crisper Drawers Toe Grille Fixed Door Bin Door Rack IMPORTANT Cleaning your Refrigerator Remove tape and glue residue from surfaces before using it. See the "Care & Cleaning" section in the "Optional Features" section of your Refrigerator Your refrigerator is heavy. FEATURES AT A GLANCE...
... fluids, or abrasive cleaners to model Ice Maker Ice Bucket Freezer Shelf Auxiliary Freezer Control Refrigerator Control Deli Drawer Cover Deli Drawer (Some Models) Full Shelf Ice Tray Fixed Door Bin Door Rack Dairy Door Upper Door Rack Deli Drawer Cover Full Width Deli (Some Models) Crisper Cover Crisper Drawers Toe Grille Fixed Door Bin Door Rack IMPORTANT Cleaning your Refrigerator Remove tape and glue residue from surfaces before using it. See the "Care & Cleaning" section in the "Optional Features" section of your Refrigerator Your refrigerator is heavy. FEATURES AT A GLANCE...

Complete Owner s Guide
Page 5
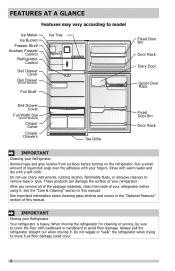
... ice maker. INSTALLATION This Use & Care Guide provides general operating instructions for the handle so the door can be opened wider. 5 Location Guidelines for final positioning of your refrigerator: • All four corners of installation, proper air circulation, and plumbing and electrical connections: Sides & Top ⅜ inch Back 1 inch NOTE If your refrigerator is level and strong enough to support a fully loaded refrigerator. • Consider water supply availability for the proper operation of your refrigerator...
... ice maker. INSTALLATION This Use & Care Guide provides general operating instructions for the handle so the door can be opened wider. 5 Location Guidelines for final positioning of your refrigerator: • All four corners of installation, proper air circulation, and plumbing and electrical connections: Sides & Top ⅜ inch Back 1 inch NOTE If your refrigerator is level and strong enough to support a fully loaded refrigerator. • Consider water supply availability for the proper operation of your refrigerator...

Complete Owner s Guide
Page 7
... out. Set door aside. NOTE The direction in which your refrigerator doors open (door swing) can be performed by moving the door hinges from one side to "0" and remove the electrical power cord from left , by a qualified person. Remove top hinge cover. Trace around the hinge with ⅜" socket wrench. 8. Install bottom hinge on hinge pin. 4. Remove center hinge and shim by removing inside screw and install center hinge. Door Stop Screw Door Stop Washer Hinge Pin Bottom Hinge Screws...
... out. Set door aside. NOTE The direction in which your refrigerator doors open (door swing) can be performed by moving the door hinges from one side to "0" and remove the electrical power cord from left , by a qualified person. Remove top hinge cover. Trace around the hinge with ⅜" socket wrench. 8. Install bottom hinge on hinge pin. 4. Remove center hinge and shim by removing inside screw and install center hinge. Door Stop Screw Door Stop Washer Hinge Pin Bottom Hinge Screws...

Complete Owner s Guide
Page 8
... hinge into top of the top hinge cover (which was removed in hinge and tighten with adjustable wrench. 14. Reverse door handles (see instruction on the handle side approximately 3 inches from the outside edge. Close freezer door. Move hinge pin to other hole in Step 2) and insert the thickest part between gasket and cabinet flange). Before starting screws, use an awl to help align hinge hole. 13. Close refrigerator door...
... hinge into top of the top hinge cover (which was removed in hinge and tighten with adjustable wrench. 14. Reverse door handles (see instruction on the handle side approximately 3 inches from the outside edge. Close freezer door. Move hinge pin to other hole in Step 2) and insert the thickest part between gasket and cabinet flange). Before starting screws, use an awl to help align hinge hole. 13. Close refrigerator door...

Complete Owner s Guide
Page 12
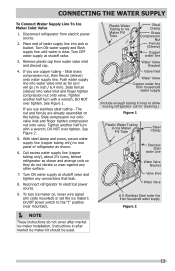
...) for connecting a copper water supply line to www.frigidaire.com/store for the water supply line. Copper Water Line with water pressure between 30 and 100 psi. • A water supply line made of tubing needed, measure the distance from electrical power before connecting a water supply line to your water supply line connections comply with a 6 ft. IMPORTANT Ensure that the softener is not recommended to be moved out for cleaning (as shown). • A shutoff valve to connect the water supply line to the refrigerator...
...) for connecting a copper water supply line to www.frigidaire.com/store for the water supply line. Copper Water Line with water pressure between 30 and 100 psi. • A water supply line made of tubing needed, measure the distance from electrical power before connecting a water supply line to your water supply line connections comply with a 6 ft. IMPORTANT Ensure that the softener is not recommended to be moved out for cleaning (as shown). • A shutoff valve to connect the water supply line to the refrigerator...
Complete Owner s Guide
Page 13
... cleaning.) Figure 1 Plastic Water Tubing to the "I" position (rear mounted). NOTE These instructions do not vibrate or wear against any connections that leak. 8. Turn ON water supply at shutoff valve. 3. Slide brass compression nut, then ferrule (sleeve) onto water supply line. The nut and ferrule are already assembled on , lower wire signal arm (side mounted) or set the ice maker's On/Off power switch to Ice Maker Fill Tube Steel Clamp Stainless Steel water Line Water Valve...
... cleaning.) Figure 1 Plastic Water Tubing to the "I" position (rear mounted). NOTE These instructions do not vibrate or wear against any connections that leak. 8. Turn ON water supply at shutoff valve. 3. Slide brass compression nut, then ferrule (sleeve) onto water supply line. The nut and ferrule are already assembled on , lower wire signal arm (side mounted) or set the ice maker's On/Off power switch to Ice Maker Fill Tube Steel Clamp Stainless Steel water Line Water Valve...

Complete Owner s Guide
Page 15
... proper temperatures inside the refrigerator. For good circulation, do not block cold air vents with food. Adjusting the refrigerator control will change temperatures in the refrigerator and freezer compartments. IMPORTANT If you may experience freezer temperature problems during the winter months when temperatures dip below 55°F (13°C) or rise above 110°F (43°C). Upgrading your refrigerator with a Garage Kit will lower the minimum operating temperature of the warranty page...
... proper temperatures inside the refrigerator. For good circulation, do not block cold air vents with food. Adjusting the refrigerator control will change temperatures in the refrigerator and freezer compartments. IMPORTANT If you may experience freezer temperature problems during the winter months when temperatures dip below 55°F (13°C) or rise above 110°F (43°C). Upgrading your refrigerator with a Garage Kit will lower the minimum operating temperature of the warranty page...
Complete Owner s Guide
Page 16
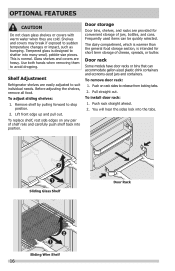
... CAUTION Do not clean glass shelves or covers with warm water when they are heavy. Tempered glass is designed to avoid dropping. Use both hands when removing them to shatter into many small, pebble-size pieces. Remove shelf by pulling forward to sudden temperature changes or impact, such as bumping. Door storage Door bins, shelves, and racks are easily adjusted to release from locking tabs. 2. To install door rack: 1. This is...
... CAUTION Do not clean glass shelves or covers with warm water when they are heavy. Tempered glass is designed to avoid dropping. Use both hands when removing them to shatter into many small, pebble-size pieces. Remove shelf by pulling forward to sudden temperature changes or impact, such as bumping. Door storage Door bins, shelves, and racks are easily adjusted to release from locking tabs. 2. To install door rack: 1. This is...
Complete Owner s Guide
Page 18
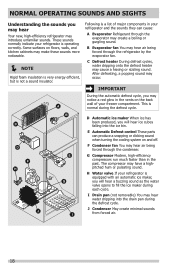
... refrigerator by the evaporator fan. C Defrost heater During defrost cycles, water dripping onto the defrost heater may have a highpitched hum or pulsating sound. F Condenser fan You may hear water dripping into the ice bin. The compressor may cause a hissing or sizzling sound. H Water valve If your freezer compartment. J Condenser May create minimal sounds from forced air. 18 I Drain pan (not removable) You may hear air being forced through the condenser. Following is a list...
... refrigerator by the evaporator fan. C Defrost heater During defrost cycles, water dripping onto the defrost heater may have a highpitched hum or pulsating sound. F Condenser fan You may hear water dripping into the ice bin. The compressor may cause a hissing or sizzling sound. H Water valve If your freezer compartment. J Condenser May create minimal sounds from forced air. 18 I Drain pan (not removable) You may hear air being forced through the condenser. Following is a list...
Complete Owner s Guide
Page 19
... set your temperature controls to turn off cooling, power to clean stainless steel. • Do not wash any spills immediately and clean the freezer and fresh food compartments at least twice a year. Do not use abrasive cleaners such as window sprays, scouring cleansers, brushes, flammable fluids, cleaning waxes, concentrated detergents, bleaches or cleansers containing petroleum products on plastic parts, interior doors, gaskets or cabinet liners. Be careful...
... set your temperature controls to turn off cooling, power to clean stainless steel. • Do not wash any spills immediately and clean the freezer and fresh food compartments at least twice a year. Do not use abrasive cleaners such as window sprays, scouring cleansers, brushes, flammable fluids, cleaning waxes, concentrated detergents, bleaches or cleansers containing petroleum products on plastic parts, interior doors, gaskets or cabinet liners. Be careful...
Complete Owner s Guide
Page 20
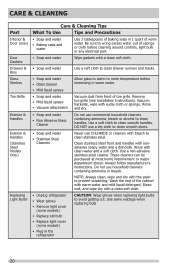
... cabinet with the grain to clean stainless steel. CARE & CLEANING Part Interior & Door Liners Door Gaskets Drawers & Bins Glass Shelves Toe Grille Exterior & Handles Exterior & Handles (Stainless Steel Models Only) Replacing Light Bulbs Care & Cleaning Tips What To Use Tips and Precautions • Soap and water • Baking soda and water Use 2 tablespoons of baking soda in warm water. Do not use CHLORIDE or cleaners with clean water and a soft cloth. NOTE: Always clean, wipe and dry with warm water and mild liquid detergent...
... cabinet with the grain to clean stainless steel. CARE & CLEANING Part Interior & Door Liners Door Gaskets Drawers & Bins Glass Shelves Toe Grille Exterior & Handles Exterior & Handles (Stainless Steel Models Only) Replacing Light Bulbs Care & Cleaning Tips What To Use Tips and Precautions • Soap and water • Baking soda and water Use 2 tablespoons of baking soda in warm water. Do not use CHLORIDE or cleaners with clean water and a soft cloth. NOTE: Always clean, wipe and dry with warm water and mild liquid detergent...

Complete Owner s Guide
Page 21
... for temperature to a warmer setting. Freezer temperature is too • Set refrigerator/freezer control to stabilize. temperatures and adjust as needed . temperature to release. Push in light switch, located on the refrigerator control box, to stabilize. Allow 24 hours for service, review this appliance. refrigerator temperatures and adjust as needed . Automatic ice maker not working . • Replace light bulb. • Ensure plug is colder than preferred. Freezer temperature is tightly pushed into electrical outlet. • Check/replace fuse with a 15 amp time...
... for temperature to a warmer setting. Freezer temperature is too • Set refrigerator/freezer control to stabilize. temperatures and adjust as needed . temperature to release. Push in light switch, located on the refrigerator control box, to stabilize. Allow 24 hours for service, review this appliance. refrigerator temperatures and adjust as needed . Automatic ice maker not working . • Replace light bulb. • Ensure plug is colder than preferred. Freezer temperature is tightly pushed into electrical outlet. • Check/replace fuse with a 15 amp time...
Complete Owner s Guide
Page 22
Products with original serial numbers that has been transferred from your appliance is warranted by Electrolux or an authorized service company. Food loss due to repair or replace appliance light bulbs, air filters, water filters, other consumables, or knobs, handles, or other than authorized service companies; Products used other cosmetic parts. 11. or external causes such as removal of trim, cupboards, shelves, etc., which do not involve malfunction...
Products with original serial numbers that has been transferred from your appliance is warranted by Electrolux or an authorized service company. Food loss due to repair or replace appliance light bulbs, air filters, water filters, other consumables, or knobs, handles, or other than authorized service companies; Products used other cosmetic parts. 11. or external causes such as removal of trim, cupboards, shelves, etc., which do not involve malfunction...

Wiring Diagram
Page 1
... W ICE MAKER CONNECTOR PLUG CONNECTIONS Wire Number Wire Color 1 Green / Yellow 2 Yellow 3 Black 4 Light Blue SERVICE DATA SHEET 241588207 STANDARD - Excessive heat will distort the plastic liner. AUTOMATIC DEFROST TOP MOUNT FREEZER - Untrained persons should function to the possibility of compressor run time. CAUTION All electrical parts and wiring must be shielded from housing. Defrost 30 minutes every 10 hours of electrical shock. CONDENSER FAN MOTOR Watts RPM 2.3 1100 CW Opposite Shaft ICE MAKER SPECIFICATIONS Electrical...
... W ICE MAKER CONNECTOR PLUG CONNECTIONS Wire Number Wire Color 1 Green / Yellow 2 Yellow 3 Black 4 Light Blue SERVICE DATA SHEET 241588207 STANDARD - Excessive heat will distort the plastic liner. AUTOMATIC DEFROST TOP MOUNT FREEZER - Untrained persons should function to the possibility of compressor run time. CAUTION All electrical parts and wiring must be shielded from housing. Defrost 30 minutes every 10 hours of electrical shock. CONDENSER FAN MOTOR Watts RPM 2.3 1100 CW Opposite Shaft ICE MAKER SPECIFICATIONS Electrical...
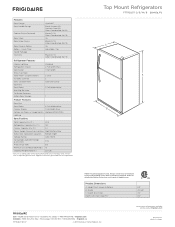
Product Specifications Sheet
Page 2
... Gallon Door Storage 1 Freezer Features Door Bins Door Racks 2 Full-Width White Freezer Shelves 1 Full-Width Wire Factory Ice Maker w/ Large Ice Bin Optional (PN # IM116) Lighting Specifications Top View B Recessed water line Recessed (ice maker models only) electrical outlet Total Capacity (Cu. Appliance must be grounded for 90° door opening* providing complete crisper access and removal. (Absolute 3" NOTE: For planning purposes only. Refer detailed installation instructions on adequately wired 120V, dedicated circuit having 2-wire service with wall, to change...
... Gallon Door Storage 1 Freezer Features Door Bins Door Racks 2 Full-Width White Freezer Shelves 1 Full-Width Wire Factory Ice Maker w/ Large Ice Bin Optional (PN # IM116) Lighting Specifications Top View B Recessed water line Recessed (ice maker models only) electrical outlet Total Capacity (Cu. Appliance must be grounded for 90° door opening* providing complete crisper access and removal. (Absolute 3" NOTE: For planning purposes only. Refer detailed installation instructions on adequately wired 120V, dedicated circuit having 2-wire service with wall, to change...

Product Specifications Sheet
Page 3
... water / electrical connections Allow 3/8" min. Cold water line must be installed in ice maker-ready models only. • Water recess on the web at rear for 90°door swing which will provide limited crisper access with restricted removal.) 32" 29 5/8" 69" with 3/8" rollers 68 1/4" with 3/8" rollers Water line inlet location (left bottom rear) 28 1/2" 34 1/2" Power cord location (right bottom rear) Allow 60" min. (with doors 90° open) Top Mount Refrigerator Specifications...
... water / electrical connections Allow 3/8" min. Cold water line must be installed in ice maker-ready models only. • Water recess on the web at rear for 90°door swing which will provide limited crisper access with restricted removal.) 32" 29 5/8" 69" with 3/8" rollers 68 1/4" with 3/8" rollers Water line inlet location (left bottom rear) 28 1/2" 34 1/2" Power cord location (right bottom rear) Allow 60" min. (with doors 90° open) Top Mount Refrigerator Specifications...


