

Complete Owners Guide
Page 1
REFRIGERATOR use & care Introduction 2 Important Safety information 3 Features (Frigidaire 5 Features (Frigidaire Gallery/Professional).... 7 Installation 8 Door Removal 10 Door Handle Installation (some models)... 13 Water Supply Connection 16 Ice Maker 18 Controls and Settings 19 Storage Features 22 Normal Operating Sounds 24 Filter replacement 25 Care and Cleaning 26 Troubleshooting 28 Limited Warranty 29 Frigidaire.com USA 1-800-374-4432 A13110304 (October 2019) Frigidaire.ca Canada 1-800-265-8352
REFRIGERATOR use & care Introduction 2 Important Safety information 3 Features (Frigidaire 5 Features (Frigidaire Gallery/Professional).... 7 Installation 8 Door Removal 10 Door Handle Installation (some models)... 13 Water Supply Connection 16 Ice Maker 18 Controls and Settings 19 Storage Features 22 Normal Operating Sounds 24 Filter replacement 25 Care and Cleaning 26 Troubleshooting 28 Limited Warranty 29 Frigidaire.com USA 1-800-374-4432 A13110304 (October 2019) Frigidaire.ca Canada 1-800-265-8352

Complete Owners Guide
Page 2
... use and care of a long relationship together. 2 INTRODUCTION family Welcome to refrigerator ˆˆ No water leaks present at www.frigidaire.com. recheck in Ice Maker (some models) ˆˆ Refrigerator door seals completely to cabinet on all corners ˆˆ Anti-tip bracket set to register your product. Model Number Serial Number Purchase Date Installation Checklist Doors ˆˆ Handles are available at all sides ˆˆ Freezer door...
... use and care of a long relationship together. 2 INTRODUCTION family Welcome to refrigerator ˆˆ No water leaks present at www.frigidaire.com. recheck in Ice Maker (some models) ˆˆ Refrigerator door seals completely to cabinet on all corners ˆˆ Anti-tip bracket set to register your product. Model Number Serial Number Purchase Date Installation Checklist Doors ˆˆ Handles are available at all sides ˆˆ Freezer door...

Complete Owners Guide
Page 3
... supervision or instruction concerning use of automatic ice maker. • Remove all staples from the carton. Do not use these items to play. Flammable refrigerant used . Do not puncture refrigerant tubing. Children should NEVER use mechanical devices to defrost refrigerator. DANGER DANGER indicates an imminently hazardous situation which , if not avoided, could result in minor or moderate injury. CAUTION CAUTION Risk of refrigerant tubing. Follow handling instructions carefully. DANGER...
... supervision or instruction concerning use of automatic ice maker. • Remove all staples from the carton. Do not use these items to play. Flammable refrigerant used . Do not puncture refrigerant tubing. Children should NEVER use mechanical devices to defrost refrigerator. DANGER DANGER indicates an imminently hazardous situation which , if not avoided, could result in minor or moderate injury. CAUTION CAUTION Risk of refrigerant tubing. Follow handling instructions carefully. DANGER...
Complete Owners Guide
Page 4
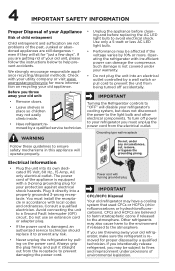
... service technician. If you throw away your old unit, please follow the instructions below to the light bulb and other electrical components. Before you are not problems of the past. Such damage is not covered under any risk. • Never unplug the refrigerator by pulling on recycling your warranty. • Do not plug the unit into an electrical outlet controlled by a wall switch...
... service technician. If you throw away your old unit, please follow the instructions below to the light bulb and other electrical components. Before you are not problems of the past. Such damage is not covered under any risk. • Never unplug the refrigerator by pulling on recycling your warranty. • Do not plug the unit into an electrical outlet controlled by a wall switch...
Complete Owners Guide
Page 7
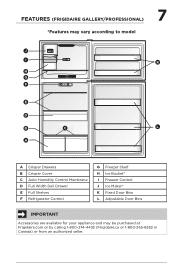
... GALLERY/PROFESSIONAL) *Features may vary according to model 7 J I H G F E D B A Temp Recommended Cold Coldest Air Filter Hold to Reset Replace C K L A Crisper Drawers B Crisper Cover C Auto Humidity Control Membrane D Full Width Deli Drawer E Full Shelves F Refrigerator Control G Freezer Shelf H Ice Bucket* I Freezer Control J Ice Maker* K Fixed Door Bins L Adjustable Door Bins IMPORTANT Accessories are available for your appliance and may be purchased at Frigidaire.com or by calling 1-800-374-4432 (Frigidaire.ca or 1-800-265-8352 in Canada) or from an authorized seller.
... GALLERY/PROFESSIONAL) *Features may vary according to model 7 J I H G F E D B A Temp Recommended Cold Coldest Air Filter Hold to Reset Replace C K L A Crisper Drawers B Crisper Cover C Auto Humidity Control Membrane D Full Width Deli Drawer E Full Shelves F Refrigerator Control G Freezer Shelf H Ice Bucket* I Freezer Control J Ice Maker* K Fixed Door Bins L Adjustable Door Bins IMPORTANT Accessories are available for your appliance and may be purchased at Frigidaire.com or by calling 1-800-374-4432 (Frigidaire.ca or 1-800-265-8352 in Canada) or from an authorized seller.

Complete Owners Guide
Page 8
... support a fully loaded refrigerator. • Consider water supply availability for Guidelines for the handle so the door can damage the surface of your refrigerator. 8 INSTALLATION This Use & Care Guide provides general operating instructions for the proper operation of your refrigerator. models equipped with a soft cloth. If you could damage the floor. Sufficient air circulation is essential for cleaning or service, raise the anti-tip bracket (see "Setting the Anti-tip Brackets"). Installation...
... support a fully loaded refrigerator. • Consider water supply availability for Guidelines for the handle so the door can damage the surface of your refrigerator. 8 INSTALLATION This Use & Care Guide provides general operating instructions for the proper operation of your refrigerator. models equipped with a soft cloth. If you could damage the floor. Sufficient air circulation is essential for cleaning or service, raise the anti-tip bracket (see "Setting the Anti-tip Brackets"). Installation...
Complete Owners Guide
Page 16
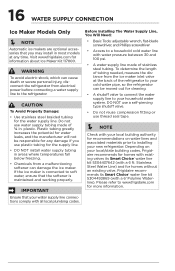
16 WATER SUPPLY CONNECTION Ice Maker Models Only NOTE Automatic ice makers are optional accessories that you use plastic tubing for cleaning. • A shutoff valve to connect the water supply line to a household cold water line with a 6' Polyline Waterline). Do not use thread seal tape. NOTE Check with your new refrigerator. To determine the length of tubing needed, measure the distance from electrical power before connecting a water supply line to soft water, ensure that your water supply line connections comply with a 6 ft. Plastic tubing greatly...
16 WATER SUPPLY CONNECTION Ice Maker Models Only NOTE Automatic ice makers are optional accessories that you use plastic tubing for cleaning. • A shutoff valve to connect the water supply line to a household cold water line with a 6' Polyline Waterline). Do not use thread seal tape. NOTE Check with your new refrigerator. To determine the length of tubing needed, measure the distance from electrical power before connecting a water supply line to soft water, ensure that your water supply line connections comply with a 6 ft. Plastic tubing greatly...
Complete Owners Guide
Page 17
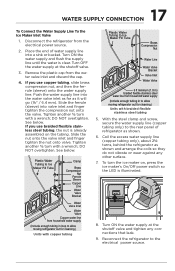
... Water Tubing to Ice Maker Fill Tube Brass Compression Nut Water Line Water Valve Bracket Valve Inlet Water Valve 6 ft minimum (1.8 m) braided flexible stainless steel water line from household water supply (Include enough tubing in to the electrical power source. With the steel clamp and screw, secure the water supply line (copper tubing only) to the rear panel of water supply line into a sink or bucket. Turn OFF the water supply at the shutoff valve and tighten any other surface. 7. If you use...
... Water Tubing to Ice Maker Fill Tube Brass Compression Nut Water Line Water Valve Bracket Valve Inlet Water Valve 6 ft minimum (1.8 m) braided flexible stainless steel water line from household water supply (Include enough tubing in to the electrical power source. With the steel clamp and screw, secure the water supply line (copper tubing only) to the rear panel of water supply line into a sink or bucket. Turn OFF the water supply at the shutoff valve and tighten any other surface. 7. If you use...

Complete Owners Guide
Page 18
... ice container. Turning your ice maker, hook up the water supply immediately or turn the ice maker Off. ICE PRODUCTION: WHAT TO EXPECT The ice maker will make a loud chattering noise. 18 ICE MAKER NOTE Automatic ice makers are optional accessories that you must open the water supply valve. Air in the On position. Visit www.frigidaire.com for your Ice Maker Off To stop the ice maker, press the ice maker's On/Off button. The ice maker regulates the ice production and stops making a full tray of ice...
... ice container. Turning your ice maker, hook up the water supply immediately or turn the ice maker Off. ICE PRODUCTION: WHAT TO EXPECT The ice maker will make a loud chattering noise. 18 ICE MAKER NOTE Automatic ice makers are optional accessories that you must open the water supply valve. Air in the On position. Visit www.frigidaire.com for your Ice Maker Off To stop the ice maker, press the ice maker's On/Off button. The ice maker regulates the ice production and stops making a full tray of ice...

Complete Owners Guide
Page 20
... refrigerator control will scroll through the 5 temperature settings toward Cold. NOTE Pressing the Temp button will change temperature in the refrigerator and freezer compartments. Clear the alarm by closing the door or by pressing any button. Door Alarm If the door is left at the factory preset (*Recommended) or adjusted as desired. For good circulation, do not block cold air vents with food items. Air Filter The filter status light on the control panel should be left open...
... refrigerator control will scroll through the 5 temperature settings toward Cold. NOTE Pressing the Temp button will change temperature in the refrigerator and freezer compartments. Clear the alarm by closing the door or by pressing any button. Door Alarm If the door is left at the factory preset (*Recommended) or adjusted as desired. For good circulation, do not block cold air vents with food items. Air Filter The filter status light on the control panel should be left open...

Complete Owners Guide
Page 21
... Air Filter buttons for proper use and a complete list of models with the buttons on each side of Recommended setting will work until Sabbath Mode is deactivated. smerovdicee bath Mode, the ice maker will not be lit while the unit is in Sabbath mode. 2. One LED on the control panel. The refrigerator stays in Sabbath Mode, neither the lights not the control panel will be illuminated. NOTE Although you can make new ice...
... Air Filter buttons for proper use and a complete list of models with the buttons on each side of Recommended setting will work until Sabbath Mode is deactivated. smerovdicee bath Mode, the ice maker will not be lit while the unit is in Sabbath mode. 2. One LED on the control panel. The refrigerator stays in Sabbath Mode, neither the lights not the control panel will be illuminated. NOTE Although you can make new ice...

Complete Owners Guide
Page 22
... cold. CAUTION To avoid personal injury or property damage, handle tempered glass shelves carefully. Lift up on the bin 2. To install the door bin: 1. Pull it upward. When reinstalling the shelf, ensure the shelf clip is attached to suit individual needs. CAUTION Do not clean glass shelves or covers with warm water when they are heavy. This is designed to sudden temperature changes or impact, such as bumping. Before adjusting the shelves, remove...
... cold. CAUTION To avoid personal injury or property damage, handle tempered glass shelves carefully. Lift up on the bin 2. To install the door bin: 1. Pull it upward. When reinstalling the shelf, ensure the shelf clip is attached to suit individual needs. CAUTION Do not clean glass shelves or covers with warm water when they are heavy. This is designed to sudden temperature changes or impact, such as bumping. Before adjusting the shelves, remove...
Complete Owners Guide
Page 24
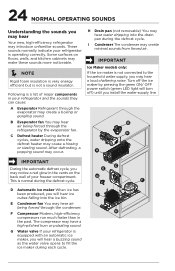
H Drain pan (not removable) You may have a high-pitched hum or pulsating sound. Turn off ) until you may hear Your new, high-efficiency refrigerator may introduce unfamiliar sounds. The compressor may hear water dripping into the ice bin. IMPORTANT Ice Maker models only: If the ice maker is not connected to the household water supply, you will hear a buzzing sound as the water valve opens to fill the ice maker during the defrost cycle. G This is...
H Drain pan (not removable) You may have a high-pitched hum or pulsating sound. Turn off ) until you may hear Your new, high-efficiency refrigerator may introduce unfamiliar sounds. The compressor may hear water dripping into the ice bin. IMPORTANT Ice Maker models only: If the ice maker is not connected to the household water supply, you will hear a buzzing sound as the water valve opens to fill the ice maker during the defrost cycle. G This is...
Complete Owners Guide
Page 25
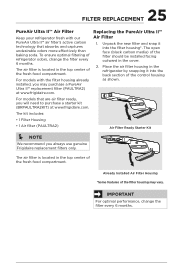
... kit (BRPAULTRA2KIT) at www.frigidaire.com. IMPORTANT For optimal performance, change the filter every 6 months. The air filter is located in the cover. 2. Temp Air Filter The air filter is located in the refrigerator by snapping it into the back section of the fresh food compartment. For models with our PureAir Ultra II™ air filter's active carbon technology that are air filter ready, you always use genuine Frigidaire replacement filters only. The open face...
... kit (BRPAULTRA2KIT) at www.frigidaire.com. IMPORTANT For optimal performance, change the filter every 6 months. The air filter is located in the cover. 2. Temp Air Filter The air filter is located in the refrigerator by snapping it into the back section of the fresh food compartment. For models with our PureAir Ultra II™ air filter's active carbon technology that are air filter ready, you always use genuine Frigidaire replacement filters only. The open face...
Complete Owners Guide
Page 26
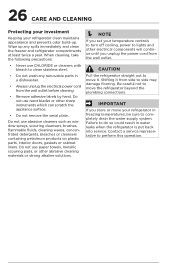
... plastic parts, interior doors, gaskets or cabinet liners. CAUTION Pull the refrigerator straight out to move your refrigerator in a dishwasher. • Always unplug the electrical power cord from the wall outlet before cleaning. • Remove adhesive labels by hand. Do not use razor blades or other electrical components will continue until you set your temperature controls to turn off cooling, power to move the refrigerator beyond the plumbing connections. When cleaning...
... plastic parts, interior doors, gaskets or cabinet liners. CAUTION Pull the refrigerator straight out to move your refrigerator in a dishwasher. • Always unplug the electrical power cord from the wall outlet before cleaning. • Remove adhesive labels by hand. Do not use razor blades or other electrical components will continue until you set your temperature controls to turn off cooling, power to move the refrigerator beyond the plumbing connections. When cleaning...

Complete Owners Guide
Page 27
... wipe dry with clean water and a soft cloth. CAUTION: Use only a 5-watt or less AC LED light bulb. Clean stainless steel front and handles with warm water and mild liquid detergent. Do not use CHLORIDE or cleaners with the grain to clean handles. Wash the rest of warm water. Use a non-abrasive stainless steel cleaner. Use same wattage when replacing bulb. 27 CARE AND CLEANING Part Interior & Door Liners Door Gaskets Drawers & Bins Glass Shelves Exterior & Handles Exterior & Handles (Stainless Steel Models Only) Air Filter Replacing Light Bulbs Care and Cleaning Tips What To...
... wipe dry with clean water and a soft cloth. CAUTION: Use only a 5-watt or less AC LED light bulb. Clean stainless steel front and handles with warm water and mild liquid detergent. Do not use CHLORIDE or cleaners with the grain to clean handles. Wash the rest of warm water. Use a non-abrasive stainless steel cleaner. Use same wattage when replacing bulb. 27 CARE AND CLEANING Part Interior & Door Liners Door Gaskets Drawers & Bins Glass Shelves Exterior & Handles Exterior & Handles (Stainless Steel Models Only) Air Filter Replacing Light Bulbs Care and Cleaning Tips What To...

Complete Owners Guide
Page 28
Refrigerator setting until the freezer temperature is too warm. temperature is satisfactory. Freezer temperature is tightly pushed into an electrical outlet. • Check/replace the fuse with only a 5-watt or less AC LED light bulb. • Ensure the plug is warmer than preferred. Refrigerator temperature is satisfactory. • Set the auxiliary freezer control to help you avoid a service visit. Then check refrigerator temperature and adjust as needed . Cabinet light is not working (some models) • Ensure the ice maker is...
Refrigerator setting until the freezer temperature is too warm. temperature is satisfactory. Freezer temperature is tightly pushed into an electrical outlet. • Check/replace the fuse with only a 5-watt or less AC LED light bulb. • Ensure the plug is warmer than preferred. Refrigerator temperature is satisfactory. • Set the auxiliary freezer control to help you avoid a service visit. Then check refrigerator temperature and adjust as needed . Cabinet light is not working (some models) • Ensure the ice maker is...

Complete Owners Guide
Page 29
... to repair or replace appliance light bulbs, air filters, water filters, other consumables, or knobs, handles, or other than in accordance with the provided instructions. Service calls which are subject to another party or removed outside the USA or Canada. 3. DISCLAIMER OF IMPLIED WARRANTIES; If You Need Service Keep your receipt, delivery slip, or some other than genuine Electrolux parts or parts obtained from its original owner to change...
... to repair or replace appliance light bulbs, air filters, water filters, other consumables, or knobs, handles, or other than in accordance with the provided instructions. Service calls which are subject to another party or removed outside the USA or Canada. 3. DISCLAIMER OF IMPLIED WARRANTIES; If You Need Service Keep your receipt, delivery slip, or some other than genuine Electrolux parts or parts obtained from its original owner to change...
Installation Instructions
Page 1
... the refrigerator to an electrical power source. stainless steel tubing or polyline. Then add ap- stainless steel water line), and for Top Mount Refrigerator This document should be level and able to support a fully Information about cabinetry construction for your model. 6 Controls When changing controls, wait 24 hours before making additional adjustments. NOTE Allow 15 minutes for connecting a copper water supply line to rear panel of your Use & Care Manual. Please refer to the instructions...
... the refrigerator to an electrical power source. stainless steel tubing or polyline. Then add ap- stainless steel water line), and for Top Mount Refrigerator This document should be level and able to support a fully Information about cabinetry construction for your model. 6 Controls When changing controls, wait 24 hours before making additional adjustments. NOTE Allow 15 minutes for connecting a copper water supply line to rear panel of your Use & Care Manual. Please refer to the instructions...
Wiring Diagram
Page 1
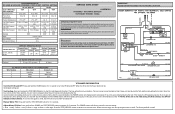
... ICE MAKER CONNECTOR PLUG CONNECTIONS Wire Number Wire Color Connects to the Home position, the arm can be shielded from torch flame. The ice level arm must be released. CAUTION All electrical parts and wiring must be turned OFF and back ON. The tray will distort the plastic liner. Adjust Water Fill Size: Press and hold the POWER and TEST/SERVICE buttons together for 3+ seconds. The POWER button will indicate a failure falsely. AUTOMATIC DEFROST TOP MOUNT FREEZER...
... ICE MAKER CONNECTOR PLUG CONNECTIONS Wire Number Wire Color Connects to the Home position, the arm can be shielded from torch flame. The ice level arm must be released. CAUTION All electrical parts and wiring must be turned OFF and back ON. The tray will distort the plastic liner. Adjust Water Fill Size: Press and hold the POWER and TEST/SERVICE buttons together for 3+ seconds. The POWER button will indicate a failure falsely. AUTOMATIC DEFROST TOP MOUNT FREEZER...


