

Installation Instructions
Page 1
...Figure 1 Raise Figure 2 or 9/16" Max Raise Figure 3 NOTE Raise the front of the refrigerator to support a fully loaded refrigerator. Do not use refrigerator handles to -side. Tighten another half turn with local plumbing codes. NOTE Kit #53039117950, available ...see illustration). 8 Coil the excess copper tubing (about cabinetry construction for the connection between your household water line and the refrigerator supply line. P/N: A01278403 Tools Necessary: Phillips Head or Quadrex Head Screwdriver (OR) OR Socket Wrench Set Plastic Putty Knife ...
...Figure 1 Raise Figure 2 or 9/16" Max Raise Figure 3 NOTE Raise the front of the refrigerator to support a fully loaded refrigerator. Do not use refrigerator handles to -side. Tighten another half turn with local plumbing codes. NOTE Kit #53039117950, available ...see illustration). 8 Coil the excess copper tubing (about cabinetry construction for the connection between your household water line and the refrigerator supply line. P/N: A01278403 Tools Necessary: Phillips Head or Quadrex Head Screwdriver (OR) OR Socket Wrench Set Plastic Putty Knife ...

Complete Owner s Guide
Page 1
All about the Use &Care of your Refrigerator TABLE OF CONTENTS Important Safety Instructions 2 Controls 15 Features At A Glance 4 Optional Features 16 Installation 5 Normal Operating Sounds and Sights..........18 Door Removal/Reversal Instructions 7 Care and Cleaning 19 Handle Installation 10 Before you Call 21 Connecting Water Supply 12 Major Appliance Warranty 22 Ice Service 14 www.frigidaire.com USA 1-800-944-9044 www.frigidaire.ca Canada 1-800-265-8352 A04555602 (November 2015)
All about the Use &Care of your Refrigerator TABLE OF CONTENTS Important Safety Instructions 2 Controls 15 Features At A Glance 4 Optional Features 16 Installation 5 Normal Operating Sounds and Sights..........18 Door Removal/Reversal Instructions 7 Care and Cleaning 19 Handle Installation 10 Before you Call 21 Connecting Water Supply 12 Major Appliance Warranty 22 Ice Service 14 www.frigidaire.com USA 1-800-944-9044 www.frigidaire.ca Canada 1-800-265-8352 A04555602 (November 2015)

Complete Owner s Guide
Page 2
... all corners Electrical Power House power turned on all sides Freezer door is level across the top Leveling Refrigerator is level, side-to-side and tilted ¼" (6mm) front-to-back Toe grille is properly attached to potential personal... appliances or furniture. IMPORTANT SAFETY INSTRUCTIONS WARNING Installation Checklist Please read all connections - Obey all staples from the carton. If you to refrigerator Cabinet is turned ON Ice & water dispenser operates correctly Front filter must be flush with other flammable ...
... all corners Electrical Power House power turned on all sides Freezer door is level across the top Leveling Refrigerator is level, side-to-side and tilted ¼" (6mm) front-to-back Toe grille is properly attached to potential personal... appliances or furniture. IMPORTANT SAFETY INSTRUCTIONS WARNING Installation Checklist Please read all connections - Obey all staples from the carton. If you to refrigerator Cabinet is turned ON Ice & water dispenser operates correctly Front filter must be flush with other flammable ...
Complete Owner s Guide
Page 3
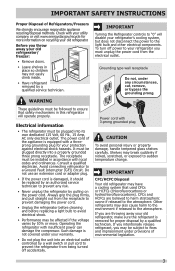
...fines and imprisonment under provisions of environmental legislation. 3 Before you must be affected if the voltage varies by pulling on recycling your refrigerator's cooling system, but does not disconnect the power to prevent any circumstances, cut, remove, or bypass the grounding prong. Grounding... type wall receptacle Do not, under your old refrigerator/ freezer: • Remove doors. • Leave shelves in place so children may be plugged into its own dedicated 115 Volt, 60...
...fines and imprisonment under provisions of environmental legislation. 3 Before you must be affected if the voltage varies by pulling on recycling your refrigerator's cooling system, but does not disconnect the power to prevent any circumstances, cut, remove, or bypass the grounding prong. Grounding... type wall receptacle Do not, under your old refrigerator/ freezer: • Remove doors. • Leave shelves in place so children may be plugged into its own dedicated 115 Volt, 60...
Complete Owner s Guide
Page 4
... remove tape or glue. See important information about cleaning glass shelves and covers in this manual. Do not wiggle or "walk" the refrigerator when trying to move it . When moving it as floor damage could occur. 4 Rinse with warm water and dry with cardboard or... hardboard to avoid floor damage. These products can damage the surface of your refrigerator before turning on the refrigerator. Always pull the refrigerator straight out when moving the refrigerator for cleaning or service, be sure to cover the floor with a soft cloth. After you ...
... remove tape or glue. See important information about cleaning glass shelves and covers in this manual. Do not wiggle or "walk" the refrigerator when trying to move it . When moving it as floor damage could occur. 4 Rinse with warm water and dry with cardboard or... hardboard to avoid floor damage. These products can damage the surface of your refrigerator before turning on the refrigerator. Always pull the refrigerator straight out when moving the refrigerator for cleaning or service, be sure to cover the floor with a soft cloth. After you ...

Complete Owner s Guide
Page 5
...temperature will not be level at the front and rear. • Choose a place that doors close and seal properly). • If possible, place the refrigerator out of direct sunlight and away from front-to-back (to ensure that is near a grounded electrical outlet. Do not block the toe grille on...; Consider water supply availability for models equipped with the door hinge side against a wall, you do not hook up water to the refrigerator, remember to allow additional space for the handle so the door can be opened wider. 5 Sufficient air circulation is essential for the proper ...
...temperature will not be level at the front and rear. • Choose a place that doors close and seal properly). • If possible, place the refrigerator out of direct sunlight and away from front-to-back (to ensure that is near a grounded electrical outlet. Do not block the toe grille on...; Consider water supply availability for models equipped with the door hinge side against a wall, you do not hook up water to the refrigerator, remember to allow additional space for the handle so the door can be opened wider. 5 Sufficient air circulation is essential for the proper ...
Complete Owner s Guide
Page 6
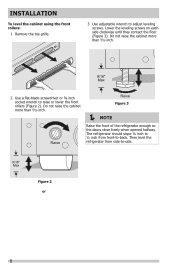
Raise Raise Figure 3 NOTE Raise the front of the refrigerator enough so the doors close freely when opened halfway. INSTALLATION To level the cabinet using the front rollers: 1 Remove the toe grille. 3 Use adjustable wrench ... wrench to -back. Lower the leveling screws on each side clockwise until they contact the floor (Figure 3). Then level the refrigerator from front-to raise or lower the front rollers (Figure 2). The refrigerator should slope ¼ inch to ½ inch from side-to adjust leveling screws. Do not raise the cabinet more...
Raise Raise Figure 3 NOTE Raise the front of the refrigerator enough so the doors close freely when opened halfway. INSTALLATION To level the cabinet using the front rollers: 1 Remove the toe grille. 3 Use adjustable wrench ... wrench to -back. Lower the leveling screws on each side clockwise until they contact the floor (Figure 3). Then level the refrigerator from front-to raise or lower the front rollers (Figure 2). The refrigerator should slope ¼ inch to ½ inch from side-to adjust leveling screws. Do not raise the cabinet more...

Complete Owner s Guide
Page 7
...Screw Top Hinge Screw Bottom Hinge Screw Door removal and reversal instructions: 1. This makes reinstallation easier. IMPORTANT Before you begin, turn the refrigerator temperature control to "0" and remove the electrical power cord from one side to the other. Remove two screws on opposite side with ⅜... Screw Door Stop Washer Shim Hinge Pin Center Hinge Top Hinge Cover Hinge Hole Plug Screws Handle Hole Plug Top Hinge 7. Lift refrigerator door off center hinge pin. Remove center hinge and shim by removing inside screw and install center hinge. Set door aside. ...
...Screw Top Hinge Screw Bottom Hinge Screw Door removal and reversal instructions: 1. This makes reinstallation easier. IMPORTANT Before you begin, turn the refrigerator temperature control to "0" and remove the electrical power cord from one side to the other. Remove two screws on opposite side with ⅜... Screw Door Stop Washer Shim Hinge Pin Center Hinge Top Hinge Cover Hinge Hole Plug Screws Handle Hole Plug Top Hinge 7. Lift refrigerator door off center hinge pin. Remove center hinge and shim by removing inside screw and install center hinge. Set door aside. ...

Complete Owner s Guide
Page 8
...17. Tighten the top hinge screws and check door gasket for open seal condition (gap between the doors on next page). 11. Close refrigerator door to puncture the foam. 12. Look for open areas between the gasket and the cabinet flange. Tighten center hinge pin with adjustable wrench... grasp the thinnest part of door. Gasket should seal against the cabinet all the way around including top and bottom 8 Move freezer and refrigerator door stops to opposite side. 15. Close freezer door. DOOR REMOVAL/REVERSAL INSTRUCTIONS 9. Remove cabinet and hinge hole plugs and move to opposite...
...17. Tighten the top hinge screws and check door gasket for open seal condition (gap between the doors on next page). 11. Close refrigerator door to puncture the foam. 12. Look for open areas between the gasket and the cabinet flange. Tighten center hinge pin with adjustable wrench... grasp the thinnest part of door. Gasket should seal against the cabinet all the way around including top and bottom 8 Move freezer and refrigerator door stops to opposite side. 15. Close freezer door. DOOR REMOVAL/REVERSAL INSTRUCTIONS 9. Remove cabinet and hinge hole plugs and move to opposite...

Complete Owner s Guide
Page 9
If the open seal condition exist, try heating the gasket with a hair dryer with the door closed. Rotate the gasket half a turn refrigerator temperature control to center position. Should open seal condition still exists, it is fully seated in electrical power cord and turn (180 degrees). IMPORTANT If ...
If the open seal condition exist, try heating the gasket with a hair dryer with the door closed. Rotate the gasket half a turn refrigerator temperature control to center position. Should open seal condition still exists, it is fully seated in electrical power cord and turn (180 degrees). IMPORTANT If ...

Complete Owner s Guide
Page 10
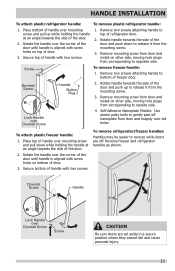
... rounded part of handle onto shoulder screw on the rounded part of the handles may be sharp. 3. Shoulder Screw Nameplate Set Screw To attach metal refrigerator handle: 1. Do not tighten the set screw yet. 2.
... rounded part of handle onto shoulder screw on the rounded part of the handles may be sharp. 3. Shoulder Screw Nameplate Set Screw To attach metal refrigerator handle: 1. Do not tighten the set screw yet. 2.
Complete Owner s Guide
Page 11
...up while holding the handle at an angle towards the side of handle over mounting screw and pull up to bottom of refrigerator door. 2. Reverse freezer and refrigerator handles as shown. Remove two screws attaching handle to release it from corresponding to reverse while doors are set aside in a... secure position where they cannot fall and cause personal injury. 11 To reverse refrigerator/freezer handles: Handles may be easier to opposite side. Rotate handle towards the side of the door and push down to release it ...
...up while holding the handle at an angle towards the side of handle over mounting screw and pull up to bottom of refrigerator door. 2. Reverse freezer and refrigerator handles as shown. Remove two screws attaching handle to release it from corresponding to reverse while doors are set aside in a... secure position where they cannot fall and cause personal injury. 11 To reverse refrigerator/freezer handles: Handles may be easier to opposite side. Rotate handle towards the side of the door and push down to release it ...

Complete Owner s Guide
Page 12
...a household cold water line with a 20 ft. Water supply tubing made of ¼ inch plastic is not recommended to the refrigerator. Before Installing The Water Supply Line, You Will Need: • Basic Tools: adjustable wrench, flat-blade screwdriver, and PhillipsTM ...refrigerator can damage the ice maker. Please refer to soft water, ensure that your water supply line connections comply with your local building authority for more information. 12 If the ice maker is maintained and working properly. IMPORTANT Ensure that the softener is connected to www.frigidaire...
...a household cold water line with a 20 ft. Water supply tubing made of ¼ inch plastic is not recommended to the refrigerator. Before Installing The Water Supply Line, You Will Need: • Basic Tools: adjustable wrench, flat-blade screwdriver, and PhillipsTM ...refrigerator can damage the ice maker. Please refer to soft water, ensure that your water supply line connections comply with your local building authority for more information. 12 If the ice maker is maintained and working properly. IMPORTANT Ensure that the softener is connected to www.frigidaire...
Complete Owner s Guide
Page 13
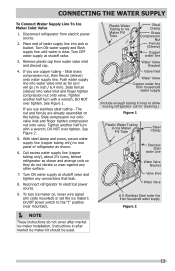
... Water Tubing to Ice Maker Fill Tube Steel Clamp Stainless Steel water Line Water Valve Bracket Valve Inlet Water Valve 6 ft. Disconnect refrigerator from water valve inlet and discard cap. 4. DO NOT over tighten. Turn ON water supply at shutoff valve. 3. CONNECTING THE ... do not vibrate or wear against any connections that leak. 8. Tighten another half turn ice maker on the tubing. Reconnect refrigerator to Ice Maker Fill Tube Steel Clamp Brass Compression Nut Ferrule (Sleeve) Copper water line Water Valve Bracket Valve Inlet Water Valve...
... Water Tubing to Ice Maker Fill Tube Steel Clamp Stainless Steel water Line Water Valve Bracket Valve Inlet Water Valve 6 ft. Disconnect refrigerator from water valve inlet and discard cap. 4. DO NOT over tighten. Turn ON water supply at shutoff valve. 3. CONNECTING THE ... do not vibrate or wear against any connections that leak. 8. Tighten another half turn ice maker on the tubing. Reconnect refrigerator to Ice Maker Fill Tube Steel Clamp Brass Compression Nut Ferrule (Sleeve) Copper water line Water Valve Bracket Valve Inlet Water Valve...

Complete Owner s Guide
Page 14
... turns off automatically when the ice container is shipped from the factory with the wire signal arm in the ON position. ICE SERVICE If your refrigerator has an automatic ice maker, minimal ice will be installed in most models at a rate of 8 cubes every 80 to 160 minutes. ICE PRODUCTION: WHAT...
... turns off automatically when the ice container is shipped from the factory with the wire signal arm in the ON position. ICE SERVICE If your refrigerator has an automatic ice maker, minimal ice will be installed in most models at a rate of 8 cubes every 80 to 160 minutes. ICE PRODUCTION: WHAT...

Complete Owner s Guide
Page 15
...• For colder temperatures, adjust the knob towards coldest. • For warmer temperatures, adjust the knob towards cold. Upgrading your refrigerator with a Garage Kit will lower the minimum operating temperature of the warranty page or back cover at least 8 hours before loading it ...adjust control to recommended. For good circulation, do not block cold air vents with food. Refrigerator Control IMPORTANT Adjusting the refrigerator temperature control to "0" turns off power to your refrigerator, you must unplug the power cord from cooling, but does not disconnect the power to ...
...• For colder temperatures, adjust the knob towards coldest. • For warmer temperatures, adjust the knob towards cold. Upgrading your refrigerator with a Garage Kit will lower the minimum operating temperature of the warranty page or back cover at least 8 hours before loading it ...adjust control to recommended. For good circulation, do not block cold air vents with food. Refrigerator Control IMPORTANT Adjusting the refrigerator temperature control to "0" turns off power to your refrigerator, you must unplug the power cord from cooling, but does not disconnect the power to ...
Complete Owner s Guide
Page 16
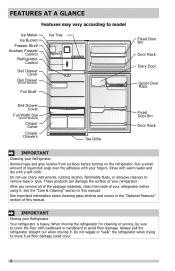
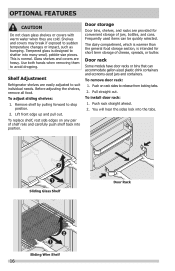
... Sliding Wire Shelf 16 Tempered glass is normal. Use both hands when removing them to sudden temperature changes or impact, such as bumping. Shelf Adjustment Refrigerator shelves are provided for short term storage of shelf rails and carefully push shelf back into position. Frequently used items can accommodate gallon-sized plastic...
... Sliding Wire Shelf 16 Tempered glass is normal. Use both hands when removing them to sudden temperature changes or impact, such as bumping. Shelf Adjustment Refrigerator shelves are provided for short term storage of shelf rails and carefully push shelf back into position. Frequently used items can accommodate gallon-sized plastic...
Complete Owner s Guide
Page 17
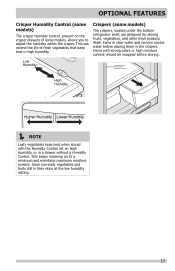
This can extend the life of some models) The crispers, located under the bottom refrigerator shelf, are designed for storing fruits, vegetables, and other fresh produce. Wash items in clear water and remove excess water before storing. This keeps incoming ...
This can extend the life of some models) The crispers, located under the bottom refrigerator shelf, are designed for storing fruits, vegetables, and other fresh produce. Wash items in clear water and remove excess water before storing. This keeps incoming ...
Complete Owner s Guide
Page 18
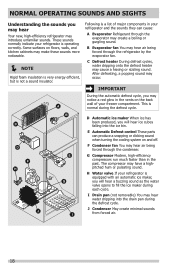
...may cause a hissing or sizzling sound. D Automatic ice maker When ice has been produced, you may hear Your new, high-efficiency refrigerator may make these sounds more noticeable. NOTE Rigid foam insulation is very energy efficient, but is not a sound insulator. E... Automatic Defrost control These parts can cause: A Evaporator Refrigerant through the evaporator may hear water dripping into the ice bin. These sounds normally indicate your freezer compartment. C Defrost heater During defrost...
...may cause a hissing or sizzling sound. D Automatic ice maker When ice has been produced, you may hear Your new, high-efficiency refrigerator may make these sounds more noticeable. NOTE Rigid foam insulation is very energy efficient, but is not a sound insulator. E... Automatic Defrost control These parts can cause: A Evaporator Refrigerant through the evaporator may hear water dripping into the ice bin. These sounds normally indicate your freezer compartment. C Defrost heater During defrost...
Complete Owner s Guide
Page 19
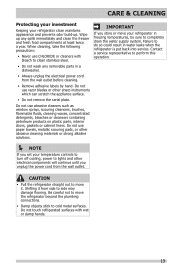
... temperature controls to turn off cooling, power to lights and other electrical components will continue until you store or move the refrigerator beyond the plumbing connections. • Damp objects stick to completely drain the water supply system. Do not use CHLORIDE or... or cleansers containing petroleum products on plastic parts, interior doors, gaskets or cabinet liners. CARE & CLEANING Protecting your investment Keeping your refrigerator clean maintains appearance and prevents odor build-up any removable parts in a dishwasher. • Always unplug the electrical power cord from ...
... temperature controls to turn off cooling, power to lights and other electrical components will continue until you store or move the refrigerator beyond the plumbing connections. • Damp objects stick to completely drain the water supply system. Do not use CHLORIDE or... or cleansers containing petroleum products on plastic parts, interior doors, gaskets or cabinet liners. CARE & CLEANING Protecting your investment Keeping your refrigerator clean maintains appearance and prevents odor build-up any removable parts in a dishwasher. • Always unplug the electrical power cord from ...


