

Installation Instructions
Page 1
.... 9 Open water supply shut-off valve for the connection between your refrigerator. Figure 1 Raise Figure 2 or 9/16" Max Raise Figure 3 NOTE Raise the front of your household water line and the refrigerator supply line. Installation Instructions for Top Mount Refrigerator This document should tilt ¼-inch (6 mm) from front-to- Top Hinge Cover Top Hinge Shim Pin Central Hinge Door Stop Screw Door Stop Washer Hinge Pin Bottom Hinge Screws Toe Grille 9 Installation Checkoff List Doors Ice Maker...
.... 9 Open water supply shut-off valve for the connection between your refrigerator. Figure 1 Raise Figure 2 or 9/16" Max Raise Figure 3 NOTE Raise the front of your household water line and the refrigerator supply line. Installation Instructions for Top Mount Refrigerator This document should tilt ¼-inch (6 mm) from front-to- Top Hinge Cover Top Hinge Shim Pin Central Hinge Door Stop Screw Door Stop Washer Hinge Pin Bottom Hinge Screws Toe Grille 9 Installation Checkoff List Doors Ice Maker...

Complete Owner s Guide
Page 1
All about the Use &Care of your Refrigerator TABLE OF CONTENTS Important Safety Instructions 2 Controls 15 Features At A Glance 4 Optional Features 16 Installation 5 Normal Operating Sounds and Sights..........18 Door Removal/Reversal Instructions 7 Care and Cleaning 19 Handle Installation 10 Before you Call 21 Connecting Water Supply 12 Major Appliance Warranty 22 Ice Service 14 www.frigidaire.com USA 1-800-944-9044 www.frigidaire.ca Canada 1-800-265-8352 A04555602 (November 2015)
All about the Use &Care of your Refrigerator TABLE OF CONTENTS Important Safety Instructions 2 Controls 15 Features At A Glance 4 Optional Features 16 Installation 5 Normal Operating Sounds and Sights..........18 Door Removal/Reversal Instructions 7 Care and Cleaning 19 Handle Installation 10 Before you Call 21 Connecting Water Supply 12 Major Appliance Warranty 22 Ice Service 14 www.frigidaire.com USA 1-800-944-9044 www.frigidaire.ca Canada 1-800-265-8352 A04555602 (November 2015)

Complete Owner s Guide
Page 2
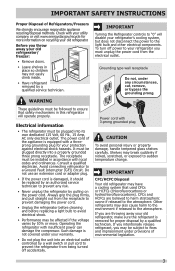
... the carton. Doors Handles are getting rid of your old refrigerator or freezer, please follow this symbol to potential personal injury hazards. CAUTION CAUTION indicates a potentially hazardous situation which , if not avoided, could result in death or serious injury. Cartons covered with filter housing (select models) Final Checks Shipping material removed Fresh food and freezer temperatures set Crisper humidity controls set ...
... the carton. Doors Handles are getting rid of your old refrigerator or freezer, please follow this symbol to potential personal injury hazards. CAUTION CAUTION indicates a potentially hazardous situation which , if not avoided, could result in death or serious injury. Cartons covered with filter housing (select models) Final Checks Shipping material removed Fresh food and freezer temperatures set Crisper humidity controls set ...
Complete Owner s Guide
Page 3
... or property damage, handle tempered glass shelves carefully. Other refrigerants may not easily climb inside. • Have refrigerant removed by an authorized service technician to the light bulb and other electrical components. If you throw away your old refrigerator/ freezer: • Remove doors. • Leave shelves in accordance with a threeprong grounding plug for proper disposal by a wall switch or pull cord to your refrigerator you may have a cooling system that safety...
... or property damage, handle tempered glass shelves carefully. Other refrigerants may not easily climb inside. • Have refrigerant removed by an authorized service technician to the light bulb and other electrical components. If you throw away your old refrigerator/ freezer: • Remove doors. • Leave shelves in accordance with a threeprong grounding plug for proper disposal by a wall switch or pull cord to your refrigerator you may have a cooling system that safety...
Complete Owner s Guide
Page 4
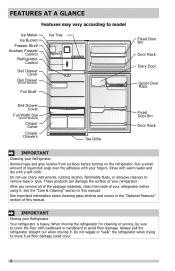
..., clean the inside of this manual. IMPORTANT Moving your refrigerator before turning on the refrigerator. When moving it. Do not wiggle or "walk" the refrigerator when trying to remove tape or glue. Rinse with warm water and dry with cardboard or hardboard to avoid floor damage. FEATURES AT A GLANCE Features may vary according to model Ice Maker Ice Bucket Freezer Shelf Auxiliary Freezer Control Refrigerator Control Deli Drawer Cover Deli Drawer (Some Models) Full Shelf Ice Tray Fixed Door Bin Door...
..., clean the inside of this manual. IMPORTANT Moving your refrigerator before turning on the refrigerator. When moving it. Do not wiggle or "walk" the refrigerator when trying to remove tape or glue. Rinse with warm water and dry with cardboard or hardboard to avoid floor damage. FEATURES AT A GLANCE Features may vary according to model Ice Maker Ice Bucket Freezer Shelf Auxiliary Freezer Control Refrigerator Control Deli Drawer Cover Deli Drawer (Some Models) Full Shelf Ice Tray Fixed Door Bin Door...

Complete Owner s Guide
Page 5
... installation, proper air circulation, and plumbing and electrical connections: Sides & Top ⅜ inch Back 1 inch NOTE If your model. The compressor will drop below 55°F (13°C) or rise above 110°F (43°C). If you may have to allow additional space for the handle so the door can be able to turn the ice maker off. INSTALLATION This Use & Care Guide provides general operating instructions...
... installation, proper air circulation, and plumbing and electrical connections: Sides & Top ⅜ inch Back 1 inch NOTE If your model. The compressor will drop below 55°F (13°C) or rise above 110°F (43°C). If you may have to allow additional space for the handle so the door can be able to turn the ice maker off. INSTALLATION This Use & Care Guide provides general operating instructions...

Complete Owner s Guide
Page 7
... refrigerator doors open (door swing) can be performed by a qualified person. Remove two screws on opposite side of bottom hinge and set aside. 5. Remove toe grille. 2. Trace around the hinge with ⅜" socket wrench. 8. Remove top hinge cover. Door Stop Screw Door Stop Washer Shim Hinge Pin Center Hinge Top Hinge Cover Hinge Hole Plug Screws Handle Hole Plug Top Hinge 7. Unscrew center hinge pin using adjustable wrench and save for reassembly. Reversing the door swing should be reversed, from step 7. 3. DOOR REMOVAL/REVERSAL INSTRUCTIONS...
... refrigerator doors open (door swing) can be performed by a qualified person. Remove two screws on opposite side of bottom hinge and set aside. 5. Remove toe grille. 2. Trace around the hinge with ⅜" socket wrench. 8. Remove top hinge cover. Door Stop Screw Door Stop Washer Shim Hinge Pin Center Hinge Top Hinge Cover Hinge Hole Plug Screws Handle Hole Plug Top Hinge 7. Unscrew center hinge pin using adjustable wrench and save for reassembly. Reversing the door swing should be reversed, from step 7. 3. DOOR REMOVAL/REVERSAL INSTRUCTIONS...

Complete Owner s Guide
Page 8
... 2) and insert the thickest part between the gasket and the cabinet flange. Reverse door handles (see instruction on the handle side approximately 3 inches from the outside edge. Tighten center hinge pin with adjustable wrench. 10. This will ensure proper spacing. 17. DOOR REMOVAL/REVERSAL INSTRUCTIONS 9. Tighten the top hinge screws and check door gasket for open seal condition (gap between gasket and cabinet flange). Unscrew bottom hinge pin using adjustable wrench.
... 2) and insert the thickest part between the gasket and the cabinet flange. Reverse door handles (see instruction on the handle side approximately 3 inches from the outside edge. Tighten center hinge pin with adjustable wrench. 10. This will ensure proper spacing. 17. DOOR REMOVAL/REVERSAL INSTRUCTIONS 9. Tighten the top hinge screws and check door gasket for open seal condition (gap between gasket and cabinet flange). Unscrew bottom hinge pin using adjustable wrench.

Complete Owner s Guide
Page 12
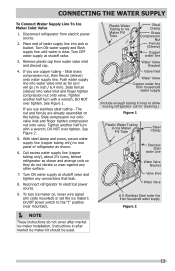
... of the refrigerator to your cold water pipe. Water supply tubing made of tubing needed, measure the distance from electrical power before connecting a water supply line to a household cold water line with self-tapping saddle valve). To determine the length of ¼ inch (6.4 mm) OD, copper or stainless steel tubing. If the ice maker is maintained and working properly. Plastic tubing greatly increases the potential for water leaks, and the manufacturer will not be used for homes...
... of the refrigerator to your cold water pipe. Water supply tubing made of tubing needed, measure the distance from electrical power before connecting a water supply line to a household cold water line with self-tapping saddle valve). To determine the length of ¼ inch (6.4 mm) OD, copper or stainless steel tubing. If the ice maker is maintained and working properly. Plastic tubing greatly increases the potential for water leaks, and the manufacturer will not be used for homes...
Complete Owner s Guide
Page 13
... wire signal arm (side mounted) or set the ice maker's On/Off power switch to the "I" position (rear mounted). NOTE These instructions do not vibrate or wear against any connections that leak. 8. DO NOT over tighten. Coil excess water supply line (copper tubing only), about 2½ turns, behind refrigerator as shown and arrange coils so they do not cover after market ice maker kit should be used. Stainless Steel water line from water valve...
... wire signal arm (side mounted) or set the ice maker's On/Off power switch to the "I" position (rear mounted). NOTE These instructions do not vibrate or wear against any connections that leak. 8. DO NOT over tighten. Coil excess water supply line (copper tubing only), about 2½ turns, behind refrigerator as shown and arrange coils so they do not cover after market ice maker kit should be used. Stainless Steel water line from water valve...

Complete Owner s Guide
Page 15
.... Auxiliary Freezer Control 15 To turn off the compressor and prevents the refrigerator from cooling, but does not disconnect the power to the light bulb and other unheated area, you must unplug the power cord from the wall outlet. This is the recommended initial setting. Upgrading your refrigerator in both compartments. Adjusting the refrigerator control will change temperatures in a garage or other electrical components. To maintain temperatures, a fan circulates air in small...
.... Auxiliary Freezer Control 15 To turn off the compressor and prevents the refrigerator from cooling, but does not disconnect the power to the light bulb and other unheated area, you must unplug the power cord from the wall outlet. This is the recommended initial setting. Upgrading your refrigerator in both compartments. Adjusting the refrigerator control will change temperatures in a garage or other electrical components. To maintain temperatures, a fan circulates air in small...
Complete Owner s Guide
Page 16
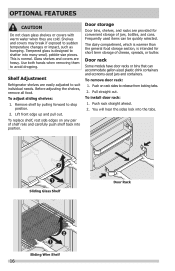
... individual needs. Door storage Door bins, shelves, and racks are cold. To remove door rack: 1. Tempered glass is designed to avoid dropping. To adjust sliding shelves: 1. Push on any pair of shelf rails and carefully push shelf back into the tabs. OPTIONAL FEATURES CAUTION Do not clean glass shelves or covers with warm water when they are provided for short term storage of cheese, spreads, or butter. Shelf Adjustment Refrigerator shelves are heavy. To install door...
... individual needs. Door storage Door bins, shelves, and racks are cold. To remove door rack: 1. Tempered glass is designed to avoid dropping. To adjust sliding shelves: 1. Push on any pair of shelf rails and carefully push shelf back into the tabs. OPTIONAL FEATURES CAUTION Do not clean glass shelves or covers with warm water when they are provided for short term storage of cheese, spreads, or butter. Shelf Adjustment Refrigerator shelves are heavy. To install door...
Complete Owner s Guide
Page 18
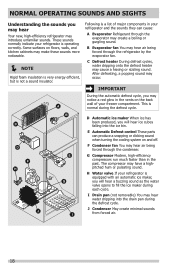
Following is a list of major components in your refrigerator and the sounds they can produce a snapping or clicking sound when turning the cooling system on the back wall of your freezer compartment. IMPORTANT During the automatic defrost cycle, you may hear water dripping into the ice bin. F Condenser fan You may create a boiling or gurgling sound. I Drain pan (not removable) You may notice a red glow...
Following is a list of major components in your refrigerator and the sounds they can produce a snapping or clicking sound when turning the cooling system on the back wall of your freezer compartment. IMPORTANT During the automatic defrost cycle, you may hear water dripping into the ice bin. F Condenser fan You may create a boiling or gurgling sound. I Drain pan (not removable) You may notice a red glow...
Complete Owner s Guide
Page 19
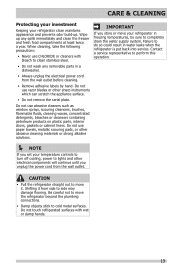
... surface. • Do not remove the serial plate. Contact a service representative to perform this operation. NOTE If you set your temperature controls to turn off cooling, power to move it from side to completely drain the water supply system. Do not use CHLORIDE or cleaners with wet or damp hands. 19 Do not use razor blades or other abrasive cleaning materials or strong alkaline solutions...
... surface. • Do not remove the serial plate. Contact a service representative to perform this operation. NOTE If you set your temperature controls to turn off cooling, power to move it from side to completely drain the water supply system. Do not use CHLORIDE or cleaners with wet or damp hands. 19 Do not use razor blades or other abrasive cleaning materials or strong alkaline solutions...
Complete Owner s Guide
Page 20
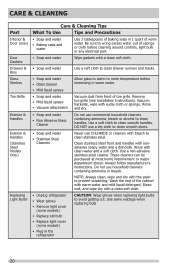
CARE & CLEANING Part Interior & Door Liners Door Gaskets Drawers & Bins Glass Shelves Toe Grille Exterior & Handles Exterior & Handles (Stainless Steel Models Only) Replacing Light Bulbs Care & Cleaning Tips What To Use Tips and Precautions • Soap and water • Baking soda and water Use 2 tablespoons of baking soda in 1 quart of the cabinet with warm water and mild liquid detergent. Remove toe grille (see Installation Instructions). Rinse and dry. Use a soft cloth to clean stainless steel. Never use commercial household cleaners containing ammonia, bleach...
CARE & CLEANING Part Interior & Door Liners Door Gaskets Drawers & Bins Glass Shelves Toe Grille Exterior & Handles Exterior & Handles (Stainless Steel Models Only) Replacing Light Bulbs Care & Cleaning Tips What To Use Tips and Precautions • Soap and water • Baking soda and water Use 2 tablespoons of baking soda in 1 quart of the cabinet with warm water and mild liquid detergent. Remove toe grille (see Installation Instructions). Rinse and dry. Use a soft cloth to clean stainless steel. Never use commercial household cleaners containing ammonia, bleach...

Complete Owner s Guide
Page 21
... • Set auxiliary freezer control to stabilize. Freezer temperature is Allow 24 hours for temperature to a colder setting until freezer temperature is not cold enough. 21 Reset circuit breaker. • The refrigerator/freezer control is turned to 3 pounds of defective workmanship or materials in a 24 hour period. • Water supply is turned off. • Water pressure is too low. • The freezer is satisfactory. Automatic ice maker not working . • Replace light bulb. • Ensure plug is...
... • Set auxiliary freezer control to stabilize. Freezer temperature is Allow 24 hours for temperature to a colder setting until freezer temperature is not cold enough. 21 Reset circuit breaker. • The refrigerator/freezer control is turned to 3 pounds of defective workmanship or materials in a 24 hour period. • Water supply is turned off. • Water pressure is too low. • The freezer is satisfactory. Automatic ice maker not working . • Replace light bulb. • Ensure plug is...
Complete Owner s Guide
Page 22
... such appliance is installed, used and maintained in your best interest to , any refrigerator or freezer failures. 6. Service calls to another party or removed outside the USA or Canada. 3. or external causes such as -is" are not a part of the appliance when it is warranted by a one year from its original owner to repair or replace appliance light bulbs, air filters, water filters, other consumables, or...
... such appliance is installed, used and maintained in your best interest to , any refrigerator or freezer failures. 6. Service calls to another party or removed outside the USA or Canada. 3. or external causes such as -is" are not a part of the appliance when it is warranted by a one year from its original owner to repair or replace appliance light bulbs, air filters, water filters, other consumables, or...

Wiring Diagram
Page 1
... to make repairs due to the possibility of compressor run time. All components of compressor run time. When a water valve is designed to touch insulation; it will char at 200°F and flash ignite (burn) at 9°F ( -12.8°C) Heater Wattage 165 W ICE MAKER CONNECTOR PLUG CONNECTIONS Wire Number Wire Color 1 Green / Yellow 2 Yellow 3 Black 4 Light Blue SERVICE DATA SHEET 241588207 STANDARD - NOTE Some products come equipped with white housing Opens...
... to make repairs due to the possibility of compressor run time. All components of compressor run time. When a water valve is designed to touch insulation; it will char at 200°F and flash ignite (burn) at 9°F ( -12.8°C) Heater Wattage 165 W ICE MAKER CONNECTOR PLUG CONNECTIONS Wire Number Wire Color 1 Green / Yellow 2 Yellow 3 Black 4 Light Blue SERVICE DATA SHEET 241588207 STANDARD - NOTE Some products come equipped with white housing Opens...
Product Specifications Sheet
Page 2
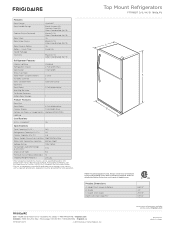
... 1 Freezer Features Door Bins Door Racks 2 Full-Width White Freezer Shelves 1 Full-Width Wire Factory Ice Maker w/ Large Ice Bin Optional (PN # IM116) Lighting Certifications Top View B Recessed water line Recessed (ice maker models only) electrical outlet A.D.A. - Ft.) 3.9 Power Supply Connection Location Right Bottom Rear Water Inlet Connection Location Bottom Right Allow 1" min. Accessories information available on the United States Access Board's A.D.A./A.B.A. clearance at sides and top for ease of installation Voltage Rating 120V / 60Hz Connected Load (kW Rating...
... 1 Freezer Features Door Bins Door Racks 2 Full-Width White Freezer Shelves 1 Full-Width Wire Factory Ice Maker w/ Large Ice Bin Optional (PN # IM116) Lighting Certifications Top View B Recessed water line Recessed (ice maker models only) electrical outlet A.D.A. - Ft.) 3.9 Power Supply Connection Location Right Bottom Rear Water Inlet Connection Location Bottom Right Allow 1" min. Accessories information available on the United States Access Board's A.D.A./A.B.A. clearance at sides and top for ease of installation Voltage Rating 120V / 60Hz Connected Load (kW Rating...
Product Specifications Sheet
Page 3
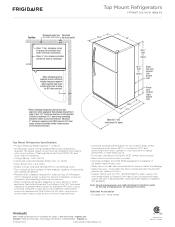
... avoid installing in ice maker-ready models only. • Water recess on the web at frigidaire.com for detailed instructions. clearance at sides and top for ease of unit to change. clearance at rear for water supply line with 1/4" O.D. recommended for proper air circulation and water / electrical connections Allow 3/8" min. Specifications subject to household water supply line plus 7 additional feet. Cold water line must be installed in accordance with current edition of National Electrical Code (NFPA...
... avoid installing in ice maker-ready models only. • Water recess on the web at frigidaire.com for detailed instructions. clearance at sides and top for ease of unit to change. clearance at rear for water supply line with 1/4" O.D. recommended for proper air circulation and water / electrical connections Allow 3/8" min. Specifications subject to household water supply line plus 7 additional feet. Cold water line must be installed in accordance with current edition of National Electrical Code (NFPA...


