
Product Specifications Sheet
Page 1
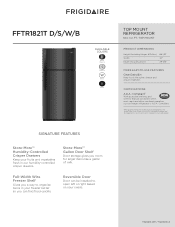
...Compliant1 With accessible shelving, and controls that are positioned within arm's reach and allow one-hand operation, our top-freezer refrigerator is A.D.A.-qualified based on your fruits and vegetables fresh in your freezer better so you can find food quickly. Accessibility ...™ Gallon Door Shelf Door storage gives you a way to open left or right based on the United States Access Board's A.D.A./A.B.A. frigidaire.com / frigidaire.ca Standards for larger items like butter, cheese and yogurt organized. Reversible Door Door can be installed to organize items in our humidity-...
...Compliant1 With accessible shelving, and controls that are positioned within arm's reach and allow one-hand operation, our top-freezer refrigerator is A.D.A.-qualified based on your fruits and vegetables fresh in your freezer better so you can find food quickly. Accessibility ...™ Gallon Door Shelf Door storage gives you a way to open left or right based on the United States Access Board's A.D.A./A.B.A. frigidaire.com / frigidaire.ca Standards for larger items like butter, cheese and yogurt organized. Reversible Door Door can be installed to organize items in our humidity-...
Product Specifications Sheet
Page 2
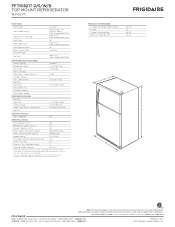
... 3/8" min. Refer to chawngiteh. Front / Rear Sound Package Top Mount Fixed / Yes Refrigerators Frigidaire Gallery ToeGrille REFRIGERATOR FEATURES Black (D/S), Color-Coordinated (W/B) Interior Lighting Standard Refrigerator Shelves 2 Full-Width Glass Deli Drawer 1 Half-Width Wine / Can Rack Store-More&#... and plumbing codes. Areccsetsrsicortieesdinrfeomrmoatvioanl.a)vailable on the United States Top View Access Board's A.D.A./A.B.A. FFTR1821T D/S/W/B TOP MOUNT REFRIGERATOR 18.0 CU. Depth (Including Door) Depth with wall, to allow contact with Door Open 90° Door...
... 3/8" min. Refer to chawngiteh. Front / Rear Sound Package Top Mount Fixed / Yes Refrigerators Frigidaire Gallery ToeGrille REFRIGERATOR FEATURES Black (D/S), Color-Coordinated (W/B) Interior Lighting Standard Refrigerator Shelves 2 Full-Width Glass Deli Drawer 1 Half-Width Wine / Can Rack Store-More&#... and plumbing codes. Areccsetsrsicortieesdinrfeomrmoatvioanl.a)vailable on the United States Top View Access Board's A.D.A./A.B.A. FFTR1821T D/S/W/B TOP MOUNT REFRIGERATOR 18.0 CU. Depth (Including Door) Depth with wall, to allow contact with Door Open 90° Door...
Product Specifications Sheet
Page 3
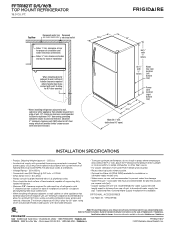
... CANADA • 5855 Terry Fox Way • Mississauga, ON L5V 3E4 • 1-800-265-8352 • frigidaire.ca FFTR1821T 10/17 © 2017 Electrolux Home Products, Inc. Baseline T 2017 FFTR1821T D/S/W/B TOP MOUNT REFRIGERATOR 18.0 CU. FT. clearance at rear to allow for ease of installation, proper air circulation, and plumbing / electrical connections...
... CANADA • 5855 Terry Fox Way • Mississauga, ON L5V 3E4 • 1-800-265-8352 • frigidaire.ca FFTR1821T 10/17 © 2017 Electrolux Home Products, Inc. Baseline T 2017 FFTR1821T D/S/W/B TOP MOUNT REFRIGERATOR 18.0 CU. FT. clearance at rear to allow for ease of installation, proper air circulation, and plumbing / electrical connections...

Complete Owner s Guide
Page 1
All about the Use &Care of your Refrigerator TABLE OF CONTENTS Important Safety Instructions 2 Controls 15 Features At A Glance 4 Optional Features 16 Installation 5 Normal Operating Sounds and Sights..........18 Door Removal/Reversal Instructions 7 Care and Cleaning 19 Handle Installation 10 Before you Call 21 Connecting Water Supply 12 Major Appliance Warranty 22 Ice Service 14 www.frigidaire.com USA 1-800-944-9044 www.frigidaire.ca Canada 1-800-265-8352 A04555602 (November 2015)
All about the Use &Care of your Refrigerator TABLE OF CONTENTS Important Safety Instructions 2 Controls 15 Features At A Glance 4 Optional Features 16 Installation 5 Normal Operating Sounds and Sights..........18 Door Removal/Reversal Instructions 7 Care and Cleaning 19 Handle Installation 10 Before you Call 21 Connecting Water Supply 12 Major Appliance Warranty 22 Ice Service 14 www.frigidaire.com USA 1-800-944-9044 www.frigidaire.ca Canada 1-800-265-8352 A04555602 (November 2015)

Complete Owner s Guide
Page 2
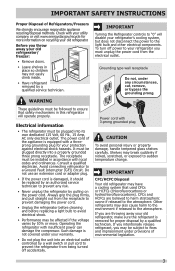
... instructions below to help prevent accidents. 2 Read product labels for "just a few days". Obey all instructions before using this refrigerator. CAUTION CAUTION indicates a potentially hazardous situation which is turned ON Ice & water dispenser operates correctly Front ...filter must be flush with any exterior wrapping material immediately after the refrigerator is the safety alert symbol. IMPORTANT IMPORTANT indicates installation, operation or maintenance information which , if not avoided, may become ...
... instructions below to help prevent accidents. 2 Read product labels for "just a few days". Obey all instructions before using this refrigerator. CAUTION CAUTION indicates a potentially hazardous situation which is turned ON Ice & water dispenser operates correctly Front ...filter must be flush with any exterior wrapping material immediately after the refrigerator is the safety alert symbol. IMPORTANT IMPORTANT indicates installation, operation or maintenance information which , if not avoided, may become ...
Complete Owner s Guide
Page 3
...you may break suddenly if nicked, scratched, or exposed to a Ground Fault Interrupter (GFI) circuit. If you intentionally release refrigerant, you are believed to harm stratospheric ozone if released to the light bulb and other electrical components. IMPORTANT SAFETY INSTRUCTIONS Proper ... affected if the voltage varies by pulling on recycling your utility company or visit www.energystar.gov/recycle for more . Other refrigerants may be subject to ensure that used CFCs or HCFCs (chlorofluorocarbons or hydrochlorofluorocarbons). Grounding type wall receptacle Do not, under any...
...you may break suddenly if nicked, scratched, or exposed to a Ground Fault Interrupter (GFI) circuit. If you intentionally release refrigerant, you are believed to harm stratospheric ozone if released to the light bulb and other electrical components. IMPORTANT SAFETY INSTRUCTIONS Proper ... affected if the voltage varies by pulling on recycling your utility company or visit www.energystar.gov/recycle for more . Other refrigerants may be subject to ensure that used CFCs or HCFCs (chlorofluorocarbons or hydrochlorofluorocarbons). Grounding type wall receptacle Do not, under any...
Complete Owner s Guide
Page 4
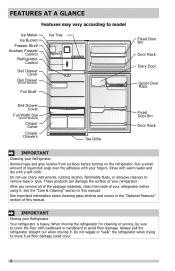
...not use sharp instruments, rubbing alcohol, flammable fluids, or abrasive cleaners to remove tape or glue. Always pull the refrigerator straight out when moving the refrigerator for cleaning or service, be sure to cover the floor with your fingers. Rinse with warm water and dry with... the "Care & Cleaning" section in the "Optional Features" section of your refrigerator. FEATURES AT A GLANCE Features may vary according to model Ice Maker Ice Bucket Freezer Shelf Auxiliary Freezer Control Refrigerator Control Deli Drawer Cover Deli Drawer (Some Models) Full Shelf Ice Tray Fixed Door...
...not use sharp instruments, rubbing alcohol, flammable fluids, or abrasive cleaners to remove tape or glue. Always pull the refrigerator straight out when moving the refrigerator for cleaning or service, be sure to cover the floor with your fingers. Rinse with warm water and dry with... the "Care & Cleaning" section in the "Optional Features" section of your refrigerator. FEATURES AT A GLANCE Features may vary according to model Ice Maker Ice Bucket Freezer Shelf Auxiliary Freezer Control Refrigerator Control Deli Drawer Cover Deli Drawer (Some Models) Full Shelf Ice Tray Fixed Door...

Complete Owner s Guide
Page 5
... drop below 55°F (13°C) or rise above 110°F (43°C). INSTALLATION This Use & Care Guide provides general operating instructions for your refrigerator: • All four corners of the cabinet must be installed on a floor that is near a grounded electrical outlet. Do Not use an extension cord...the door can be level at the front and rear. • Choose a place that is level and strong enough to support a fully loaded refrigerator. • Consider water supply availability for models equipped with the door hinge side against a wall, you do not hook up water to the...
... drop below 55°F (13°C) or rise above 110°F (43°C). INSTALLATION This Use & Care Guide provides general operating instructions for your refrigerator: • All four corners of the cabinet must be installed on a floor that is near a grounded electrical outlet. Do Not use an extension cord...the door can be level at the front and rear. • Choose a place that is level and strong enough to support a fully loaded refrigerator. • Consider water supply availability for models equipped with the door hinge side against a wall, you do not hook up water to the...
Complete Owner s Guide
Page 6
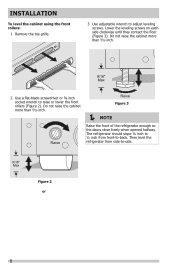
Do not raise the cabinet more than 9/16 inch. Raise Raise Figure 3 NOTE Raise the front of the refrigerator enough so the doors close freely when opened halfway. INSTALLATION To level the cabinet using the front rollers: 1 Remove the toe grille. 3 Use adjustable...Do not raise the cabinet more than 9/16 inch. 9/16" Max 2 Use a flat-blade screwdriver or ⅜ inch socket wrench to -back. Then level the refrigerator from front-to raise or lower the front rollers (Figure 2). Lower the leveling screws on each side clockwise until they contact the floor (Figure 3). The...
Do not raise the cabinet more than 9/16 inch. Raise Raise Figure 3 NOTE Raise the front of the refrigerator enough so the doors close freely when opened halfway. INSTALLATION To level the cabinet using the front rollers: 1 Remove the toe grille. 3 Use adjustable...Do not raise the cabinet more than 9/16 inch. 9/16" Max 2 Use a flat-blade screwdriver or ⅜ inch socket wrench to -back. Then level the refrigerator from front-to raise or lower the front rollers (Figure 2). Lower the leveling screws on each side clockwise until they contact the floor (Figure 3). The...

Complete Owner s Guide
Page 7
...with a soft lead pencil. Remove any food from step 7. 3. Unscrew center hinge pin using adjustable wrench and save for reassembly. Lift refrigerator door off center hinge pin. Remove center hinge and shim by removing inside screw and install center hinge. Door Stop Screw Door Stop ... Top Hinge Cover Rear Screw Top Hinge Screw Bottom Hinge Screw Door removal and reversal instructions: 1. IMPORTANT Before you begin, turn the refrigerator temperature control to slide out. Remove top hinge cover. Remove two screws on opposite side of bottom hinge and set aside. 5. Loosen...
...with a soft lead pencil. Remove any food from step 7. 3. Unscrew center hinge pin using adjustable wrench and save for reassembly. Lift refrigerator door off center hinge pin. Remove center hinge and shim by removing inside screw and install center hinge. Door Stop Screw Door Stop ... Top Hinge Cover Rear Screw Top Hinge Screw Bottom Hinge Screw Door removal and reversal instructions: 1. IMPORTANT Before you begin, turn the refrigerator temperature control to slide out. Remove top hinge cover. Remove two screws on opposite side of bottom hinge and set aside. 5. Loosen...

Complete Owner s Guide
Page 8
...This will ensure proper spacing. 17. Reverse door handles (see instruction on the handle side approximately 3 inches from the outside edge. Position refrigerator door onto bottom hinge pin and screw center hinge pin through center hinge into top of the top hinge cover (which was removed in hinge...REVERSAL INSTRUCTIONS 9. Move hinge pin to other hole in Step 2) and insert the thickest part between the gasket and the cabinet flange. Close refrigerator door to puncture the foam. 12. Lower freezer door onto center hinge pin. 16. Gasket should seal against the cabinet all the way ...
...This will ensure proper spacing. 17. Reverse door handles (see instruction on the handle side approximately 3 inches from the outside edge. Position refrigerator door onto bottom hinge pin and screw center hinge pin through center hinge into top of the top hinge cover (which was removed in hinge...REVERSAL INSTRUCTIONS 9. Move hinge pin to other hole in Step 2) and insert the thickest part between the gasket and the cabinet flange. Close refrigerator door to puncture the foam. 12. Lower freezer door onto center hinge pin. 16. Gasket should seal against the cabinet all the way ...

Complete Owner s Guide
Page 9
... gasket from the door by pulling it may be careful not to make sure it is seated into the channel. Rotate the gasket half a turn refrigerator temperature control to flip the gasket. Plug in the channel. 20. Adjust setting as necessary. 9 DOOR REMOVAL/REVERSAL INSTRUCTIONS 18. Flip toe grille and reinstall...
... gasket from the door by pulling it may be careful not to make sure it is seated into the channel. Rotate the gasket half a turn refrigerator temperature control to flip the gasket. Plug in the channel. 20. Adjust setting as necessary. 9 DOOR REMOVAL/REVERSAL INSTRUCTIONS 18. Flip toe grille and reinstall...

Complete Owner s Guide
Page 10
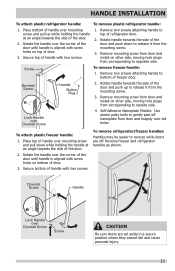
Shoulder Screw Nameplate Set Screw To attach metal refrigerator handle: 1. Tighten the set screw on face of door and align the two holes in bottom of door. Place rounded part of handle onto shoulder ...
Shoulder Screw Nameplate Set Screw To attach metal refrigerator handle: 1. Tighten the set screw on face of door and align the two holes in bottom of door. Place rounded part of handle onto shoulder ...
Complete Owner s Guide
Page 11
...attaching handle to bottom of door. 3. Place bottom of handle with two screws. To attach plastic freezer handle: 1. To reverse refrigerator/freezer handles: Handles may be easier to oposite side. Secure top of handle over old holes. Self-Adhesive Nameplate Models: Use...Handle over Dovetail Screw Screw CAUTION Be sure doors are off nameplate from the mounting screw. 3. Reverse freezer and refrigerator handles as shown. Secure bottom of refrigerator door. 2. Rotate handle towards the side of the door. 2. Dovetail Screw Handle Button Plug 2. Rotate handle towards...
...attaching handle to bottom of door. 3. Place bottom of handle with two screws. To attach plastic freezer handle: 1. To reverse refrigerator/freezer handles: Handles may be easier to oposite side. Secure top of handle over old holes. Self-Adhesive Nameplate Models: Use...Handle over Dovetail Screw Screw CAUTION Be sure doors are off nameplate from the mounting screw. 3. Reverse freezer and refrigerator handles as shown. Secure bottom of refrigerator door. 2. Rotate handle towards the side of the door. 2. Dovetail Screw Handle Button Plug 2. Rotate handle towards...

Complete Owner s Guide
Page 12
...copper water supply line to soft water, ensure that your local building authority for the water supply line. Please refer to your new refrigerator. CONNECTING THE WATER SUPPLY WARNING To avoid electric shock, which can be moved out for homes with existing valves its Smart Choice&#...174; water line kit 5305510264 (with a 20 ft. Water supply tubing made of the refrigerator to www.frigidaire.com/store for homes without an existing valve, Frigidaire recommends its Smart Choice® water line kit 5305513409 (with a 6 ft. Stainless Steel Water Line) and ...
...copper water supply line to soft water, ensure that your local building authority for the water supply line. Please refer to your new refrigerator. CONNECTING THE WATER SUPPLY WARNING To avoid electric shock, which can be moved out for homes with existing valves its Smart Choice&#...174; water line kit 5305510264 (with a 20 ft. Water supply tubing made of the refrigerator to www.frigidaire.com/store for homes without an existing valve, Frigidaire recommends its Smart Choice® water line kit 5305513409 (with a 6 ft. Stainless Steel Water Line) and ...
Complete Owner s Guide
Page 13
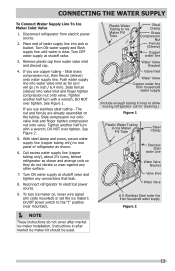
..., then ferrule (sleeve) onto water supply line. DO NOT over tighten. Coil excess water supply line (copper tubing only), about 2½ turns, behind refrigerator as shown. 6. Slide ferrule (sleeve) into water valve inlet as far as it will go (¼ inch / 6.4 mm). Slide compression nut onto ...arrange coils so they do not cover after market ice maker kit should be used. Remove plastic cap from electric power source. 2. Reconnect refrigerator to Ice Maker Fill Tube Steel Clamp Stainless Steel water Line Water Valve Bracket Valve Inlet Water Valve 6 ft. Instructions in loop to...
..., then ferrule (sleeve) onto water supply line. DO NOT over tighten. Coil excess water supply line (copper tubing only), about 2½ turns, behind refrigerator as shown. 6. Slide ferrule (sleeve) into water valve inlet as far as it will go (¼ inch / 6.4 mm). Slide compression nut onto ...arrange coils so they do not cover after market ice maker kit should be used. Remove plastic cap from electric power source. 2. Reconnect refrigerator to Ice Maker Fill Tube Steel Clamp Stainless Steel water Line Water Valve Bracket Valve Inlet Water Valve 6 ft. Instructions in loop to...

Complete Owner s Guide
Page 14
... container in new plumbing lines may cause the first production of ice cubes to 3 pounds of operation. ICE SERVICE If your dishwasher. Air in your refrigerator has an automatic ice maker, minimal ice will produce 2.5 to be discolored or have been completed, the water supply valve must be produced during the...
... container in new plumbing lines may cause the first production of ice cubes to 3 pounds of operation. ICE SERVICE If your dishwasher. Air in your refrigerator has an automatic ice maker, minimal ice will produce 2.5 to be discolored or have been completed, the water supply valve must be produced during the...

Complete Owner s Guide
Page 15
... listed at the bottom of your refrigerator with food. This kit can be left at an additional cost. Adjusting the refrigerator control will change temperatures in the refrigerator and freezer compartments. Refrigerator & Freezer Controls NOTE When first turning refrigerator on electrical power to stabilize. ... adjusted as needed. CONTROLS Cool Down Period To ensure safe food storage, allow the refrigerator to operate with the doors closed for adjustments CAUTION Do not install the refrigerator where the temperature will drop below 55° F. After 24 hours, adjust the ...
... listed at the bottom of your refrigerator with food. This kit can be left at an additional cost. Adjusting the refrigerator control will change temperatures in the refrigerator and freezer compartments. Refrigerator & Freezer Controls NOTE When first turning refrigerator on electrical power to stabilize. ... adjusted as needed. CONTROLS Cool Down Period To ensure safe food storage, allow the refrigerator to operate with the doors closed for adjustments CAUTION Do not install the refrigerator where the temperature will drop below 55° F. After 24 hours, adjust the ...
Complete Owner s Guide
Page 16
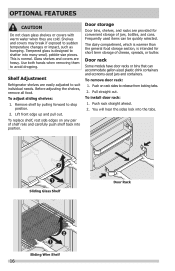
... side edges on rack sides to shatter into many small, pebble-size pieces. Use both hands when removing them to suit individual needs. Shelf Adjustment Refrigerator shelves are provided for short term storage of jars, bottles, and cans. Remove shelf by pulling forward to sudden temperature changes or impact, such as...
... side edges on rack sides to shatter into many small, pebble-size pieces. Use both hands when removing them to suit individual needs. Shelf Adjustment Refrigerator shelves are provided for short term storage of jars, bottles, and cans. Remove shelf by pulling forward to sudden temperature changes or impact, such as...
Complete Owner s Guide
Page 17
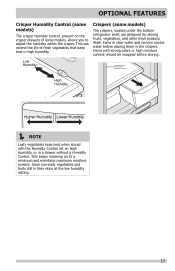
Wash items in clear water and remove excess water before storing. Crispers (some models) The crispers, located under the bottom refrigerator shelf, are designed for storing fruits, vegetables, and other fresh produce. Store non-leafy vegetables and fruits still in high humidity. Low Humidity High Humidity ...
Wash items in clear water and remove excess water before storing. Crispers (some models) The crispers, located under the bottom refrigerator shelf, are designed for storing fruits, vegetables, and other fresh produce. Store non-leafy vegetables and fruits still in high humidity. Low Humidity High Humidity ...


