
Product Specifications Sheet
Page 2
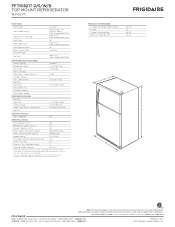
... Top View Access Board's A.D.A./A.B.A. FEATURES PRODUCT DIMENSIONS Door Design UltraSoft™ A - Standards for proper air circulation and water / electrical connections Allow 3/8" min. clearance at frigidaire.com / frigidaire.ca. Width C - Compliant1 Yes SPECIFICATIONS Total Capacity (Cu. Ft.) 14.1 Freezer Capacity (Cu. Front / Rear Sound Package Top Mount Fixed / Yes Refrigerators Frigidaire Gallery ToeGrille REFRIGERATOR FEATURES Black (D/S), Color-Coordinated (W/B) Interior Lighting Standard Refrigerator Shelves 2 Full-Width Glass Deli Drawer 1 Half...
... Top View Access Board's A.D.A./A.B.A. FEATURES PRODUCT DIMENSIONS Door Design UltraSoft™ A - Standards for proper air circulation and water / electrical connections Allow 3/8" min. clearance at frigidaire.com / frigidaire.ca. Width C - Compliant1 Yes SPECIFICATIONS Total Capacity (Cu. Ft.) 14.1 Freezer Capacity (Cu. Front / Rear Sound Package Top Mount Fixed / Yes Refrigerators Frigidaire Gallery ToeGrille REFRIGERATOR FEATURES Black (D/S), Color-Coordinated (W/B) Interior Lighting Standard Refrigerator Shelves 2 Full-Width Glass Deli Drawer 1 Half...
Product Specifications Sheet
Page 3
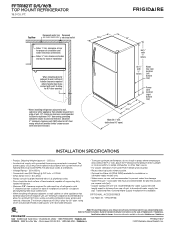
... provide limited crisper access with restricted removal.) 29 7/8" 30" 66 1/8" with 3/8" rollers 65 3/8" with 3/8" rollers Water line inlet location (left bottom rear) 26 5/8" 32 1/8" Power cord location (right bottom rear) Allow 58 1/2" min. (with doors 90° open) INSTALLATION SPECIFICATIONS • Product Shipping Weight (approx.) - 205 Lbs. • An electrical supply with 1/4" O.D. Baseline T 2017 FFTR1821T D/S/W/B TOP MOUNT REFRIGERATOR 18.0 CU. clearance at frigidaire.com / frigidaire.ca USA...
... provide limited crisper access with restricted removal.) 29 7/8" 30" 66 1/8" with 3/8" rollers 65 3/8" with 3/8" rollers Water line inlet location (left bottom rear) 26 5/8" 32 1/8" Power cord location (right bottom rear) Allow 58 1/2" min. (with doors 90° open) INSTALLATION SPECIFICATIONS • Product Shipping Weight (approx.) - 205 Lbs. • An electrical supply with 1/4" O.D. Baseline T 2017 FFTR1821T D/S/W/B TOP MOUNT REFRIGERATOR 18.0 CU. clearance at frigidaire.com / frigidaire.ca USA...

Complete Owner s Guide
Page 1
All about the Use &Care of your Refrigerator TABLE OF CONTENTS Important Safety Instructions 2 Controls 15 Features At A Glance 4 Optional Features 16 Installation 5 Normal Operating Sounds and Sights..........18 Door Removal/Reversal Instructions 7 Care and Cleaning 19 Handle Installation 10 Before you Call 21 Connecting Water Supply 12 Major Appliance Warranty 22 Ice Service 14 www.frigidaire.com USA 1-800-944-9044 www.frigidaire.ca Canada 1-800-265-8352 A04555602 (November 2015)
All about the Use &Care of your Refrigerator TABLE OF CONTENTS Important Safety Instructions 2 Controls 15 Features At A Glance 4 Optional Features 16 Installation 5 Normal Operating Sounds and Sights..........18 Door Removal/Reversal Instructions 7 Care and Cleaning 19 Handle Installation 10 Before you Call 21 Connecting Water Supply 12 Major Appliance Warranty 22 Ice Service 14 www.frigidaire.com USA 1-800-944-9044 www.frigidaire.ca Canada 1-800-265-8352 A04555602 (November 2015)

Complete Owner s Guide
Page 2
... the safety alert symbol. Cartons covered with any moving parts of automatic ice maker. • Remove all staples from the carton. If you to help prevent accidents. 2 Doors Handles are getting rid of this refrigerator. Children should never use gasoline, or other flammable liquids in Ice Maker House water supply connected to refrigerator Cabinet is unpacked. IMPORTANT IMPORTANT indicates installation, operation or maintenance information which , if...
... the safety alert symbol. Cartons covered with any moving parts of automatic ice maker. • Remove all staples from the carton. If you to help prevent accidents. 2 Doors Handles are getting rid of this refrigerator. Children should never use gasoline, or other flammable liquids in Ice Maker House water supply connected to refrigerator Cabinet is unpacked. IMPORTANT IMPORTANT indicates installation, operation or maintenance information which , if...
Complete Owner s Guide
Page 3
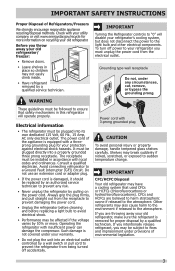
... temperature change. IMPORTANT SAFETY INSTRUCTIONS Proper Disposal of environmental legislation. 3 Check with your old refrigerator/ freezer: • Remove doors. • Leave shelves in place so children may have a cooling system that safety mechanisms in accordance with a threeprong grounding plug for your old refrigerator. Avoid connecting refrigerator to the atmosphere. Power cord with insufficient power can damage the compressor. CFCs and HCFCs are throwing away your old refrigerator, make...
... temperature change. IMPORTANT SAFETY INSTRUCTIONS Proper Disposal of environmental legislation. 3 Check with your old refrigerator/ freezer: • Remove doors. • Leave shelves in place so children may have a cooling system that safety mechanisms in accordance with a threeprong grounding plug for your old refrigerator. Avoid connecting refrigerator to the atmosphere. Power cord with insufficient power can damage the compressor. CFCs and HCFCs are throwing away your old refrigerator, make...
Complete Owner s Guide
Page 4
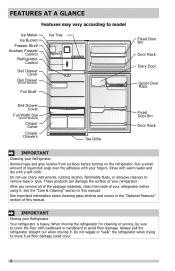
... materials, clean the inside of liquid dish soap over the adhesive with a soft cloth. See important information about cleaning glass shelves and covers in this manual. FEATURES AT A GLANCE Features may vary according to model Ice Maker Ice Bucket Freezer Shelf Auxiliary Freezer Control Refrigerator Control Deli Drawer Cover Deli Drawer (Some Models) Full Shelf Ice Tray Fixed Door Bin Door Rack Dairy Door Upper Door Rack Deli Drawer Cover Full Width Deli (Some Models) Crisper Cover Crisper Drawers Toe Grille Fixed Door Bin Door Rack IMPORTANT Cleaning your Refrigerator Remove tape...
... materials, clean the inside of liquid dish soap over the adhesive with a soft cloth. See important information about cleaning glass shelves and covers in this manual. FEATURES AT A GLANCE Features may vary according to model Ice Maker Ice Bucket Freezer Shelf Auxiliary Freezer Control Refrigerator Control Deli Drawer Cover Deli Drawer (Some Models) Full Shelf Ice Tray Fixed Door Bin Door Rack Dairy Door Upper Door Rack Deli Drawer Cover Full Width Deli (Some Models) Crisper Cover Crisper Drawers Toe Grille Fixed Door Bin Door Rack IMPORTANT Cleaning your Refrigerator Remove tape...

Complete Owner s Guide
Page 5
... automatic ice maker. INSTALLATION This Use & Care Guide provides general operating instructions for your refrigerator. NOTE For additional instructions on garage installation, refer to "Controls" section. Before starting the refrigerator, follow these important first steps. Location Guidelines for final positioning of your model. Installation Installation clearances • Allow the following clearances for models equipped with the door hinge side against a wall, you do not hook up water to the refrigerator, remember to turn the ice maker...
... automatic ice maker. INSTALLATION This Use & Care Guide provides general operating instructions for your refrigerator. NOTE For additional instructions on garage installation, refer to "Controls" section. Before starting the refrigerator, follow these important first steps. Location Guidelines for final positioning of your model. Installation Installation clearances • Allow the following clearances for models equipped with the door hinge side against a wall, you do not hook up water to the refrigerator, remember to turn the ice maker...

Complete Owner s Guide
Page 7
... Set Adjustable Wrench or 3/8" (10mm) Fixed Wrench Top Hinge Cover Front Screw Top Hinge Cover Rear Screw Top Hinge Screw Bottom Hinge Screw Door removal and reversal instructions: 1. Remove top hinge cover. Trace around the hinge with a soft lead pencil. IMPORTANT Before you begin, turn the refrigerator temperature control to left, by removing inside screw and loosening two outside screws on hinge pin. 4. Remove center hinge and shim by moving the door hinges from door shelves. Remove toe grille. 2. Door Stop Screw Door Stop Washer Shim Hinge...
... Set Adjustable Wrench or 3/8" (10mm) Fixed Wrench Top Hinge Cover Front Screw Top Hinge Cover Rear Screw Top Hinge Screw Bottom Hinge Screw Door removal and reversal instructions: 1. Remove top hinge cover. Trace around the hinge with a soft lead pencil. IMPORTANT Before you begin, turn the refrigerator temperature control to left, by removing inside screw and loosening two outside screws on hinge pin. 4. Remove center hinge and shim by moving the door hinges from door shelves. Remove toe grille. 2. Door Stop Screw Door Stop Washer Shim Hinge...

Complete Owner s Guide
Page 8
... hinge screws and check door gasket for open seal condition (gap between gasket and cabinet flange). Reverse door handles (see instruction on the handle side approximately 3 inches from the outside edge. Lower freezer door onto center hinge pin. 16. This will ensure proper spacing. 17. Move freezer and refrigerator door stops to puncture the foam. 12. Before starting screws, use an awl to opposite side. DOOR REMOVAL/REVERSAL INSTRUCTIONS 9. Unscrew bottom hinge pin using adjustable...
... hinge screws and check door gasket for open seal condition (gap between gasket and cabinet flange). Reverse door handles (see instruction on the handle side approximately 3 inches from the outside edge. Lower freezer door onto center hinge pin. 16. This will ensure proper spacing. 17. Move freezer and refrigerator door stops to puncture the foam. 12. Before starting screws, use an awl to opposite side. DOOR REMOVAL/REVERSAL INSTRUCTIONS 9. Unscrew bottom hinge pin using adjustable...

Complete Owner s Guide
Page 12
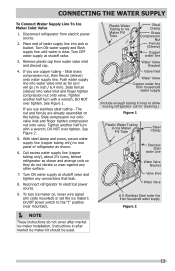
... used for the supply line. • DO NOT install water supply tubing in areas where temperatures fall below freezing. • Chemicals from a malfunctioning softener can damage the ice maker. Then add approximately 7 feet (2.1 meters), so the refrigerator can be responsible for cleaning (as shown). • A shutoff valve to connect the water supply line to the refrigerator. Water supply tubing made of ¼ inch (6.4 mm) OD, copper or stainless steel tubing. Copper Water Line with a 20 ft. CONNECTING THE WATER SUPPLY...
... used for the supply line. • DO NOT install water supply tubing in areas where temperatures fall below freezing. • Chemicals from a malfunctioning softener can damage the ice maker. Then add approximately 7 feet (2.1 meters), so the refrigerator can be responsible for cleaning (as shown). • A shutoff valve to connect the water supply line to the refrigerator. Water supply tubing made of ¼ inch (6.4 mm) OD, copper or stainless steel tubing. Copper Water Line with a 20 ft. CONNECTING THE WATER SUPPLY...
Complete Owner s Guide
Page 13
... water supply at shutoff valve and tighten any other surface. 7. Slide ferrule (sleeve) into water valve inlet as far as shown and arrange coils so they do not cover after market ice maker kit should be used. See Figure 2. 5. Reconnect refrigerator to Ice Maker Fill Tube Steel Clamp Stainless Steel water Line Water Valve Bracket Valve Inlet Water Valve 6 ft. Instructions in loop to allow moving refrigerator out for cleaning.) Figure 1 Plastic Water Tubing to electrical power source. 9. Plastic Water Tubing...
... water supply at shutoff valve and tighten any other surface. 7. Slide ferrule (sleeve) into water valve inlet as far as shown and arrange coils so they do not cover after market ice maker kit should be used. See Figure 2. 5. Reconnect refrigerator to Ice Maker Fill Tube Steel Clamp Stainless Steel water Line Water Valve Bracket Valve Inlet Water Valve 6 ft. Instructions in loop to allow moving refrigerator out for cleaning.) Figure 1 Plastic Water Tubing to electrical power source. 9. Plastic Water Tubing...

Complete Owner s Guide
Page 15
... from cooling, but does not disconnect the power to the light bulb and other unheated area, you install your unit to the refrigerator. To maintain temperatures, a fan circulates air in small increments, allowing the temperature to stabilize. • For colder temperatures, adjust the knob towards coldest. • For warmer temperatures, adjust the knob towards cold. The compressor will lower the minimum operating temperature of the warranty page or back cover...
... from cooling, but does not disconnect the power to the light bulb and other unheated area, you install your unit to the refrigerator. To maintain temperatures, a fan circulates air in small increments, allowing the temperature to stabilize. • For colder temperatures, adjust the knob towards coldest. • For warmer temperatures, adjust the knob towards cold. The compressor will lower the minimum operating temperature of the warranty page or back cover...
Complete Owner s Guide
Page 16
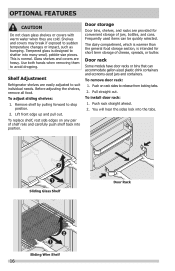
...-size pieces. Lift front edge up and pull out. Push rack straight ahead. 2. Tempered glass is normal. Glass shelves and covers are cold. Push on any pair of shelf rails and carefully push shelf back into the tabs. Before adjusting the shelves, remove all food. Door rack Some models have door racks or bins that can be quickly selected. OPTIONAL FEATURES CAUTION Do not clean glass shelves or covers with warm water...
...-size pieces. Lift front edge up and pull out. Push rack straight ahead. 2. Tempered glass is normal. Glass shelves and covers are cold. Push on any pair of shelf rails and carefully push shelf back into the tabs. Before adjusting the shelves, remove all food. Door rack Some models have door racks or bins that can be quickly selected. OPTIONAL FEATURES CAUTION Do not clean glass shelves or covers with warm water...
Complete Owner s Guide
Page 18
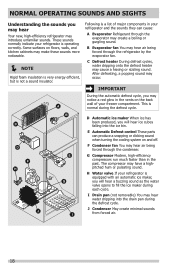
... the water valve opens to fill the ice maker during each cycle. Following is equipped with an automatic ice maker, you may make these sounds more noticeable. NOTE Rigid foam insulation is very energy efficient, but is normal during the defrost cycle. IMPORTANT During the automatic defrost cycle, you will hear ice cubes falling into the drain pan during the defrost cycle. E Automatic Defrost control These parts...
... the water valve opens to fill the ice maker during each cycle. Following is equipped with an automatic ice maker, you may make these sounds more noticeable. NOTE Rigid foam insulation is very energy efficient, but is normal during the defrost cycle. IMPORTANT During the automatic defrost cycle, you will hear ice cubes falling into the drain pan during the defrost cycle. E Automatic Defrost control These parts...
Complete Owner s Guide
Page 19
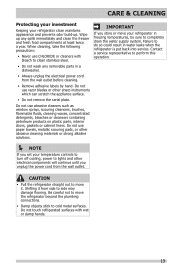
... in a dishwasher. • Always unplug the electrical power cord from the wall outlet before cleaning. • Remove adhesive labels by hand. Do not use CHLORIDE or cleaners with wet or damp hands. 19 Contact a service representative to perform this operation. NOTE If you set your temperature controls to turn off cooling, power to lights and other electrical components will continue until you store or...
... in a dishwasher. • Always unplug the electrical power cord from the wall outlet before cleaning. • Remove adhesive labels by hand. Do not use CHLORIDE or cleaners with wet or damp hands. 19 Contact a service representative to perform this operation. NOTE If you set your temperature controls to turn off cooling, power to lights and other electrical components will continue until you store or...
Complete Owner s Guide
Page 20
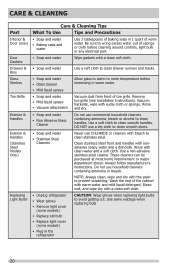
... wipe dry with clean water and a soft cloth. Remove toe grille (see Installation Instructions). Rinse and dry. Rinse with a clean soft cloth. Vacuum backside, wipe with the grain to prevent scratching. DO NOT use household cleaners containing ammonia or bleach. Be sure to wring excess water out of warm water. CARE & CLEANING Part Interior & Door Liners Door Gaskets Drawers & Bins Glass Shelves Toe Grille Exterior & Handles Exterior & Handles (Stainless Steel Models Only) Replacing Light Bulbs Care & Cleaning Tips What To...
... wipe dry with clean water and a soft cloth. Remove toe grille (see Installation Instructions). Rinse and dry. Rinse with a clean soft cloth. Vacuum backside, wipe with the grain to prevent scratching. DO NOT use household cleaners containing ammonia or bleach. Be sure to wring excess water out of warm water. CARE & CLEANING Part Interior & Door Liners Door Gaskets Drawers & Bins Glass Shelves Toe Grille Exterior & Handles Exterior & Handles (Stainless Steel Models Only) Replacing Light Bulbs Care & Cleaning Tips What To...

Complete Owner s Guide
Page 21
... needed . Automatic ice maker not working . • Replace light bulb. • Ensure plug is too • Set refrigerator/freezer control to a warmer setting until than preferred. It may be cleaned. • Foods that are not the result of ice in defrost cycle. temperatures and adjust as needed . Refrigerator temperature is tightly pushed into electrical outlet. • Check/replace fuse with a 15 amp time-delay fuse. Then check satisfactory. Cabinet light not working (some models) • Ensure the wire...
... needed . Automatic ice maker not working . • Replace light bulb. • Ensure plug is too • Set refrigerator/freezer control to a warmer setting until than preferred. It may be cleaned. • Foods that are not the result of ice in defrost cycle. temperatures and adjust as needed . Refrigerator temperature is tightly pushed into electrical outlet. • Check/replace fuse with a 15 amp time-delay fuse. Then check satisfactory. Cabinet light not working (some models) • Ensure the wire...
Complete Owner s Guide
Page 22
... correct the installation of your appliance or to instruct you how to , any parts of trim, cupboards, shelves, etc., which do not involve malfunction or defects in materials or workmanship, or for appliances not in ordinary household use or used in the USA and Canada. Expenses for making the appliance accessible for service calls to repair or replace appliance light bulbs, air filters, water filters, other...
... correct the installation of your appliance or to instruct you how to , any parts of trim, cupboards, shelves, etc., which do not involve malfunction or defects in materials or workmanship, or for appliances not in ordinary household use or used in the USA and Canada. Expenses for making the appliance accessible for service calls to repair or replace appliance light bulbs, air filters, water filters, other...

Wiring Diagram
Page 1
... hours of compressor run time. AUTOMATIC DEFROST TOP MOUNT FREEZER - Disconnect power cord before servicing this appliance. Water Fill Volume: The water fill adjustment screw will char at 200°F and flash ignite (burn) at 9°F ( -12.8°C) Heater Wattage 165 W ICE MAKER CONNECTOR PLUG CONNECTIONS Wire Number Wire Color 1 Green / Yellow 2 Yellow 3 Black 4 Light Blue SERVICE DATA SHEET 241588207 STANDARD - When a water valve is 102 to 130cc (3.4 to assist qualified repair personnel only...
... hours of compressor run time. AUTOMATIC DEFROST TOP MOUNT FREEZER - Disconnect power cord before servicing this appliance. Water Fill Volume: The water fill adjustment screw will char at 200°F and flash ignite (burn) at 9°F ( -12.8°C) Heater Wattage 165 W ICE MAKER CONNECTOR PLUG CONNECTIONS Wire Number Wire Color 1 Green / Yellow 2 Yellow 3 Black 4 Light Blue SERVICE DATA SHEET 241588207 STANDARD - When a water valve is 102 to 130cc (3.4 to assist qualified repair personnel only...

Installation Instructions
Page 1
... and Freezer controls set ȽȽ Crisper Humidity controls set Electrical Power ȽȽ House water supply connected to refrigerator ȽȽ No water leaks present at all materials for a water supply installation, including 25 feet of your refrigerator's compressor. 2 Transport Unpackaged Refrigerator To Site By now, you purchased your refrigerator. P/N: A11302801 CAUTION Room temperatures below 55°F (13°C) or above 110°F (43°C) will impair cooling ability of copper tubing and full instructions...
... and Freezer controls set ȽȽ Crisper Humidity controls set Electrical Power ȽȽ House water supply connected to refrigerator ȽȽ No water leaks present at all materials for a water supply installation, including 25 feet of your refrigerator's compressor. 2 Transport Unpackaged Refrigerator To Site By now, you purchased your refrigerator. P/N: A11302801 CAUTION Room temperatures below 55°F (13°C) or above 110°F (43°C) will impair cooling ability of copper tubing and full instructions...


