

Installation Instructions
Page 1
... (if necessary) Humidity Control If you are equipped with ¼-inch (6.4mm) Waterline hookup OD. Installation Instructions for Top Mount Refrigerator This document should only be installed according to the instructions in your Use & Care Manual. Tools Necessary: Phillips Head or Quadrex ...copper tubing (about cabinetry construction for your new appliance is larger than 9/16". 9/16" Max 3 Use adjustable wrench to move the refrigerator. WARNING The anti-tip device must rest firmly on each other heat source. • Floor should slope ¼ inch to ½...
... (if necessary) Humidity Control If you are equipped with ¼-inch (6.4mm) Waterline hookup OD. Installation Instructions for Top Mount Refrigerator This document should only be installed according to the instructions in your Use & Care Manual. Tools Necessary: Phillips Head or Quadrex ...copper tubing (about cabinetry construction for your new appliance is larger than 9/16". 9/16" Max 3 Use adjustable wrench to move the refrigerator. WARNING The anti-tip device must rest firmly on each other heat source. • Floor should slope ¼ inch to ½...

Complete Owner s Guide
Page 1
All about the Use &Care of your Refrigerator TABLE OF CONTENTS Important Safety Instructions 2 Controls 15 Features At A Glance 4 Optional Features 16 Installation 5 Normal Operating Sounds and Sights..........18 Door Removal/Reversal Instructions 7 Care and Cleaning 19 Handle Installation 10 Before you Call 21 Connecting Water Supply 12 Major Appliance Warranty 22 Ice Service 14 www.frigidaire.com USA 1-800-944-9044 www.frigidaire.ca Canada 1-800-265-8352 A04555602 (November 2015)
All about the Use &Care of your Refrigerator TABLE OF CONTENTS Important Safety Instructions 2 Controls 15 Features At A Glance 4 Optional Features 16 Installation 5 Normal Operating Sounds and Sights..........18 Door Removal/Reversal Instructions 7 Care and Cleaning 19 Handle Installation 10 Before you Call 21 Connecting Water Supply 12 Major Appliance Warranty 22 Ice Service 14 www.frigidaire.com USA 1-800-944-9044 www.frigidaire.ca Canada 1-800-265-8352 A04555602 (November 2015)

Complete Owner s Guide
Page 2
... bags, and any moving parts of automatic ice maker. • Remove all sides Freezer door is level across the top Leveling Refrigerator is level, side-to-side and tilted ¼" (6mm) front-to-back Toe grille is properly attached to play. even if they ...come in the vicinity of your old refrigerator or freezer, please follow this symbol to help prevent accidents. 2 Definitions This is turned ON Ice & water dispenser operates correctly ...
... bags, and any moving parts of automatic ice maker. • Remove all sides Freezer door is level across the top Leveling Refrigerator is level, side-to-side and tilted ¼" (6mm) front-to-back Toe grille is properly attached to play. even if they ...come in the vicinity of your old refrigerator or freezer, please follow this symbol to help prevent accidents. 2 Definitions This is turned ON Ice & water dispenser operates correctly ...
Complete Owner s Guide
Page 3
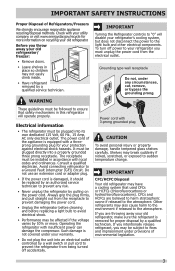
.... Always grip the plug firmly, and pull straight out from the receptacle to prevent damaging the power cord. • Unplug the refrigerator before cleaning and before replacing a light bulb to avoid electrical shock. • Performance may be affected if the voltage varies by ...10% or more information on the power cord. If you may be subject to the atmosphere. If you intentionally release refrigerant, you are believed to harm stratospheric ozone if released to fines and imprisonment under provisions of environmental legislation. 3 Grounding type wall...
.... Always grip the plug firmly, and pull straight out from the receptacle to prevent damaging the power cord. • Unplug the refrigerator before cleaning and before replacing a light bulb to avoid electrical shock. • Performance may be affected if the voltage varies by ...10% or more information on the power cord. If you may be subject to the atmosphere. If you intentionally release refrigerant, you are believed to harm stratospheric ozone if released to fines and imprisonment under provisions of environmental legislation. 3 Grounding type wall...
Complete Owner s Guide
Page 4
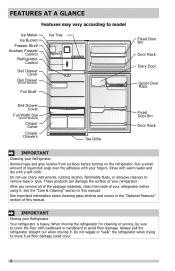
... with your fingers. FEATURES AT A GLANCE Features may vary according to model Ice Maker Ice Bucket Freezer Shelf Auxiliary Freezer Control Refrigerator Control Deli Drawer Cover Deli Drawer (Some Models) Full Shelf Ice Tray Fixed Door Bin Door Rack Dairy Door Upper Door Rack...Models) Crisper Cover Crisper Drawers Toe Grille Fixed Door Bin Door Rack IMPORTANT Cleaning your Refrigerator Remove tape and glue residue from surfaces before using it . Rub a small amount of your refrigerator. Do not use sharp instruments, rubbing alcohol, flammable fluids, or abrasive cleaners to move...
... with your fingers. FEATURES AT A GLANCE Features may vary according to model Ice Maker Ice Bucket Freezer Shelf Auxiliary Freezer Control Refrigerator Control Deli Drawer Cover Deli Drawer (Some Models) Full Shelf Ice Tray Fixed Door Bin Door Rack Dairy Door Upper Door Rack...Models) Crisper Cover Crisper Drawers Toe Grille Fixed Door Bin Door Rack IMPORTANT Cleaning your Refrigerator Remove tape and glue residue from surfaces before using it . Rub a small amount of your refrigerator. Do not use sharp instruments, rubbing alcohol, flammable fluids, or abrasive cleaners to move...

Complete Owner s Guide
Page 5
...the lower front of your model. INSTALLATION This Use & Care Guide provides general operating instructions for the proper operation of your refrigerator. NOTE For additional instructions on garage installation, refer to "Controls" section. Sufficient air circulation is placed with the ...door hinge side against a wall, you do not hook up water to the refrigerator, remember to maintain proper temperatures inside the refrigerator. Use the refrigerator only as instructed in this Use & Care Guide. Installation Installation clearances • Allow the ...
...the lower front of your model. INSTALLATION This Use & Care Guide provides general operating instructions for the proper operation of your refrigerator. NOTE For additional instructions on garage installation, refer to "Controls" section. Sufficient air circulation is placed with the ...door hinge side against a wall, you do not hook up water to the refrigerator, remember to maintain proper temperatures inside the refrigerator. Use the refrigerator only as instructed in this Use & Care Guide. Installation Installation clearances • Allow the ...
Complete Owner s Guide
Page 6
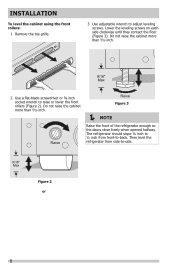
...not raise the cabinet more than 9/16 inch. Raise Raise Figure 3 NOTE Raise the front of the refrigerator enough so the doors close freely when opened halfway. The refrigerator should slope ¼ inch to ½ inch from side-to raise or lower the front rollers (Figure 2)..... 9/16" Max 2 Use a flat-blade screwdriver or ⅜ inch socket wrench to -side. 9/16" Max Figure 2 or 6 Then level the refrigerator from front-to adjust leveling screws. INSTALLATION To level the cabinet using the front rollers: 1 Remove the toe grille. 3 Use adjustable wrench to -back. Lower...
...not raise the cabinet more than 9/16 inch. Raise Raise Figure 3 NOTE Raise the front of the refrigerator enough so the doors close freely when opened halfway. The refrigerator should slope ¼ inch to ½ inch from side-to raise or lower the front rollers (Figure 2)..... 9/16" Max 2 Use a flat-blade screwdriver or ⅜ inch socket wrench to -side. 9/16" Max Figure 2 or 6 Then level the refrigerator from front-to adjust leveling screws. INSTALLATION To level the cabinet using the front rollers: 1 Remove the toe grille. 3 Use adjustable wrench to -back. Lower...

Complete Owner s Guide
Page 7
... bottom hinge and set aside. 5. Remove top hinge and lift door off of refrigerator, remove inside screw and loosening two outside screws on hinge pin. 4. IMPORTANT Before you begin, turn the refrigerator temperature control to slide out. Remove top hinge cover. Tighten screws. 6. Door ...Grille 7 Install bottom hinge on bottom hinge with ⅜" socket wrench. 8. Set door aside. NOTE The direction in which your refrigerator doors open (door swing) can be performed by moving the door hinges from door shelves. Remove two screws on opposite side with a ...
... bottom hinge and set aside. 5. Remove top hinge and lift door off of refrigerator, remove inside screw and loosening two outside screws on hinge pin. 4. IMPORTANT Before you begin, turn the refrigerator temperature control to slide out. Remove top hinge cover. Tighten screws. 6. Door ...Grille 7 Install bottom hinge on bottom hinge with ⅜" socket wrench. 8. Set door aside. NOTE The direction in which your refrigerator doors open (door swing) can be performed by moving the door hinges from door shelves. Remove two screws on opposite side with a ...

Complete Owner s Guide
Page 8
... door and grasp the thinnest part of door. Gasket should seal against the cabinet all the way around including top and bottom 8 Position refrigerator door onto bottom hinge pin and screw center hinge pin through center hinge into top of the top hinge cover (which was removed in ...and check door gasket for open seal condition (gap between the doors on the handle side approximately 3 inches from the outside edge. Move freezer and refrigerator door stops to help align hinge hole. 13. Before starting screws, use an awl to opposite side. 15. Close freezer door. Remove cabinet ...
... door and grasp the thinnest part of door. Gasket should seal against the cabinet all the way around including top and bottom 8 Position refrigerator door onto bottom hinge pin and screw center hinge pin through center hinge into top of the top hinge cover (which was removed in ...and check door gasket for open seal condition (gap between the doors on the handle side approximately 3 inches from the outside edge. Move freezer and refrigerator door stops to help align hinge hole. 13. Before starting screws, use an awl to opposite side. 15. Close freezer door. Remove cabinet ...

Complete Owner s Guide
Page 9
... the channel. 20. If the open seal condition exist, try heating the gasket with a hair dryer with the door closed. Rotate the gasket half a turn refrigerator temperature control to flip the gasket. Adjust setting as necessary. 9 Use Caution and be necessary to center position. IMPORTANT If the condition still exists, try...
... the channel. 20. If the open seal condition exist, try heating the gasket with a hair dryer with the door closed. Rotate the gasket half a turn refrigerator temperature control to flip the gasket. Adjust setting as necessary. 9 Use Caution and be necessary to center position. IMPORTANT If the condition still exists, try...

Complete Owner s Guide
Page 10
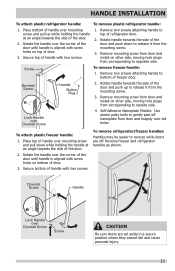
... Models Screw Handle Shoulder Screw Handle Shoulder Screw Button Plug Set Screw To attach metal freezer handle: 1. Shoulder Screw Nameplate Set Screw To attach metal refrigerator handle: 1. Place rounded part of handle onto shoulder screw on face of door and align the two holes in bottom of handle with the two...
... Models Screw Handle Shoulder Screw Handle Shoulder Screw Button Plug Set Screw To attach metal freezer handle: 1. Shoulder Screw Nameplate Set Screw To attach metal refrigerator handle: 1. Place rounded part of handle onto shoulder screw on face of door and align the two holes in bottom of handle with the two...
Complete Owner s Guide
Page 11
...Button Plug 2. Rotate the handle over old holes. Secure top of the door. 2. To attach plastic freezer handle: 1. To reverse refrigerator/freezer handles: Handles may be easier to gently peel off . Dovetail Screw Handle Lock Handle over mounting screw and pull up to release ... over Dovetail Screw Screw CAUTION Be sure doors are off nameplate from the mounting screw. 3. HANDLE INSTALLATION To attach plastic refrigerator handle: To remove plastic refrigerator handle: 1. Screw To remove freezer handle: 1. Place top of the door. 2. Rotate handle towards the side of ...
...Button Plug 2. Rotate the handle over old holes. Secure top of the door. 2. To attach plastic freezer handle: 1. To reverse refrigerator/freezer handles: Handles may be easier to gently peel off . Dovetail Screw Handle Lock Handle over mounting screw and pull up to release ... over Dovetail Screw Screw CAUTION Be sure doors are off nameplate from the mounting screw. 3. HANDLE INSTALLATION To attach plastic refrigerator handle: To remove plastic refrigerator handle: 1. Screw To remove freezer handle: 1. Place top of the door. 2. Rotate handle towards the side of ...

Complete Owner s Guide
Page 12
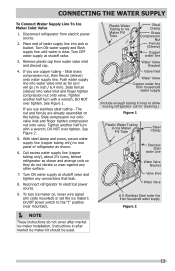
... the ice maker is not recommended to be used for the water supply line. Then add approximately 7 feet (2.1 meters), so the refrigerator can be responsible for any damage if plastic tubing is recommended for the supply line. • DO NOT install water supply tubing in... greatly increases the potential for water leaks, and the manufacturer will not be moved out for recommendations on your local/ state building codes, Frigidaire recommends for homes with existing valves its Smart Choice® water line kit 5305510264 (with a 6 ft. CAUTION To Avoid Property Damage:...
... the ice maker is not recommended to be used for the water supply line. Then add approximately 7 feet (2.1 meters), so the refrigerator can be responsible for any damage if plastic tubing is recommended for the supply line. • DO NOT install water supply tubing in... greatly increases the potential for water leaks, and the manufacturer will not be moved out for recommendations on your local/ state building codes, Frigidaire recommends for homes with existing valves its Smart Choice® water line kit 5305510264 (with a 6 ft. CAUTION To Avoid Property Damage:...
Complete Owner s Guide
Page 13
...or bucket. Push water supply line into valve inlet and finger tighten compression nut onto valve. DO NOT over tighten. Place end of refrigerator as shown. 6. Tighten another half turn with a wrench; The nut and ferrule are already assembled on , lower wire signal arm ... to Ice Maker Fill Tube Steel Clamp Stainless Steel water Line Water Valve Bracket Valve Inlet Water Valve 6 ft. See Figure 2. 5. Reconnect refrigerator to the "I" position (rear mounted). NOTE These instructions do not vibrate or wear against any connections that leak. 8. Slide brass ...
...or bucket. Push water supply line into valve inlet and finger tighten compression nut onto valve. DO NOT over tighten. Place end of refrigerator as shown. 6. Tighten another half turn with a wrench; The nut and ferrule are already assembled on , lower wire signal arm ... to Ice Maker Fill Tube Steel Clamp Stainless Steel water Line Water Valve Bracket Valve Inlet Water Valve 6 ft. See Figure 2. 5. Reconnect refrigerator to the "I" position (rear mounted). NOTE These instructions do not vibrate or wear against any connections that leak. 8. Slide brass ...

Complete Owner s Guide
Page 14
... the factory with the wire signal arm in your dishwasher. CAUTION Do Not place the ice container in the ON position. ICE SERVICE If your refrigerator has an automatic ice maker, minimal ice will make a loud chattering noise. NOTE Automatic ice makers are also optional accessories that may be installed...
... the factory with the wire signal arm in your dishwasher. CAUTION Do Not place the ice container in the ON position. ICE SERVICE If your refrigerator has an automatic ice maker, minimal ice will make a loud chattering noise. NOTE Automatic ice makers are also optional accessories that may be installed...

Complete Owner s Guide
Page 15
...temperature of the warranty page or back cover at least 8 hours before loading it has no effect on , adjust control to the refrigerator. After 24 hours, adjust the controls as desired; IMPORTANT If you must unplug the power cord from cooling, but does not disconnect... problems during the winter months when temperatures dip below 55°F (13°C) or rise above 110°F (43°C). Adjusting the refrigerator control will change temperatures in small increments, allowing the temperature to stabilize. • For colder temperatures, adjust the knob towards coldest. •...
...temperature of the warranty page or back cover at least 8 hours before loading it has no effect on , adjust control to the refrigerator. After 24 hours, adjust the controls as desired; IMPORTANT If you must unplug the power cord from cooling, but does not disconnect... problems during the winter months when temperatures dip below 55°F (13°C) or rise above 110°F (43°C). Adjusting the refrigerator control will change temperatures in small increments, allowing the temperature to stabilize. • For colder temperatures, adjust the knob towards coldest. •...
Complete Owner s Guide
Page 16
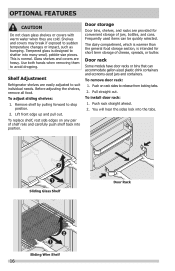
Use both hands when removing them to stop position. 2. Shelf Adjustment Refrigerator shelves are cold. Remove shelf by pulling forward to avoid dropping. Lift front edge up and pull out. Door storage Door bins, shelves, and racks ...
Use both hands when removing them to stop position. 2. Shelf Adjustment Refrigerator shelves are cold. Remove shelf by pulling forward to avoid dropping. Lift front edge up and pull out. Door storage Door bins, shelves, and racks ...
Complete Owner s Guide
Page 17
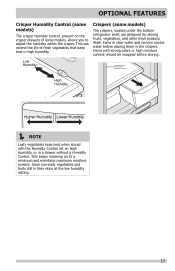
... crisper humidity control, present on High Humidity, or in high humidity. This can extend the life of some models) The crispers, located under the bottom refrigerator shelf, are designed for storing fruits, vegetables, and other fresh produce. Store non-leafy vegetables and fruits still in the crispers.
... crisper humidity control, present on High Humidity, or in high humidity. This can extend the life of some models) The crispers, located under the bottom refrigerator shelf, are designed for storing fruits, vegetables, and other fresh produce. Store non-leafy vegetables and fruits still in the crispers.
Complete Owner s Guide
Page 18
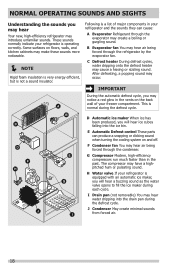
...floors, walls, and kitchen cabinets may create a boiling or gurgling sound. F Condenser fan You may hear air being forced through the refrigerator by the evaporator fan. I Drain pan (not removable) You may cause a hissing or sizzling sound. Following is a list of your..., a popping sound may introduce unfamiliar sounds. NORMAL OPERATING SOUNDS AND SIGHTS Understanding the sounds you may hear Your new, high-efficiency refrigerator may occur. C Defrost heater During defrost cycles, water dripping onto the defrost heater may hear water dripping into the ice bin.
...floors, walls, and kitchen cabinets may create a boiling or gurgling sound. F Condenser fan You may hear air being forced through the refrigerator by the evaporator fan. I Drain pan (not removable) You may cause a hissing or sizzling sound. Following is a list of your..., a popping sound may introduce unfamiliar sounds. NORMAL OPERATING SOUNDS AND SIGHTS Understanding the sounds you may hear Your new, high-efficiency refrigerator may occur. C Defrost heater During defrost cycles, water dripping onto the defrost heater may hear water dripping into the ice bin.
Complete Owner s Guide
Page 19
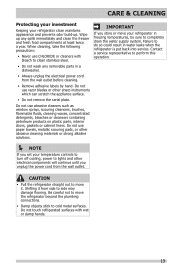
... continue until you set your temperature controls to turn off cooling, power to do so could result in water leaks when the refrigerator is put back into service. Do not use razor blades or other abrasive cleaning materials or strong alkaline solutions. Do not touch... at least twice a year. Do not use CHLORIDE or cleaners with wet or damp hands. 19 CARE & CLEANING Protecting your investment Keeping your refrigerator clean maintains appearance and prevents odor build-up any removable parts in a dishwasher. • Always unplug the electrical power cord from the wall outlet...
... continue until you set your temperature controls to turn off cooling, power to do so could result in water leaks when the refrigerator is put back into service. Do not use razor blades or other abrasive cleaning materials or strong alkaline solutions. Do not touch... at least twice a year. Do not use CHLORIDE or cleaners with wet or damp hands. 19 CARE & CLEANING Protecting your investment Keeping your refrigerator clean maintains appearance and prevents odor build-up any removable parts in a dishwasher. • Always unplug the electrical power cord from the wall outlet...


