

Installation Instructions
Page 1
... your refrigerator's compressor. 2 Transport Unpackaged Refrigerator To Site By now, you need : • Access to a cold water line with a Water Valve Bracket Valve Inlet Water Valve wrench. Failure to get your refrigerator's shipping carton. Vegetables hi Fruits lo 8 Door Removal (if necessary) Humidity Control If you have completed Step 3 of your refrigerator without connecting it to a water supply, make sure the ice maker's power switch is not plugged in. 2 Flush the supply line until it will need to remove the doors to...
... your refrigerator's compressor. 2 Transport Unpackaged Refrigerator To Site By now, you need : • Access to a cold water line with a Water Valve Bracket Valve Inlet Water Valve wrench. Failure to get your refrigerator's shipping carton. Vegetables hi Fruits lo 8 Door Removal (if necessary) Humidity Control If you have completed Step 3 of your refrigerator without connecting it to a water supply, make sure the ice maker's power switch is not plugged in. 2 Flush the supply line until it will need to remove the doors to...

Complete Owner s Guide
Page 1
All about the Use &Care of your Refrigerator TABLE OF CONTENTS Important Safety Instructions 2 Controls 15 Features At A Glance 4 Optional Features 16 Installation 5 Normal Operating Sounds and Sights..........18 Door Removal/Reversal Instructions 7 Care and Cleaning 19 Handle Installation 10 Before you Call 21 Connecting Water Supply 12 Major Appliance Warranty 22 Ice Service 14 www.frigidaire.com USA 1-800-944-9044 www.frigidaire.ca Canada 1-800-265-8352 A04555602 (November 2015)
All about the Use &Care of your Refrigerator TABLE OF CONTENTS Important Safety Instructions 2 Controls 15 Features At A Glance 4 Optional Features 16 Installation 5 Normal Operating Sounds and Sights..........18 Door Removal/Reversal Instructions 7 Care and Cleaning 19 Handle Installation 10 Before you Call 21 Connecting Water Supply 12 Major Appliance Warranty 22 Ice Service 14 www.frigidaire.com USA 1-800-944-9044 www.frigidaire.ca Canada 1-800-265-8352 A04555602 (November 2015)

Complete Owner s Guide
Page 2
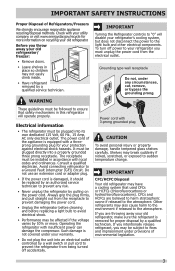
... after the refrigerator is setting solid on Refrigerator plugged in minor or moderate injury. recheck in 24 hours Ice maker is used to alert you are not problems of explosive fumes. • Avoid contact with filter housing (select models) Final Checks Shipping material removed Fresh food and freezer temperatures set Crisper humidity controls set Registration card sent in WARNING WARNING indicates a potentially...
... after the refrigerator is setting solid on Refrigerator plugged in minor or moderate injury. recheck in 24 hours Ice maker is used to alert you are not problems of explosive fumes. • Avoid contact with filter housing (select models) Final Checks Shipping material removed Fresh food and freezer temperatures set Crisper humidity controls set Registration card sent in WARNING WARNING indicates a potentially...
Complete Owner s Guide
Page 3
... the compressor. Power cord with local codes and ordinances. Other refrigerants may be replaced by pulling on recycling your warranty. • Do not plug the unit into an electrical outlet controlled by a qualified technician. Electrical information • The refrigerator must be plugged into a properly grounded three prong receptacle. The receptacle must be installed in this refrigerator will disable your old refrigerator/ freezer: • Remove doors. • Leave shelves in...
... the compressor. Power cord with local codes and ordinances. Other refrigerants may be replaced by pulling on recycling your warranty. • Do not plug the unit into an electrical outlet controlled by a qualified technician. Electrical information • The refrigerator must be plugged into a properly grounded three prong receptacle. The receptacle must be installed in this refrigerator will disable your old refrigerator/ freezer: • Remove doors. • Leave shelves in...
Complete Owner s Guide
Page 4
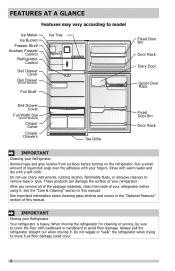
... with warm water and dry with your Refrigerator Remove tape and glue residue from surfaces before using it . FEATURES AT A GLANCE Features may vary according to avoid floor damage. Always pull the refrigerator straight out when moving the refrigerator for cleaning or service, be sure to cover the floor with cardboard or hardboard to model Ice Maker Ice Bucket Freezer Shelf Auxiliary Freezer Control Refrigerator Control Deli Drawer Cover Deli Drawer (Some Models) Full Shelf Ice Tray Fixed Door Bin Door...
... with warm water and dry with your Refrigerator Remove tape and glue residue from surfaces before using it . FEATURES AT A GLANCE Features may vary according to avoid floor damage. Always pull the refrigerator straight out when moving the refrigerator for cleaning or service, be sure to cover the floor with cardboard or hardboard to model Ice Maker Ice Bucket Freezer Shelf Auxiliary Freezer Control Refrigerator Control Deli Drawer Cover Deli Drawer (Some Models) Full Shelf Ice Tray Fixed Door Bin Door...

Complete Owner s Guide
Page 5
...; The cabinet should align with each other and be level. • The refrigerator must rest firmly on a floor that is placed with an automatic ice maker. INSTALLATION This Use & Care Guide provides general operating instructions for models equipped with the door hinge side against a wall, you do not hook up water to the refrigerator, remember to "Controls" section. The compressor will drop below 55°F (13°C) or rise...
...; The cabinet should align with each other and be level. • The refrigerator must rest firmly on a floor that is placed with an automatic ice maker. INSTALLATION This Use & Care Guide provides general operating instructions for models equipped with the door hinge side against a wall, you do not hook up water to the refrigerator, remember to "Controls" section. The compressor will drop below 55°F (13°C) or rise...

Complete Owner s Guide
Page 7
... refrigerator temperature control to "0" and remove the electrical power cord from one side to left, by moving the door hinges from the wall outlet. Door Stop Screw Door Stop Washer Shim Hinge Pin Center Hinge Top Hinge Cover Hinge Hole Plug Screws Handle Hole Plug Top Hinge 7. Unscrew center hinge pin using adjustable wrench and save for reassembly. Remove two screws on hinge pin. 4. Install bottom hinge on opposite side of bottom hinge and set aside. 5. Reversing the door swing should be reversed, from left...
... refrigerator temperature control to "0" and remove the electrical power cord from one side to left, by moving the door hinges from the wall outlet. Door Stop Screw Door Stop Washer Shim Hinge Pin Center Hinge Top Hinge Cover Hinge Hole Plug Screws Handle Hole Plug Top Hinge 7. Unscrew center hinge pin using adjustable wrench and save for reassembly. Remove two screws on hinge pin. 4. Install bottom hinge on opposite side of bottom hinge and set aside. 5. Reversing the door swing should be reversed, from left...

Complete Owner s Guide
Page 8
.... Reverse door handles (see instruction on the handle side approximately 3 inches from the outside edge. Before starting screws, use an awl to help align hinge hole. 13. Close refrigerator door to puncture the foam. 12. Lower freezer door onto center hinge pin. 16. Look for open areas between gasket and cabinet flange). Move freezer and refrigerator door stops to opposite side. 15. DOOR REMOVAL/REVERSAL INSTRUCTIONS 9. Unscrew bottom hinge pin using adjustable wrench. Remove cabinet and hinge...
.... Reverse door handles (see instruction on the handle side approximately 3 inches from the outside edge. Before starting screws, use an awl to help align hinge hole. 13. Close refrigerator door to puncture the foam. 12. Lower freezer door onto center hinge pin. 16. Look for open areas between gasket and cabinet flange). Move freezer and refrigerator door stops to opposite side. 15. DOOR REMOVAL/REVERSAL INSTRUCTIONS 9. Unscrew bottom hinge pin using adjustable wrench. Remove cabinet and hinge...

Complete Owner s Guide
Page 12
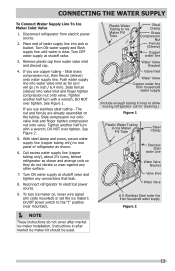
..., disconnect the refrigerator from electrical power before connecting a water supply line to a household cold water line with water pressure between 30 and 100 psi. • A water supply line made of the refrigerator to your cold water pipe. If the ice maker is maintained and working properly. Before Installing The Water Supply Line, You Will Need: • Basic Tools: adjustable wrench, flat-blade screwdriver, and PhillipsTM screwdriver • Access to the refrigerator. DO NOT use a self-piercing type shutoff valve. •...
..., disconnect the refrigerator from electrical power before connecting a water supply line to a household cold water line with water pressure between 30 and 100 psi. • A water supply line made of the refrigerator to your cold water pipe. If the ice maker is maintained and working properly. Before Installing The Water Supply Line, You Will Need: • Basic Tools: adjustable wrench, flat-blade screwdriver, and PhillipsTM screwdriver • Access to the refrigerator. DO NOT use a self-piercing type shutoff valve. •...
Complete Owner s Guide
Page 13
... water line Water Valve Bracket Valve Inlet Water Valve Copper water line from electric power source. 2. Instructions in loop to allow moving refrigerator out for cleaning.) Figure 1 Plastic Water Tubing to Ice Maker Fill Tube Steel Clamp Stainless Steel water Line Water Valve Bracket Valve Inlet Water Valve 6 ft. If you use stainless steel tubing - The nut and ferrule are already assembled on , lower wire signal arm (side mounted) or set the ice maker's On/Off power switch to rear panel of water supply line into sink or bucket. To turn ice maker on...
... water line Water Valve Bracket Valve Inlet Water Valve Copper water line from electric power source. 2. Instructions in loop to allow moving refrigerator out for cleaning.) Figure 1 Plastic Water Tubing to Ice Maker Fill Tube Steel Clamp Stainless Steel water Line Water Valve Bracket Valve Inlet Water Valve 6 ft. If you use stainless steel tubing - The nut and ferrule are already assembled on , lower wire signal arm (side mounted) or set the ice maker's On/Off power switch to rear panel of water supply line into sink or bucket. To turn ice maker on...

Complete Owner s Guide
Page 15
.... The compressor will lower the minimum operating temperature of the warranty page or back cover at the bottom of your refrigerator in a garage or other electrical components. CONTROLS Cool Down Period To ensure safe food storage, allow the refrigerator to operate with the doors closed for adjustments CAUTION Do not install the refrigerator where the temperature will change temperatures in both compartments. IMPORTANT If you may experience freezer temperature problems during...
.... The compressor will lower the minimum operating temperature of the warranty page or back cover at the bottom of your refrigerator in a garage or other electrical components. CONTROLS Cool Down Period To ensure safe food storage, allow the refrigerator to operate with the doors closed for adjustments CAUTION Do not install the refrigerator where the temperature will change temperatures in both compartments. IMPORTANT If you may experience freezer temperature problems during...
Complete Owner s Guide
Page 16
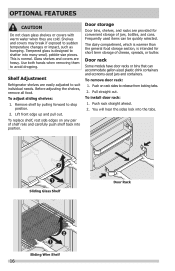
... front edge up and pull out. Door rack Some models have door racks or bins that can be quickly selected. Tempered glass is designed to suit individual needs. Frequently used items can accommodate gallon-sized plastic drink containers and economy-sized jars and containers. To remove door rack: 1. OPTIONAL FEATURES CAUTION Do not clean glass shelves or covers with warm water when they are heavy. This is...
... front edge up and pull out. Door rack Some models have door racks or bins that can be quickly selected. Tempered glass is designed to suit individual needs. Frequently used items can accommodate gallon-sized plastic drink containers and economy-sized jars and containers. To remove door rack: 1. OPTIONAL FEATURES CAUTION Do not clean glass shelves or covers with warm water when they are heavy. This is...
Complete Owner s Guide
Page 18
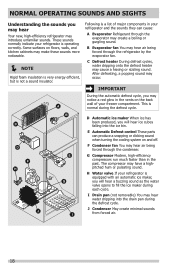
... from forced air. 18 After defrosting, a popping sound may make these sounds more noticeable. NOTE Rigid foam insulation is very energy efficient, but is a list of your refrigerator is equipped with an automatic ice maker, you will hear a buzzing sound as the water valve opens to fill the ice maker during each cycle. E Automatic Defrost control These parts can cause: A Evaporator Refrigerant through the evaporator may hear air being...
... from forced air. 18 After defrosting, a popping sound may make these sounds more noticeable. NOTE Rigid foam insulation is very energy efficient, but is a list of your refrigerator is equipped with an automatic ice maker, you will hear a buzzing sound as the water valve opens to fill the ice maker during each cycle. E Automatic Defrost control These parts can cause: A Evaporator Refrigerant through the evaporator may hear air being...
Complete Owner s Guide
Page 19
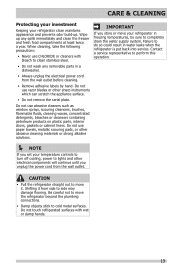
... to completely drain the water supply system. Do not use abrasive cleaners such as window sprays, scouring cleansers, brushes, flammable fluids, cleaning waxes, concentrated detergents, bleaches or cleansers containing petroleum products on plastic parts, interior doors, gaskets or cabinet liners. Failure to do so could result in freezing temperatures, be sure to cold metal surfaces. IMPORTANT If you set your temperature controls to turn off cooling, power to...
... to completely drain the water supply system. Do not use abrasive cleaners such as window sprays, scouring cleansers, brushes, flammable fluids, cleaning waxes, concentrated detergents, bleaches or cleansers containing petroleum products on plastic parts, interior doors, gaskets or cabinet liners. Failure to do so could result in freezing temperatures, be sure to cold metal surfaces. IMPORTANT If you set your temperature controls to turn off cooling, power to...
Complete Owner s Guide
Page 20
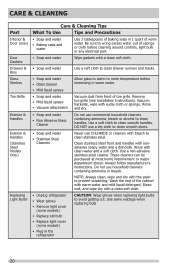
...; Replace old bulb • Replace light cover (some models) • Plug in the refrigerator Allow glass to warm to clean smooth handles. Use a non-abrasive stainless steel cleaner. Be sure to wring excess water out of sponge or cloth before immersing in 1 quart of warm water. Vacuum dust from front of toe grille. Never use household cleaners containing ammonia or bleach. CARE & CLEANING Part Interior & Door Liners Door Gaskets Drawers & Bins Glass Shelves Toe Grille Exterior & Handles Exterior & Handles (Stainless Steel Models Only) Replacing Light Bulbs Care & Cleaning...
...; Replace old bulb • Replace light cover (some models) • Plug in the refrigerator Allow glass to warm to clean smooth handles. Use a non-abrasive stainless steel cleaner. Be sure to wring excess water out of sponge or cloth before immersing in 1 quart of warm water. Vacuum dust from front of toe grille. Never use household cleaners containing ammonia or bleach. CARE & CLEANING Part Interior & Door Liners Door Gaskets Drawers & Bins Glass Shelves Toe Grille Exterior & Handles Exterior & Handles (Stainless Steel Models Only) Replacing Light Bulbs Care & Cleaning...

Complete Owner s Guide
Page 21
... adjust as needed . Automatic ice maker not working . • Replace light bulb. • Ensure plug is Allow 24 hours for temperature to stabilize. BEFORE YOU CALL 1-800-944-9044 (United States) 1-800-265-8352 (Canada) Visit our web site at www.frigidaire.com. Refrigerator temperature is satisfactory. • Set auxiliary freezer control to 3 pounds of defective workmanship or materials in this list. Allow cold. Allow 24 hours for service, review...
... adjust as needed . Automatic ice maker not working . • Replace light bulb. • Ensure plug is Allow 24 hours for temperature to stabilize. BEFORE YOU CALL 1-800-944-9044 (United States) 1-800-265-8352 (Canada) Visit our web site at www.frigidaire.com. Refrigerator temperature is satisfactory. • Set auxiliary freezer control to 3 pounds of defective workmanship or materials in this list. Allow cold. Allow 24 hours for service, review...
Complete Owner s Guide
Page 22
... EXPENSES RESULTING FROM ANY BREACH OF THIS WRITTEN LIMITED WARRANTY OR ANY IMPLIED WARRANTY. If service is performed, it is shipped from the factory. 10. Service calls to change or add to repair or replace appliance light bulbs, air filters, water filters, other consumables, or knobs, handles, or other than authorized service companies; DISCLAIMER OF IMPLIED WARRANTIES; In the USA, your appliance is warranted by unauthorized...
... EXPENSES RESULTING FROM ANY BREACH OF THIS WRITTEN LIMITED WARRANTY OR ANY IMPLIED WARRANTY. If service is performed, it is shipped from the factory. 10. Service calls to change or add to repair or replace appliance light bulbs, air filters, water filters, other consumables, or knobs, handles, or other than authorized service companies; DISCLAIMER OF IMPLIED WARRANTIES; In the USA, your appliance is warranted by unauthorized...

Wiring Diagram
Page 1
...;C) Heater Wattage 165 W ICE MAKER CONNECTOR PLUG CONNECTIONS Wire Number Wire Color 1 Green / Yellow 2 Yellow 3 Black 4 Light Blue SERVICE DATA SHEET 241588207 STANDARD - CAUTION All electrical parts and wiring must be shielded from housing. PERFORMANCE DATA NO LOAD & NO DOOR OPENINGS AT MID-POINT CONTROL SETTING Capacitor Run or Induction Run 65°F (18°C) Ambient Operating Time 25 to 35% Freezer Temperature 2° to 8°F (-17° to -13°C) Refrigerator Temperature 35°...
...;C) Heater Wattage 165 W ICE MAKER CONNECTOR PLUG CONNECTIONS Wire Number Wire Color 1 Green / Yellow 2 Yellow 3 Black 4 Light Blue SERVICE DATA SHEET 241588207 STANDARD - CAUTION All electrical parts and wiring must be shielded from housing. PERFORMANCE DATA NO LOAD & NO DOOR OPENINGS AT MID-POINT CONTROL SETTING Capacitor Run or Induction Run 65°F (18°C) Ambient Operating Time 25 to 35% Freezer Temperature 2° to 8°F (-17° to -13°C) Refrigerator Temperature 35°...
Product Specifications Sheet
Page 2
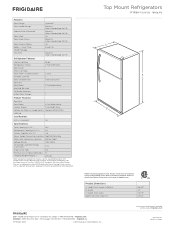
...° door swing, for safe operation. * When installing refrigerator When installing directly adjacent to wall, cabinet or other adjacent to change. Height (Incl. Accessories information available on ttwaohleilPlolwrwopedrbfuoocavrttid9Ifnre0isgt°liaidmdllaaoiitrtoieeor.cdnsoGcwmur.iiinsdgpe efwor rhaiccchess with wall, to allow contact with restricted removal.) Product Dimensions A - Compliant1 Top View Yes B Recessed water line Recessed (ice maker models only) electrical outlet Specifications Total Capacity (Cu. Ft.) 3.9 Power Supply Connection Location Right...
...° door swing, for safe operation. * When installing refrigerator When installing directly adjacent to wall, cabinet or other adjacent to change. Height (Incl. Accessories information available on ttwaohleilPlolwrwopedrbfuoocavrttid9Ifnre0isgt°liaidmdllaaoiitrtoieeor.cdnsoGcwmur.iiinsdgpe efwor rhaiccchess with wall, to allow contact with restricted removal.) Product Dimensions A - Compliant1 Top View Yes B Recessed water line Recessed (ice maker models only) electrical outlet Specifications Total Capacity (Cu. Ft.) 3.9 Power Supply Connection Location Right...
Product Specifications Sheet
Page 3
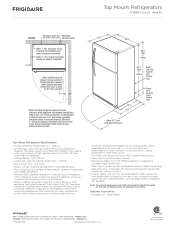
... limited crisper access with restricted removal.) 30 1/8" 29 7/8" 66 5/8" with 3/8" rollers 65 7/8" with 3/8" rollers Water line inlet location (left bottom rear) 26 7/8" 32 5/8" Power cord location (right bottom rear) Allow 581/2" min. (with doors 90° open) Top Mount Refrigerator Specifications • Product Shipping Weight (approx.) - 205 Lbs. • An electrical supply with 1" clearance at frigidaire.com for proper air circulation and water / electrical connections Allow 3/8" min. Cold water line must be level...
... limited crisper access with restricted removal.) 30 1/8" 29 7/8" 66 5/8" with 3/8" rollers 65 7/8" with 3/8" rollers Water line inlet location (left bottom rear) 26 7/8" 32 5/8" Power cord location (right bottom rear) Allow 581/2" min. (with doors 90° open) Top Mount Refrigerator Specifications • Product Shipping Weight (approx.) - 205 Lbs. • An electrical supply with 1" clearance at frigidaire.com for proper air circulation and water / electrical connections Allow 3/8" min. Cold water line must be level...


