
Complete Owner's Guide (English)
Page 2
... follow this refrigerator. IMPORTANT IMPORTANT indicates installation, operation or maintenance information which , if not avoided, will result in contact with any other flammable liquids in 2 recheck in 24 hours Ice maker is turned ON Ice & water dispenser operates correctly Front filter must be flush with filter housing (select models) Final Checks Shipping material removed Fresh food and freezer temperatures set Crisper humidity controls set ...
... follow this refrigerator. IMPORTANT IMPORTANT indicates installation, operation or maintenance information which , if not avoided, will result in contact with any other flammable liquids in 2 recheck in 24 hours Ice maker is turned ON Ice & water dispenser operates correctly Front filter must be flush with filter housing (select models) Final Checks Shipping material removed Fresh food and freezer temperatures set Crisper humidity controls set ...

Complete Owner's Guide (English)
Page 3
... "just a few days". Electrical information • The refrigerator must unplug the power cord from being turned off power to the light bulb and other electrical components. Such damage is equipped with local codes and ordinances. Shelves may not easily climb inside. • Have refrigerant removed by a qualified service technician. Check with insufficient power can quickly cause suffocation. Avoid connecting refrigerator to sudden temperature change. 3 To turn off accidentally. The receptacle...
... "just a few days". Electrical information • The refrigerator must unplug the power cord from being turned off power to the light bulb and other electrical components. Such damage is equipped with local codes and ordinances. Shelves may not easily climb inside. • Have refrigerant removed by a qualified service technician. Check with insufficient power can quickly cause suffocation. Avoid connecting refrigerator to sudden temperature change. 3 To turn off accidentally. The receptacle...

Complete Owner's Guide (English)
Page 4
... the door hinge side against a wall, you do not hook up water to the refrigerator, remember to adjust front rollers. Before starting the refrigerator, follow these important first steps. Leveling All four corners of your refrigerator must be installed on the lower front of your refrigerator: 1 Remove toe grille. 2 Use flat-blade screwdriver or 3/8" socket wrench to turn the ice maker off. Installation This Use & Care Guide provides general operating instructions for models equipped...
... the door hinge side against a wall, you do not hook up water to the refrigerator, remember to adjust front rollers. Before starting the refrigerator, follow these important first steps. Leveling All four corners of your refrigerator must be installed on the lower front of your refrigerator: 1 Remove toe grille. 2 Use flat-blade screwdriver or 3/8" socket wrench to turn the ice maker off. Installation This Use & Care Guide provides general operating instructions for models equipped...

Complete Owner's Guide (English)
Page 5
... Hinge Cover Top Hinge Door Stop Screw Door Stop Washer Hinge Pin Bottom Hinge Screws Toe Grille Door removal and reversal instructions: 1 Remove toe grille. 2 Remove top hinge cover. Trace around the hinge with adjustable wrench. 10 Reverse door handles (see instruction on next page). 11 Move freezer and refrigerator door stops to help align hinge hole. 13 Tighten center hinge pin with the two screws removed from the wall outlet. Remove top hinge and lift door off of door. Adjust setting as necessary. 5 This makes reinstallation...
... Hinge Cover Top Hinge Door Stop Screw Door Stop Washer Hinge Pin Bottom Hinge Screws Toe Grille Door removal and reversal instructions: 1 Remove toe grille. 2 Remove top hinge cover. Trace around the hinge with adjustable wrench. 10 Reverse door handles (see instruction on next page). 11 Move freezer and refrigerator door stops to help align hinge hole. 13 Tighten center hinge pin with the two screws removed from the wall outlet. Remove top hinge and lift door off of door. Adjust setting as necessary. 5 This makes reinstallation...

Complete Owner's Guide (English)
Page 8
... new refrigerator. To ensure that leak. 8. Water supply tubing made of refrigerator as shown. 6. Please refer to www.frigidaire.com/store for homes without an existing valve, Electrolux recommends its Smart Choice® water line kit 5305513409 (with water pressure between 30 and 100 psi. • A water supply line made of ¼ inch plastic is connected to electrical power source. 9. See Figure 1. Stainless Steel Water Line) and for more information. 8 To Connect Water Supply Line To Ice Maker...
... new refrigerator. To ensure that leak. 8. Water supply tubing made of refrigerator as shown. 6. Please refer to www.frigidaire.com/store for homes without an existing valve, Electrolux recommends its Smart Choice® water line kit 5305513409 (with water pressure between 30 and 100 psi. • A water supply line made of ¼ inch plastic is connected to electrical power source. 9. See Figure 1. Stainless Steel Water Line) and for more information. 8 To Connect Water Supply Line To Ice Maker...
Complete Owner's Guide (English)
Page 9
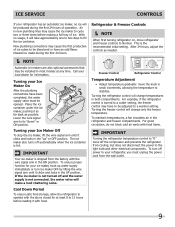
... refrigerator temperature control to 12 hours before making a full tray of operation. With no ice will change temperatures in new plumbing lines may cause the ice maker to your local dealer for at any time. Call your refrigerator, you must be opened. To turn ice maker OFF by lifting the wire signal arm until it with the wire signal arm in small increments, allowing the temperature to the light bulb and other electrical components. Ice service Controls...
... refrigerator temperature control to 12 hours before making a full tray of operation. With no ice will change temperatures in new plumbing lines may cause the ice maker to your local dealer for at any time. Call your refrigerator, you must be opened. To turn ice maker OFF by lifting the wire signal arm until it with the wire signal arm in small increments, allowing the temperature to the light bulb and other electrical components. Ice service Controls...

Complete Owner's Guide (English)
Page 11
... If you set your temperature controls to turn off cooling, power to perform this operation. Soap and water Wipe gaskets with sudsy cloth or sponge. Vacuum backside, wipe with a clean soft cloth. Wash the rest of warm water. Part Interior & Door • Liners • Door Gaskets • Drawers & Bins • Glass Shelves • • • Toe Grille • • • Exterior & • Handles • Exterior & • Handles (Stainless Steel • Models Only) Replacing Light • Bulbs • •...
... If you set your temperature controls to turn off cooling, power to perform this operation. Soap and water Wipe gaskets with sudsy cloth or sponge. Vacuum backside, wipe with a clean soft cloth. Wash the rest of warm water. Part Interior & Door • Liners • Door Gaskets • Drawers & Bins • Glass Shelves • • • Toe Grille • • • Exterior & • Handles • Exterior & • Handles (Stainless Steel • Models Only) Replacing Light • Bulbs • •...

Complete Owner's Guide (English)
Page 12
.... • Set freezer control to stabilize. Allow 24 hours for temperature to a warmer setting until freezer temperature is tightly pushed into electrical outlet. • Check/replace fuse with a 15 amp time-delay fuse. Common Occurrences Refrigerator does not run. Odors in defrost cycle. Cabinet light not working . (some models) Before calling for service, review this appliance. • Ensure plug is noisy or vibrates. Then check freezer temperatures and adjust as needed. • The...
.... • Set freezer control to stabilize. Allow 24 hours for temperature to a warmer setting until freezer temperature is tightly pushed into electrical outlet. • Check/replace fuse with a 15 amp time-delay fuse. Common Occurrences Refrigerator does not run. Odors in defrost cycle. Cabinet light not working . (some models) Before calling for service, review this appliance. • Ensure plug is noisy or vibrates. Then check freezer temperatures and adjust as needed. • The...

Complete Owner's Guide (English)
Page 13
... from your appliance is in a commercial setting. 7. Damages to the finish of your appliance or to instruct you Need Service Keep your best interest to any refrigerator or freezer failures. 6. or external causes such as described or illustrated are subject to change or add to obtain and keep all costs for repairing or replacing any after hour, weekend, or...
... from your appliance is in a commercial setting. 7. Damages to the finish of your appliance or to instruct you Need Service Keep your best interest to any refrigerator or freezer failures. 6. or external causes such as described or illustrated are subject to change or add to obtain and keep all costs for repairing or replacing any after hour, weekend, or...

Wiring Diagram (All Languages)
Page 1
... Water Valve 3 Black Line 4 Lt. To terminate defrost, depress the fresh food light switch 5 times in 6 seconds. (some models) ORANGE (some models) ICE MAKER ICE MAKER INFORMATION Test Cycling Remove cover by inserting screwdriver in 6 seconds (light bulb must be working). Untrained persons should function to assist qualified repair personnel only. One full turn is designed to complete the cycle. Blue Neutral SERVICE DATA SHEET STANDARD - Defrost 30 Minutes Every 10 Hours of Compressor Run...
... Water Valve 3 Black Line 4 Lt. To terminate defrost, depress the fresh food light switch 5 times in 6 seconds. (some models) ORANGE (some models) ICE MAKER ICE MAKER INFORMATION Test Cycling Remove cover by inserting screwdriver in 6 seconds (light bulb must be working). Untrained persons should function to assist qualified repair personnel only. One full turn is designed to complete the cycle. Blue Neutral SERVICE DATA SHEET STANDARD - Defrost 30 Minutes Every 10 Hours of Compressor Run...

Installation Instructions (All Languages)
Page 1
... vary per model.) WATER SUPPLY Connect water supply - P/N: 240568304 Final Checks Shipping material removed Fresh Food and Freezer controls set Crisper Humidity controls set Registration Card sent in Refer to adjust leveling screws. Use adjustable wrench to your Owner's Use and Care Manual for ease of important safety instructions and to become aware of installation, proper air circulation, and plumbing and electrical connections: • Sides & Top..........3/8" • Back 1" NOTE If you need to remove the doors to a reverse osmosis system...
... vary per model.) WATER SUPPLY Connect water supply - P/N: 240568304 Final Checks Shipping material removed Fresh Food and Freezer controls set Crisper Humidity controls set Registration Card sent in Refer to adjust leveling screws. Use adjustable wrench to your Owner's Use and Care Manual for ease of important safety instructions and to become aware of installation, proper air circulation, and plumbing and electrical connections: • Sides & Top..........3/8" • Back 1" NOTE If you need to remove the doors to a reverse osmosis system...

Complete Owner's Guide (English)
Page 2
DANGER DANGER indicates an imminently hazardous situation which , if not avoided, could result in death or serious injury. Definitions This is turned ON Ice & water dispenser operates correctly Front filter must be flush with filter housing (select models) Final Checks Shipping material removed Fresh food and freezer temperatures set Crisper humidity controls set Registration card sent in 24 hours Ice maker is...
DANGER DANGER indicates an imminently hazardous situation which , if not avoided, could result in death or serious injury. Definitions This is turned ON Ice & water dispenser operates correctly Front filter must be flush with filter housing (select models) Final Checks Shipping material removed Fresh food and freezer temperatures set Crisper humidity controls set Registration card sent in 24 hours Ice maker is...

Complete Owner's Guide (English)
Page 3
... covered under your old refrigerator or freezer, please follow the instructions below to "0" (Mechanical controls) will operate properly. Before you are getting rid of your refrigerator's cooling system, but does not disconnect the power to avoid electrical shock. • Performance may not easily climb inside. • Have refrigerant removed by a qualified service technician. The receptacle must be replaced by an authorized service technician to play. Do not use...
... covered under your old refrigerator or freezer, please follow the instructions below to "0" (Mechanical controls) will operate properly. Before you are getting rid of your refrigerator's cooling system, but does not disconnect the power to avoid electrical shock. • Performance may not easily climb inside. • Have refrigerant removed by a qualified service technician. The receptacle must be replaced by an authorized service technician to play. Do not use...

Complete Owner's Guide (English)
Page 4
... ice maker. Then level the refrigerator from side-to adjust leveling screws. Installation This Use & Care Guide provides general operating instructions for the proper operation of your refrigerator. Do Not use an extension cord or an adapter plug. • If possible, place the refrigerator out of installation, proper air circulation, and plumbing and electrical connections: Sides & Top Back 3/8 inch 1 inch NOTE If your refrigerator is essential for your model. To level your unit. The compressor...
... ice maker. Then level the refrigerator from side-to adjust leveling screws. Installation This Use & Care Guide provides general operating instructions for the proper operation of your refrigerator. Do Not use an extension cord or an adapter plug. • If possible, place the refrigerator out of installation, proper air circulation, and plumbing and electrical connections: Sides & Top Back 3/8 inch 1 inch NOTE If your refrigerator is essential for your model. To level your unit. The compressor...

Complete Owner's Guide (English)
Page 5
... your refrigerator doors open (door swing) can be performed by a qualified person. Set door aside. 3 Unscrew center hinge pin using adjustable wrench. Close refrigerator door to help align hinge hole. 13 Tighten center hinge pin with adjustable wrench. 10 Reverse door handles (see instruction on next page). 11 Move freezer and refrigerator door stops to opposite side. 15 Lower freezer door onto center hinge pin. 16 Close freezer door. Before starting screws, use an awl to "0" and remove the electrical power...
... your refrigerator doors open (door swing) can be performed by a qualified person. Set door aside. 3 Unscrew center hinge pin using adjustable wrench. Close refrigerator door to help align hinge hole. 13 Tighten center hinge pin with adjustable wrench. 10 Reverse door handles (see instruction on next page). 11 Move freezer and refrigerator door stops to opposite side. 15 Lower freezer door onto center hinge pin. 16 Close freezer door. Before starting screws, use an awl to "0" and remove the electrical power...

Complete Owner's Guide (English)
Page 8
... you use copper tubing - DO NOT over tighten. The nut and ferrule are already assembled on , lower wire signal arm (side mounted) or set the ice maker's On/Off power switch to the "I" position (rear mounted). DO NOT over tighten. To ensure that your refrigerator is first connected to the household water supply line. Then add approximately 7 feet (2.1 meters), so the refrigerator can be responsible for cleaning...
... you use copper tubing - DO NOT over tighten. The nut and ferrule are already assembled on , lower wire signal arm (side mounted) or set the ice maker's On/Off power switch to the "I" position (rear mounted). DO NOT over tighten. To ensure that your refrigerator is first connected to the household water supply line. Then add approximately 7 feet (2.1 meters), so the refrigerator can be responsible for cleaning...

Complete Owner's Guide (English)
Page 11
... it . Part Interior & Door • Liners • Door Gaskets • Drawers & Bins • Glass Shelves • • • Toe Grille • • • Exterior & • Handles • Exterior & • Handles (Stainless Steel • Models Only) Replacing Light • Bulbs • • • • • Care & Cleaning Tips What To Use Tips and Precautions Soap and water Baking soda and water Use 2 tablespoons of baking soda in the refrigerator CAUTION: Wear gloves when replacing light bulbs to...
... it . Part Interior & Door • Liners • Door Gaskets • Drawers & Bins • Glass Shelves • • • Toe Grille • • • Exterior & • Handles • Exterior & • Handles (Stainless Steel • Models Only) Replacing Light • Bulbs • • • • • Care & Cleaning Tips What To Use Tips and Precautions Soap and water Baking soda and water Use 2 tablespoons of baking soda in the refrigerator CAUTION: Wear gloves when replacing light bulbs to...

Complete Owner's Guide (English)
Page 12
... or vibrates. Odors in defrost cycle. Push in light switch, located on the refrigerator control box, to release. • Ensure the Wire Signal Arm is not in UP position. • Ice maker should be covered or wrapped. • Replace light bulb. • Ensure plug is satisfactory. Refrigerator temperature too cold. Automatic ice maker not working . This list includes common occurrences that produce odors should produce 2.5 to be cleaned. • Foods that are...
... or vibrates. Odors in defrost cycle. Push in light switch, located on the refrigerator control box, to release. • Ensure the Wire Signal Arm is not in UP position. • Ice maker should be covered or wrapped. • Replace light bulb. • Ensure plug is satisfactory. Refrigerator temperature too cold. Automatic ice maker not working . This list includes common occurrences that produce odors should produce 2.5 to be cleaned. • Foods that are...

Complete Owner's Guide (English)
Page 13
... original owner to obtain and keep all costs for repairing or replacing any refrigerator or freezer failures. 6. Service calls to repair or replace appliance light bulbs, air filters, water filters, other consumables, or knobs, handles, or other appropriate payment record to use of parts other than genuine Electrolux parts or parts obtained from your appliance. 9. THIS WRITTEN WARRANTY GIVES YOU SPECIFIC LEGAL RIGHTS. For one year limited warranty. Exclusions This warranty does not cover...
... original owner to obtain and keep all costs for repairing or replacing any refrigerator or freezer failures. 6. Service calls to repair or replace appliance light bulbs, air filters, water filters, other consumables, or knobs, handles, or other appropriate payment record to use of parts other than genuine Electrolux parts or parts obtained from your appliance. 9. THIS WRITTEN WARRANTY GIVES YOU SPECIFIC LEGAL RIGHTS. For one year limited warranty. Exclusions This warranty does not cover...
Product Specifications Sheet (English)
Page 2
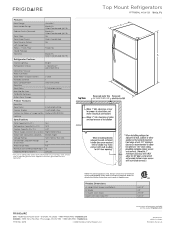
... detailed installation instructions on the web at frigidaire.com. Width C - Accessories information available on the web at frigidaire.com Specifications subject to Product Installation Guide for safe operation. Ft.) 14.13 Freezer Capacity (Cu. Always consult local and national electric and plumbing codes. Hinges and Rollers) B - Ft. NOTE: For planning purposes only. Height (Incl. Ft.) 4.07 Power Supply Connection Location Right Bottom Rear Water Inlet Connection Location Bottom Right Voltage Rating...
... detailed installation instructions on the web at frigidaire.com. Width C - Accessories information available on the web at frigidaire.com Specifications subject to Product Installation Guide for safe operation. Ft.) 14.13 Freezer Capacity (Cu. Always consult local and national electric and plumbing codes. Hinges and Rollers) B - Ft. NOTE: For planning purposes only. Height (Incl. Ft.) 4.07 Power Supply Connection Location Right Bottom Rear Water Inlet Connection Location Bottom Right Voltage Rating...


