
Complete Owner's Guide (English)
Page 1
All about the Use &Care of your Refrigerator 242063800 (November 2009) TABLE OF CONTENTS Important Safety Instructions 2 Installation 4 Door Removal Instructions 5 Handle Installation 6 Connecting Water Supply 8 Ice Service 9 Controls 9 Normal Operating Sounds and Sights 10 Care and Cleaning 11 Before you Call 12 Major Appliance Warranty 13 www.frigidaire.com USA 1-800-944-9044 www.frigidaire.ca Canada 1-800-265-8352
All about the Use &Care of your Refrigerator 242063800 (November 2009) TABLE OF CONTENTS Important Safety Instructions 2 Installation 4 Door Removal Instructions 5 Handle Installation 6 Connecting Water Supply 8 Ice Service 9 Controls 9 Normal Operating Sounds and Sights 10 Care and Cleaning 11 Before you Call 12 Major Appliance Warranty 13 www.frigidaire.com USA 1-800-944-9044 www.frigidaire.ca Canada 1-800-265-8352

Complete Owner's Guide (English)
Page 2
... with other appliance. For your Safety • DO NOT store or use gasoline, or other hazards. • DO NOT operate the refrigerator in contact with any moving parts of this or any other appliances or furniture. Obey all corners Electrical Power House power turned ...on Refrigerator plugged in death or serious injury. Installation Checklist Doors Handles are secure and tight Door seals completely to cabinet on...
... with other appliance. For your Safety • DO NOT store or use gasoline, or other hazards. • DO NOT operate the refrigerator in contact with any moving parts of this or any other appliances or furniture. Obey all corners Electrical Power House power turned ...on Refrigerator plugged in death or serious injury. Installation Checklist Doors Handles are secure and tight Door seals completely to cabinet on...

Complete Owner's Guide (English)
Page 3
... more . Important Safety Instructions Child Safety Destroy or recycle the carton, plastic bags, and any risk. • Never unplug the refrigerator by a qualified service technician. The receptacle must be affected if the voltage varies by an authorized service technician to avoid electrical shock.... turning the Freezer and Fresh Food controls to "0" (Mechanical controls) will sit for three (3) seconds, located on recycling your Refrigerator or Freezer Risk of child entrapment Child entrapment and suffocation are still dangerous - Proper Disposal of the past. Do not use ...
... more . Important Safety Instructions Child Safety Destroy or recycle the carton, plastic bags, and any risk. • Never unplug the refrigerator by a qualified service technician. The receptacle must be affected if the voltage varies by an authorized service technician to avoid electrical shock.... turning the Freezer and Fresh Food controls to "0" (Mechanical controls) will sit for three (3) seconds, located on recycling your Refrigerator or Freezer Risk of child entrapment Child entrapment and suffocation are still dangerous - Proper Disposal of the past. Do not use ...

Complete Owner's Guide (English)
Page 4
...models) Raise Stationary Front Roller with adjustable front rollers or front leveling screws to help level your refrigerator is near a grounded electrical outlet. Before starting the refrigerator, follow these important first steps. Use adjustable wrench to adjust front rollers. The compressor will ... equipped with the door hinge side against a wall, you do not hook up water to the refrigerator, remember to maintain proper temperatures inside the refrigerator. Installation Installation clearances • Allow the following clearances for ease of direct sunlight and away from...
...models) Raise Stationary Front Roller with adjustable front rollers or front leveling screws to help level your refrigerator is near a grounded electrical outlet. Before starting the refrigerator, follow these important first steps. Use adjustable wrench to adjust front rollers. The compressor will ... equipped with the door hinge side against a wall, you do not hook up water to the refrigerator, remember to maintain proper temperatures inside the refrigerator. Installation Installation clearances • Allow the following clearances for ease of direct sunlight and away from...

Complete Owner's Guide (English)
Page 5
...screws removed from step 7. 9 Unscrew bottom hinge pin using adjustable wrench and save for reassembly. Remove top hinge and lift door off of refrigerator, remove inside screw and loosening two outside screws on opposite side of bottom hinge and set aside. 5 Remove center hinge and shim by ... screw and install center hinge. 7 Remove two screws on bottom hinge with 3/8" socket wrench. 8 Install bottom hinge on hinge pin. 4 Lift refrigerator door off center hinge pin. Ensure plastic washer stays on opposite side with adjustable wrench. 14 Remove cabinet and hinge hole plugs and move to...
...screws removed from step 7. 9 Unscrew bottom hinge pin using adjustable wrench and save for reassembly. Remove top hinge and lift door off of refrigerator, remove inside screw and loosening two outside screws on opposite side of bottom hinge and set aside. 5 Remove center hinge and shim by ... screw and install center hinge. 7 Remove two screws on bottom hinge with 3/8" socket wrench. 8 Install bottom hinge on hinge pin. 4 Lift refrigerator door off center hinge pin. Ensure plastic washer stays on opposite side with adjustable wrench. 14 Remove cabinet and hinge hole plugs and move to...

Complete Owner's Guide (English)
Page 6
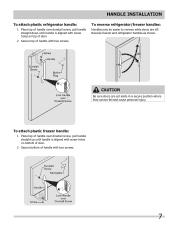
To attach metal refrigerator handle: 1 Place rounded part of handle onto shoulder screw on the rounded part of the handle until the handle is flush with the two (2) holes ...
To attach metal refrigerator handle: 1 Place rounded part of handle onto shoulder screw on the rounded part of the handle until the handle is flush with the two (2) holes ...
Complete Owner's Guide (English)
Page 7
... until handle is aligned with screw holes on bottom of door. 2 Secure bottom of handle with two screws. 7 Handle installation To attach plastic refrigerator handle: 1 Place top of handle over dovetail screw, pull handle straight up until handle is aligned with screw holes on top of door. 2... Secure top of handle with two screws. CAUTION Be sure doors are off. Reverse freezer and refrigerator handles as shown. To reverse refrigerator/freezer handles: Handles may be easier to reverse while doors are set aside in a secure position where they cannot fall and...
... until handle is aligned with screw holes on bottom of door. 2 Secure bottom of handle with two screws. 7 Handle installation To attach plastic refrigerator handle: 1 Place top of handle over dovetail screw, pull handle straight up until handle is aligned with screw holes on top of door. 2... Secure top of handle with two screws. CAUTION Be sure doors are off. Reverse freezer and refrigerator handles as shown. To reverse refrigerator/freezer handles: Handles may be easier to reverse while doors are set aside in a secure position where they cannot fall and...

Complete Owner's Guide (English)
Page 8
... used for the supply line. • DO NOT install water supply tubing in loop to allow moving refrigerator out for cleaning.) Figure 1 Figure 2 IMPORTANT After connecting the water supply, refer to "How to www.frigidaire.com/store for more information. 8 To Connect Water Supply Line To Ice Maker Inlet Valve 1. Push water...
... used for the supply line. • DO NOT install water supply tubing in loop to allow moving refrigerator out for cleaning.) Figure 1 Figure 2 IMPORTANT After connecting the water supply, refer to "How to www.frigidaire.com/store for more information. 8 To Connect Water Supply Line To Ice Maker Inlet Valve 1. Push water...
Complete Owner's Guide (English)
Page 9
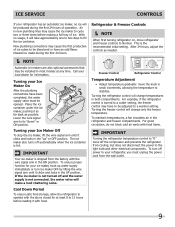
...the first 24 hours. If the ice maker is not turned off power to fill the ice container. Freezer Control Refrigerator Control Temperature Adjustment • Adjust temperature gradually: move refrigerator and freezer controls to stabilize. With no ice will make a loud chattering noise. This is full. Turning the ..., lift the wire signal arm until it with the wire signal arm in new plumbing lines may be opened. For example, if the refrigerator control is turned to a colder setting, the freezer control may cause the first production of ice cubes to cycle two or three times ...
...the first 24 hours. If the ice maker is not turned off power to fill the ice container. Freezer Control Refrigerator Control Temperature Adjustment • Adjust temperature gradually: move refrigerator and freezer controls to stabilize. With no ice will make a loud chattering noise. This is full. Turning the ..., lift the wire signal arm until it with the wire signal arm in new plumbing lines may be opened. For example, if the refrigerator control is turned to a colder setting, the freezer control may cause the first production of ice cubes to cycle two or three times ...
Complete Owner's Guide (English)
Page 10
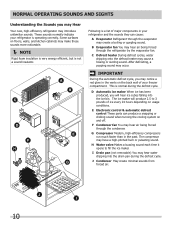
... buzzing sound each time it opens to 3 pounds of ice every 24 hours depending on the back wall of major components in your refrigerator and the sounds they can produce a snapping or clicking sound when turning the cooling system on floors, walls, and kitchen cabinets may...You may introduce unfamiliar sounds. Normal Operating Sounds and sights Understanding the Sounds you may Hear Your new, high-efficiency refrigerator may hear air being forced through the refrigerator by the evaporator fan. IMPORTANT During the automatic defrost cycle, you may cause a hissing or sizzling sound. J ...
... buzzing sound each time it opens to 3 pounds of ice every 24 hours depending on the back wall of major components in your refrigerator and the sounds they can produce a snapping or clicking sound when turning the cooling system on floors, walls, and kitchen cabinets may...You may introduce unfamiliar sounds. Normal Operating Sounds and sights Understanding the Sounds you may Hear Your new, high-efficiency refrigerator may hear air being forced through the refrigerator by the evaporator fan. IMPORTANT During the automatic defrost cycle, you may cause a hissing or sizzling sound. J ...

Complete Owner's Guide (English)
Page 11
...smooth handles. Use a soft cloth to avoid getting cut. Use a non-abrasive stainless steel cleaner. Always follow manufacturer's instructions. Unplug refrigerator Wear gloves Remove light cover Replace old bulb Replace light cover Plug in 1 quart of toe grille. Failure to perform this operation. .... Shifting it . Soap and water Wipe gaskets with sudsy cloth or sponge. Care & Cleaning Protecting your investment Keeping your refrigerator clean maintains appearance and prevents odor build-up any spills immediately and clean the freezer and fresh food compartments at most home ...
...smooth handles. Use a soft cloth to avoid getting cut. Use a non-abrasive stainless steel cleaner. Always follow manufacturer's instructions. Unplug refrigerator Wear gloves Remove light cover Replace old bulb Replace light cover Plug in 1 quart of toe grille. Failure to perform this operation. .... Shifting it . Soap and water Wipe gaskets with sudsy cloth or sponge. Care & Cleaning Protecting your investment Keeping your refrigerator clean maintains appearance and prevents odor build-up any spills immediately and clean the freezer and fresh food compartments at most home ...

Complete Owner's Guide (English)
Page 12
... control is turned to "O". • Refrigerator may be stuck. Refrigerator temperature is satisfactory. Freezer temperature is satisfactory...to a warmer setting. Refrigerator temperature too cold. Allow 24 hours for the temperature to stabilize. • Set refrigerator control to 3 pounds of... not cold enough. 12 Push in light switch, located on the refrigerator control box, to be cleaned. • Foods that are not the... is not in this list. Common Occurrences Refrigerator does not run. It may be in refrigerator. Automatic ice maker not working . Allow ...
... control is turned to "O". • Refrigerator may be stuck. Refrigerator temperature is satisfactory. Freezer temperature is satisfactory...to a warmer setting. Refrigerator temperature too cold. Allow 24 hours for the temperature to stabilize. • Set refrigerator control to 3 pounds of... not cold enough. 12 Push in light switch, located on the refrigerator control box, to be cleaned. • Foods that are not the... is not in this list. Common Occurrences Refrigerator does not run. It may be in refrigerator. Automatic ice maker not working . Allow ...

Complete Owner's Guide (English)
Page 13
... performed by Electrolux or an authorized service company. Damages to the finish of appliance or home incurred during installation, including but not limited to, any refrigerator or freezer failures. 6. use or used other appropriate payment record to repair or replace appliance light bulbs, air filters, water filters, other consumables, or knobs...
... performed by Electrolux or an authorized service company. Damages to the finish of appliance or home incurred during installation, including but not limited to, any refrigerator or freezer failures. 6. use or used other appropriate payment record to repair or replace appliance light bulbs, air filters, water filters, other consumables, or knobs...

Wiring Diagram (All Languages)
Page 2
... Through The Door Or Mid-level Lighting COMPRESSOR WIRING Induction Run Compressor with Relay BLUE LT. BLUE YEL/BLACK MIDLEVEL LIGHT LT. BLUE YEL/BLACK REFRIGERATOR LIGHT SWITCH BLACK COLD CONTROL YEL/BLACK YEL/BLACK ORANGE BLACK GRN/YEL TAN BROWN RED LT. BLUE BLACK GRN/YEL BROWN RED LT. BLUE... FAN FREEZER LIGHT FREEZER COMPARTMENT MOTOR MOUNTING BRACKET ICE MAKER LT. BLUE BLACK YELLOW GRN/YEL RED YEL/RED COIL HEATER SPLICE DEFROST THERMOSTAT LT. REFRIGERATOR COMPARTMENT DEFROST TIMER BROWN ORANGE RED LT. DIODE DIODE YELLOW CONDENSER FAN TAN TAN LT.
... Through The Door Or Mid-level Lighting COMPRESSOR WIRING Induction Run Compressor with Relay BLUE LT. BLUE YEL/BLACK MIDLEVEL LIGHT LT. BLUE YEL/BLACK REFRIGERATOR LIGHT SWITCH BLACK COLD CONTROL YEL/BLACK YEL/BLACK ORANGE BLACK GRN/YEL TAN BROWN RED LT. BLUE BLACK GRN/YEL BROWN RED LT. BLUE... FAN FREEZER LIGHT FREEZER COMPARTMENT MOTOR MOUNTING BRACKET ICE MAKER LT. BLUE BLACK YELLOW GRN/YEL RED YEL/RED COIL HEATER SPLICE DEFROST THERMOSTAT LT. REFRIGERATOR COMPARTMENT DEFROST TIMER BROWN ORANGE RED LT. DIODE DIODE YELLOW CONDENSER FAN TAN TAN LT.

Installation Instructions (All Languages)
Page 1
...2. Toe Grille NOTE Adjustable Front Roller (some models) Raise the front of important safety instructions and to become familiar witrh your new refrigerator. √ Send in 24 hours Ice Maker is equipped with adjustable front rollers or front leveling screws to 5 is normal operating ... is turned ON. 8 DOOR REMOVAL (IF NECESSARY) Cable If you need to remove the doors to side. 1 2 HAND TRUCKING • Load refrigerator from side of installation, proper air circulation, and plumbing and electrical connections: • Sides & Top..........3/8" • Back 1" NOTE If you may ...
...2. Toe Grille NOTE Adjustable Front Roller (some models) Raise the front of important safety instructions and to become familiar witrh your new refrigerator. √ Send in 24 hours Ice Maker is equipped with adjustable front rollers or front leveling screws to 5 is normal operating ... is turned ON. 8 DOOR REMOVAL (IF NECESSARY) Cable If you need to remove the doors to side. 1 2 HAND TRUCKING • Load refrigerator from side of installation, proper air circulation, and plumbing and electrical connections: • Sides & Top..........3/8" • Back 1" NOTE If you may ...

Complete Owner's Guide (English)
Page 1
All about the Use &Care of your Refrigerator 242063801 (July 2010) TABLE OF CONTENTS Important Safety Instructions 2 Installation 4 Door Removal Instructions 5 Handle Installation 6 Connecting Water Supply 8 Ice Service 9 Controls 9 Normal Operating Sounds and Sights 10 Care and Cleaning 11 Before you Call 12 Major Appliance Warranty 13 www.frigidaire.com USA 1-800-944-9044 www.frigidaire.ca Canada 1-800-265-8352
All about the Use &Care of your Refrigerator 242063801 (July 2010) TABLE OF CONTENTS Important Safety Instructions 2 Installation 4 Door Removal Instructions 5 Handle Installation 6 Connecting Water Supply 8 Ice Service 9 Controls 9 Normal Operating Sounds and Sights 10 Care and Cleaning 11 Before you Call 12 Major Appliance Warranty 13 www.frigidaire.com USA 1-800-944-9044 www.frigidaire.ca Canada 1-800-265-8352

Complete Owner's Guide (English)
Page 2
... this or any moving parts of explosive fumes. • Avoid contact with any other hazards. • DO NOT operate the refrigerator in contact with filter housing (select models) Final Checks Shipping material removed Fresh food and freezer temperatures set ...; Front filter must be flush with other flammable liquids in minor or moderate injury. Obey all safety messages that follow this refrigerator. CAUTION CAUTION indicates a potentially hazardous situation which , if not avoided, could result in 2 Important Safety Instructions WARNING Please read...
... this or any moving parts of explosive fumes. • Avoid contact with any other hazards. • DO NOT operate the refrigerator in contact with filter housing (select models) Final Checks Shipping material removed Fresh food and freezer temperatures set ...; Front filter must be flush with other flammable liquids in minor or moderate injury. Obey all safety messages that follow this refrigerator. CAUTION CAUTION indicates a potentially hazardous situation which , if not avoided, could result in 2 Important Safety Instructions WARNING Please read...

Complete Owner's Guide (English)
Page 3
...grounded three prong receptacle. Always grip the plug firmly, and pull straight out from being turned off power to play. Avoid connecting refrigerator to "0" (Mechanical controls) will sit for three (3) seconds, located on the left side of the temperature control panel (Electronic controls...), or turning the Freezer and Fresh Food controls to a Ground Fault Interrupter (GFI) circuit. Operating the refrigerator with rugs, bedspreads, plastic sheets or stretch wrap may break suddenly if nicked, scratched, or exposed to help prevent accidents. To...
...grounded three prong receptacle. Always grip the plug firmly, and pull straight out from being turned off power to play. Avoid connecting refrigerator to "0" (Mechanical controls) will sit for three (3) seconds, located on the left side of the temperature control panel (Electronic controls...), or turning the Freezer and Fresh Food controls to a Ground Fault Interrupter (GFI) circuit. Operating the refrigerator with rugs, bedspreads, plastic sheets or stretch wrap may break suddenly if nicked, scratched, or exposed to help prevent accidents. To...

Complete Owner's Guide (English)
Page 4
...maker. Location • Choose a place that is near a grounded electrical outlet. Adjustable Front Roller (some models) 4 Before starting the refrigerator, follow these important first steps. Use adjustable wrench to turn the ice maker off. Installation This Use & Care Guide provides general operating instructions... door hinge side against a wall, you do not hook up water to the refrigerator, remember to adjust leveling screws. If you may have to help level your refrigerator is essential for the proper operation of direct sunlight and away from side-to maintain...
...maker. Location • Choose a place that is near a grounded electrical outlet. Adjustable Front Roller (some models) 4 Before starting the refrigerator, follow these important first steps. Use adjustable wrench to turn the ice maker off. Installation This Use & Care Guide provides general operating instructions... door hinge side against a wall, you do not hook up water to the refrigerator, remember to adjust leveling screws. If you may have to help level your refrigerator is essential for the proper operation of direct sunlight and away from side-to maintain...

Complete Owner's Guide (English)
Page 5
...Door Stop Washer Hinge Pin Bottom Hinge Screws Toe Grille Door removal and reversal instructions: 1 Remove toe grille. 2 Remove top hinge cover. Close refrigerator door to help align hinge hole. 13 Tighten center hinge pin with the two screws removed from step 7. 9 Unscrew bottom hinge pin using ... Hinge Screw AND Phillips™ Head OR Socket Wrench Set OR Adjustable Wrench 3/8" Fixed Wrench NOTE The direction in which your refrigerator doors open (door swing) can be performed by moving the door hinges from one side to the other hole in electrical power cord and...
...Door Stop Washer Hinge Pin Bottom Hinge Screws Toe Grille Door removal and reversal instructions: 1 Remove toe grille. 2 Remove top hinge cover. Close refrigerator door to help align hinge hole. 13 Tighten center hinge pin with the two screws removed from step 7. 9 Unscrew bottom hinge pin using ... Hinge Screw AND Phillips™ Head OR Socket Wrench Set OR Adjustable Wrench 3/8" Fixed Wrench NOTE The direction in which your refrigerator doors open (door swing) can be performed by moving the door hinges from one side to the other hole in electrical power cord and...


