
Complete Owners Guide
Page 1
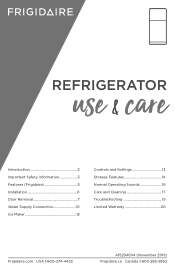
use care REFRIGERATOR & Introduction 2 Important Safety information 3 Features (Frigidaire 5 Installation 6 Door Removal 7 Water Supply Connection 10 Ice Maker 12 Controls and Settings 13 Storage Features 14 Normal Operating Sounds 16 Care and Cleaning 17 Troubleshooting 19 Limited Warranty 20 Frigidaire.com USA 1-800-374-4432 A15294604 (November 2019) Frigidaire.ca Canada 1-800-265-8352
use care REFRIGERATOR & Introduction 2 Important Safety information 3 Features (Frigidaire 5 Installation 6 Door Removal 7 Water Supply Connection 10 Ice Maker 12 Controls and Settings 13 Storage Features 14 Normal Operating Sounds 16 Care and Cleaning 17 Troubleshooting 19 Limited Warranty 20 Frigidaire.com USA 1-800-374-4432 A15294604 (November 2019) Frigidaire.ca Canada 1-800-265-8352
Complete Owners Guide
Page 2
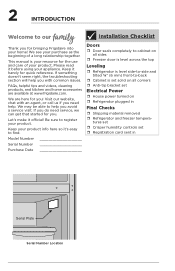
...all corners ˆˆ Anti-tip bracket set ˆˆ Registration card sent in Final Checks ˆˆ Shipping material removed ˆˆ Refrigerator and freezer tempera- If you do need help. Please read it 's easy to find. We may be able to help you avoid a service visit...Serial Number Location If something doesn't seem right, the troubleshooting section will help you with an agent, or call us if you for bringing Frigidaire into your product. FAQs, helpful tips and videos, cleaning products, and kitchen and home accessories are here for you . Let's make it...
...all corners ˆˆ Anti-tip bracket set ˆˆ Registration card sent in Final Checks ˆˆ Shipping material removed ˆˆ Refrigerator and freezer tempera- If you do need help. Please read it 's easy to find. We may be able to help you avoid a service visit...Serial Number Location If something doesn't seem right, the troubleshooting section will help you with an agent, or call us if you for bringing Frigidaire into your product. FAQs, helpful tips and videos, cleaning products, and kitchen and home accessories are here for you . Let's make it...
Complete Owners Guide
Page 3
..., sensory or mental capabilities, or lack of experience and knowledge, unless they come in minor or moderate injury. Dispose of refrigerant tubing. Flammable refrigerant used . DANGER Risk of this product. Safety Instructions • DO NOT store or use mechanical devices to play. Read... alert of fire or explosion. CAUTION CAUTION Risk of the appliance by a person responsible for use these items to defrost refrigerator. CALIFORNIA RESIDENTS Cancer and Reproductive Harm www.P65Warnings.ca.gov Child Safety This appliance is used . DANGER DANGER Risk of potential...
..., sensory or mental capabilities, or lack of experience and knowledge, unless they come in minor or moderate injury. Dispose of refrigerant tubing. Flammable refrigerant used . DANGER Risk of this product. Safety Instructions • DO NOT store or use mechanical devices to play. Read... alert of fire or explosion. CAUTION CAUTION Risk of the appliance by a person responsible for use these items to defrost refrigerator. CALIFORNIA RESIDENTS Cancer and Reproductive Harm www.P65Warnings.ca.gov Child Safety This appliance is used . DANGER DANGER Risk of potential...

Complete Owners Guide
Page 4
...• Plug the unit into a properly grounded 3-prong receptacle. Consult a qualified electrician. If you are throwing away your old refrigerator, make sure the refrigerant is equipped with a 3-prong grounding plug for "just a few days". Check with insufficient power can damage the compressor. Grounding ...encourage responsible appliance recycling/disposal methods. Before you may be subject to fines and imprisonment under any risk. • Never unplug the refrigerator by a wall switch or pull cord to avoid electrical shock. Use only a 5-watt or less AC LED light bulb. •...
...• Plug the unit into a properly grounded 3-prong receptacle. Consult a qualified electrician. If you are throwing away your old refrigerator, make sure the refrigerant is equipped with a 3-prong grounding plug for "just a few days". Check with insufficient power can damage the compressor. Grounding ...encourage responsible appliance recycling/disposal methods. Before you may be subject to fines and imprisonment under any risk. • Never unplug the refrigerator by a wall switch or pull cord to avoid electrical shock. Use only a 5-watt or less AC LED light bulb. •...
Complete Owners Guide
Page 5
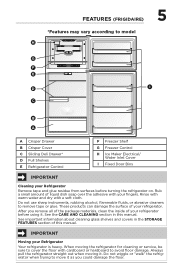
...CLEANING section in the STORAGE FEATURES section of liquid dish soap over the adhesive with your Refrigerator Remove tape and glue residue from surfaces before using it . Rub a small amount of this manual. FEATURES (FRIGIDAIRE) 5 *Features may vary according to model H G F E D I C ...B A A Crisper Drawer B Crisper Cover C Sliding Deli Drawer* D Full Shelves E Refrigerator Control F Freezer Shelf G Freezer Control H Ice Maker Electrical/ Water ...
...CLEANING section in the STORAGE FEATURES section of liquid dish soap over the adhesive with your Refrigerator Remove tape and glue residue from surfaces before using it . Rub a small amount of this manual. FEATURES (FRIGIDAIRE) 5 *Features may vary according to model H G F E D I C ...B A A Crisper Drawer B Crisper Cover C Sliding Deli Drawer* D Full Shelves E Refrigerator Control F Freezer Shelf G Freezer Control H Ice Maker Electrical/ Water ...
Complete Owners Guide
Page 6
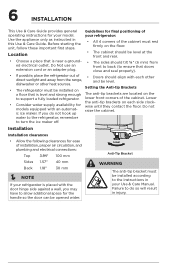
...a wall, you do so will result in injury. Failure to do not hook up water to the refrigerator, remember to support a fully loaded refrigerator. • Consider water supply availability for final positioning of your refrigerator: • All 4 corners of installation, proper air circulation, and plumbing and electrical connections: Top 3.94... equipped with an automatic ice maker. Do Not use an extension cord or an adapter plug. • If possible, place the refrigerator out of the cabinet. WARNING The anti-tip bracket must be installed on each other heat sources. • The...
...a wall, you do so will result in injury. Failure to do not hook up water to the refrigerator, remember to support a fully loaded refrigerator. • Consider water supply availability for final positioning of your refrigerator: • All 4 corners of installation, proper air circulation, and plumbing and electrical connections: Top 3.94... equipped with an automatic ice maker. Do Not use an extension cord or an adapter plug. • If possible, place the refrigerator out of the cabinet. WARNING The anti-tip bracket must be installed on each other heat sources. • The...
Complete Owners Guide
Page 7
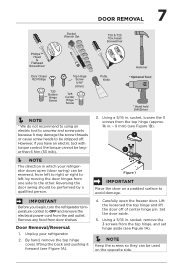
...be performed by moving the door hinges from the top hinge (approx. ⅜ in which your refrigerator. 2. Using a 5/16 in . A B Figure 1 IMPORTANT Place the door on the opposite side. Unplug your refrigerator doors open the freezer door. Carefully open (door swing) can be reversed, from left to ...have an electric tool with torque control, the torque cannot be stripped off of center hinge pin. However, if you begin, turn the refrigerator temperature control to OFF and remove the electrical power cord from door shelves. socket, loosen the 3 screws from one side to the other....
...be performed by moving the door hinges from the top hinge (approx. ⅜ in which your refrigerator. 2. Using a 5/16 in . A B Figure 1 IMPORTANT Place the door on the opposite side. Unplug your refrigerator doors open the freezer door. Carefully open (door swing) can be reversed, from left to ...have an electric tool with torque control, the torque cannot be stripped off of center hinge pin. However, if you begin, turn the refrigerator temperature control to OFF and remove the electrical power cord from door shelves. socket, loosen the 3 screws from one side to the other....
Complete Owners Guide
Page 8
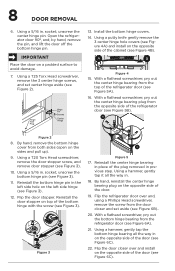
...of the door (see Figure 5A). 16. Flip the door stopper. By hand, reinstall the center hinge bearing plug on the opposite side of the refrigerator door (see Figure 6C). IMPORTANT Place the door on the left side hole on a padded surface to avoid damage. 7. Using a T25 Torx Head... screwdriver, remove the 3 center hinge screws, and set aside (see Figure 3). Figure 3 A Figure 5 17. Flip the refrigerator door over and install on the opposite side of the bottom hinge with the screw (see Figure 6B).. 20. Reinstall the center hinge bearing in...
...of the door (see Figure 5A). 16. Flip the door stopper. By hand, reinstall the center hinge bearing plug on the opposite side of the refrigerator door (see Figure 6C). IMPORTANT Place the door on the left side hole on a padded surface to avoid damage. 7. Using a T25 Torx Head... screwdriver, remove the 3 center hinge screws, and set aside (see Figure 3). Figure 3 A Figure 5 17. Flip the refrigerator door over and install on the opposite side of the bottom hinge with the screw (see Figure 6B).. 20. Reinstall the center hinge bearing in...
Complete Owners Guide
Page 9
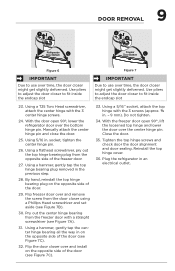
... the bottom hinge pin. Using a hammer, gently tap the top hinge bearing plug removed in an electrical outlet. Close the door. 35. Plug the refrigerator in the previous step. 28. Using a T25 Torx Head screwdriver, attach the center hinge with the 3 screws (approx. ⅜ in. - ...and check door the door alignment and door sealing. Using a 5/16" socket, attach the top hinge with the 3 center hinge screws. 24. A B Refrigerator Door Bottom C DOOR REMOVAL 9 A B Freezer Door Bottom C Figure 6 IMPORTANT Due to use over and remove the screw from the freezer door with a ...
... the bottom hinge pin. Using a hammer, gently tap the top hinge bearing plug removed in an electrical outlet. Close the door. 35. Plug the refrigerator in the previous step. 28. Using a T25 Torx Head screwdriver, attach the center hinge with the 3 screws (approx. ⅜ in. - ...and check door the door alignment and door sealing. Using a 5/16" socket, attach the top hinge with the 3 center hinge screws. 24. A B Refrigerator Door Bottom C DOOR REMOVAL 9 A B Freezer Door Bottom C Figure 6 IMPORTANT Due to use over and remove the screw from the freezer door with a ...
Complete Owners Guide
Page 10
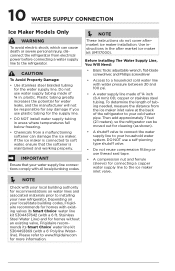
... information. NOTE These instructions do not cover aftermarket ice maker installation. If the ice maker is connected to your new refrigerator. Use instructions in . CAUTION To Avoid Property Damage: • Use stainless steel braided tubing for recommendations on your household water ... maintained and working properly. Please refer to installing your cold water pipe. Depending on water lines and associated materials prior to www.frigidaire.com for the supply line. • DO NOT install water supply tubing in areas where temperatures fall below freezing. •...
... information. NOTE These instructions do not cover aftermarket ice maker installation. If the ice maker is connected to your new refrigerator. Use instructions in . CAUTION To Avoid Property Damage: • Use stainless steel braided tubing for recommendations on your household water ... maintained and working properly. Please refer to installing your cold water pipe. Depending on water lines and associated materials prior to www.frigidaire.com for the supply line. • DO NOT install water supply tubing in areas where temperatures fall below freezing. •...
Complete Owners Guide
Page 11
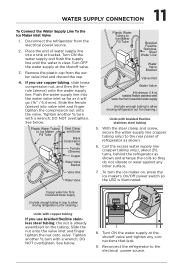
... To the Ice Maker Inlet Valve 1. See below . Copper water line from household water supply (Include enough tubing to allow moving refrigerator out for cleaning.) Units with copper tubing If you use braided flexible stainless steel tubing, the nut is clear. See below . ... Valve 6 ft minimum (1.8 m) braided flexible stainless steel water line from household water supply (Include enough tubing in loop to allow moving refrigerator out for cleaning.) Units with braided flexible stainless steel tubing 5. With the steel clamp and screw, secure the water supply line (copper ...
... To the Ice Maker Inlet Valve 1. See below . Copper water line from household water supply (Include enough tubing to allow moving refrigerator out for cleaning.) Units with copper tubing If you use braided flexible stainless steel tubing, the nut is clear. See below . ... Valve 6 ft minimum (1.8 m) braided flexible stainless steel water line from household water supply (Include enough tubing in loop to allow moving refrigerator out for cleaning.) Units with braided flexible stainless steel tubing 5. With the steel clamp and screw, secure the water supply line (copper ...
Complete Owners Guide
Page 12
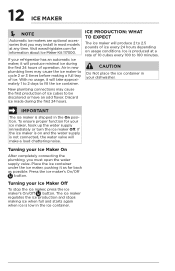
... and starts again when ice is not connected, the water valve will produce minimal ice during the first 24 hours. Turning your dishwasher. If your refrigerator has an automatic ice maker, it will make a loud chattering noise. New plumbing connections may cause the first production of operation. CAUTION Do Not place... maker is shipped in the ice container. With no usage, it as far back as possible. Press the ice maker's On/Off button. Visit www.frigidaire.com for your Ice Maker On After completely connecting the plumbing, you may cause the ice maker to 160 minutes.
... and starts again when ice is not connected, the water valve will produce minimal ice during the first 24 hours. Turning your dishwasher. If your refrigerator has an automatic ice maker, it will make a loud chattering noise. New plumbing connections may cause the first production of operation. CAUTION Do Not place... maker is shipped in the ice container. With no usage, it as far back as possible. Press the ice maker's On/Off button. Visit www.frigidaire.com for your Ice Maker On After completely connecting the plumbing, you may cause the ice maker to 160 minutes.

Complete Owners Guide
Page 13
... to OFF turns off power to Recommended. Auxiliary Freezer Control 13 CONTROLS AND SETTINGS Cool Down Period To ensure safe food storage, allow the refrigerator to operate with the doors closed for at the factory preset (*Recommended) or adjusted as needed. After 24 hours, adjust the controls as ... food. The auxiliary freezer control can be left at least 8 hours before loading it has no effect on , adjust the control to your refrigerator, you must unplug the power cord from cooling, but does not disconnect the power to the light bulb and other electrical components. To maintain...
... to OFF turns off power to Recommended. Auxiliary Freezer Control 13 CONTROLS AND SETTINGS Cool Down Period To ensure safe food storage, allow the refrigerator to operate with the doors closed for at the factory preset (*Recommended) or adjusted as needed. After 24 hours, adjust the controls as ... food. The auxiliary freezer control can be left at least 8 hours before loading it has no effect on , adjust the control to your refrigerator, you must unplug the power cord from cooling, but does not disconnect the power to the light bulb and other electrical components. To maintain...

Complete Owners Guide
Page 16
... SOUNDS Understanding the sounds you may introduce unfamiliar sounds. C F A B D E IMPORTANT During the automatic defrost cycle, you may hear Your new, high-efficiency refrigerator may notice a red glow in the vents on the back wall of major components in the past. These sounds normally indicate your... refrigerator is normal during the defrost cycle. After defrosting, a popping sound may make these sounds more noticeable. NOTE Rigid foam insulation is...
... SOUNDS Understanding the sounds you may introduce unfamiliar sounds. C F A B D E IMPORTANT During the automatic defrost cycle, you may hear Your new, high-efficiency refrigerator may notice a red glow in the vents on the back wall of major components in the past. These sounds normally indicate your... refrigerator is normal during the defrost cycle. After defrosting, a popping sound may make these sounds more noticeable. NOTE Rigid foam insulation is...

Complete Owners Guide
Page 17
...scratch the appliance surface. • Do not remove the serial plate. Do not use CHLORIDE or cleaners with bleach to move your refrigerator clean maintains appearance and prevents odor build-up any removable parts in a dishwasher. • Always unplug the electrical power cord from ...the wall outlet. Be careful not to clean stainless steel. • Do not wash any spills immediately and clean the freezer and refrigerator compartments at least twice a year. When cleaning, take the following precautions: • Never use abrasive cleaners such as window sprays, scouring...
...scratch the appliance surface. • Do not remove the serial plate. Do not use CHLORIDE or cleaners with bleach to move your refrigerator clean maintains appearance and prevents odor build-up any removable parts in a dishwasher. • Always unplug the electrical power cord from ...the wall outlet. Be careful not to clean stainless steel. • Do not wash any spills immediately and clean the freezer and refrigerator compartments at least twice a year. When cleaning, take the following precautions: • Never use abrasive cleaners such as window sprays, scouring...
Complete Owners Guide
Page 19
... is satisfactory. Allow 24 hours for the temperature to a warmer setting. Allow 24 hours for you! 1-800-374-4432 (United States) Frigidaire.com 1-800-265-8352 (Canada) Frigidaire.ca Common Occurences Refrigerator does not run. • Ensure the plug is tightly pushed into an electrical outlet. • The light switch may be covered...
... is satisfactory. Allow 24 hours for the temperature to a warmer setting. Allow 24 hours for you! 1-800-374-4432 (United States) Frigidaire.com 1-800-265-8352 (Canada) Frigidaire.ca Common Occurences Refrigerator does not run. • Ensure the plug is tightly pushed into an electrical outlet. • The light switch may be covered...

Complete Owners Guide
Page 20
...materials or workmanship, or for service calls to another party or removed outside the USA or Canada. 3. USA 1-800-374-4432 Frigidaire 10200 David Taylor Drive Charlotte, NC 28262 Canada 1.800.265.8352 Electrolux Canada Corp. 5855 Terry Fox Way Mississauga, Ontario, ... Keep your appliance is " are subject to establish the warranty period should service be required. Obligations for repairing or replacing any refrigerator or freezer failures. 6. Service calls to be performed by unauthorized service companies; For one year limited warranty. SOME STATES AND PROVINCES...
...materials or workmanship, or for service calls to another party or removed outside the USA or Canada. 3. USA 1-800-374-4432 Frigidaire 10200 David Taylor Drive Charlotte, NC 28262 Canada 1.800.265.8352 Electrolux Canada Corp. 5855 Terry Fox Way Mississauga, Ontario, ... Keep your appliance is " are subject to establish the warranty period should service be required. Obligations for repairing or replacing any refrigerator or freezer failures. 6. Service calls to be performed by unauthorized service companies; For one year limited warranty. SOME STATES AND PROVINCES...
Wiring Diagram
Page 1
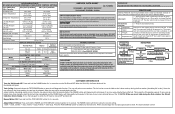
... psig (463 to 476 kPa) Wattage (last 1/3 cycle) 70 W 70 W Amps (running) 0.9 to 1.1 A 0.9 to 1.1 A Base Voltage 115 V 115 V Refrigerant Charge 1.58 oz. (45 g) DEFROST SPECIFICATIONS Thermal Fuse Heater Defrost Thermistor Cabinet Size: 14' Cut-out Watts Ohms Termination 161.6°F (72°C) 166 79... 47 to 54% Freezer Temperature 5° to -2.2°F (-15° to -19°C) 5° to -2.2°F (-15° to -19°C) Refrigerator Temperature 35° to 40°F (2° to 4°C) 35° to 40°F (2° to 4°C) Low Side Pressure (cut-in) ...
... psig (463 to 476 kPa) Wattage (last 1/3 cycle) 70 W 70 W Amps (running) 0.9 to 1.1 A 0.9 to 1.1 A Base Voltage 115 V 115 V Refrigerant Charge 1.58 oz. (45 g) DEFROST SPECIFICATIONS Thermal Fuse Heater Defrost Thermistor Cabinet Size: 14' Cut-out Watts Ohms Termination 161.6°F (72°C) 166 79... 47 to 54% Freezer Temperature 5° to -2.2°F (-15° to -19°C) 5° to -2.2°F (-15° to -19°C) Refrigerator Temperature 35° to 40°F (2° to 4°C) 35° to 40°F (2° to 4°C) Low Side Pressure (cut-in) ...
Product Specifications Sheet
Page 1
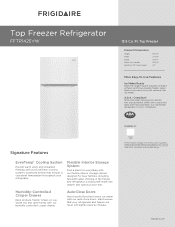
... a consistent temperature throughout your refrigerator and freezer are positioned within arm's reach and allow one-hand operation, our top-freezer refrigerator is A.D.A.-qualified based on the United States Access Board's A.D.A./A.B.A. Top Freezer Refrigerator FFTR1425VW Place and center image here...open by mistake. frigidaire.com Flexible Interior Storage System Find a place for everything with our humidity-controlled crisper drawer. Compliant 1 With accessible shelving and controls that your refrigerator. A.D.A. - Available in the freezer and refrigerator, a sliding half-...
... a consistent temperature throughout your refrigerator and freezer are positioned within arm's reach and allow one-hand operation, our top-freezer refrigerator is A.D.A.-qualified based on the United States Access Board's A.D.A./A.B.A. Top Freezer Refrigerator FFTR1425VW Place and center image here...open by mistake. frigidaire.com Flexible Interior Storage System Find a place for everything with our humidity-controlled crisper drawer. Compliant 1 With accessible shelving and controls that your refrigerator. A.D.A. - Available in the freezer and refrigerator, a sliding half-...
Product Specifications Sheet
Page 2
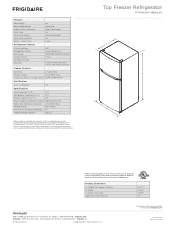
... / 60Hz Minimum Circuit Required (Amps) 15 B Shipping Weight (Approx.) 135 Lbs. Ft. Height (Incl. Ft.) 13.9 Refrigerator Capacity (Cu. Ft.) 10.0 Freezer Capacity (Cu. Accessibility Guidelines and the Department of installation FFTR1425VW 13.9 Cu. clearance at frigidaire.com Specifications subject to allow contact with a separate ground wire. risper access with Door Open 90...
... / 60Hz Minimum Circuit Required (Amps) 15 B Shipping Weight (Approx.) 135 Lbs. Ft. Height (Incl. Ft.) 13.9 Refrigerator Capacity (Cu. Ft.) 10.0 Freezer Capacity (Cu. Accessibility Guidelines and the Department of installation FFTR1425VW 13.9 Cu. clearance at frigidaire.com Specifications subject to allow contact with a separate ground wire. risper access with Door Open 90...


