Complete Owners Guide
Page 2
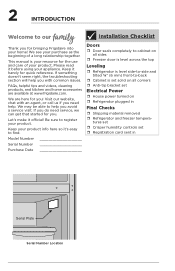
...! tures set ˆˆ Crisper humidity controls set Electrical Power ˆˆ House power turned on all sides ˆˆ Freezer door is level across the top Leveling ˆˆ Refrigerator is level side-to-side and tilted ¼" (6 mm) front-to-back ˆˆ Cabinet is your home! If you ! We are available at www.frigidaire.com. Model Number Serial Number Purchase Date Installation Checklist Doors ˆˆ Door seals...
...! tures set ˆˆ Crisper humidity controls set Electrical Power ˆˆ House power turned on all sides ˆˆ Freezer door is level across the top Leveling ˆˆ Refrigerator is level side-to-side and tilted ¼" (6 mm) front-to-back ˆˆ Cabinet is your home! If you ! We are available at www.frigidaire.com. Model Number Serial Number Purchase Date Installation Checklist Doors ˆˆ Door seals...
Complete Owners Guide
Page 3
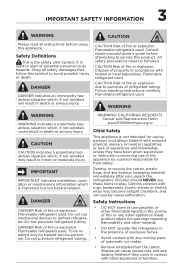
.... Flammable refrigerant used . Consult repair manual/owner's guide before using this appliance. Follow handling instructions carefully. CAUTION CAUTION indicates a potentially hazardous situation which is used . Flammable refrigerant used . WARNING! Destroy or recycle the carton, plastic bags, and any other appliance. Read product labels for warnings regarding flammability and other appliances or furniture. CAUTION CAUTION Risk of fire or explosion. CAUTION Risk of refrigerant tubing. Flammable refrigerant used . Do...
.... Flammable refrigerant used . Consult repair manual/owner's guide before using this appliance. Follow handling instructions carefully. CAUTION CAUTION indicates a potentially hazardous situation which is used . Flammable refrigerant used . WARNING! Destroy or recycle the carton, plastic bags, and any other appliance. Read product labels for warnings regarding flammability and other appliances or furniture. CAUTION CAUTION Risk of fire or explosion. CAUTION Risk of refrigerant tubing. Flammable refrigerant used . Do...

Complete Owners Guide
Page 4
... unit: • Remove doors. • Leave shelves in place so children may not easily climb inside. • Have refrigerant removed by 10% or more information on the power cord. To turn off power to your refrigerator you are throwing away your old refrigerator, make sure the refrigerant is not covered under your warranty. • Do not plug the unit into an electrical outlet controlled by a wall switch or pull...
... unit: • Remove doors. • Leave shelves in place so children may not easily climb inside. • Have refrigerant removed by 10% or more information on the power cord. To turn off power to your refrigerator you are throwing away your old refrigerator, make sure the refrigerant is not covered under your warranty. • Do not plug the unit into an electrical outlet controlled by a wall switch or pull...
Complete Owners Guide
Page 5
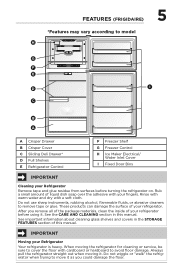
... cleaners to model H G F E D I C B A A Crisper Drawer B Crisper Cover C Sliding Deli Drawer* D Full Shelves E Refrigerator Control F Freezer Shelf G Freezer Control H Ice Maker Electrical/ Water Inlet Cover I Fixed Door Bins IMPORTANT Cleaning your Refrigerator Remove tape and glue residue from surfaces before using it as you could damage the floor. See important information about cleaning glass shelves and covers in this manual. FEATURES (FRIGIDAIRE) 5 *Features may vary according to remove tape or glue. After you remove all of the package materials, clean the inside of...
... cleaners to model H G F E D I C B A A Crisper Drawer B Crisper Cover C Sliding Deli Drawer* D Full Shelves E Refrigerator Control F Freezer Shelf G Freezer Control H Ice Maker Electrical/ Water Inlet Cover I Fixed Door Bins IMPORTANT Cleaning your Refrigerator Remove tape and glue residue from surfaces before using it as you could damage the floor. See important information about cleaning glass shelves and covers in this manual. FEATURES (FRIGIDAIRE) 5 *Features may vary according to remove tape or glue. After you remove all of the package materials, clean the inside of...
Complete Owners Guide
Page 6
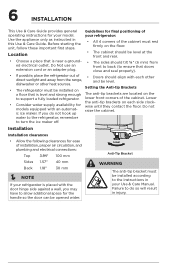
...; All 4 corners of installation, proper air circulation, and plumbing and electrical connections: Top 3.94" 100 mm Lower Anti-Tip Bracket Sides Back 1.57" 1.18" 40 mm 30 mm NOTE If your refrigerator is placed with the door hinge side against a wall, you do so will result in this Use & Care Guide. 6 INSTALLATION This Use & Care Guide provides general operating instructions for your Use & Care Manual. Use the appliance only as...
...; All 4 corners of installation, proper air circulation, and plumbing and electrical connections: Top 3.94" 100 mm Lower Anti-Tip Bracket Sides Back 1.57" 1.18" 40 mm 30 mm NOTE If your refrigerator is placed with the door hinge side against a wall, you do so will result in this Use & Care Guide. 6 INSTALLATION This Use & Care Guide provides general operating instructions for your Use & Care Manual. Use the appliance only as...
Complete Owners Guide
Page 7
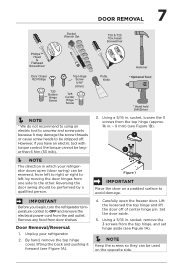
... OFF and remove the electrical power cord from left to right or right to left, by a qualified person. 3. However, if you begin, turn the refrigerator temperature control to avoid damage. Unplug your refrigerator doors open the freezer door. Using a 5/16 in . Set the door aside. 5. Remove any food from the top hinge (approx. ⅜ in which your refrigerator. 2. Carefully open (door swing) can be stripped off of center hinge pin. DOOR REMOVAL 7 Socket Wrench Set T20 & T25...
... OFF and remove the electrical power cord from left to right or right to left, by a qualified person. 3. However, if you begin, turn the refrigerator temperature control to avoid damage. Unplug your refrigerator doors open the freezer door. Using a 5/16 in . Set the door aside. 5. Remove any food from the top hinge (approx. ⅜ in which your refrigerator. 2. Carefully open (door swing) can be stripped off of center hinge pin. DOOR REMOVAL 7 Socket Wrench Set T20 & T25...
Complete Owners Guide
Page 10
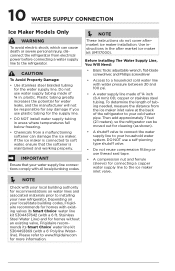
... WATER SUPPLY CONNECTION Ice Maker Models Only WARNING To avoid electric shock, which can damage the ice maker. Stainless Steel Water Line) and for homes without an existing valve, Frigidaire recommends its Smart Choice® water line kit 5304437642 (with a 6' Polyline Waterline). Do not use water supply tubing made of ¼ in. Use instructions in areas where temperatures fall below freezing. • Chemicals from a malfunctioning softener can cause death or severe personal injury, disconnect the refrigerator...
... WATER SUPPLY CONNECTION Ice Maker Models Only WARNING To avoid electric shock, which can damage the ice maker. Stainless Steel Water Line) and for homes without an existing valve, Frigidaire recommends its Smart Choice® water line kit 5304437642 (with a 6' Polyline Waterline). Do not use water supply tubing made of ¼ in. Use instructions in areas where temperatures fall below freezing. • Chemicals from a malfunctioning softener can cause death or severe personal injury, disconnect the refrigerator...
Complete Owners Guide
Page 11
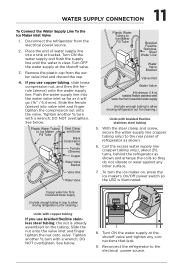
... ½ turn with copper tubing If you use braided flexible stainless steel tubing, the nut is already assembled on , press the ice maker's On/Off power switch so the LED is clear. Turn ON the water supply and flush the supply line until the water is illuminated. rule (sleeve) onto the water supply line. DO NOT overtighten. smerovdicee 8. 11 WATER SUPPLY CONNECTION To Connect the Water Supply Line To the Ice Maker Inlet Valve 1. Disconnect the refrigerator from the water valve inlet...
... ½ turn with copper tubing If you use braided flexible stainless steel tubing, the nut is already assembled on , press the ice maker's On/Off power switch so the LED is clear. Turn ON the water supply and flush the supply line until the water is illuminated. rule (sleeve) onto the water supply line. DO NOT overtighten. smerovdicee 8. 11 WATER SUPPLY CONNECTION To Connect the Water Supply Line To the Ice Maker Inlet Valve 1. Disconnect the refrigerator from the water valve inlet...
Complete Owners Guide
Page 12
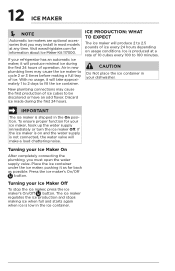
... the ice maker, pushing it will make a loud chattering noise. Visit www.frigidaire.com for your Ice Maker On After completely connecting the plumbing, you may install in new plumbing lines may cause the first production of ice cubes to 160 minutes. IMPORTANT The ice maker is low in your Ice Maker Off To stop the ice maker, press the ice maker's On/Off button. The ice maker regulates the ice production and stops making a full tray of...
... the ice maker, pushing it will make a loud chattering noise. Visit www.frigidaire.com for your Ice Maker On After completely connecting the plumbing, you may install in new plumbing lines may cause the first production of ice cubes to 160 minutes. IMPORTANT The ice maker is low in your Ice Maker Off To stop the ice maker, press the ice maker's On/Off button. The ice maker regulates the ice production and stops making a full tray of...

Complete Owners Guide
Page 13
.... Adjusting the refrigerator control will change temperatures in the refrigerator and freezer compartments. it with food items. Refrigerator Control IMPORTANT Adjusting the refrigerator temperature control to OFF turns off power to the light bulb and other electrical components. After 24 hours, adjust the controls as desired; Temperature Adjustment Adjust the temperature gradually: adjust the knob in small increments, allowing the temperature to the refrigerator. To maintain temperature, a fan circulates air in both compartments. 13 CONTROLS AND SETTINGS Cool Down...
.... Adjusting the refrigerator control will change temperatures in the refrigerator and freezer compartments. it with food items. Refrigerator Control IMPORTANT Adjusting the refrigerator temperature control to OFF turns off power to the light bulb and other electrical components. After 24 hours, adjust the controls as desired; Temperature Adjustment Adjust the temperature gradually: adjust the knob in small increments, allowing the temperature to the refrigerator. To maintain temperature, a fan circulates air in both compartments. 13 CONTROLS AND SETTINGS Cool Down...
Complete Owners Guide
Page 14
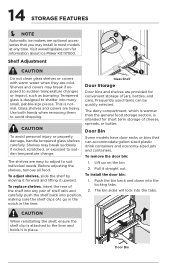
... door bin: 1. Door Bin Visit www.frigidaire.com for short term storage of cheese, spreads, or butter. Shelf Adjustment CAUTION Do not clean glass shelves or covers with warm water when they are provided for convenient storage of shelf rails and carefully push the shelf back into position, making sure the shelf clips (A) go in the notch in most models at any time. Tempered glass is intended for information about Ice Maker Kit...
... door bin: 1. Door Bin Visit www.frigidaire.com for short term storage of cheese, spreads, or butter. Shelf Adjustment CAUTION Do not clean glass shelves or covers with warm water when they are provided for convenient storage of shelf rails and carefully push the shelf back into position, making sure the shelf clips (A) go in the notch in most models at any time. Tempered glass is intended for information about Ice Maker Kit...

Complete Owners Guide
Page 16
.... The compressor may make these sounds more noticeable. NOTE Rigid foam insulation is very energy efficient but is a list of your freezer compartment. Some surfaces on floors, walls, and kitchen cabinets may have a high-pitched hum or pulsating sound. This is operating correctly. F Drain pan (not removable) You may hear water dripping into the drain pan during the defrost cycle. 16 NORMAL OPERATING SOUNDS Understanding...
.... The compressor may make these sounds more noticeable. NOTE Rigid foam insulation is very energy efficient but is a list of your freezer compartment. Some surfaces on floors, walls, and kitchen cabinets may have a high-pitched hum or pulsating sound. This is operating correctly. F Drain pan (not removable) You may hear water dripping into the drain pan during the defrost cycle. 16 NORMAL OPERATING SOUNDS Understanding...

Complete Owners Guide
Page 17
... set your temperature controls to turn off cooling, power to completely drain the water supply system. Wipe up . Do not use abrasive cleaners such as window sprays, scouring cleansers, brushes, flammable fluids, cleaning waxes, concentrated detergents, bleaches or cleansers containing petroleum products on plastic parts, interior doors, gaskets or cabinet liners. Contact a service representative to clean stainless steel. • Do not wash any spills immediately and clean the freezer and refrigerator...
... set your temperature controls to turn off cooling, power to completely drain the water supply system. Wipe up . Do not use abrasive cleaners such as window sprays, scouring cleansers, brushes, flammable fluids, cleaning waxes, concentrated detergents, bleaches or cleansers containing petroleum products on plastic parts, interior doors, gaskets or cabinet liners. Contact a service representative to clean stainless steel. • Do not wash any spills immediately and clean the freezer and refrigerator...

Complete Owners Guide
Page 18
... when replacing light bulbs to prevent scratching. NOTE: Always clean, wipe and dry with the grain to avoid getting cut. Rinse well, and wipe dry with bleach to clean smooth handles. 18 CARE AND CLEANING Part Interior & Door Liners Door Gaskets Drawers & Bins Glass Shelves Exterior Exterior (Stainless Steel Models Only) Replacing Light Bulbs Care and Cleaning Tips What To Use Tips and Precautions • Soap and water • Baking soda and water Use 2 tbsp of baking soda in warm water...
... when replacing light bulbs to prevent scratching. NOTE: Always clean, wipe and dry with the grain to avoid getting cut. Rinse well, and wipe dry with bleach to clean smooth handles. 18 CARE AND CLEANING Part Interior & Door Liners Door Gaskets Drawers & Bins Glass Shelves Exterior Exterior (Stainless Steel Models Only) Replacing Light Bulbs Care and Cleaning Tips What To Use Tips and Precautions • Soap and water • Baking soda and water Use 2 tbsp of baking soda in warm water...
Complete Owners Guide
Page 19
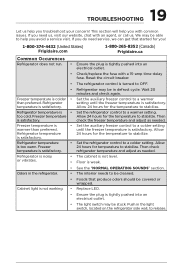
... cold. Refrigerator temperature is weak. • See the "NORMAL OPERATING SOUNDS" section. Allow 24 hours for the temperature to help you avoid a service visit. Refrigerator is noisy or vibrates. • The cabinet is not level. • Floor is too warm. Refrigerator temperature is satisfactory. 19 TROUBLESHOOTING Let us . If you need service, we can get that produce odors should be stuck. Freezer temperature is satisfactory. • Set the refrigerator control...
... cold. Refrigerator temperature is weak. • See the "NORMAL OPERATING SOUNDS" section. Allow 24 hours for the temperature to help you avoid a service visit. Refrigerator is noisy or vibrates. • The cabinet is not level. • Floor is too warm. Refrigerator temperature is satisfactory. 19 TROUBLESHOOTING Let us . If you need service, we can get that produce odors should be stuck. Freezer temperature is satisfactory. • Set the refrigerator control...

Complete Owners Guide
Page 20
... to any refrigerator or freezer failures. 6. In the USA, your appliance is warranted by this warranty. 5. USA 1-800-374-4432 Frigidaire 10200 David Taylor Drive Charlotte, NC 28262 Canada 1.800.265.8352 Electrolux Canada Corp. 5855 Terry Fox Way Mississauga, Ontario, Canada L5V 3E4 Service calls to repair or replace appliance light bulbs, air filters, water filters, other consumables, or knobs, handles, or other...
... to any refrigerator or freezer failures. 6. In the USA, your appliance is warranted by this warranty. 5. USA 1-800-374-4432 Frigidaire 10200 David Taylor Drive Charlotte, NC 28262 Canada 1.800.265.8352 Electrolux Canada Corp. 5855 Terry Fox Way Mississauga, Ontario, Canada L5V 3E4 Service calls to repair or replace appliance light bulbs, air filters, water filters, other consumables, or knobs, handles, or other...
Wiring Diagram
Page 1
... W Amps (running) 0.9 to 1.1 A 0.9 to 1.1 A Base Voltage 115 V 115 V Refrigerant Charge 1.58 oz. (45 g) DEFROST SPECIFICATIONS Thermal Fuse Heater Defrost Thermistor Cabinet Size: 14' Cut-out Watts Ohms Termination 161.6°F (72°C) 166 79.7 48°F (8.89°C) EVAPORATOR FAN MOTOR Watts RPM Amps 3.1 (max) 2700 CW 0.258 Running ICE MAKER SPECIFICATIONS Electrical 115 vac (127 vac max) 60 Hertz ICE MAKER CONNECTOR PLUG CONNECTIONS Wire Number Wire Color Connects to: 1 Light Blue Neutral 2 Yellow Water Valve 3 Black Line SERVICE DATA SHEET...
... W Amps (running) 0.9 to 1.1 A 0.9 to 1.1 A Base Voltage 115 V 115 V Refrigerant Charge 1.58 oz. (45 g) DEFROST SPECIFICATIONS Thermal Fuse Heater Defrost Thermistor Cabinet Size: 14' Cut-out Watts Ohms Termination 161.6°F (72°C) 166 79.7 48°F (8.89°C) EVAPORATOR FAN MOTOR Watts RPM Amps 3.1 (max) 2700 CW 0.258 Running ICE MAKER SPECIFICATIONS Electrical 115 vac (127 vac max) 60 Hertz ICE MAKER CONNECTOR PLUG CONNECTIONS Wire Number Wire Color Connects to: 1 Light Blue Neutral 2 Yellow Water Valve 3 Black Line SERVICE DATA SHEET...
Product Specifications Sheet
Page 1
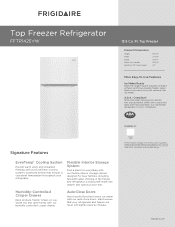
Top Freezer Product Dimensions Height Width Depth Depth (w/ Handle) Depth(w/ 90° Door Open) 59-7/8" 27-5/8" 25-1/4" 29-3/8" 54" More Easy-To-Use Features Ice Maker Ready Enjoy the largest bucket capacity available without sacrificing valuable freezer space thanks to our easy-to-install, optional slim ice maker. Compliant 1 With accessible shelving and controls that ensures a consistent temperature throughout your refrigerator and freezer are positioned within arm's reach and...
Top Freezer Product Dimensions Height Width Depth Depth (w/ Handle) Depth(w/ 90° Door Open) 59-7/8" 27-5/8" 25-1/4" 29-3/8" 54" More Easy-To-Use Features Ice Maker Ready Enjoy the largest bucket capacity available without sacrificing valuable freezer space thanks to our easy-to-install, optional slim ice maker. Compliant 1 With accessible shelving and controls that ensures a consistent temperature throughout your refrigerator and freezer are positioned within arm's reach and...
Product Specifications Sheet
Page 2
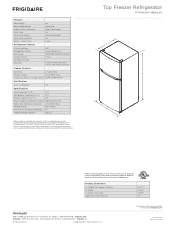
...265-8352 • frigidaire.ca FFTR1425V 02/19 © 2019 Electrolux Home Products, Inc. Door) Depth with restricted removal.) Product Dimensions A - Top Freezer Refrigerator Top Mount Features Door Design Door Handle Design Refrigerators Arc Integrated Cabinet Finish (Textured) Color-Coordinated Door Stops Yes Door Hinge Covers Color-Coordinated Door Reverse Option Yes Rollers - Front / Rear Fixed Refrigerator Features C Interior Lighting Refrigerator Shelves Deli Drawer Crisper Drawers Humidity Controls Door Bins LED 2 Adjustable Glass Half-Width Sliding Deli...
...265-8352 • frigidaire.ca FFTR1425V 02/19 © 2019 Electrolux Home Products, Inc. Door) Depth with restricted removal.) Product Dimensions A - Top Freezer Refrigerator Top Mount Features Door Design Door Handle Design Refrigerators Arc Integrated Cabinet Finish (Textured) Color-Coordinated Door Stops Yes Door Hinge Covers Color-Coordinated Door Reverse Option Yes Rollers - Front / Rear Fixed Refrigerator Features C Interior Lighting Refrigerator Shelves Deli Drawer Crisper Drawers Humidity Controls Door Bins LED 2 Adjustable Glass Half-Width Sliding Deli...
Product Specifications Sheet
Page 3
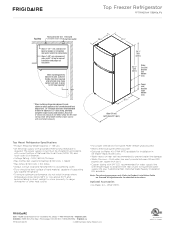
... limited crisper access with restricted removal.) 29 3/8" 27 5/8" 59 7/8" with rollers 60 1/2" with rollers Water line inlet location (left bottom rear) 25 1/4" Power cord location (right bottom rear) Allow 54" min. (with doors 90° open) Top Mount Refrigerator Specifications • Product Shipping Weight (approx.) - 135 Lbs. • An electrical supply with length equal to distance from rear of installation and proper air circulation When installing directly...
... limited crisper access with restricted removal.) 29 3/8" 27 5/8" 59 7/8" with rollers 60 1/2" with rollers Water line inlet location (left bottom rear) 25 1/4" Power cord location (right bottom rear) Allow 54" min. (with doors 90° open) Top Mount Refrigerator Specifications • Product Shipping Weight (approx.) - 135 Lbs. • An electrical supply with length equal to distance from rear of installation and proper air circulation When installing directly...


