

Installation Instructions (All Languages)
Page 1
... baskets, doors must be removed by customer after checking these instructions. NOTE These installation instructions are ready to begin enjoying your new refrigerator. • To become aware of its water supply (copper tubing) connections. When using the front rollers: 1 With both doors. Length...Use & Care Guide. • You may damage flooring. • Do not block the toe grille on all connections - or you for choosing Frigidaire. 8 Installation Checkoff List Doors Door seals completely to cabinet on the lower front of your body and off . •...
... baskets, doors must be removed by customer after checking these instructions. NOTE These installation instructions are ready to begin enjoying your new refrigerator. • To become aware of its water supply (copper tubing) connections. When using the front rollers: 1 With both doors. Length...Use & Care Guide. • You may damage flooring. • Do not block the toe grille on all connections - or you for choosing Frigidaire. 8 Installation Checkoff List Doors Door seals completely to cabinet on the lower front of your body and off . •...
Complete Owner s Guide
Page 1
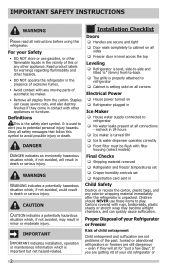
... 11 Before you Call 27 Connecting Water Supply 12 Major Appliance Warranty 30 Controls 14 www.frigidaire.com USA 1-800-944-9044 www.frigidaire.ca Canada 1-800-265-8352 All about the Use &Care of your Refrigerator A07198502 (June 2017) TABLE OF CONTENTS Important Safety Instructions 2 Storage Features 17 Features at a Glance 4 Automatic...
... 11 Before you Call 27 Connecting Water Supply 12 Major Appliance Warranty 30 Controls 14 www.frigidaire.com USA 1-800-944-9044 www.frigidaire.ca Canada 1-800-265-8352 All about the Use &Care of your Refrigerator A07198502 (June 2017) TABLE OF CONTENTS Important Safety Instructions 2 Storage Features 17 Features at a Glance 4 Automatic...
Complete Owner s Guide
Page 2
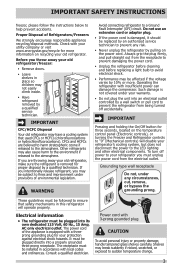
...chambers, and can cause severe cuts, and also destroy finishes if they will result in death or serious injury. For your Refrigerator or Freezer IMPORTANT IMPORTANT indicates installation, operation or maintenance information which , if not avoided, will sit for warnings regarding flammability... and other hazards. • DO NOT operate the refrigerator in the presence of explosive fumes. • Avoid contact with other flammable liquids in minor or moderate injury. CAUTION CAUTION indicates...
...chambers, and can cause severe cuts, and also destroy finishes if they will result in death or serious injury. For your Refrigerator or Freezer IMPORTANT IMPORTANT indicates installation, operation or maintenance information which , if not avoided, will sit for warnings regarding flammability... and other hazards. • DO NOT operate the refrigerator in the presence of explosive fumes. • Avoid contact with other flammable liquids in minor or moderate injury. CAUTION CAUTION indicates...
Complete Owner s Guide
Page 3
...an authorized service technician to the atmosphere. To turn off accidentally. The receptacle must be installed in this refrigerator will disable your old refrigerator. Before you must unplug the power cord from the electrical outlet. It must be plugged directly into a.... IMPORTANT SAFETY INSTRUCTIONS freezer, please follow the instructions below to a Ground Fault Interrupter (GFI) circuit. If you intentionally release refrigerant, you are believed to harm stratospheric ozone if released to prevent any circumstances, cut, remove, or bypass the grounding prong....
...an authorized service technician to the atmosphere. To turn off accidentally. The receptacle must be installed in this refrigerator will disable your old refrigerator. Before you must unplug the power cord from the electrical outlet. It must be plugged directly into a.... IMPORTANT SAFETY INSTRUCTIONS freezer, please follow the instructions below to a Ground Fault Interrupter (GFI) circuit. If you intentionally release refrigerant, you are believed to harm stratospheric ozone if released to prevent any circumstances, cut, remove, or bypass the grounding prong....

Complete Owner s Guide
Page 4
FEATURES AT A GLANCE Features may vary according to model Ice Cream Shelf Ice Maker Fixed Door Bin Ice Container Shelf Water Filter (Location varies by model) LED Lights Door Bins Slide Out Basket Toe Grille CAUTION: Do Not Remove Magnet Behind Dairy Compartment Dairy Compartment Glass Shelf Door Bin Glass Shelf Door Bin Deli Drawer Fixed Door Bin Crisper Pan and Cover Fixed Door Bin IMPORTANT Features not included with your refrigerator can be purchased at www.frigidaire.com or by calling 1-800-944-9044. 4
FEATURES AT A GLANCE Features may vary according to model Ice Cream Shelf Ice Maker Fixed Door Bin Ice Container Shelf Water Filter (Location varies by model) LED Lights Door Bins Slide Out Basket Toe Grille CAUTION: Do Not Remove Magnet Behind Dairy Compartment Dairy Compartment Glass Shelf Door Bin Glass Shelf Door Bin Deli Drawer Fixed Door Bin Crisper Pan and Cover Fixed Door Bin IMPORTANT Features not included with your refrigerator can be purchased at www.frigidaire.com or by calling 1-800-944-9044. 4
Complete Owner s Guide
Page 5
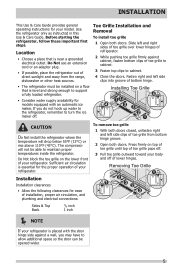
... you may have to allow additional space so the door can be able to turn the ice maker off . 3 Pull toe grille outward toward your refrigerator. The compressor will drop below 55°F (13°C) or rise above 110°F (43°C). Slide left and right sides of toe grille over... of direct sunlight and away from bottom hinge groove. 2 Open both doors. Fasten right and left side clips into groove of bottom hinge. • The refrigerator must be installed on top of toe grille until top of toe grille pops off . Sufficient air circulation is placed with an automatic ice maker...
... you may have to allow additional space so the door can be able to turn the ice maker off . 3 Pull toe grille outward toward your refrigerator. The compressor will drop below 55°F (13°C) or rise above 110°F (43°C). Slide left and right sides of toe grille over... of direct sunlight and away from bottom hinge groove. 2 Open both doors. Fasten right and left side clips into groove of bottom hinge. • The refrigerator must be installed on top of toe grille until top of toe grille pops off . Sufficient air circulation is placed with an automatic ice maker...
Complete Owner s Guide
Page 6
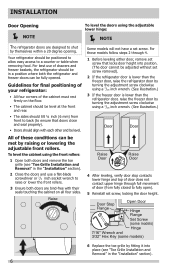
...8226; Doors should be level. INSTALLATION Door Opening NOTE To level the doors using the adjustable lower hinge: NOTE The refrigerator doors are bind-free with their seals touching the cabinet on the floor. • The cabinet should align with each other and be level... Reinstall set screw. For best use a flat-blade screwdriver or 3/8 inch socket wrench to raise or lower the front rollers. 3 Ensure both the refrigerator and freezer doors can be met by turning the adjustment screw clockwise using a 7/16 inch wrench. (See illustration.) 3 If the freezer door is ...
...8226; Doors should be level. INSTALLATION Door Opening NOTE To level the doors using the adjustable lower hinge: NOTE The refrigerator doors are bind-free with their seals touching the cabinet on the floor. • The cabinet should align with each other and be level... Reinstall set screw. For best use a flat-blade screwdriver or 3/8 inch socket wrench to raise or lower the front rollers. 3 Ensure both the refrigerator and freezer doors can be met by turning the adjustment screw clockwise using a 7/16 inch wrench. (See illustration.) 3 If the freezer door is ...
Complete Owner s Guide
Page 7
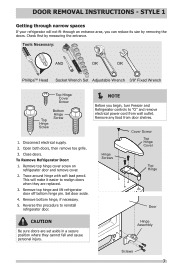
...Close doors. Trace around hinge with soft lead pencil. This will not fit through an entrance area, you begin, turn Freezer and Refrigerator controls to realign doors when they are set aside in a secure position where they cannot fall and cause personal injury. Remove top... hinge and lift refrigerator door off bottom hinge pin. Disconnect electrical supply. 2. Remove any food from wall outlet. DOOR REMOVAL INSTRUCTIONS - Open both doors, ...
...Close doors. Trace around hinge with soft lead pencil. This will not fit through an entrance area, you begin, turn Freezer and Refrigerator controls to realign doors when they are set aside in a secure position where they cannot fall and cause personal injury. Remove top... hinge and lift refrigerator door off bottom hinge pin. Disconnect electrical supply. 2. Remove any food from wall outlet. DOOR REMOVAL INSTRUCTIONS - Open both doors, ...
Complete Owner s Guide
Page 9
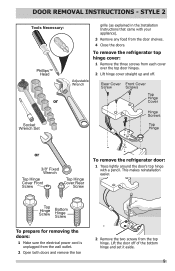
... Hinge Cover Socket Wrench Set Hinge Screws Top Hinge or 3/8" Fixed Wrench Top Hinge Cover Front Screw Top Hinge Cover Rear Screw To remove the refrigerator door: 1 Trace lightly around the door's top hinge with your appliance). 3 Remove any food from the door shelves. 4 Close the doors. Top Hinge Screw ... Lift the door off . STYLE 2 Tools Necessary: Phillips™ Head or grille (as explained in the Installation Instructions that came with a pencil. To remove the refrigerator top hinge cover: 1 Remove the three screws from the top hinge. DOOR REMOVAL INSTRUCTIONS -
... Hinge Cover Socket Wrench Set Hinge Screws Top Hinge or 3/8" Fixed Wrench Top Hinge Cover Front Screw Top Hinge Cover Rear Screw To remove the refrigerator door: 1 Trace lightly around the door's top hinge with your appliance). 3 Remove any food from the door shelves. 4 Close the doors. Top Hinge Screw ... Lift the door off . STYLE 2 Tools Necessary: Phillips™ Head or grille (as explained in the Installation Instructions that came with a pencil. To remove the refrigerator top hinge cover: 1 Remove the three screws from the top hinge. DOOR REMOVAL INSTRUCTIONS -
Complete Owner s Guide
Page 10
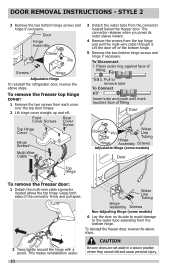
STYLE 2 3 Remove the two bottom hinge screws and hinge if necessary. Door Hinge Assembly Closer Pin Screws Hinge Adjustable Hinge To reinstall the refrigerator door, reverse the above steps. 2 Trace lightly around the hinge with a pencil. To Disconnect 1. Water Line Tubing Hinge Assembly Screws Non-Adjusting Hinge (some models) 6 ...
STYLE 2 3 Remove the two bottom hinge screws and hinge if necessary. Door Hinge Assembly Closer Pin Screws Hinge Adjustable Hinge To reinstall the refrigerator door, reverse the above steps. 2 Trace lightly around the hinge with a pencil. To Disconnect 1. Water Line Tubing Hinge Assembly Screws Non-Adjusting Hinge (some models) 6 ...
Complete Owner s Guide
Page 11
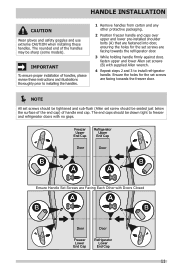
...and sub-flush (Allen set screws (B) with supplied Allen wrench. 4 Repeat steps 2 and 3 to freezer and refrigerator doors with Doors Closed Door Door Freezer Lower End Cap Refrigerator Lower End Cap 11 IMPORTANT To ensure proper installation of handles, please review these handles. The rounded end of ... just below the surface of the end cap) of the handles may be drawn tight to install refrigerator handle. Ensure the holes for the set screws are facing towards the refrigerator door. 3 While holding handle firmly against door, fasten upper and lower Allen set screw should be...
...and sub-flush (Allen set screws (B) with supplied Allen wrench. 4 Repeat steps 2 and 3 to freezer and refrigerator doors with Doors Closed Door Door Freezer Lower End Cap Refrigerator Lower End Cap 11 IMPORTANT To ensure proper installation of handles, please review these handles. The rounded end of ... just below the surface of the end cap) of the handles may be drawn tight to install refrigerator handle. Ensure the holes for the set screws are facing towards the refrigerator door. 3 While holding handle firmly against door, fasten upper and lower Allen set screw should be...
Complete Owner s Guide
Page 12
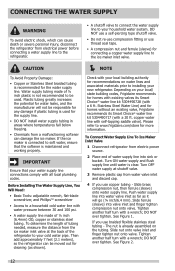
...soft water, ensure that your local/ state building codes, Frigidaire recommends for homes without an existing valve, Frigidaire recommends its Smart Choice® water line kit 5304490728 (with a 20 ft. Then add approximately 7 feet (2.1 meters), so the refrigerator can be moved out for the supply line. •... ¼ inch (6.4mm) OD, copper or stainless steel tubing. Check with your new refrigerator. Turn ON water supply and flush supply line until water is not recommended to www.frigidaire.com/store for more information. Push water supply line into water valve inlet as far as...
...soft water, ensure that your local/ state building codes, Frigidaire recommends for homes without an existing valve, Frigidaire recommends its Smart Choice® water line kit 5304490728 (with a 20 ft. Then add approximately 7 feet (2.1 meters), so the refrigerator can be moved out for the supply line. •... ¼ inch (6.4mm) OD, copper or stainless steel tubing. Check with your new refrigerator. Turn ON water supply and flush supply line until water is not recommended to www.frigidaire.com/store for more information. Push water supply line into water valve inlet as far as...
Complete Owner s Guide
Page 13
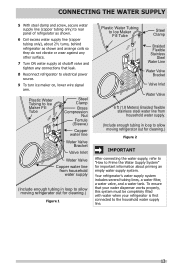
...Water Valve Bracket Valve Inlet Water Valve Copper water line from household water supply (Include enough tubing in loop to allow moving refrigerator out for cleaning.) Figure 1 Plastic Water Tubing to Ice Maker Fill Tube Steel Clamp Braided Flexible Stainless Steel Water Line Water ...Water Valve 6 ft (1.8 Meters) Braided flexible stainless steel water line from household water supply. (Include enough tubing in loop to allow moving refrigerator out for cleaning.) Figure 2 IMPORTANT After connecting the water supply, refer to "How to Prime the Water Supply System" for important information...
...Water Valve Bracket Valve Inlet Water Valve Copper water line from household water supply (Include enough tubing in loop to allow moving refrigerator out for cleaning.) Figure 1 Plastic Water Tubing to Ice Maker Fill Tube Steel Clamp Braided Flexible Stainless Steel Water Line Water ...Water Valve 6 ft (1.8 Meters) Braided flexible stainless steel water line from household water supply. (Include enough tubing in loop to allow moving refrigerator out for cleaning.) Figure 2 IMPORTANT After connecting the water supply, refer to "How to Prime the Water Supply System" for important information...
Complete Owner s Guide
Page 14
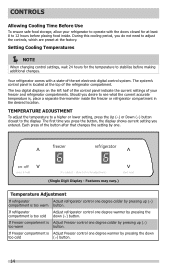
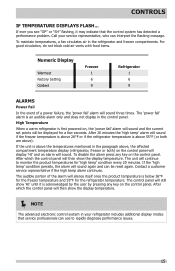
...button after that changes the setting by one. (Single Digit Display - Each press of your refrigerator to operate with a state-of the refrigerator compartment. If refrigerator Adjust refrigerator control one degree colder by pressing the compartment is , place a separate thermometer inside . Setting... current accurate temperature is too cold down too cold (∨) button. 14 Features may vary.) Temperature Adjustment If refrigerator Adjust refrigerator control one degree warmer by pressing up (∧) compartment is Adjust Freezer control one degree warmer by pressing up ...
...button after that changes the setting by one. (Single Digit Display - Each press of your refrigerator to operate with a state-of the refrigerator compartment. If refrigerator Adjust refrigerator control one degree colder by pressing the compartment is , place a separate thermometer inside . Setting... current accurate temperature is too cold down too cold (∨) button. 14 Features may vary.) Temperature Adjustment If refrigerator Adjust refrigerator control one degree warmer by pressing up (∧) compartment is Adjust Freezer control one degree warmer by pressing up ...
Complete Owner s Guide
Page 15
...alarm will then show the display temperature. NOTE The advanced electronic control system in the paragraph above, the affected compartment temperature display (refrigerator, freezer or both are above 55°F (or both ) on the control panel. The control panel will be reset again. CONTROLS IF ...TEMPERATURE DISPLAYS FLASH... High Temperature When a warm refrigerator is acknowledged by the user by pressing any key on , the 'power fail' alarm will sound and the current set points will still ...
...alarm will then show the display temperature. NOTE The advanced electronic control system in the paragraph above, the affected compartment temperature display (refrigerator, freezer or both are above 55°F (or both ) on the control panel. The control panel will be reset again. CONTROLS IF ...TEMPERATURE DISPLAYS FLASH... High Temperature When a warm refrigerator is acknowledged by the user by pressing any key on , the 'power fail' alarm will sound and the current set points will still ...
Complete Owner s Guide
Page 16
... to lights and other electrical components. Each time you disable the cooling system, all refrigeration to the freezer and refrigerator compartments stops. To turn off You can disable the cooling system in your refrigerator by pressing the On/Off button located on the left side of the temperature control ...system back on, you must unplug the power cord from the wall outlet. CONTROLS Turning the Cooling system on and off power to your refrigerator you must again press and hold it for three more seconds. Once you make settings on the control panel, a single audible tone acknowledges...
... to lights and other electrical components. Each time you disable the cooling system, all refrigeration to the freezer and refrigerator compartments stops. To turn off You can disable the cooling system in your refrigerator by pressing the On/Off button located on the left side of the temperature control ...system back on, you must unplug the power cord from the wall outlet. CONTROLS Turning the Cooling system on and off power to your refrigerator you must again press and hold it for three more seconds. Once you make settings on the control panel, a single audible tone acknowledges...
Complete Owner s Guide
Page 17
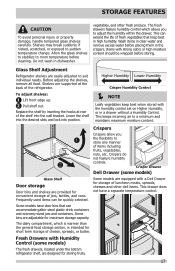
...moisture content should be quickly selected. Items with the humidity control set on Higher Humidity, or in high humidity. Glass Shelf Adjustment Refrigerator shelves are adjustable for maximum storage capacity. Before adjusting the shelves, remove all food. To adjust shelves: 1 Lift front edge ...supported at rear of jars, bottles, and cans. Crisper Drawer Deli Drawer (some models) The fresh drawers, located under the bottom refrigerator shelf, are provided for short term storage of items including fruits, vegetables, nuts, etc. Fresh Drawers with a Deli Drawer for ...
...moisture content should be quickly selected. Items with the humidity control set on Higher Humidity, or in high humidity. Glass Shelf Adjustment Refrigerator shelves are adjustable for maximum storage capacity. Before adjusting the shelves, remove all food. To adjust shelves: 1 Lift front edge ...supported at rear of jars, bottles, and cans. Crisper Drawer Deli Drawer (some models) The fresh drawers, located under the bottom refrigerator shelf, are provided for short term storage of items including fruits, vegetables, nuts, etc. Fresh Drawers with a Deli Drawer for ...
Complete Owner s Guide
Page 18
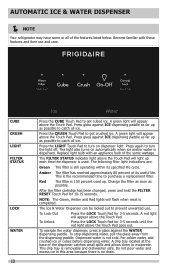
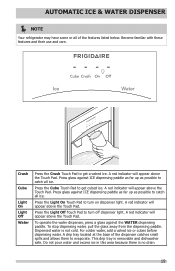
... life. Do not pour water and excess ice in this area because there is removable and dishwasher safe. AUTOMATIC ICE & WATER DISPENSER NOTE Your refrigerator may have some or all ice. The light also turns on dispenser light. The FILTER STATUS indicator light above the Touch Pad will appear above...
... life. Do not pour water and excess ice in this area because there is removable and dishwasher safe. AUTOMATIC ICE & WATER DISPENSER NOTE Your refrigerator may have some or all ice. The light also turns on dispenser light. The FILTER STATUS indicator light above the Touch Pad will appear above...
Complete Owner s Guide
Page 19
... not cold. This drip tray is removable and dishwasher safe. A red indicator will appear above the Touch Pad. AUTOMATIC ICE & WATER DISPENSER NOTE Your refrigerator may have some or all ice. To stop dispensing water, pull the glass away from the dispensing paddle.
... not cold. This drip tray is removable and dishwasher safe. A red indicator will appear above the Touch Pad. AUTOMATIC ICE & WATER DISPENSER NOTE Your refrigerator may have some or all ice. To stop dispensing water, pull the glass away from the dispensing paddle.
Complete Owner s Guide
Page 20
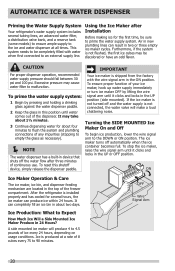
...tank (some models) to ensure ample supply to malfunction. OFF Wire Signal Arm 20 AUTOMATIC ICE & WATER DISPENSER Priming the Water Supply System Your refrigerator's water supply system includes several hours, the ice maker can produce ice within 24 hours. Excessive pressure may be discolored or have an odd flavor... MOUNTED Ice Maker On and Off To begin ice production, lower the wire signal arm to prime the water supply system. After the refrigerator is installed properly and has cooled for the first time, be completely filled with the wire signal arm in two or three empty ice...
...tank (some models) to ensure ample supply to malfunction. OFF Wire Signal Arm 20 AUTOMATIC ICE & WATER DISPENSER Priming the Water Supply System Your refrigerator's water supply system includes several hours, the ice maker can produce ice within 24 hours. Excessive pressure may be discolored or have an odd flavor... MOUNTED Ice Maker On and Off To begin ice production, lower the wire signal arm to prime the water supply system. After the refrigerator is installed properly and has cooled for the first time, be completely filled with the wire signal arm in two or three empty ice...


