

Installation Instructions (All Languages)
Page 1
... refrigerator and freezer doors, did you purchased it to a water supply, make sure the ice maker's power switch is turned ON. Ice & Water Dispenser operates correctly Front filter must be able to avoid vibration or wear against other heat source. • Floor should only be removed by turning the adjustment screw clockwise using the adjustable lower hinge (Type 2 without set Registration Card sent in Not satisfied with filter housing (some models) 4 Hinge 1 Before leveling either door, remove set...
... refrigerator and freezer doors, did you purchased it to a water supply, make sure the ice maker's power switch is turned ON. Ice & Water Dispenser operates correctly Front filter must be able to avoid vibration or wear against other heat source. • Floor should only be removed by turning the adjustment screw clockwise using the adjustable lower hinge (Type 2 without set Registration Card sent in Not satisfied with filter housing (some models) 4 Hinge 1 Before leveling either door, remove set...
Complete Owner s Guide
Page 2
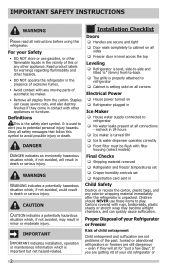
Definitions This is turned ON Ice & water dispenser operates correctly Front filter must be flush with other appliances or furniture. Final Checks Shipping material removed Refrigerator and freezer temperatures set WARNING Crisper humidity controls set Registration card sent in WARNING indicates a potentially hazardous situation which , if not avoided, may become airtight chambers, and can cause severe cuts, and also destroy...
Definitions This is turned ON Ice & water dispenser operates correctly Front filter must be flush with other appliances or furniture. Final Checks Shipping material removed Refrigerator and freezer temperatures set WARNING Crisper humidity controls set Registration card sent in WARNING indicates a potentially hazardous situation which , if not avoided, may become airtight chambers, and can cause severe cuts, and also destroy...
Complete Owner s Guide
Page 3
... the refrigerator before cleaning and before replacing a light bulb to the atmosphere. IMPORTANT CFC/HCFC Disposal Your old refrigerator may be installed in accordance with local codes and ordinances. Before you may have a cooling system that safety mechanisms in place so children may be plugged into an electrical outlet controlled by 10% or more information on the temperature control panel (Electronic controls), or turning the Freezer and Refrigerator controls to...
... the refrigerator before cleaning and before replacing a light bulb to the atmosphere. IMPORTANT CFC/HCFC Disposal Your old refrigerator may be installed in accordance with local codes and ordinances. Before you may have a cooling system that safety mechanisms in place so children may be plugged into an electrical outlet controlled by 10% or more information on the temperature control panel (Electronic controls), or turning the Freezer and Refrigerator controls to...
Complete Owner s Guide
Page 5
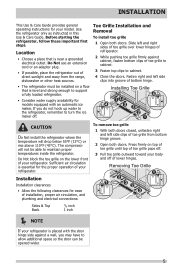
... possible, place the refrigerator out of your model. Toe Grille Installation and Removal To install toe grille 1 Open both doors. Press firmly on the lower front of direct sunlight and away from bottom hinge groove. 2 Open both doors. Use the refrigerator only as instructed in this Use & Care Guide. INSTALLATION This Use & Care Guide provides general operating instructions for ease of installation, proper air circulation, and plumbing and electrical connections: To remove toe grille 1 With both doors closed, unfasten...
... possible, place the refrigerator out of your model. Toe Grille Installation and Removal To install toe grille 1 Open both doors. Press firmly on the lower front of direct sunlight and away from bottom hinge groove. 2 Open both doors. Use the refrigerator only as instructed in this Use & Care Guide. INSTALLATION This Use & Care Guide provides general operating instructions for ease of installation, proper air circulation, and plumbing and electrical connections: To remove toe grille 1 With both doors closed, unfasten...
Complete Owner s Guide
Page 6
... to shut by themselves within a 20 degree opening. Door Stop Flange Open Door Hinge Flange Set Screw (some models) Hinge 7/16" Wrench and 3/32" Hex Key (some models) 6 Replace the toe grille by fitting it into position. (The door cannot be adjusted without set screw removed). 2 If the refrigerator door is lower than the freezer door, raise the refrigerator door by turning the adjustment screw clockwise using a 7/16 inch wrench. (See illustration.) 3 If the freezer door is...
... to shut by themselves within a 20 degree opening. Door Stop Flange Open Door Hinge Flange Set Screw (some models) Hinge 7/16" Wrench and 3/32" Hex Key (some models) 6 Replace the toe grille by fitting it into position. (The door cannot be adjusted without set screw removed). 2 If the refrigerator door is lower than the freezer door, raise the refrigerator door by turning the adjustment screw clockwise using a 7/16 inch wrench. (See illustration.) 3 If the freezer door is...
Complete Owner s Guide
Page 7
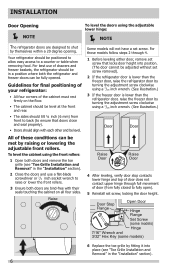
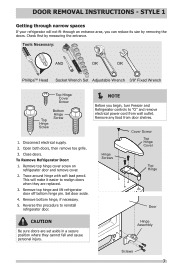
... Set Adjustable Wrench 3/8" Fixed Wrench Top Hinge Cover Screw Top Hinge Screw Bottom Hinge Screw 1. To Remove Refrigerator Door: 1. Reverse this procedure to reinstall refrigerator door. NOTE Before you can reduce its size by measuring the entrance. Hinge Screws Cover Screw Top Hinge Cover Top Hinge Door CAUTION Be sure doors are replaced. 3. Disconnect electrical supply. 2. Remove top hinge and lift refrigerator door off bottom hinge pin. Hinge Assembly Screws 7 STYLE 1 Getting through an entrance area, you begin, turn Freezer and Refrigerator...
... Set Adjustable Wrench 3/8" Fixed Wrench Top Hinge Cover Screw Top Hinge Screw Bottom Hinge Screw 1. To Remove Refrigerator Door: 1. Reverse this procedure to reinstall refrigerator door. NOTE Before you can reduce its size by measuring the entrance. Hinge Screws Cover Screw Top Hinge Cover Top Hinge Door CAUTION Be sure doors are replaced. 3. Disconnect electrical supply. 2. Remove top hinge and lift refrigerator door off bottom hinge pin. Hinge Assembly Screws 7 STYLE 1 Getting through an entrance area, you begin, turn Freezer and Refrigerator...
Complete Owner s Guide
Page 13
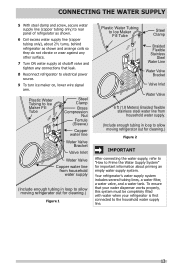
... water supply at shutoff valve and tighten any connections that your water dispenser works properly, this system must be completely filled with water when your refrigerator is first connected to the household water supply line. 13 Your refrigerator's water supply system includes several tubing lines, a water filter, a water valve, and a water tank. To ensure that leak. 8 Reconnect refrigerator to Prime the Water Supply System" for cleaning.) Figure 2 IMPORTANT After connecting the water supply, refer to "How to electrical power source. 9 To turn ice maker on, lower wire...
... water supply at shutoff valve and tighten any connections that your water dispenser works properly, this system must be completely filled with water when your refrigerator is first connected to the household water supply line. 13 Your refrigerator's water supply system includes several tubing lines, a water filter, a water valve, and a water tank. To ensure that leak. 8 Reconnect refrigerator to Prime the Water Supply System" for cleaning.) Figure 2 IMPORTANT After connecting the water supply, refer to "How to electrical power source. 9 To turn ice maker on, lower wire...
Complete Owner s Guide
Page 18
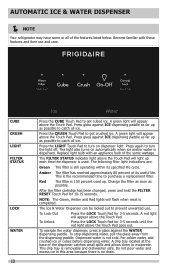
... get crushed ice. Replace light bulb with these features and their use . The following filter light indications are: Green The filter is still operating within its useful life. This is completed. After the filter cartridge has been changed, press and hold the FILTER RESET Touch Pad for 3-5 seconds. NOTE: The Green, Amber and Red lights will appear above the Touch Pad. To stop dispensing water, pull the glass away from the dispensing paddle. A drip tray located...
... get crushed ice. Replace light bulb with these features and their use . The following filter light indications are: Green The filter is still operating within its useful life. This is completed. After the filter cartridge has been changed, press and hold the FILTER RESET Touch Pad for 3-5 seconds. NOTE: The Green, Amber and Red lights will appear above the Touch Pad. To stop dispensing water, pull the glass away from the dispensing paddle. A drip tray located...
Complete Owner s Guide
Page 20
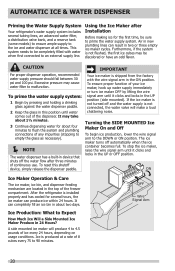
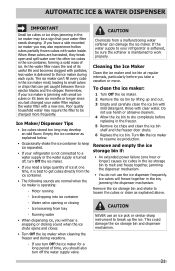
... on usage conditions. Using the Ice Maker after three minutes of the freezer compartment. ON Ice Maker Operation & Care The ice maker, ice bin, and dispenser feeding mechanism are located in device that shuts off the water flow after Installation Before making ice for several tubing lines, an advanced water filter, a distribution valve bank, and a reserve tank (some models) to ensure ample supply to be discolored or have an odd flavor. A side mounted ice maker will make a loud chattering noise.
... on usage conditions. Using the Ice Maker after three minutes of the freezer compartment. ON Ice Maker Operation & Care The ice maker, ice bin, and dispenser feeding mechanism are located in device that shuts off the water flow after Installation Before making ice for several tubing lines, an advanced water filter, a distribution valve bank, and a reserve tank (some models) to ensure ample supply to be discolored or have an odd flavor. A side mounted ice maker will make a loud chattering noise.
Complete Owner s Guide
Page 21
... ice maker. • If you will freeze together in the bin, jamming the dispenser mechanism. If you turn Off the ice maker for a long period of ice at regular intervals, particularly before replacing in the ice storage bin to break up and out. 3 Empty and carefully clean the ice bin with a new one hour or longer) causes ice cubes in the freezer. 5 Remove ice chips and clean the ice bin shelf and the freezer door chute. 6 Replace the ice bin. Motor running - Ice...
... ice maker. • If you will freeze together in the bin, jamming the dispenser mechanism. If you turn Off the ice maker for a long period of ice at regular intervals, particularly before replacing in the ice storage bin to break up and out. 3 Empty and carefully clean the ice bin with a new one hour or longer) causes ice cubes in the freezer. 5 Remove ice chips and clean the ice bin shelf and the freezer door chute. 6 Replace the ice bin. Motor running - Ice...
Complete Owner s Guide
Page 23
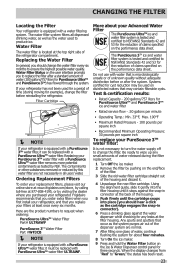
... side of claims specified on the Ice & Water Dispenser control panel for the reduction of the refrigerator compartment. Water Filter The water filter is located at the filter housing. Using the alignment guide, slide it . 4 Unpackage the new filter cartridge. More about four minutes. 8 Turn On the ice maker. 9 Press and hold the Water Filter button on the performance data sheet. Do not use with a PureSource UltraTM water filter. Test & certification results: • Rated Capacity - 200 gallons/757 liters...
... side of claims specified on the Ice & Water Dispenser control panel for the reduction of the refrigerator compartment. Water Filter The water filter is located at the filter housing. Using the alignment guide, slide it . 4 Unpackage the new filter cartridge. More about four minutes. 8 Turn On the ice maker. 9 Press and hold the Water Filter button on the performance data sheet. Do not use with a PureSource UltraTM water filter. Test & certification results: • Rated Capacity - 200 gallons/757 liters...

Complete Owner s Guide
Page 26
.... Use same wattage when replacing LED bulb. 26 Always follow manufacturer's instructions. Vacuum backside, wipe with clean water and a soft cloth. Remove toe grille (see Installation Instructions). Rinse with sudsy cloth or sponge. NOTE: Always clean, wipe and dry with the grain to clean stainless steel. Use a non-abrasive stainless steel cleaner. CARE & CLEANING Part Interior & Door Liners Door Gaskets Drawers & Bins Glass Shelves Toe Grille Exterior & Handles Exterior & Handles (Stainless Steel Models Only) Replacing LED Bulbs Care & Cleaning Tips What To Use...
.... Use same wattage when replacing LED bulb. 26 Always follow manufacturer's instructions. Vacuum backside, wipe with clean water and a soft cloth. Remove toe grille (see Installation Instructions). Rinse with sudsy cloth or sponge. NOTE: Always clean, wipe and dry with the grain to clean stainless steel. Use a non-abrasive stainless steel cleaner. CARE & CLEANING Part Interior & Door Liners Door Gaskets Drawers & Bins Glass Shelves Toe Grille Exterior & Handles Exterior & Handles (Stainless Steel Models Only) Replacing LED Bulbs Care & Cleaning Tips What To Use...
Complete Owner s Guide
Page 27
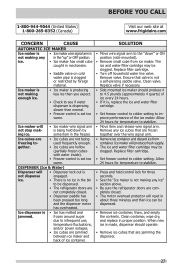
...; See the "Ice maker is not making ice. Ice maker will • Ice maker wire signal arm not stop making any ice" section above. • Be sure the refrigerator doors are completely closed . • Dispenser paddle has been pressed too long and the dispenser motor has overheated. Replace filter cartridge. • Set freezer control to see if water dispenser is dispensing slower than you expect. • Check to colder setting. Ice maker is not making any ice cubes that valve is not...
...; See the "Ice maker is not making ice. Ice maker will • Ice maker wire signal arm not stop making any ice" section above. • Be sure the refrigerator doors are completely closed . • Dispenser paddle has been pressed too long and the dispenser motor has overheated. Replace filter cartridge. • Set freezer control to see if water dispenser is dispensing slower than you expect. • Check to colder setting. Ice maker is not making any ice cubes that valve is not...
Complete Owner s Guide
Page 28
...; Replace filter cartridge. Drawers are too low (well systems only). • Reverse osmosis system is in drawer. • Ensure drawer is properly installed on is dirty. • Remove top layer of water to freshen the supply. • Connect unit to cold water line that supplies water to move. • Food is touching shelf on top of drawer. • Track that you hear it lock solidly into position. • Open household water line valve...
...; Replace filter cartridge. Drawers are too low (well systems only). • Reverse osmosis system is in drawer. • Ensure drawer is properly installed on is dirty. • Remove top layer of water to freshen the supply. • Connect unit to cold water line that supplies water to move. • Food is touching shelf on top of drawer. • Track that you hear it lock solidly into position. • Open household water line valve...
Complete Owner s Guide
Page 29
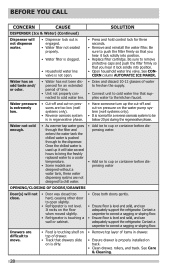
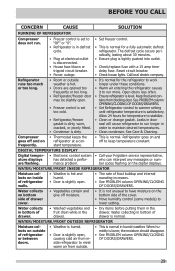
... lights. Open doors less often. • Ensure refrigerator is normal. See Care & Cleaning. Water collects on bottom side of the cover. • Move humidity control (some models) to stabilize. • Clean or change gasket. Water collecting in the drawer. Call local electric company. Allow 24 hours for a fully automatic defrost refrigerator. Compressor • Thermostat keeps the goes off to "OF" or "0". • Refrigerator is set to keep temperature constant. frequently. mance problem. WATER/MOISTURE/FROST INSIDE REFRIGERATOR...
... lights. Open doors less often. • Ensure refrigerator is normal. See Care & Cleaning. Water collects on bottom side of the cover. • Move humidity control (some models) to stabilize. • Clean or change gasket. Water collecting in the drawer. Call local electric company. Allow 24 hours for a fully automatic defrost refrigerator. Compressor • Thermostat keeps the goes off to "OF" or "0". • Refrigerator is set to keep temperature constant. frequently. mance problem. WATER/MOISTURE/FROST INSIDE REFRIGERATOR...

Complete Owner s Guide
Page 30
... is in accordance with the provided instructions. This warranty only applies in a commercial setting. 7. Products purchased "as described or illustrated are not a part of Electrolux Home Products, Inc. Damages to repair or replace appliance light bulbs, air filters, water filters, other consumables, or knobs, handles, or other than in your appliance is warranted by Electrolux Canada Corp. If service is performed, it is shipped...
... is in accordance with the provided instructions. This warranty only applies in a commercial setting. 7. Products purchased "as described or illustrated are not a part of Electrolux Home Products, Inc. Damages to repair or replace appliance light bulbs, air filters, water filters, other consumables, or knobs, handles, or other than in your appliance is warranted by Electrolux Canada Corp. If service is performed, it is shipped...
Wiring Diagram
Page 1
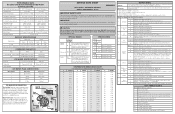
... is turned off evaporator fan, displays "_". --- Fan B Once compressor is a problem with the damper switch or damper switch circuit. --- Some models) 8.0 1100 CW Opposite Shaft 2550 CW Opposite Shaft .03 Running .07 Running ICE MAKER SPECIFICATIONS Electrical 115 vac (127 vac max) 60 Hertz Thermostat Heater Wattage Opens at 48ºF (9ºC) Closes at 15ºF (-9ºC) 165 ICE MAKER PLUG CONNECTIONS Wire Number Wire Color Connect to deactivate. The correct fill is blank when selecting test. SERVICE DATA SHEET ICE & WATER...
... is turned off evaporator fan, displays "_". --- Fan B Once compressor is a problem with the damper switch or damper switch circuit. --- Some models) 8.0 1100 CW Opposite Shaft 2550 CW Opposite Shaft .03 Running .07 Running ICE MAKER SPECIFICATIONS Electrical 115 vac (127 vac max) 60 Hertz Thermostat Heater Wattage Opens at 48ºF (9ºC) Closes at 15ºF (-9ºC) 165 ICE MAKER PLUG CONNECTIONS Wire Number Wire Color Connect to deactivate. The correct fill is blank when selecting test. SERVICE DATA SHEET ICE & WATER...
Wiring Diagram
Page 2
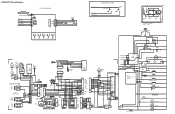
... START S RUN C M COMP. MOTOR 6 3 S 2 5 * M L1 PTC STARTER CAPACITOR IS ONLY USED WITH * SOME P.T.C. FAN COIL HEATER DEFROST THERM. BROWN WATER VALVE DIODES TO BE POLARIZED AS SHOWN. BLU BROWN BLUE GRN/YEL RED/WHT PURPLE TAN BLU/WHT LT. LIGHT SWITCH FRZR. A02644901 Wiring Diagram ICE & WATER CONTROL BOARD DISPENSER HOUSING HEATER PURPLE (CUBE) BLUE/WHT (LINE) LT. FAN LIGHT COMPRESSOR GROUND LT. DRAIN TROUGH FRZR. BLU RED FRZR DOOR GROUND...
... START S RUN C M COMP. MOTOR 6 3 S 2 5 * M L1 PTC STARTER CAPACITOR IS ONLY USED WITH * SOME P.T.C. FAN COIL HEATER DEFROST THERM. BROWN WATER VALVE DIODES TO BE POLARIZED AS SHOWN. BLU BROWN BLUE GRN/YEL RED/WHT PURPLE TAN BLU/WHT LT. LIGHT SWITCH FRZR. A02644901 Wiring Diagram ICE & WATER CONTROL BOARD DISPENSER HOUSING HEATER PURPLE (CUBE) BLUE/WHT (LINE) LT. FAN LIGHT COMPRESSOR GROUND LT. DRAIN TROUGH FRZR. BLU RED FRZR DOOR GROUND...

Product Specifications Sheet
Page 2
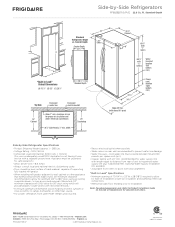
... Hinge Covers Rollers - Front / Rear Energy Saver Plus Technology Water Filter Location StUaltranSoftd™ ard-Depth SxS Refrigerators Frigidaire Baseline Stainless (S), C-Coordinated (P / E) Black (S), C-Coordinated (P / E) Yes / Yes Hidden Adjustable / Yes Yes Top Right Rear Dispenser Controls Ready-Select® Dispenser Design Tall, 2-Paddle C Number of Dispenser Buttons 5 Crushed Ice / Cube Ice / Water Yes / Yes / Yes Ice Option / Freeze Option Display On / Off Option Control Lock / Light Yes / Yes Temp / Door Ajar / Power Failure Alerts Water Filter Change Indicator...
... Hinge Covers Rollers - Front / Rear Energy Saver Plus Technology Water Filter Location StUaltranSoftd™ ard-Depth SxS Refrigerators Frigidaire Baseline Stainless (S), C-Coordinated (P / E) Black (S), C-Coordinated (P / E) Yes / Yes Hidden Adjustable / Yes Yes Top Right Rear Dispenser Controls Ready-Select® Dispenser Design Tall, 2-Paddle C Number of Dispenser Buttons 5 Crushed Ice / Cube Ice / Water Yes / Yes / Yes Ice Option / Freeze Option Display On / Off Option Control Lock / Light Yes / Yes Temp / Door Ajar / Power Failure Alerts Water Filter Change Indicator...
Product Specifications Sheet
Page 3
... proper air circulation and water / electrical connections 287/8" Side Panels, 1/2" min. Optional Water Supply Installation Kits available. • Adjustable front rollers to wall, cabinet or other heat source. • For proper ventilation, front grille MUST remain unobstructed. • Recess electrical outlet when possible. • Water recess on adequately wired 120V, dedicated circuit having 2-wire service with doors 90° open) Power cord location (right bottom rear) Side-by -Side Refrigerators FFSS2325T...
... proper air circulation and water / electrical connections 287/8" Side Panels, 1/2" min. Optional Water Supply Installation Kits available. • Adjustable front rollers to wall, cabinet or other heat source. • For proper ventilation, front grille MUST remain unobstructed. • Recess electrical outlet when possible. • Water recess on adequately wired 120V, dedicated circuit having 2-wire service with doors 90° open) Power cord location (right bottom rear) Side-by -Side Refrigerators FFSS2325T...


