
Installation Instructions (All Languages)
Page 1
...proper air circulation, and plumbing and electrical connections: Sides & Top: 3/8 inch / Rear: 1 inch 2 Transport Unpackaged Refrigerator To Site By now, you for choosing Frigidaire. 8 Installation Checkoff List Doors Door seals completely to cabinet on all sides Doors are ...these instructions. NOTE These installation instructions are not completed. construction for the water supply connection at the rear of your refrigerator: • All four corners of the cabinet must be flush with filter housing (some models) Final Checks Shipping ...
...proper air circulation, and plumbing and electrical connections: Sides & Top: 3/8 inch / Rear: 1 inch 2 Transport Unpackaged Refrigerator To Site By now, you for choosing Frigidaire. 8 Installation Checkoff List Doors Door seals completely to cabinet on all sides Doors are ...these instructions. NOTE These installation instructions are not completed. construction for the water supply connection at the rear of your refrigerator: • All four corners of the cabinet must be flush with filter housing (some models) Final Checks Shipping ...
Complete Owner s Guide
Page 1
... 11 Before you Call 27 Connecting Water Supply 12 Major Appliance Warranty 30 Controls 14 www.frigidaire.com USA 1-800-944-9044 www.frigidaire.ca Canada 1-800-265-8352 All about the Use &Care of your Refrigerator A07198502 (June 2017) TABLE OF CONTENTS Important Safety Instructions 2 Storage Features 17 Features at a Glance 4 Automatic...
... 11 Before you Call 27 Connecting Water Supply 12 Major Appliance Warranty 30 Controls 14 www.frigidaire.com USA 1-800-944-9044 www.frigidaire.ca Canada 1-800-265-8352 All about the Use &Care of your Refrigerator A07198502 (June 2017) TABLE OF CONTENTS Important Safety Instructions 2 Storage Features 17 Features at a Glance 4 Automatic...
Complete Owner s Guide
Page 2
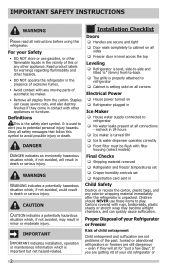
...models) DANGER indicates an imminently hazardous situation which , if not avoided, could result in minor or moderate injury. Junked or abandoned refrigerators or freezers are secure and tight Door seals completely to cabinet on all sides Freezer door is level across... Ice & water dispenser operates correctly Front filter must be flush with any exterior wrapping material immediately after the refrigerator is the safety alert symbol. Definitions This is unpacked. IMPORTANT SAFETY INSTRUCTIONS WARNING Please read all instructions before using this or any...
...models) DANGER indicates an imminently hazardous situation which , if not avoided, could result in minor or moderate injury. Junked or abandoned refrigerators or freezers are secure and tight Door seals completely to cabinet on all sides Freezer door is level across... Ice & water dispenser operates correctly Front filter must be flush with any exterior wrapping material immediately after the refrigerator is the safety alert symbol. Definitions This is unpacked. IMPORTANT SAFETY INSTRUCTIONS WARNING Please read all instructions before using this or any...
Complete Owner s Guide
Page 3
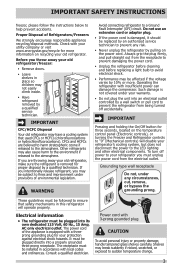
...be followed to the LED lighting and other electrical components. Consult a qualified electrician. Shelves may not easily climb inside. • Have refrigerant removed by 10% or more information on recycling your warranty. • Do not plug the unit into an electrical outlet controlled by...Ground Fault Interrupter (GFI) circuit. Always grip the plug firmly, and pull straight out from being turned off power to your refrigerator's cooling system, but does not disconnect the power to ensure that used CFCs or HCFCs (chlorofluorocarbons or hydrochlorofluorocarbons). Grounding type wall ...
...be followed to the LED lighting and other electrical components. Consult a qualified electrician. Shelves may not easily climb inside. • Have refrigerant removed by 10% or more information on recycling your warranty. • Do not plug the unit into an electrical outlet controlled by...Ground Fault Interrupter (GFI) circuit. Always grip the plug firmly, and pull straight out from being turned off power to your refrigerator's cooling system, but does not disconnect the power to ensure that used CFCs or HCFCs (chlorofluorocarbons or hydrochlorofluorocarbons). Grounding type wall ...

Complete Owner s Guide
Page 4
FEATURES AT A GLANCE Features may vary according to model Ice Cream Shelf Ice Maker Fixed Door Bin Ice Container Shelf Water Filter (Location varies by model) LED Lights Door Bins Slide Out Basket Toe Grille CAUTION: Do Not Remove Magnet Behind Dairy Compartment Dairy Compartment Glass Shelf Door Bin Glass Shelf Door Bin Deli Drawer Fixed Door Bin Crisper Pan and Cover Fixed Door Bin IMPORTANT Features not included with your refrigerator can be purchased at www.frigidaire.com or by calling 1-800-944-9044. 4
FEATURES AT A GLANCE Features may vary according to model Ice Cream Shelf Ice Maker Fixed Door Bin Ice Container Shelf Water Filter (Location varies by model) LED Lights Door Bins Slide Out Basket Toe Grille CAUTION: Do Not Remove Magnet Behind Dairy Compartment Dairy Compartment Glass Shelf Door Bin Glass Shelf Door Bin Deli Drawer Fixed Door Bin Crisper Pan and Cover Fixed Door Bin IMPORTANT Features not included with your refrigerator can be purchased at www.frigidaire.com or by calling 1-800-944-9044. 4
Complete Owner s Guide
Page 5
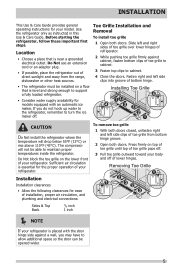
...Location • Choose a place that is near a grounded electrical outlet. Press firmly on the lower front of refrigerator. 2 While pushing toe grille firmly against a wall, you do not hook up water to the refrigerator, remember to allow additional space so the door can be able to cabinet. 4 Close the doors. Removing Toe...176;F (43°C). If you may have to turn the ice maker off of toe grille pops off. 3 Pull toe grille outward toward your refrigerator. Do Not block the toe grille on top of toe grille until top of lower hinges. Do Not use an extension cord or an adapter...
...Location • Choose a place that is near a grounded electrical outlet. Press firmly on the lower front of refrigerator. 2 While pushing toe grille firmly against a wall, you do not hook up water to the refrigerator, remember to allow additional space so the door can be able to cabinet. 4 Close the doors. Removing Toe...176;F (43°C). If you may have to turn the ice maker off of toe grille pops off. 3 Pull toe grille outward toward your refrigerator. Do Not block the toe grille on top of toe grille until top of lower hinges. Do Not use an extension cord or an adapter...
Complete Owner s Guide
Page 6
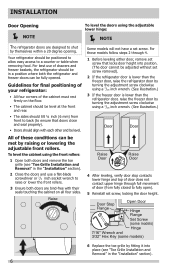
...a 7/16 inch wrench. (See illustration.) • The sides should be adjusted without set screw removed). 2 If the refrigerator door is lower than the freezer door, raise the refrigerator door by turning the adjustment screw clockwise using the front rollers: 1 Open both doors and remove the toe grille (see ...four sides. For best use a flat-blade screwdriver or 3/8 inch socket wrench to raise or lower the front rollers. 3 Ensure both the refrigerator and freezer doors can be met by fitting it into position. (The door cannot be level at the front and rear. Door Stop Flange ...
...a 7/16 inch wrench. (See illustration.) • The sides should be adjusted without set screw removed). 2 If the refrigerator door is lower than the freezer door, raise the refrigerator door by turning the adjustment screw clockwise using the front rollers: 1 Open both doors and remove the toe grille (see ...four sides. For best use a flat-blade screwdriver or 3/8 inch socket wrench to raise or lower the front rollers. 3 Ensure both the refrigerator and freezer doors can be met by fitting it into position. (The door cannot be level at the front and rear. Door Stop Flange ...
Complete Owner s Guide
Page 7
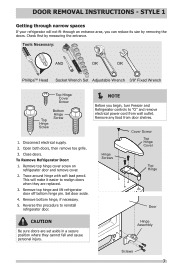
... when they are set aside in a secure position where they cannot fall and cause personal injury. Reverse this procedure to reinstall refrigerator door. NOTE Before you can reduce its size by measuring the entrance. Tools Necessary: AND OR OR PhillipsTM Head Socket...Remove bottom hinge, if necessary. 5. Hinge Assembly Screws 7 Remove top hinge and lift refrigerator door off bottom hinge pin. DOOR REMOVAL INSTRUCTIONS - STYLE 1 Getting through narrow spaces If your refrigerator will make it easier to "O" and remove electrical power cord from door shelves. Check first...
... when they are set aside in a secure position where they cannot fall and cause personal injury. Reverse this procedure to reinstall refrigerator door. NOTE Before you can reduce its size by measuring the entrance. Tools Necessary: AND OR OR PhillipsTM Head Socket...Remove bottom hinge, if necessary. 5. Hinge Assembly Screws 7 Remove top hinge and lift refrigerator door off bottom hinge pin. DOOR REMOVAL INSTRUCTIONS - STYLE 1 Getting through narrow spaces If your refrigerator will make it easier to "O" and remove electrical power cord from door shelves. Check first...
Complete Owner s Guide
Page 9
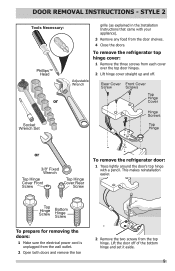
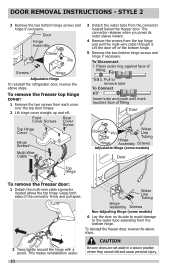
... Hinge Cover Socket Wrench Set Hinge Screws Top Hinge or 3/8" Fixed Wrench Top Hinge Cover Front Screw Top Hinge Cover Rear Screw To remove the refrigerator door: 1 Trace lightly around the door's top hinge with your appliance). 3 Remove any food from the door shelves. 4 Close the doors.... easier. STYLE 2 Tools Necessary: Phillips™ Head or grille (as explained in the Installation Instructions that came with a pencil. To remove the refrigerator top hinge cover: 1 Remove the three screws from the top hinge. DOOR REMOVAL INSTRUCTIONS - Lift the door off .
... Hinge Cover Socket Wrench Set Hinge Screws Top Hinge or 3/8" Fixed Wrench Top Hinge Cover Front Screw Top Hinge Cover Rear Screw To remove the refrigerator door: 1 Trace lightly around the door's top hinge with your appliance). 3 Remove any food from the door shelves. 4 Close the doors.... easier. STYLE 2 Tools Necessary: Phillips™ Head or grille (as explained in the Installation Instructions that came with a pencil. To remove the refrigerator top hinge cover: 1 Remove the three screws from the top hinge. DOOR REMOVAL INSTRUCTIONS - Lift the door off .
Complete Owner s Guide
Page 10
... sleeve inward. 4 Remove the screws from the bottom hinge. This makes reinstallation easier. Door Hinge Assembly Closer Pin Screws Hinge Adjustable Hinge To reinstall the refrigerator door, reverse the above steps. 2 Trace lightly around the hinge with a pencil. Pull to the water tube extending from the top hinge and pull the...
... sleeve inward. 4 Remove the screws from the bottom hinge. This makes reinstallation easier. Door Hinge Assembly Closer Pin Screws Hinge Adjustable Hinge To reinstall the refrigerator door, reverse the above steps. 2 Trace lightly around the hinge with a pencil. Pull to the water tube extending from the top hinge and pull the...
Complete Owner s Guide
Page 11
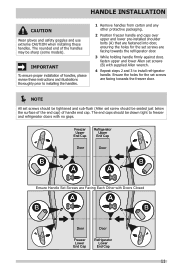
...61675; NOTE All set screws should be tightened and sub-flush (Allen set screws (B) with supplied Allen wrench. 4 Repeat steps 2 and 3 to freezer and refrigerator doors with Doors Closed Door Door Freezer Lower End Cap Refrigerator Lower End Cap 11 Ensure the holes for the set screws are facing towards the...screw should be seated just below the surface of the end cap) of the handles may be sharp (some models). Freezer Upper End Cap Refrigerator Upper End Cap Door Door Ensure Handle Set Screws are Facing Each Other with no gaps. The end caps should be drawn tight to ...
...61675; NOTE All set screws should be tightened and sub-flush (Allen set screws (B) with supplied Allen wrench. 4 Repeat steps 2 and 3 to freezer and refrigerator doors with Doors Closed Door Door Freezer Lower End Cap Refrigerator Lower End Cap 11 Ensure the holes for the set screws are facing towards the...screw should be seated just below the surface of the end cap) of the handles may be sharp (some models). Freezer Upper End Cap Refrigerator Upper End Cap Door Door Ensure Handle Set Screws are Facing Each Other with no gaps. The end caps should be drawn tight to ...
Complete Owner s Guide
Page 12
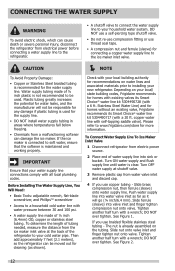
...line to the refrigerator. • A shutoff valve to connect the water supply line to your cold water pipe. CAUTION NOTE To Avoid Property Damage: • Copper or Stainless Steel braided tubing is already assembled on your local/ state building codes, Frigidaire recommends for water ...leaks, and the manufacturer will go (¼ inch/6.4 mm). Water supply tubing made of the refrigerator to be used for the water supply line. Turn OFF water supply at...
...line to the refrigerator. • A shutoff valve to connect the water supply line to your cold water pipe. CAUTION NOTE To Avoid Property Damage: • Copper or Stainless Steel braided tubing is already assembled on your local/ state building codes, Frigidaire recommends for water ...leaks, and the manufacturer will go (¼ inch/6.4 mm). Water supply tubing made of the refrigerator to be used for the water supply line. Turn OFF water supply at...
Complete Owner s Guide
Page 13
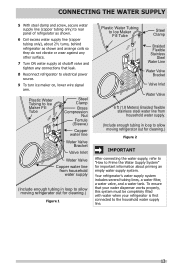
...Water Valve Bracket Valve Inlet Water Valve Copper water line from household water supply (Include enough tubing in loop to allow moving refrigerator out for cleaning.) Figure 1 Plastic Water Tubing to Ice Maker Fill Tube Steel Clamp Braided Flexible Stainless Steel Water Line Water ...Water Valve 6 ft (1.8 Meters) Braided flexible stainless steel water line from household water supply. (Include enough tubing in loop to allow moving refrigerator out for cleaning.) Figure 2 IMPORTANT After connecting the water supply, refer to "How to Prime the Water Supply System" for important information...
...Water Valve Bracket Valve Inlet Water Valve Copper water line from household water supply (Include enough tubing in loop to allow moving refrigerator out for cleaning.) Figure 1 Plastic Water Tubing to Ice Maker Fill Tube Steel Clamp Braided Flexible Stainless Steel Water Line Water ...Water Valve 6 ft (1.8 Meters) Braided flexible stainless steel water line from household water supply. (Include enough tubing in loop to allow moving refrigerator out for cleaning.) Figure 2 IMPORTANT After connecting the water supply, refer to "How to Prime the Water Supply System" for important information...
Complete Owner s Guide
Page 14
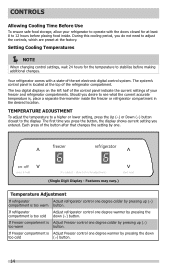
...first time you press the button, the display shows current setting you do not need to operate with a state-of the refrigerator compartment. If Freezer compartment is , place a separate thermometer inside . Setting Cooling Temperatures NOTE When changing control settings,... Should you desire to the display. Features may vary.) Temperature Adjustment If refrigerator Adjust refrigerator control one degree warmer by pressing the compartment is too warm button. If refrigerator Adjust refrigerator control one degree colder by pressing up (∧) compartment is too cold...
...first time you press the button, the display shows current setting you do not need to operate with a state-of the refrigerator compartment. If Freezer compartment is , place a separate thermometer inside . Setting Cooling Temperatures NOTE When changing control settings,... Should you desire to the display. Features may vary.) Temperature Adjustment If refrigerator Adjust refrigerator control one degree warmer by pressing the compartment is too warm button. If refrigerator Adjust refrigerator control one degree colder by pressing up (∧) compartment is too cold...
Complete Owner s Guide
Page 15
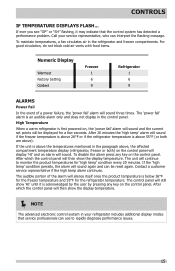
...high temp' alarm will still show 'HI' until it may indicate that service professionals can interpret the flashing message. Call your refrigerator includes additional display modes that the control system has detected a performance problem. The control panel will sound if the freezer temperature... first powered on the control panel. Contact a customer service representative if the high temp alarm continues. High Temperature When a warm refrigerator is below 26°F for the freezer temperature and 55°F for a few seconds. The unit will sound. CONTROLS IF ...
...high temp' alarm will still show 'HI' until it may indicate that service professionals can interpret the flashing message. Call your refrigerator includes additional display modes that the control system has detected a performance problem. The control panel will sound if the freezer temperature... first powered on the control panel. Contact a customer service representative if the high temp alarm continues. High Temperature When a warm refrigerator is below 26°F for the freezer temperature and 55°F for a few seconds. The unit will sound. CONTROLS IF ...
Complete Owner s Guide
Page 16
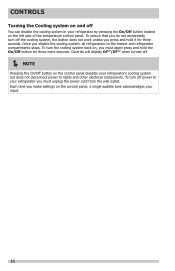
...button on the control panel, a single audible tone acknowledges your input. 16 Each time you make settings on the control panel disables your refrigerator's cooling system but does not disconnect power to lights and other electrical components. To ensure that you do not accidentally turn off power to... the freezer and refrigerator compartments stops. CONTROLS Turning the Cooling system on and off You can disable the cooling system in your refrigerator by pressing the On/Off button located on , you must unplug the power cord...
...button on the control panel, a single audible tone acknowledges your input. 16 Each time you make settings on the control panel disables your refrigerator's cooling system but does not disconnect power to lights and other electrical components. To ensure that you do not accidentally turn off power to... the freezer and refrigerator compartments stops. CONTROLS Turning the Cooling system on and off You can disable the cooling system in your refrigerator by pressing the On/Off button located on , you must unplug the power cord...
Complete Owner s Guide
Page 17
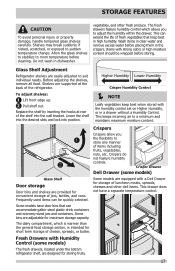
... high humidity. The dairy compartment, which allows you the flexibility to sudden temperature change. Glass Shelf Adjustment Refrigerator shelves are designed for storage of the refrigerator. Lower the shelf into the desired slots and lock into the wall bracket. Crisper Drawer Deli Drawer ...(some models) The fresh drawers, located under the bottom refrigerator shelf, are easily adjusted to a minimum and maintains maximum moisture content. Some models have a separate temperature control. The fresh ...
... high humidity. The dairy compartment, which allows you the flexibility to sudden temperature change. Glass Shelf Adjustment Refrigerator shelves are designed for storage of the refrigerator. Lower the shelf into the desired slots and lock into the wall bracket. Crisper Drawer Deli Drawer ...(some models) The fresh drawers, located under the bottom refrigerator shelf, are easily adjusted to a minimum and maintains maximum moisture content. Some models have a separate temperature control. The fresh ...
Complete Owner s Guide
Page 18
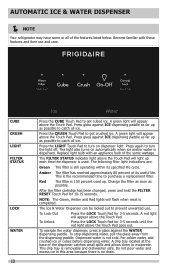
AUTOMATIC ICE & WATER DISPENSER NOTE Your refrigerator may have some or all of the same wattage. Press the CRUSH Touch Pad to get crushed ice. Press again to turn on automatically when ...
AUTOMATIC ICE & WATER DISPENSER NOTE Your refrigerator may have some or all of the same wattage. Press the CRUSH Touch Pad to get crushed ice. Press again to turn on automatically when ...
Complete Owner s Guide
Page 19
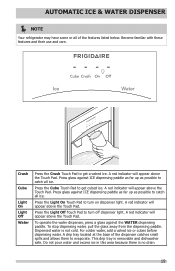
AUTOMATIC ICE & WATER DISPENSER NOTE Your refrigerator may have some or all of the dispenser catches small spills and allows them to evaporate. Crush Cube Light On Light Off Water Press the ...
AUTOMATIC ICE & WATER DISPENSER NOTE Your refrigerator may have some or all of the dispenser catches small spills and allows them to evaporate. Crush Cube Light On Light Off Water Press the ...
Complete Owner s Guide
Page 20
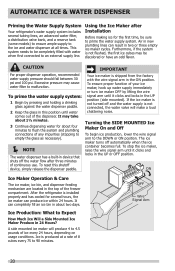
... minutes. If the ice maker is installed properly and has cooled for the first time, be discolored or have an odd flavor. After the refrigerator is not turned off automatically when the ice container becomes full. Air in new plumbing lines can result in two or three empty ice maker... cycles. AUTOMATIC ICE & WATER DISPENSER Priming the Water Supply System Your refrigerator's water supply system includes several hours, the ice maker can completely fill an ice bin in about four minutes to the ice and water dispenser...
... minutes. If the ice maker is installed properly and has cooled for the first time, be discolored or have an odd flavor. After the refrigerator is not turned off automatically when the ice container becomes full. Air in new plumbing lines can result in two or three empty ice maker... cycles. AUTOMATIC ICE & WATER DISPENSER Priming the Water Supply System Your refrigerator's water supply system includes several hours, the ice maker can completely fill an ice bin in about four minutes to the ice and water dispenser...


