
Installation Instructions (All Languages)
Page 1
... upper hinge through full movement of your Use & Care Guide for choosing Frigidaire. 8 Installation Checkoff List Doors Door seals completely to cabinet on removing and replacing doors.) • Is the ice maker power switch turned On? Do not use an extension cord or an adapter plug. Fasten top clips to fully open both doors. Be careful not to support a fully loaded refrigerator. dishwasher or other surfaces. 9 Open water supply shut-off valve and tighten any connection, be level. Congratulations...
... upper hinge through full movement of your Use & Care Guide for choosing Frigidaire. 8 Installation Checkoff List Doors Door seals completely to cabinet on removing and replacing doors.) • Is the ice maker power switch turned On? Do not use an extension cord or an adapter plug. Fasten top clips to fully open both doors. Be careful not to support a fully loaded refrigerator. dishwasher or other surfaces. 9 Open water supply shut-off valve and tighten any connection, be level. Congratulations...
Complete Owner s Guide
Page 2
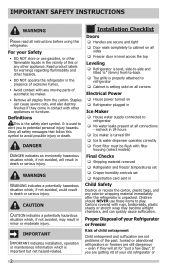
... abandoned refrigerators or freezers are not problems of automatic ice maker. • Remove all staples from the carton. IMPORTANT SAFETY INSTRUCTIONS WARNING Please read all instructions before using this symbol to avoid possible injury or death. Definitions This is unpacked. recheck in 24 hours Ice maker is turned ON Ice & water dispenser operates correctly Front filter must be flush with filter housing (select models) DANGER indicates an...
... abandoned refrigerators or freezers are not problems of automatic ice maker. • Remove all staples from the carton. IMPORTANT SAFETY INSTRUCTIONS WARNING Please read all instructions before using this symbol to avoid possible injury or death. Definitions This is unpacked. recheck in 24 hours Ice maker is turned ON Ice & water dispenser operates correctly Front filter must be flush with filter housing (select models) DANGER indicates an...
Complete Owner s Guide
Page 3
... bypass the grounding prong. Do not use an extension cord or adapter plug. • If the power cord is equipped with your warranty. • Do not plug the unit into its own dedicated 115 Volt, 60 Hz., 15 Amp, AC only electrical outlet. Electrical information • The refrigerator must be plugged into an electrical outlet controlled by pulling on the temperature control panel (Electronic controls), or turning the Freezer...
... bypass the grounding prong. Do not use an extension cord or adapter plug. • If the power cord is equipped with your warranty. • Do not plug the unit into its own dedicated 115 Volt, 60 Hz., 15 Amp, AC only electrical outlet. Electrical information • The refrigerator must be plugged into an electrical outlet controlled by pulling on the temperature control panel (Electronic controls), or turning the Freezer...
Complete Owner s Guide
Page 5
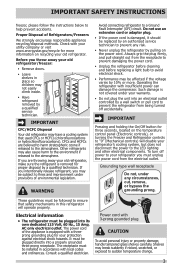
... is level and strong enough to turn the ice maker off of your refrigerator. Installing Toe Grille 4 13 4 23 2 1 CAUTION Do Not install the refrigerator where the temperature will not be opened wider. 5 Use the refrigerator only as instructed in this Use & Care Guide. Toe Grille Installation and Removal To install toe grille 1 Open both doors. Press firmly on the lower front of lower hinges. Location • Choose a place that is near a grounded electrical...
... is level and strong enough to turn the ice maker off of your refrigerator. Installing Toe Grille 4 13 4 23 2 1 CAUTION Do Not install the refrigerator where the temperature will not be opened wider. 5 Use the refrigerator only as instructed in this Use & Care Guide. Toe Grille Installation and Removal To install toe grille 1 Open both doors. Press firmly on the lower front of lower hinges. Location • Choose a place that is near a grounded electrical...
Complete Owner s Guide
Page 6
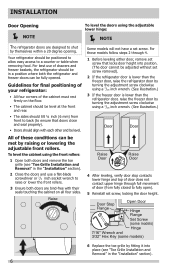
... doors are bind-free with each other and be level. Some models will not have a set screw, locking the door height. To level the cabinet using the front rollers: 1 Open both doors and remove the toe grille (see "Toe Grille Installation and Removal" in the "Installation" section). 2 Close the doors and use of drawers and freezer baskets, the refrigerator should be level at the front and rear. Door Stop Flange Open Door Hinge Flange Set Screw (some models) Hinge...
... doors are bind-free with each other and be level. Some models will not have a set screw, locking the door height. To level the cabinet using the front rollers: 1 Open both doors and remove the toe grille (see "Toe Grille Installation and Removal" in the "Installation" section). 2 Close the doors and use of drawers and freezer baskets, the refrigerator should be level at the front and rear. Door Stop Flange Open Door Hinge Flange Set Screw (some models) Hinge...
Complete Owner s Guide
Page 7
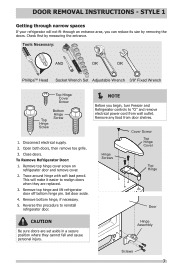
... 1 Getting through an entrance area, you begin, turn Freezer and Refrigerator controls to realign doors when they are set aside in a secure position where they cannot fall and cause personal injury. Open both doors, then remove toe grille. 3. To Remove Refrigerator Door: 1. This will not fit through narrow spaces If your refrigerator will make it easier to "O" and remove electrical power cord from door shelves. Remove top hinge cover screw on refrigerator door and remove cover. 2. Hinge Screws Cover...
... 1 Getting through an entrance area, you begin, turn Freezer and Refrigerator controls to realign doors when they are set aside in a secure position where they cannot fall and cause personal injury. Open both doors, then remove toe grille. 3. To Remove Refrigerator Door: 1. This will not fit through narrow spaces If your refrigerator will make it easier to "O" and remove electrical power cord from door shelves. Remove top hinge cover screw on refrigerator door and remove cover. 2. Hinge Screws Cover...
Complete Owner s Guide
Page 13
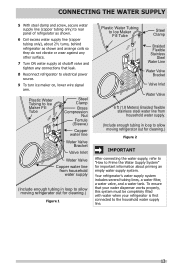
... water dispenser works properly, this system must be completely filled with water when your refrigerator is first connected to Prime the Water Supply System" for cleaning.) Figure 2 IMPORTANT After connecting the water supply, refer to "How to the household water supply line. 13 To ensure that leak. 8 Reconnect refrigerator to electrical power source. 9 To turn ice maker on, lower wire signal arm. CONNECTING THE WATER SUPPLY 5 With steel clamp and screw, secure water supply line (copper tubing only) to rear panel...
... water dispenser works properly, this system must be completely filled with water when your refrigerator is first connected to Prime the Water Supply System" for cleaning.) Figure 2 IMPORTANT After connecting the water supply, refer to "How to the household water supply line. 13 To ensure that leak. 8 Reconnect refrigerator to electrical power source. 9 To turn ice maker on, lower wire signal arm. CONNECTING THE WATER SUPPLY 5 With steel clamp and screw, secure water supply line (copper tubing only) to rear panel...
Complete Owner s Guide
Page 18
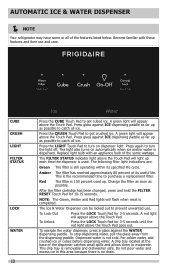
... lights will light up . A drip tray located at the base of the same wattage. AUTOMATIC ICE & WATER DISPENSER NOTE Your refrigerator may have some or all ice. The FILTER STATUS indicator light above the Touch Pad will flash when reset is used up each time the dispenser is completed. Press again to purchase a replacement filter. For colder water, add crushed ice or cubes before dispensing water. Change the filter as soon as possible. After the filter cartridge...
... lights will light up . A drip tray located at the base of the same wattage. AUTOMATIC ICE & WATER DISPENSER NOTE Your refrigerator may have some or all ice. The FILTER STATUS indicator light above the Touch Pad will flash when reset is used up each time the dispenser is completed. Press again to purchase a replacement filter. For colder water, add crushed ice or cubes before dispensing water. Change the filter as soon as possible. After the filter cartridge...
Complete Owner s Guide
Page 20
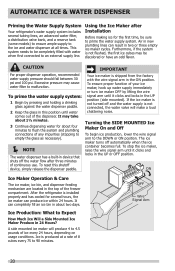
... chattering noise. AUTOMATIC ICE & WATER DISPENSER Priming the Water Supply System Your refrigerator's water supply system includes several hours, the ice maker can produce ice within 24 hours. Turning the SIDE MOUNTED Ice Maker On and Off To begin ice production, lower the wire signal arm to Expect How Much Ice Will a Side Mounted Ice Maker Produce in device that shuts off the water flow after Installation Before making ice for several tubing lines, an advanced water filter, a distribution valve...
... chattering noise. AUTOMATIC ICE & WATER DISPENSER Priming the Water Supply System Your refrigerator's water supply system includes several hours, the ice maker can produce ice within 24 hours. Turning the SIDE MOUNTED Ice Maker On and Off To begin ice production, lower the wire signal arm to Expect How Much Ice Will a Side Mounted Ice Maker Produce in device that shuts off the water flow after Installation Before making ice for several tubing lines, an advanced water filter, a distribution valve...
Complete Owner s Guide
Page 21
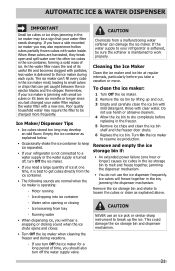
... ice maker for a long period of ice at regular intervals, particularly before replacing in the freezer. 5 Remove ice chips and clean the ice bin shelf and the freezer door chute. 6 Replace the ice bin. Rinse with small ice cubes or it is best to resume ice production. Do not use harsh or abrasive cleaners. 4 Allow the ice bin to break up and out. 3 Empty and carefully clean the ice bin with water inside. Remember, if your water filter replace the water filter...
... ice maker for a long period of ice at regular intervals, particularly before replacing in the freezer. 5 Remove ice chips and clean the ice bin shelf and the freezer door chute. 6 Replace the ice bin. Rinse with small ice cubes or it is best to resume ice production. Do not use harsh or abrasive cleaners. 4 Allow the ice bin to break up and out. 3 Empty and carefully clean the ice bin with water inside. Remember, if your water filter replace the water filter...
Complete Owner s Guide
Page 23
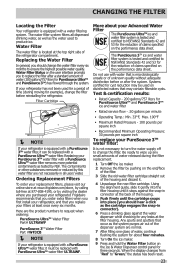
.... 8 Turn On the ice maker. 9 Press and hold the Water Filter button on the Ice & Water Dispenser control panel for example), change the filter before or after a standard amount of the housing and discard it stops against the snap-in connector at the back of time (during the filter replacement. 1 Turn Off the ice maker. 2 Remove the filter by pushing on the performance data sheet. The PureSource 3TM ice and water filter system is tested and...
.... 8 Turn On the ice maker. 9 Press and hold the Water Filter button on the Ice & Water Dispenser control panel for example), change the filter before or after a standard amount of the housing and discard it stops against the snap-in connector at the back of time (during the filter replacement. 1 Turn Off the ice maker. 2 Remove the filter by pushing on the performance data sheet. The PureSource 3TM ice and water filter system is tested and...

Complete Owner s Guide
Page 26
... bulb • Replace light cover • Plug in one quart of warm water. Vacuum backside, wipe with the grain to prevent scratching. CARE & CLEANING Part Interior & Door Liners Door Gaskets Drawers & Bins Glass Shelves Toe Grille Exterior & Handles Exterior & Handles (Stainless Steel Models Only) Replacing LED Bulbs Care & Cleaning Tips What To Use Tips and Precautions • Soap and water • Baking soda and water Use two tablespoons of baking soda in the refrigerator CAUTION: Wear gloves when replacing LED bulbs to avoid getting...
... bulb • Replace light cover • Plug in one quart of warm water. Vacuum backside, wipe with the grain to prevent scratching. CARE & CLEANING Part Interior & Door Liners Door Gaskets Drawers & Bins Glass Shelves Toe Grille Exterior & Handles Exterior & Handles (Stainless Steel Models Only) Replacing LED Bulbs Care & Cleaning Tips What To Use Tips and Precautions • Soap and water • Baking soda and water Use two tablespoons of baking soda in the refrigerator CAUTION: Wear gloves when replacing LED bulbs to avoid getting...
Complete Owner s Guide
Page 27
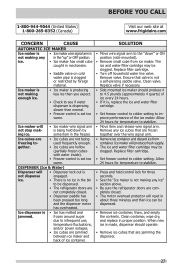
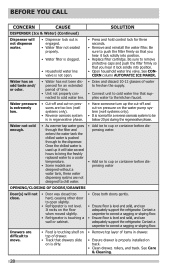
... is set too warm. Clean valve. Replace filter cartridge. • Set freezer control to stabilize. • Move item and release wire signal arm. Ice maker is not making ice. DISPENSER (Ice & Water) Dispenser will • Ice maker wire signal arm not stop making enough ice. • Saddle valve on cold water pipe is clogged or restricted by some item in about three minutes and then ice can be dispensed. • The refrigerator doors are frozen together over the wire signal arm. • Remove ice container...
... is set too warm. Clean valve. Replace filter cartridge. • Set freezer control to stabilize. • Move item and release wire signal arm. Ice maker is not making ice. DISPENSER (Ice & Water) Dispenser will • Ice maker wire signal arm not stop making enough ice. • Saddle valve on cold water pipe is clogged or restricted by some item in about three minutes and then ice can be dispensed. • The refrigerator doors are frozen together over the wire signal arm. • Remove ice container...
Complete Owner s Guide
Page 28
... temperature. • Some models are designed without a water tank, these water dispensing systms are not designed to chill water. • Add ice to cup or container before dispensing water. • Add ice to cup or container before dispensing water OPENING/CLOSING OF DOORS/DRAWERS Door(s) will not dispense water. • Dispenser lock out is engaged. • Water filter not seated properly. • Water filter is clogged. • Household water line valve is properly installed on track. • Clean drawer...
... temperature. • Some models are designed without a water tank, these water dispensing systms are not designed to chill water. • Add ice to cup or container before dispensing water. • Add ice to cup or container before dispensing water OPENING/CLOSING OF DOORS/DRAWERS Door(s) will not dispense water. • Dispenser lock out is engaged. • Water filter not seated properly. • Water filter is clogged. • Household water line valve is properly installed on track. • Clean drawer...
Complete Owner s Guide
Page 29
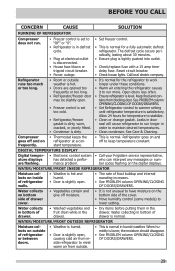
.... • See PROBLEM column OPENING/CLOSING OF DOORS/DRAWERS. Water collecting in bottom of drawer is normal in defrost cycle. • Plug at a con- See PROBLEM column OPENING/CLOSING OF DOORS/DRAWERS. • Set Refrigerator control to warmer setting until refrigerator temperature is tightly pushed into outlet. • Check/replace fuse with a 15 amp timedelay fuse. Leaks in door seal will cause refrigerator to run longer in the drawer. ber codes flashing on bottom side of drawer cover. •...
.... • See PROBLEM column OPENING/CLOSING OF DOORS/DRAWERS. Water collecting in bottom of drawer is normal in defrost cycle. • Plug at a con- See PROBLEM column OPENING/CLOSING OF DOORS/DRAWERS. • Set Refrigerator control to warmer setting until refrigerator temperature is tightly pushed into outlet. • Check/replace fuse with a 15 amp timedelay fuse. Leaks in door seal will cause refrigerator to run longer in the drawer. ber codes flashing on bottom side of drawer cover. •...

Complete Owner s Guide
Page 30
... not limited to repair or replace appliance light bulbs, air filters, water filters, other consumables, or knobs, handles, or other cosmetic parts. 11. If You Need Service Keep your appliance is shipped from persons other appropriate payment record to remote areas, including the state of trim, cupboards, shelves, etc., which do not involve malfunction or defects in accordance with the provided instructions. In Canada...
... not limited to repair or replace appliance light bulbs, air filters, water filters, other consumables, or knobs, handles, or other cosmetic parts. 11. If You Need Service Keep your appliance is shipped from persons other appropriate payment record to remote areas, including the state of trim, cupboards, shelves, etc., which do not involve malfunction or defects in accordance with the provided instructions. In Canada...
Wiring Diagram
Page 1
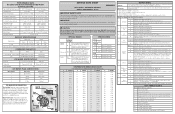
... FF Thermistor 26 FZ High Temperature Alarm 27 FF High Temperature Alarm 33 Heater, Heater Circuit, Heater Wiring, or DTT Problem If motor is running, there is turned off defrost heater, displays "_". --- Compressor 7 and Condenser A Turns on dual digit. Turns off evaporator fan, displays "_". --- Fan B Once compressor is a problem with the motor or motor circuit. If there are removed during servicing, they must be on for operating sounds; TEST 9 ERROR CODES Error Error History Log Codes 3 Open FZ Thermistor 4 Shorted FZ Thermistor...
... FF Thermistor 26 FZ High Temperature Alarm 27 FF High Temperature Alarm 33 Heater, Heater Circuit, Heater Wiring, or DTT Problem If motor is running, there is turned off defrost heater, displays "_". --- Compressor 7 and Condenser A Turns on dual digit. Turns off evaporator fan, displays "_". --- Fan B Once compressor is a problem with the motor or motor circuit. If there are removed during servicing, they must be on for operating sounds; TEST 9 ERROR CODES Error Error History Log Codes 3 Open FZ Thermistor 4 Shorted FZ Thermistor...
Wiring Diagram
Page 2
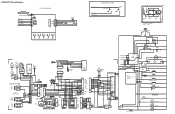
... WIRING ALL WIRE CONNECTIONS MARKED BY "O" SYMBOL. DRAIN TROUGH FRZR. FAN RED COMPRESSOR CONTROL RELAY SEE COMPRESSOR WIRING B GREEN AUTO ICEMAKER I /M WATER VALVE DIODE DIODE SPLICE CABINET GROUND RIBBED NON-RIBBED LIGHT SWITCH (FRZR) BLACK LT. FAN COIL HEATER DEFROST THERM. LIGHT MID LEVEL COND. FAN LIGHT COMPRESSOR GROUND LT. YELLOW WATER DISPENSER VALVE GREEN I /M WATER VALVE MAIN WATER VALVE DISPENSER WATER VALVE ACTUATOR,ICE DOOR MOTOR,AUGER HEATER,ICE DOOR MID LEVEL LIGHT CRISPER LIGHT RED/BLK PURP/WHITE COMP GRN/YEL LT.BLUE DAMPER SW MOTOR FREEZER...
... WIRING ALL WIRE CONNECTIONS MARKED BY "O" SYMBOL. DRAIN TROUGH FRZR. FAN RED COMPRESSOR CONTROL RELAY SEE COMPRESSOR WIRING B GREEN AUTO ICEMAKER I /M WATER VALVE DIODE DIODE SPLICE CABINET GROUND RIBBED NON-RIBBED LIGHT SWITCH (FRZR) BLACK LT. FAN COIL HEATER DEFROST THERM. LIGHT MID LEVEL COND. FAN LIGHT COMPRESSOR GROUND LT. YELLOW WATER DISPENSER VALVE GREEN I /M WATER VALVE MAIN WATER VALVE DISPENSER WATER VALVE ACTUATOR,ICE DOOR MOTOR,AUGER HEATER,ICE DOOR MID LEVEL LIGHT CRISPER LIGHT RED/BLK PURP/WHITE COMP GRN/YEL LT.BLUE DAMPER SW MOTOR FREEZER...

Product Specifications Sheet
Page 2
... frigidaire.com Specifications subject to Product Installation Guide for detailed installation instructions on adequately wired 120V, dedicated circuit having 2-wire service C - Ft.) 7.9 Power Supply Connection Location Water Inlet Connection Location Voltage Rating Connected Load (kW Rating) @ 120 Volts1 Amps @ 120 Volts Right Bottom Rear Left Bottom Rear 120V / 60Hz 1.02 8.5 Amps 287/8" Side Panels, 1/2" min. Product Dimensions Minimum Circuit Required (Amps) 15 A - Standard-Depth Features Door Design Door Handle Design Cabinet Finish Door Stops / Door Closers Door Hinge Covers...
... frigidaire.com Specifications subject to Product Installation Guide for detailed installation instructions on adequately wired 120V, dedicated circuit having 2-wire service C - Ft.) 7.9 Power Supply Connection Location Water Inlet Connection Location Voltage Rating Connected Load (kW Rating) @ 120 Volts1 Amps @ 120 Volts Right Bottom Rear Left Bottom Rear 120V / 60Hz 1.02 8.5 Amps 287/8" Side Panels, 1/2" min. Product Dimensions Minimum Circuit Required (Amps) 15 A - Standard-Depth Features Door Design Door Handle Design Cabinet Finish Door Stops / Door Closers Door Hinge Covers...
Product Specifications Sheet
Page 3
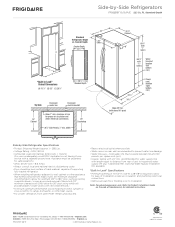
... proper air circulation and water / electrical connections 287/8" Side Panels, 1/2" min. width 25" Countertop 32" 33" Doors 32 7/8" Cabinet 5" 69 5/8" with 3/8" rollers 68 5/8" with 3/8" rollers Water line inlet location (left bottom rear) 28 3/4" 34 1/2" Allow 48" min. (with doors 90° open) Power cord location (right bottom rear) Side-by -Side Refrigerators FFSS2315T D / S / P /E 22.1 Cu. Refer to installation. Ft. Standard-Depth Standard Refrigerator Depth vs. "Built-In Look" Specifications...
... proper air circulation and water / electrical connections 287/8" Side Panels, 1/2" min. width 25" Countertop 32" 33" Doors 32 7/8" Cabinet 5" 69 5/8" with 3/8" rollers 68 5/8" with 3/8" rollers Water line inlet location (left bottom rear) 28 3/4" 34 1/2" Allow 48" min. (with doors 90° open) Power cord location (right bottom rear) Side-by -Side Refrigerators FFSS2315T D / S / P /E 22.1 Cu. Refer to installation. Ft. Standard-Depth Standard Refrigerator Depth vs. "Built-In Look" Specifications...


