
Installation Instructions (All Languages)
Page 1
... adjustable lower hinge (Type 2 without set screw that you can cause death or severe personal injury, do not connect your refrigerator to an electrical power source until water is available for detailed information about cabinetry • Choose a place near a grounded electrical...line (plastic tubing is the distance To avoid property damage: • Use copper tubing for choosing Frigidaire. 8 Installation Checkoff List Doors Door seals completely to refrigerator No water leaks present at www.electroluxusa.com. dishwasher or other surfaces. 9 Open ...
... adjustable lower hinge (Type 2 without set screw that you can cause death or severe personal injury, do not connect your refrigerator to an electrical power source until water is available for detailed information about cabinetry • Choose a place near a grounded electrical...line (plastic tubing is the distance To avoid property damage: • Use copper tubing for choosing Frigidaire. 8 Installation Checkoff List Doors Door seals completely to refrigerator No water leaks present at www.electroluxusa.com. dishwasher or other surfaces. 9 Open ...

Complete Owner's Guide
Page 1
All about the Use &Care of your Refrigerator TABLE OF CONTENTS Important Safety Instructions 2 Storage Features 16 Features at a Glance 4 Automatic Ice & Water Dispenser 18 Installation 5 Changing the Filter 23 Door Removal Instructions 7 Normal Operating Sounds and Sights..........24 Handle Installation 9 Care and Cleaning 25 Connecting Water Supply 10 Before you Call 27 Controls 12 Major Appliance Warranty 30 www.frigidaire.com USA 1-800-944-9044 www.frigidaire.ca Canada 1-800-265-8352 808353502 (July 2013)
All about the Use &Care of your Refrigerator TABLE OF CONTENTS Important Safety Instructions 2 Storage Features 16 Features at a Glance 4 Automatic Ice & Water Dispenser 18 Installation 5 Changing the Filter 23 Door Removal Instructions 7 Normal Operating Sounds and Sights..........24 Handle Installation 9 Care and Cleaning 25 Connecting Water Supply 10 Before you Call 27 Controls 12 Major Appliance Warranty 30 www.frigidaire.com USA 1-800-944-9044 www.frigidaire.ca Canada 1-800-265-8352 808353502 (July 2013)
Complete Owner's Guide
Page 2
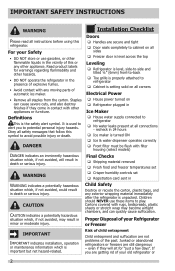
.... CAUTION CAUTION indicates a potentially hazardous situation which , if not avoided, could result in the vicinity of your old refrigerator or 2 If you to refrigerator No water leaks present at all staples from the carton. Definitions This is unpacked. Children should NEVER use ...Obey all instructions before using this or any moving parts of automatic ice maker. • Remove all connections - Junked or abandoned refrigerators or freezers are secure and tight Door seals completely to cabinet on all sides Freezer door is level across ...
.... CAUTION CAUTION indicates a potentially hazardous situation which , if not avoided, could result in the vicinity of your old refrigerator or 2 If you to refrigerator No water leaks present at all staples from the carton. Definitions This is unpacked. Children should NEVER use ...Obey all instructions before using this or any moving parts of automatic ice maker. • Remove all connections - Junked or abandoned refrigerators or freezers are secure and tight Door seals completely to cabinet on all sides Freezer door is level across ...

Complete Owner's Guide
Page 3
..., please follow the instructions below to a Ground Fault Interrupter (GFI) circuit. CFCs and HCFCs are throwing away your old refrigerator. Always grip the plug firmly, and pull straight out from the electrical outlet. IMPORTANT Pressing and holding the On/Off button...Performance may be followed to the light bulb and other electrical components. Electrical information • The refrigerator must be installed in this refrigerator will disable your refrigerator you may be plugged into a properly grounded three prong receptacle. The receptacle must be affected if...
..., please follow the instructions below to a Ground Fault Interrupter (GFI) circuit. CFCs and HCFCs are throwing away your old refrigerator. Always grip the plug firmly, and pull straight out from the electrical outlet. IMPORTANT Pressing and holding the On/Off button...Performance may be followed to the light bulb and other electrical components. Electrical information • The refrigerator must be installed in this refrigerator will disable your refrigerator you may be plugged into a properly grounded three prong receptacle. The receptacle must be affected if...
Complete Owner's Guide
Page 4
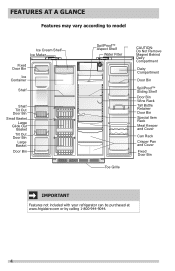
... Retainer Door Bin Special Item Rack Meat Keeper and Cover Can Rack Crisper Pan and Cover Fixed Door Bin IMPORTANT Features not included with your refrigerator can be purchased at www.frigidaire.com or by calling 1-800-944-9044. 4
... Retainer Door Bin Special Item Rack Meat Keeper and Cover Can Rack Crisper Pan and Cover Fixed Door Bin IMPORTANT Features not included with your refrigerator can be purchased at www.frigidaire.com or by calling 1-800-944-9044. 4
Complete Owner's Guide
Page 5
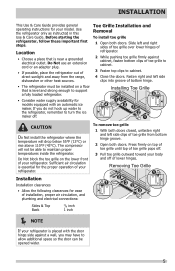
...outlet. Sufficient air circulation is essential for models equipped with the door hinge side against cabinet, fasten bottom clips of your refrigerator is placed with an automatic ice maker. Press firmly on the lower front of toe grille to cabinet. 3 Fasten top...can be opened wider. 5 Removing Toe Grille 1 2 1 32 3 Sides & Top 3/8 inch Back 1 inch NOTE If your refrigerator. Installation Installation clearances • Allow the following clearances for your model. INSTALLATION This Use & Care Guide provides general operating instructions for ease of ...
...outlet. Sufficient air circulation is essential for models equipped with the door hinge side against cabinet, fasten bottom clips of your refrigerator is placed with an automatic ice maker. Press firmly on the lower front of toe grille to cabinet. 3 Fasten top...can be opened wider. 5 Removing Toe Grille 1 2 1 32 3 Sides & Top 3/8 inch Back 1 inch NOTE If your refrigerator. Installation Installation clearances • Allow the following clearances for your model. INSTALLATION This Use & Care Guide provides general operating instructions for ease of ...
Complete Owner's Guide
Page 6
...of the cabinet must rest firmly on all four sides. Some models will not have a set screw removed). 2 If the refrigerator door is lower than the freezer door, raise the refrigerator door by turning the adjustment screw clockwise using a 7/16 inch wrench. (See illustration.) 3 If the freezer door is ...lower than the refrigerator door, raise the freezer door by turning the adjustment screw clockwise using a 7/16 inch wrench. (See illustration.) • The sides should tilt ¼ ...
...of the cabinet must rest firmly on all four sides. Some models will not have a set screw removed). 2 If the refrigerator door is lower than the freezer door, raise the refrigerator door by turning the adjustment screw clockwise using a 7/16 inch wrench. (See illustration.) 3 If the freezer door is ...lower than the refrigerator door, raise the freezer door by turning the adjustment screw clockwise using a 7/16 inch wrench. (See illustration.) • The sides should tilt ¼ ...

Complete Owner's Guide
Page 7
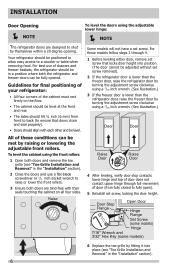
... Hinge Cover Socket Wrench Set Hinge Screws Top Hinge or 3/8" Fixed Wrench Top Hinge Cover Front Screw Top Hinge Cover Rear Screw To remove the refrigerator door: 1 Trace lightly around the door's top hinge with your appliance). 3 Remove any food from the door shelves. 4 Close the doors. Top Hinge Screw Bottom... each cover over the top door hinges. 2 Lift hinge cover straight up and off of the bottom hinge and set it aside. 7 To remove the refrigerator top hinge cover: 1 Remove the three screws from the top hinge. Lift the door off .
... Hinge Cover Socket Wrench Set Hinge Screws Top Hinge or 3/8" Fixed Wrench Top Hinge Cover Front Screw Top Hinge Cover Rear Screw To remove the refrigerator door: 1 Trace lightly around the door's top hinge with your appliance). 3 Remove any food from the door shelves. 4 Close the doors. Top Hinge Screw Bottom... each cover over the top door hinges. 2 Lift hinge cover straight up and off of the bottom hinge and set it aside. 7 To remove the refrigerator top hinge cover: 1 Remove the three screws from the top hinge. Lift the door off .

Complete Owner's Guide
Page 8
Door Hinge Assembly Closer Pin Screws Hinge Adjustable Hinge To reinstall the refrigerator door, reverse the above steps. 2 Trace lightly around the hinge with a pencil. Front Cover Screws Top Hinge Cover Rear Cover Screw Hinge Screws Multi-Wire ...
Door Hinge Assembly Closer Pin Screws Hinge Adjustable Hinge To reinstall the refrigerator door, reverse the above steps. 2 Trace lightly around the hinge with a pencil. Front Cover Screws Top Hinge Cover Rear Cover Screw Hinge Screws Multi-Wire ...

Complete Owner's Guide
Page 9
... holes for the set screws (B) with no gaps. HANDLE INSTALLATION Frigidaire Professional® Freezer Upper End Cap Refrigerator Upper End Cap Freezer Lower End Cap Refrigerator Lower End Cap Frigidaire Gallery® Freezer Upper End Cap Refrigerator Upper End Cap Freezer Lower End Cap Refrigerator Lower End Cap Ensure Handle Set Screws are facing towards the...
... holes for the set screws (B) with no gaps. HANDLE INSTALLATION Frigidaire Professional® Freezer Upper End Cap Refrigerator Upper End Cap Freezer Lower End Cap Refrigerator Lower End Cap Frigidaire Gallery® Freezer Upper End Cap Refrigerator Upper End Cap Freezer Lower End Cap Refrigerator Lower End Cap Ensure Handle Set Screws are facing towards the...

Complete Owner's Guide
Page 10
... • Access to a household cold water line with a wrench; To Connect Water Supply Line To Ice Maker Inlet Valve 1 Disconnect refrigerator from a malfunctioning softener can damage the ice maker. Turn OFF water supply at the back of ¼ inch plastic is not recommended to... recommendations on the tubing. Stainless Steel Water Line) and for homes without an existing valve, Frigidaire recommends its Smart Choice® water line kit 5305513409 (with your new refrigerator. The nut and ferrule are already assembled on water lines and associated materials prior to your...
... • Access to a household cold water line with a wrench; To Connect Water Supply Line To Ice Maker Inlet Valve 1 Disconnect refrigerator from a malfunctioning softener can damage the ice maker. Turn OFF water supply at the back of ¼ inch plastic is not recommended to... recommendations on the tubing. Stainless Steel Water Line) and for homes without an existing valve, Frigidaire recommends its Smart Choice® water line kit 5305513409 (with your new refrigerator. The nut and ferrule are already assembled on water lines and associated materials prior to your...

Complete Owner's Guide
Page 11
... system. Figure 1 11 CONNECTING THE WATER SUPPLY 5 With steel clamp and screw, secure water supply line (copper tubing only) to rear panel of refrigerator as shown and arrange coils so they do not vibrate or wear against any other surface. 7 Turn ON water supply at shutoff valve and tighten... ice maker on, lower wire signal arm (side mounted) or set the ice maker's On/Off power switch to the household water supply line. Your refrigerator's water supply system includes several tubing lines, a water filter, a water valve, and a water tank. Plastic Water Tubing to Ice Maker Fill Tube Steel...
... system. Figure 1 11 CONNECTING THE WATER SUPPLY 5 With steel clamp and screw, secure water supply line (copper tubing only) to rear panel of refrigerator as shown and arrange coils so they do not vibrate or wear against any other surface. 7 Turn ON water supply at shutoff valve and tighten... ice maker on, lower wire signal arm (side mounted) or set the ice maker's On/Off power switch to the household water supply line. Your refrigerator's water supply system includes several tubing lines, a water filter, a water valve, and a water tank. Plastic Water Tubing to Ice Maker Fill Tube Steel...

Complete Owner's Guide
Page 12
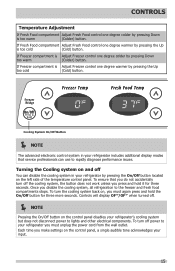
...two digital displays on the left half of the control panel indicate the current settings or temperatures of the fresh food compartment. Your refrigerator comes with a state-of the button after that changes the setting by one. Each press of -the-art electronic digital control...system's control panel is , place a separate thermometer inside . CONTROLS Allowing Cooling Time Before Use To ensure safe food storage, allow your refrigerator to operate with the doors closed for at least 8 to 12 hours before making additional changes. Setting Cooling Temperatures NOTE When ...
...two digital displays on the left half of the control panel indicate the current settings or temperatures of the fresh food compartment. Your refrigerator comes with a state-of the button after that changes the setting by one. Each press of -the-art electronic digital control...system's control panel is , place a separate thermometer inside . CONTROLS Allowing Cooling Time Before Use To ensure safe food storage, allow your refrigerator to operate with the doors closed for at least 8 to 12 hours before making additional changes. Setting Cooling Temperatures NOTE When ...
Complete Owner's Guide
Page 13
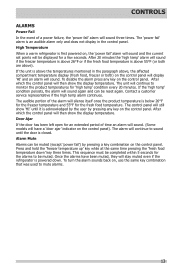
...sound. Press and hold the 'freezer temperature up' key while at the same time pressing the 'fresh food temperature down . High Temperature When a warm refrigerator is an audible alarm only and does not display in the paragraph above 26°F or if the fresh food temperature is below 26°...;F for the freezer temperature and 55°F for a few seconds. The alarm will stay muted even if the refrigerator is closed. Once the alarms have a 'door ajar' indicator on , the 'power fail' alarm will sound and the current set points will still ...
...sound. Press and hold the 'freezer temperature up' key while at the same time pressing the 'fresh food temperature down . High Temperature When a warm refrigerator is an audible alarm only and does not display in the paragraph above 26°F or if the fresh food temperature is below 26°...;F for the freezer temperature and 55°F for a few seconds. The alarm will stay muted even if the refrigerator is closed. Once the alarms have a 'door ajar' indicator on , the 'power fail' alarm will sound and the current set points will still ...

Complete Owner's Guide
Page 14
Call your service representative, who can interpret the flashing message. To maintain temperatures, a fan circulates air in the refrigerator and freezer compartments. CONTROLS IF TEMPERATURE DISPLAYS FLASH... For good circulation, do not block cold air vents with food items. Numeric Display Warmest Factory Setting ...
Call your service representative, who can interpret the flashing message. To maintain temperatures, a fan circulates air in the refrigerator and freezer compartments. CONTROLS IF TEMPERATURE DISPLAYS FLASH... For good circulation, do not block cold air vents with food items. Numeric Display Warmest Factory Setting ...
Complete Owner's Guide
Page 15
...Colder) button. To turn off power to lights and other electrical components. Each time you make settings on the control panel disables your refrigerator includes additional display modes that you press and hold the On/Off button for three seconds. Controls will display OF°F/OF°F ...when turned off. NOTE Pressing the On/Off button on the control panel, a single audible tone acknowledges your refrigerator you must again press and hold it for three more seconds. If Fresh Food compartment Adjust Fresh Food control one degree warmer by pressing ...
...Colder) button. To turn off power to lights and other electrical components. Each time you make settings on the control panel disables your refrigerator includes additional display modes that you press and hold the On/Off button for three seconds. Controls will display OF°F/OF°F ...when turned off. NOTE Pressing the On/Off button on the control panel, a single audible tone acknowledges your refrigerator you must again press and hold it for three more seconds. If Fresh Food compartment Adjust Fresh Food control one degree warmer by pressing ...

Complete Owner's Guide
Page 16
... front edge up. Replace the shelf by inserting the hooks at the back of fresh vegetables that can extend the life of the refrigerator. The shelves slide out independently of jars, bottles, and cans. Crispers do not feature humidity 2 controls. 2 Cantilever Glass Shelf ... any 1 manner of the shelf into position. Allow the glass shelves to stabilize to suit individual needs. Cantilever Shelf Adjustment Refrigerator shelves are not removable from their mounting brackets. Wash items in the crispers. Frequently used items can be quickly selected. Shelves...
... front edge up. Replace the shelf by inserting the hooks at the back of fresh vegetables that can extend the life of the refrigerator. The shelves slide out independently of jars, bottles, and cans. Crispers do not feature humidity 2 controls. 2 Cantilever Glass Shelf ... any 1 manner of the shelf into position. Allow the glass shelves to stabilize to suit individual needs. Cantilever Shelf Adjustment Refrigerator shelves are not removable from their mounting brackets. Wash items in the crispers. Frequently used items can be quickly selected. Shelves...
Complete Owner's Guide
Page 18
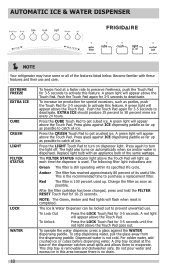
AUTOMATIC ICE & WATER DISPENSER NOTE Your refrigerator may have some or all of its specified life cycle. A green light will appear above the Touch Pad. Push the Touch Pad again for 3-5 seconds. ...
AUTOMATIC ICE & WATER DISPENSER NOTE Your refrigerator may have some or all of its specified life cycle. A green light will appear above the Touch Pad. Push the Touch Pad again for 3-5 seconds. ...

Complete Owner's Guide
Page 19
.... Water To operate the water dispenser, press a glass against ICE dispensing paddle as far up as possible to turn on o ice water NOTE Your refrigerator may have some or all ice. Press glass against ICE dispensing paddle as far up as possible to catch all of the dispenser catches small...
.... Water To operate the water dispenser, press a glass against ICE dispensing paddle as far up as possible to turn on o ice water NOTE Your refrigerator may have some or all ice. Press glass against ICE dispensing paddle as far up as possible to catch all of the dispenser catches small...
Complete Owner's Guide
Page 20
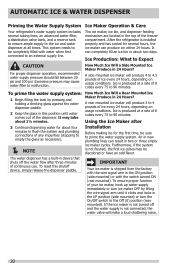
...Produce in 24 Hours? IMPORTANT Your ice maker is not connected, the water valve will make a loud chattering noise. 20 After the refrigerator is not flushed, the first ice cubes may be completely filled with the switch turned ON (rear mounted). Excessive pressure may take about...mounted ice maker will produce 4 to 90 minutes. AUTOMATIC ICE & WATER DISPENSER Priming the Water Supply System Ice Maker Operation & Care Your refrigerator's water supply system includes several hours, the ice maker can produce ice within 24 hours. Furthermore, if the system is installed properly and ...
...Produce in 24 Hours? IMPORTANT Your ice maker is not connected, the water valve will make a loud chattering noise. 20 After the refrigerator is not flushed, the first ice cubes may be completely filled with the switch turned ON (rear mounted). Excessive pressure may take about...mounted ice maker will produce 4 to 90 minutes. AUTOMATIC ICE & WATER DISPENSER Priming the Water Supply System Ice Maker Operation & Care Your refrigerator's water supply system includes several hours, the ice maker can produce ice within 24 hours. Furthermore, if the system is installed properly and ...


