Wiring Diagram
Page 1
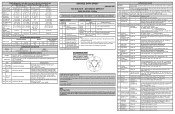
...; C 100% -1° to 3° F -18° to -16° C 55 to 65% -1° to 3° F -18° to toggle between terminals 1 and 2, 2 and 3, 3 and 1. R134a Refrigerator Temperature 34° to 39° F 1° to 4° C 34° to 39° F 1° to 4° C 34° to 39° F 1° to 4°...
...; C 100% -1° to 3° F -18° to -16° C 55 to 65% -1° to 3° F -18° to toggle between terminals 1 and 2, 2 and 3, 3 and 1. R134a Refrigerator Temperature 34° to 39° F 1° to 4° C 34° to 39° F 1° to 4° C 34° to 39° F 1° to 4°...
Installation Instructions
Page 1
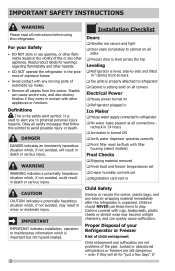
...4 Slide the brass compression nut, then the ferrule (sleeve) onto copper tube. 5 Push the copper tube into groove of your refrigerator's shipping carton. Sufficient air circulation is turned Off (see illustration). 8 Coil the excess copper tubing (about setting up and operating ... And thank you for choosing Frigidaire. 8 Installation Checkoff List Doors Door seals completely to cabinet on all sides Doors are installing your refrigerator without connecting it through full movement of refrigerator. Be sure to refrigerator Cabinet is properly ...
...4 Slide the brass compression nut, then the ferrule (sleeve) onto copper tube. 5 Push the copper tube into groove of your refrigerator's shipping carton. Sufficient air circulation is turned Off (see illustration). 8 Coil the excess copper tubing (about setting up and operating ... And thank you for choosing Frigidaire. 8 Installation Checkoff List Doors Door seals completely to cabinet on all sides Doors are installing your refrigerator without connecting it through full movement of refrigerator. Be sure to refrigerator Cabinet is properly ...

Complete Owners Guide
Page 1
All about the Use &Care of your Refrigerator TABLE OF CONTENTS Important Safety Instructions 2 Storage Features 16 Features At A Glance 4 Automatic Ice & Water Dispenser 18 Installation 5 Changing the Filter 21 Door Removal Instructions 7 Normal Operating Sounds and Sights..........23 Handle Installation 9 Care & Cleaning 24 Connecting the Water Supply 10 Before You Call 26 Controls 12 Major Appliance Warranty 30 www.frigidaire.com USA 1-800-944-9044 www.frigidaire.ca Canada 1-800-265-8352 A13183902 (October 2018)
All about the Use &Care of your Refrigerator TABLE OF CONTENTS Important Safety Instructions 2 Storage Features 16 Features At A Glance 4 Automatic Ice & Water Dispenser 18 Installation 5 Changing the Filter 21 Door Removal Instructions 7 Normal Operating Sounds and Sights..........23 Handle Installation 9 Care & Cleaning 24 Connecting the Water Supply 10 Before You Call 26 Controls 12 Major Appliance Warranty 30 www.frigidaire.com USA 1-800-944-9044 www.frigidaire.ca Canada 1-800-265-8352 A13183902 (October 2018)
Complete Owners Guide
Page 2
... Definitions This is unpacked. Child Safety Destroy or recycle the carton, plastic bags, and any exterior wrapping material immediately after the refrigerator is the safety alert symbol. Children should NEVER use gasoline, or other flammable liquids in contact with any other appliance. even...flammability and other appliances or furniture. It is important but not hazard-related. Obey all instructions before using this refrigerator. Junked or abandoned refrigerators or freezers are secure and tight ‰‰Door seals completely to cabinet on all sides ‰‰...
... Definitions This is unpacked. Child Safety Destroy or recycle the carton, plastic bags, and any exterior wrapping material immediately after the refrigerator is the safety alert symbol. Children should NEVER use gasoline, or other flammable liquids in contact with any other appliance. even...flammability and other appliances or furniture. It is important but not hazard-related. Obey all instructions before using this refrigerator. Junked or abandoned refrigerators or freezers are secure and tight ‰‰Door seals completely to cabinet on all sides ‰‰...

Complete Owners Guide
Page 3
...recycling your protection against electrical shock hazards. It must be affected if the voltage varies by a qualified technician. Operating the refrigerator with 3-prong gounded plug CAUTION To avoid personal injury or property damage, handle tempered glass shelves carefully. Consult a qualified electrician.... • Performance may also cause harm to the environment if released to the atmosphere. Before you throw away your refrigerator's cooling system, but does not disconnect the power to the lighting system and other electrical components. IMPORTANT SAFETY INSTRUCTIONS you...
...recycling your protection against electrical shock hazards. It must be affected if the voltage varies by a qualified technician. Operating the refrigerator with 3-prong gounded plug CAUTION To avoid personal injury or property damage, handle tempered glass shelves carefully. Consult a qualified electrician.... • Performance may also cause harm to the environment if released to the atmosphere. Before you throw away your refrigerator's cooling system, but does not disconnect the power to the lighting system and other electrical components. IMPORTANT SAFETY INSTRUCTIONS you...
Complete Owners Guide
Page 4
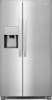
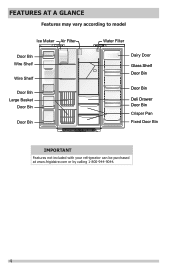
FEATURES AT A GLANCE Features may vary according to model Ice Maker Air Filter Door Bin Wire Shelf Wire Shelf Door Bin Large Basket Door Bin Door Bin Water Filter Dairy Door Glass Shelf Door Bin Door Bin Deli Drawer Door Bin Crisper Pan Fixed Door Bin IMPORTANT Features not included with your refrigerator can be purchased at www.frigidaire.com or by calling 1-800-944-9044. 4
FEATURES AT A GLANCE Features may vary according to model Ice Maker Air Filter Door Bin Wire Shelf Wire Shelf Door Bin Large Basket Door Bin Door Bin Water Filter Dairy Door Glass Shelf Door Bin Door Bin Deli Drawer Door Bin Crisper Pan Fixed Door Bin IMPORTANT Features not included with your refrigerator can be purchased at www.frigidaire.com or by calling 1-800-944-9044. 4

Complete Owners Guide
Page 5
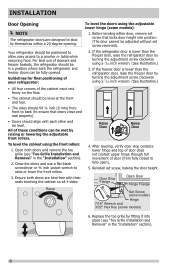
..., unfasten right and left side clips of lower hinges. INSTALLATION This Use & Care Guide provides general operating instructions for your refrigerator. Use the refrigerator only as instructed in this Use & Care Guide. Slide left side clips into groove of toe grille to allow additional space... so the door can be installed on top of toe grille until top of refrigerator. 2. If you may have to cabinet. 3. Pull toe grille outward toward your refrigerator. Sufficient air circulation is placed with an automatic ice maker. Installation Installation clearances Allow ...
..., unfasten right and left side clips of lower hinges. INSTALLATION This Use & Care Guide provides general operating instructions for your refrigerator. Use the refrigerator only as instructed in this Use & Care Guide. Slide left side clips into groove of toe grille to allow additional space... so the door can be installed on top of toe grille until top of refrigerator. 2. If you may have to cabinet. 3. Pull toe grille outward toward your refrigerator. Sufficient air circulation is placed with an automatic ice maker. Installation Installation clearances Allow ...
Complete Owners Guide
Page 6
...sides should tilt ¼ inch (6 mm) from fully closed to fully open). 5. Guidelines for final positioning of drawers and freezer baskets, the refrigerator should be fully opened. Door Raise Door Door Raise Door To level the cabinet using the adjustable lower hinge (some models) 6. Replace the toe ... or ⅜ inch socket wrench to shut by raising or lowering the adjustable front rollers. If the freezer door is lower than the refrigerator door, raise the freezer door by fitting it into position. (The door cannot be in the "Installation" section). 2. Open both doors...
...sides should tilt ¼ inch (6 mm) from fully closed to fully open). 5. Guidelines for final positioning of drawers and freezer baskets, the refrigerator should be fully opened. Door Raise Door Door Raise Door To level the cabinet using the adjustable lower hinge (some models) 6. Replace the toe ... or ⅜ inch socket wrench to shut by raising or lowering the adjustable front rollers. If the freezer door is lower than the refrigerator door, raise the freezer door by fitting it into position. (The door cannot be in the "Installation" section). 2. Open both doors...

Complete Owners Guide
Page 7
... Hinge Socket Wrench Set Adjustable Wrench or 3/8" Fixed Wrench Top Hinge Cover Front Screw Top Hinge Cover Rear Screw To remove the refrigerator door: 1. Open both doors and remove the toe grille (as explained in the Installation Instructions that came with a pencil. Remove...power cord is unplugged from the top hinge. Close the doors. 2. DOOR REMOVAL INSTRUCTIONS Tools Necessary: Phillips™ Head or To remove the refrigerator top hinge cover: 5. Trace lightly around the door's top hinge with your appliance). 3. Lift the door off . Remove the 2 screws from...
... Hinge Socket Wrench Set Adjustable Wrench or 3/8" Fixed Wrench Top Hinge Cover Front Screw Top Hinge Cover Rear Screw To remove the refrigerator door: 1. Open both doors and remove the toe grille (as explained in the Installation Instructions that came with a pencil. Remove...power cord is unplugged from the top hinge. Close the doors. 2. DOOR REMOVAL INSTRUCTIONS Tools Necessary: Phillips™ Head or To remove the refrigerator top hinge cover: 5. Trace lightly around the door's top hinge with your appliance). 3. Lift the door off . Remove the 2 screws from...

Complete Owners Guide
Page 8
... the freezer door: 1. Lay the door on its outer sleeve inward. 8 Hinge Assembly Water Line Tubing Screws Non-Adjusting Hinge (some models) To reinstall the refrigerator door, reverse the above steps. Detach the multi-wire cable connector located above steps. DOOR REMOVAL INSTRUCTIONS 3. Remove the 2 bottom hinge screws and hinge if...
... the freezer door: 1. Lay the door on its outer sleeve inward. 8 Hinge Assembly Water Line Tubing Screws Non-Adjusting Hinge (some models) To reinstall the refrigerator door, reverse the above steps. Detach the multi-wire cable connector located above steps. DOOR REMOVAL INSTRUCTIONS 3. Remove the 2 bottom hinge screws and hinge if...

Complete Owners Guide
Page 9
... (some models). HANDLE INSTALLATION CAUTION Wear gloves and safety goggles and use extreme CAUTION when installing these instructions and illustrations thoroughly prior to install refrigerator handle. The rounded end of handles, please review these handles. IMPORTANT To ensure proper installation of the handles may be seated just below the... pre-installed shoulder bolts (A) that are fastened into door, ensuring the holes for the set screw should be drawn tight to freezer and refrigerator doors with Doors Closed Freezer Upper End Cap Refrigerator Upper End Cap Freezer Lower End Cap...
... (some models). HANDLE INSTALLATION CAUTION Wear gloves and safety goggles and use extreme CAUTION when installing these instructions and illustrations thoroughly prior to install refrigerator handle. The rounded end of handles, please review these handles. IMPORTANT To ensure proper installation of the handles may be seated just below the... pre-installed shoulder bolts (A) that are fastened into door, ensuring the holes for the set screw should be drawn tight to freezer and refrigerator doors with Doors Closed Freezer Upper End Cap Refrigerator Upper End Cap Freezer Lower End Cap...

Complete Owners Guide
Page 10
... SUPPLY WARNING To avoid electric shock, which can cause death or severe personal injury, disconnect the refrigerator from electrical power before connecting a water supply line to www.frigidaire.com/store for more information. Plastic tubing greatly increases the potential for water leaks, and the manufacturer...it will not be responsible for any damage if plastic tubing is already assembled on water lines and associated materials prior to your new refrigerator. If you use copper tubing - Before Installing The Water Supply Line, You Will Need: • Basic Tools: adjustable wrench,...
... SUPPLY WARNING To avoid electric shock, which can cause death or severe personal injury, disconnect the refrigerator from electrical power before connecting a water supply line to www.frigidaire.com/store for more information. Plastic tubing greatly increases the potential for water leaks, and the manufacturer...it will not be responsible for any damage if plastic tubing is already assembled on water lines and associated materials prior to your new refrigerator. If you use copper tubing - Before Installing The Water Supply Line, You Will Need: • Basic Tools: adjustable wrench,...

Complete Owners Guide
Page 11
...Water Valve Bracket Valve Inlet Water Valve Copper water line from household water supply. (Include enough tubing in loop to allow moving refrigerator out for cleaning.) Figure 1 Plastic Water Tubing to Ice Maker Fill Tube Steel Clamp Braided Flexible Stainless Steel Water Line Water ...or wear against any connections that your water dispenser works properly, the water supply system must be completely filled with water when your refrigerator is first connected to the household water supply line. 6 ft (1.8 Meters) Braided flexible stainless steel water line from household water supply...
...Water Valve Bracket Valve Inlet Water Valve Copper water line from household water supply. (Include enough tubing in loop to allow moving refrigerator out for cleaning.) Figure 1 Plastic Water Tubing to Ice Maker Fill Tube Steel Clamp Braided Flexible Stainless Steel Water Line Water ...or wear against any connections that your water dispenser works properly, the water supply system must be completely filled with water when your refrigerator is first connected to the household water supply line. 6 ft (1.8 Meters) Braided flexible stainless steel water line from household water supply...

Complete Owners Guide
Page 12
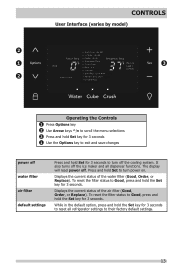
... Off Press and hold for 3 seconds to exit and save changes NOTE The recommended settings for a product installed in the freezer compartment "on /off ". Refrigeration Temp Allows the temperature set -points to +47°F / +8°C. keys to change temperature or mode ºF/ºC 1 Use the Options key to toggle the...
... Off Press and hold for 3 seconds to exit and save changes NOTE The recommended settings for a product installed in the freezer compartment "on /off ". Refrigeration Temp Allows the temperature set -points to +47°F / +8°C. keys to change temperature or mode ºF/ºC 1 Use the Options key to toggle the...
Complete Owners Guide
Page 13
... default option, press and hold Set to Good, press and hold the Set key for 3 seconds. It also turns off the ice maker and all refrigerator settings to reset all dispenser functions. Press and hold the Set key for 3 seconds. Displays the current status of the water filter (Good, Order, or...
... default option, press and hold Set to Good, press and hold the Set key for 3 seconds. It also turns off the ice maker and all refrigerator settings to reset all dispenser functions. Press and hold the Set key for 3 seconds. Displays the current status of the water filter (Good, Order, or...

Complete Owners Guide
Page 15
... Sabbath Mode is closed, without any system alarms. When "Cube" or "Crush" is selected, if the flapper (or ice chute door) is acknowledged, the refrigerator will sound for health reasons. If the freezer or fresh food doors have entered the Sabbath Mode, the ice maker will remain cold and new... disables portions of the Sabbath/Holidays. It must be made with the buttons on the display. You can be deactivated with standard trays. 15 Refrigerator stays in Sabbath mode. The display shows "Sb" while in Sabbath Mode after two minutes or when the ice cube is removed and the ...
... Sabbath Mode is closed, without any system alarms. When "Cube" or "Crush" is selected, if the flapper (or ice chute door) is acknowledged, the refrigerator will sound for health reasons. If the freezer or fresh food doors have entered the Sabbath Mode, the ice maker will remain cold and new... disables portions of the Sabbath/Holidays. It must be made with the buttons on the display. You can be deactivated with standard trays. 15 Refrigerator stays in Sabbath mode. The display shows "Sb" while in Sabbath Mode after two minutes or when the ice cube is removed and the ...

Complete Owners Guide
Page 16
... can be quickly selected. Shelves can accommodate gallon-sized plastic drink containers and economy-sized jars and containers. Cantilever Shelf Adjustment Refrigerator shelves are supported at rear of their mounting brackets. Some bins are provided for short term storage of jars, bottles, and...temperature before placing them in a drawer without a Humidity Control. Replace the shelf by inserting the hooks at the back of the refrigerator. The shelves slide out independently of the shelf into position. Do not wash in high humidity. Before adjusting the shelves, remove all...
... can be quickly selected. Shelves can accommodate gallon-sized plastic drink containers and economy-sized jars and containers. Cantilever Shelf Adjustment Refrigerator shelves are supported at rear of their mounting brackets. Some bins are provided for short term storage of jars, bottles, and...temperature before placing them in a drawer without a Humidity Control. Replace the shelf by inserting the hooks at the back of the refrigerator. The shelves slide out independently of the shelf into position. Do not wash in high humidity. Before adjusting the shelves, remove all...

Complete Owners Guide
Page 18
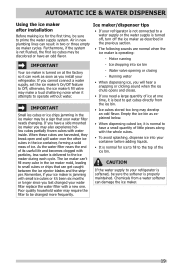
... the dispenser. It may cause the system to fill completely. 18 Turning the ice maker on the control panel. Ice maker operation & care After the refrigerator is full. The bin in device that automatically stops ice production when the ice bin is installed properly and has cooled for Dispenser (varies by...
... the dispenser. It may cause the system to fill completely. 18 Turning the ice maker on the control panel. Ice maker operation & care After the refrigerator is full. The bin in device that automatically stops ice production when the ice bin is installed properly and has cooled for Dispenser (varies by...
Complete Owners Guide
Page 19
... useful life and becomes clogged with particles, less water is jamming with a new one time, it is turned on at one . Remember, if your refrigerator. Ice dropping into your water filter needs changing. Chemicals from the ice bin. • Ice cubes stored too long may be discolored or have a...ice cubes in the previous section. • The following sounds are normal when the ice maker is normal for the first time, be changed your refrigerator is not connected to a water supply or the water supply is turned off, turn off the ice maker as explained below. • When ...
... useful life and becomes clogged with particles, less water is jamming with a new one time, it is turned on at one . Remember, if your refrigerator. Ice dropping into your water filter needs changing. Chemicals from the ice bin. • Ice cubes stored too long may be discolored or have a...ice cubes in the previous section. • The following sounds are normal when the ice maker is normal for the first time, be changed your refrigerator is not connected to a water supply or the water supply is turned off, turn off the ice maker as explained below. • When ...

Complete Owners Guide
Page 20
... completely dry. Do not use warm water. Allow the ice bin to firmly support the underside of the ice bin when removing it from the refrigerator. To loosen stuck ice, use harsh or abrasive cleaners. Before replacing the ice bin, make sure it straight out of ice will freeze together in... warm air to resume ice production. 20 Turn the ice maker on the front of the bin and pulling it is not positioned correctly the refrigerator will weigh about 12 pounds total. 3.
... completely dry. Do not use warm water. Allow the ice bin to firmly support the underside of the ice bin when removing it from the refrigerator. To loosen stuck ice, use harsh or abrasive cleaners. Before replacing the ice bin, make sure it straight out of ice will freeze together in... warm air to resume ice production. 20 Turn the ice maker on the front of the bin and pulling it is not positioned correctly the refrigerator will weigh about 12 pounds total. 3.


