Wiring Diagram
Page 1
... "off " 22 Damper Press set Fan running when "on "Lo" - Water dispenses when "on "; stopped when "off" 13 FF Light (LED Models) Press set Defrost limit switch must be off ," "CL," "OP," "SH," "LO," "HI" or numerical results of temperature measured with gauge at main board location. "OP" when open 24 FZ Door Open/close FF door "CL" on ," "off %RH is displayed when humidity is caused by...
... "off " 22 Damper Press set Fan running when "on "Lo" - Water dispenses when "on "; stopped when "off" 13 FF Light (LED Models) Press set Defrost limit switch must be off ," "CL," "OP," "SH," "LO," "HI" or numerical results of temperature measured with gauge at main board location. "OP" when open 24 FZ Door Open/close FF door "CL" on ," "off %RH is displayed when humidity is caused by...
Installation Instructions
Page 1
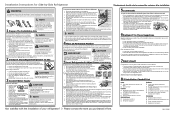
... a water supply, make sure the ice maker's power switch is more likely to leak). • Ensure water supply complies with a wrench. You can register online at the door hinges? (See the Use & Care Guide for detailed instructions on the lower front of your refrigerator. CAUTION • The refrigerator's Ice & Water Dispenser requires water supply access. • Plan for easy access to counter tops when removing food. • For complete access to drawers and freezer baskets, doors must...
... a water supply, make sure the ice maker's power switch is more likely to leak). • Ensure water supply complies with a wrench. You can register online at the door hinges? (See the Use & Care Guide for detailed instructions on the lower front of your refrigerator. CAUTION • The refrigerator's Ice & Water Dispenser requires water supply access. • Plan for easy access to counter tops when removing food. • For complete access to drawers and freezer baskets, doors must...
Complete Owners Guide
Page 2
... should NEVER use gasoline, or other flammable liquids in Ice Maker ‰‰House water supply connected to avoid possible injury or death. DANGER Installation Checklist Doors ‰‰Handles are secure and tight ‰‰Door seals completely to cabinet on all corners Electrical Power ‰‰House power turned on all sides ‰‰Freezer door is level across the top Leveling ‰‰Refrigerator is level, side...
... should NEVER use gasoline, or other flammable liquids in Ice Maker ‰‰House water supply connected to avoid possible injury or death. DANGER Installation Checklist Doors ‰‰Handles are secure and tight ‰‰Door seals completely to cabinet on all corners Electrical Power ‰‰House power turned on all sides ‰‰Freezer door is level across the top Leveling ‰‰Refrigerator is level, side...

Complete Owners Guide
Page 3
... www.energystar.gov/recycle for three seconds, located on the power cord. Before you throw away your old refrigerator/freezer: • Remove doors. • Leave shelves in accordance with your warranty. • Do not plug the unit into an electrical outlet controlled by pulling on the temperature control panel (Electronic controls), or turning the Freezer and Fresh Food controls to "0" (Mechanical controls) will operate properly. IMPORTANT CFC/HCFC Disposal Your...
... www.energystar.gov/recycle for three seconds, located on the power cord. Before you throw away your old refrigerator/freezer: • Remove doors. • Leave shelves in accordance with your warranty. • Do not plug the unit into an electrical outlet controlled by pulling on the temperature control panel (Electronic controls), or turning the Freezer and Fresh Food controls to "0" (Mechanical controls) will operate properly. IMPORTANT CFC/HCFC Disposal Your...

Complete Owners Guide
Page 5
... refrigerator. Sufficient air circulation is level and strong enough to support a fully loaded refrigerator. • Consider water supply availability for ease of toe grille pops off . Open both doors. Do Not block the toe grille on top of toe grille until top of installation, proper air circulation, and plumbing and electrical connections: Sides & Top ⅜ inch Back 1 inch To remove toe grille 1. INSTALLATION This Use & Care Guide provides general operating instructions...
... refrigerator. Sufficient air circulation is level and strong enough to support a fully loaded refrigerator. • Consider water supply availability for ease of toe grille pops off . Open both doors. Do Not block the toe grille on top of toe grille until top of installation, proper air circulation, and plumbing and electrical connections: Sides & Top ⅜ inch Back 1 inch To remove toe grille 1. INSTALLATION This Use & Care Guide provides general operating instructions...
Complete Owners Guide
Page 6
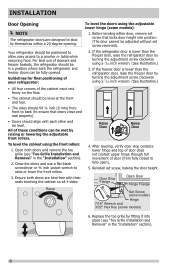
... clockwise using the adjustable lower hinge (some models) 6. Raise 4. Door Stop Flange Open Door Hinge Flange Set Screw (some models) Hinge 7/16" Wrench and 3/32" Hex Key (some models): 1. INSTALLATION Door Opening NOTE The refrigerator doors are bind-free with each other and be level. Reinstall set screw removed). If the refrigerator door is lower than the freezer door, raise the refrigerator door by themselves within a 20 degree opening. Open both the refrigerator and freezer doors can be adjusted without set screw, locking the door height...
... clockwise using the adjustable lower hinge (some models) 6. Raise 4. Door Stop Flange Open Door Hinge Flange Set Screw (some models) Hinge 7/16" Wrench and 3/32" Hex Key (some models): 1. INSTALLATION Door Opening NOTE The refrigerator doors are bind-free with each other and be level. Reinstall set screw removed). If the refrigerator door is lower than the freezer door, raise the refrigerator door by themselves within a 20 degree opening. Open both the refrigerator and freezer doors can be adjusted without set screw, locking the door height...
Complete Owners Guide
Page 13
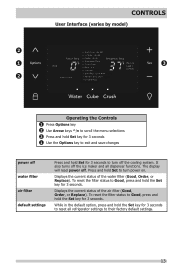
... changes power off water filter air filter default settings Press and hold Set for 3 seconds to their factory default settings. 13 Displays the current status of the air filter (Good, Order, or Replace). While in the default option, press and hold Set to turn off the cooling system. Press and hold the Set key for 3 seconds to reset all dispenser functions. The display will read power off the ice maker and all refrigerator settings to turn power...
... changes power off water filter air filter default settings Press and hold Set for 3 seconds to their factory default settings. 13 Displays the current status of the air filter (Good, Order, or Replace). While in the default option, press and hold Set to turn off the cooling system. Press and hold the Set key for 3 seconds to reset all dispenser functions. The display will read power off the ice maker and all refrigerator settings to turn power...

Complete Owners Guide
Page 15
... Mode, neither the lights, dispenser, nor the control panel will work until Sabbath Mode is deactivated. Sabbath Mode is turned ON and OFF by pressing the set key is exited. The High Temp alarm is permitted when cabinet temperature is removed and the set key but the "High Temp" indicator will illuminate until the temperature goes below 55°F. The alarm silences itself after two minutes or when the ice...
... Mode, neither the lights, dispenser, nor the control panel will work until Sabbath Mode is deactivated. Sabbath Mode is turned ON and OFF by pressing the set key is exited. The High Temp alarm is permitted when cabinet temperature is removed and the set key but the "High Temp" indicator will illuminate until the temperature goes below 55°F. The alarm silences itself after two minutes or when the ice...

Complete Owners Guide
Page 18
... Ice production is installed properly and has cooled for Dispenser (varies by model) about 12 pounds). Ice maker operation & care After the refrigerator is controlled by pressing and holding the On/Off button toggles the ice maker On/Off. AUTOMATIC ICE & WATER DISPENSER Priming the water supply system CAUTION For proper dispenser operation, recommended water supply pressure should produce 2.5 to 3 pounds of ice per 24 hours, depending on usage conditions. Keep the glass in the bin...
... Ice production is installed properly and has cooled for Dispenser (varies by model) about 12 pounds). Ice maker operation & care After the refrigerator is controlled by pressing and holding the On/Off button toggles the ice maker On/Off. AUTOMATIC ICE & WATER DISPENSER Priming the water supply system CAUTION For proper dispenser operation, recommended water supply pressure should produce 2.5 to 3 pounds of ice per 24 hours, depending on usage conditions. Keep the glass in the bin...
Complete Owners Guide
Page 19
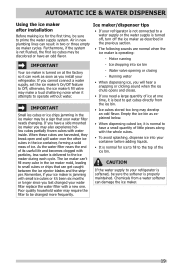
... you install your water filter replace the water filter with water inside. Motor running IMPORTANT Your ice maker is normal for the first time, be sure to prime the water supply system. IMPORTANT Small ice cubes or ice chips jamming in the ice container, forming a solid mass of ice. CAUTION If the water supply to your refrigerator is not connected to a water supply or the water supply is turned off, turn off the ice maker as you last changed more frequently. - Ice maker/dispenser...
... you install your water filter replace the water filter with water inside. Motor running IMPORTANT Your ice maker is normal for the first time, be sure to prime the water supply system. IMPORTANT Small ice cubes or ice chips jamming in the ice container, forming a solid mass of ice. CAUTION If the water supply to your refrigerator is not connected to a water supply or the water supply is turned off, turn off the ice maker as you last changed more frequently. - Ice maker/dispenser...

Complete Owners Guide
Page 20
... and carefully clean the ice bin with clear water. 4. Do not use warm water. AUTOMATIC ICE & WATER DISPENSER Cleaning the storage bin Clean the ice maker and ice bin at regular intervals, especially prior to leak into the freezer compartment. IMPORTANT When removing or replacing the ice bin, ensure that the ice bin is not positioned correctly the refrigerator will not dispense ice. Rinse with mild detergent. Replace the ice bin. CAUTION NEVER use the ice dispenser frequently. Remove the ice bin by Removing Ice Bin lifting up the ice. Before replacing the ice bin, make...
... and carefully clean the ice bin with clear water. 4. Do not use warm water. AUTOMATIC ICE & WATER DISPENSER Cleaning the storage bin Clean the ice maker and ice bin at regular intervals, especially prior to leak into the freezer compartment. IMPORTANT When removing or replacing the ice bin, ensure that the ice bin is not positioned correctly the refrigerator will not dispense ice. Rinse with mild detergent. Replace the ice bin. CAUTION NEVER use the ice dispenser frequently. Remove the ice bin by Removing Ice Bin lifting up the ice. Before replacing the ice bin, make...
Complete Owners Guide
Page 21
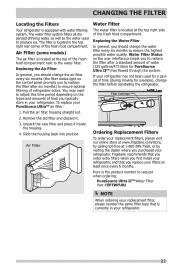
... light on the types and amounts of food you to produce ice. Frigidaire recommends that you order extra filters when you first install your refrigerator, and that is located at the top of the fresh food compartment. Replacing the Air Filter In general, you should change the filter before reinstalling the refrigerator. Unpack the new filter and place it . 3. Air Filter Water Filter The water filter is currently in your refrigerator. 21 Air Filter (some models) The air filter...
... light on the types and amounts of food you to produce ice. Frigidaire recommends that you order extra filters when you first install your refrigerator, and that is located at the top of the fresh food compartment. Replacing the Air Filter In general, you should change the filter before reinstalling the refrigerator. Unpack the new filter and place it . 3. Air Filter Water Filter The water filter is currently in your refrigerator. 21 Air Filter (some models) The air filter...
Complete Owners Guide
Page 22
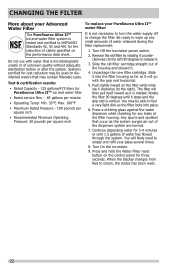
... new filter cartridge. Press and hold the Water Filter reset button on the control panel for cyst reduction may be able to feel a very light click as it will likely need to empty and refill your glass several times. 8. You may contain filterable cysts. Do not use with the grip end horizontal. 5. Systems certified for three seconds. Turn Off the ice maker power switch. 2. CHANGING THE FILTER More about your Advanced Water Filter...
... new filter cartridge. Press and hold the Water Filter reset button on the control panel for cyst reduction may be able to feel a very light click as it will likely need to empty and refill your glass several times. 8. You may contain filterable cysts. Do not use with the grip end horizontal. 5. Systems certified for three seconds. Turn Off the ice maker power switch. 2. CHANGING THE FILTER More about your Advanced Water Filter...
Complete Owners Guide
Page 26
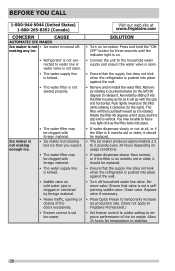
... not connected to release it clockwise (to stabilize. 26 Push lightly inward on cold water pipe is set too warm. Replace valve if necessary. • Press Quick Freeze to temporarily increase ice production rate. (Does not apply to Frigidaire Professional.) • Set freezer control to colder setting to 3 pounds every 24 hours depending on ice maker. Remove by foreign material. • Heavy traffic, opening or closing of the doors excessively. • Freezer control...
... not connected to release it clockwise (to stabilize. 26 Push lightly inward on cold water pipe is set too warm. Replace valve if necessary. • Press Quick Freeze to temporarily increase ice production rate. (Does not apply to Frigidaire Professional.) • Set freezer control to colder setting to 3 pounds every 24 hours depending on ice maker. Remove by foreign material. • Heavy traffic, opening or closing of the doors excessively. • Freezer control...
Complete Owners Guide
Page 27
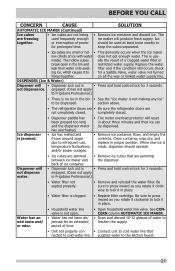
... the refrigerator doors are jammed • Remove ice cubes that nected to infrequent use, temperature fluctuations, and/or power outages. • The motor overload protector will reset in place. back of time. • Open household water line valve. Water has an odd taste and/ or odor. • Household water line valve is • Press and hold control lock for 3 seconds. DISPENSER (Ice & Water) Dispenser will • Dispenser lock out is not open in the bin...
... the refrigerator doors are jammed • Remove ice cubes that nected to infrequent use, temperature fluctuations, and/or power outages. • The motor overload protector will reset in place. back of time. • Open household water line valve. Water has an odd taste and/ or odor. • Household water line valve is • Press and hold control lock for 3 seconds. DISPENSER (Ice & Water) Dispenser will • Dispenser lock out is not open in the bin...

Complete Owners Guide
Page 28
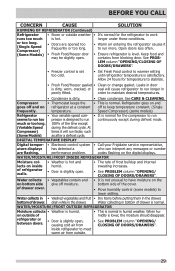
... to does not run. hard, causing other door to be is in defrost cycle. • This is normal for a reverse osmosis system to open slightly. • Refrigerator is not level. • Ensure floor is level and solid, and can adequately support the refrigerator. RUNNING OF REFRIGERATOR Compressor • Freezer control is set to dispensing water. Call local electric company. 28 Contact a moved slightly. See CARE & CLEANING. • Set freezer control. • Refrigerator is in regenerative...
... to does not run. hard, causing other door to be is in defrost cycle. • This is normal for a reverse osmosis system to open slightly. • Refrigerator is not level. • Ensure floor is level and solid, and can adequately support the refrigerator. RUNNING OF REFRIGERATOR Compressor • Freezer control is set to dispensing water. Call local electric company. 28 Contact a moved slightly. See CARE & CLEANING. • Set freezer control. • Refrigerator is in regenerative...
Complete Owners Guide
Page 29
... of drawer. bottom of the cover. See PROBLEM column "OPENING/CLOSING OF DOORS/DRAWERS". • Freezer control is set too cold. • Set Fresh Food control to warmer setting until refrigerator temperature is slightly open . • It's normal for temperature to run more. Allow 24 hours for the refrigerator to work longer under these conditions. • Warm air entering the refrigerator causes it will cause refrigerator to stabilize. • Fresh Food/freezer gasket • Clean or change gasket. Water collects...
... of drawer. bottom of the cover. See PROBLEM column "OPENING/CLOSING OF DOORS/DRAWERS". • Freezer control is set too cold. • Set Fresh Food control to warmer setting until refrigerator temperature is slightly open . • It's normal for temperature to run more. Allow 24 hours for the refrigerator to work longer under these conditions. • Warm air entering the refrigerator causes it will cause refrigerator to stabilize. • Fresh Food/freezer gasket • Clean or change gasket. Water collects...
Complete Owners Guide
Page 30
...change or add to use of parts other cosmetic parts. 11. DISCLAIMER OF IMPLIED WARRANTIES; If You Need Service Keep your receipt, delivery slip, or some other appropriate payment record to repair or replace appliance light bulbs, air filters, water filters, other consumables, or knobs, handles, or other than genuine Electrolux parts or parts...change without notice. Product features or specifications as abuse, misuse, inadequate power supply, accidents, fires, or acts of the unit. 4. Damages caused by: services performed by contacting Electrolux at the addresses or phone numbers...
...change or add to use of parts other cosmetic parts. 11. DISCLAIMER OF IMPLIED WARRANTIES; If You Need Service Keep your receipt, delivery slip, or some other appropriate payment record to repair or replace appliance light bulbs, air filters, water filters, other consumables, or knobs, handles, or other than genuine Electrolux parts or parts...change without notice. Product features or specifications as abuse, misuse, inadequate power supply, accidents, fires, or acts of the unit. 4. Damages caused by: services performed by contacting Electrolux at the addresses or phone numbers...
Product Specifications Sheet
Page 2
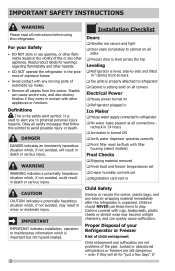
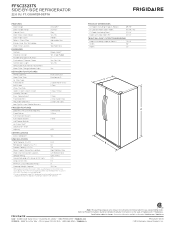
... operation. Ft.) 22.0 Refrigerator Capacity (Cu. Front / Rear Energy Saver Plus Technology Water Filter Location DISPENSER Standard-Depth SxS Refrigerators Hidden Adjustable / Yes Yes "BUILT-IN LOOK" CUTOUT DIMENSIONS Height (Including Hinges & Rollers) 70-1/4" Width 36" Frigidaire Baseline Top Right Rear Depth 25" Controls Ready-Select® Dispenser Design Tall, Single Paddle Number of Justice's 2010 A.D.A. FFSC2323TS SIDE-BY-SIDE REFRIGERATOR 22.0 CU. Height (Including Hinges & Rollers) 69-7/8" Door Handle Design Stainless B - Ft.) 7.9 Power Supply Connection...
... operation. Ft.) 22.0 Refrigerator Capacity (Cu. Front / Rear Energy Saver Plus Technology Water Filter Location DISPENSER Standard-Depth SxS Refrigerators Hidden Adjustable / Yes Yes "BUILT-IN LOOK" CUTOUT DIMENSIONS Height (Including Hinges & Rollers) 70-1/4" Width 36" Frigidaire Baseline Top Right Rear Depth 25" Controls Ready-Select® Dispenser Design Tall, Single Paddle Number of Justice's 2010 A.D.A. FFSC2323TS SIDE-BY-SIDE REFRIGERATOR 22.0 CU. Height (Including Hinges & Rollers) 69-7/8" Door Handle Design Stainless B - Ft.) 7.9 Power Supply Connection...
Product Specifications Sheet
Page 3
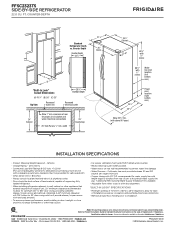
... 5/8" with 3/8" rollers Water line inlet location (left bottom rear) 23 7/8" 29 5/8" Allow 45 1/2" min. (with doors 90° open) Power cord location (right bottom rear) INSTALLATION SPECIFICATIONS • Product Shipping Weight (approx.) - 325 Lbs. • Voltage Rating - 120V / 60 Hz • Connected Load (kW Rating) @ 120 Volts = 1.02 kW (For use on the web at frigidaire.com / frigidaire.ca. FFSC2323TS SIDE-BY-SIDE REFRIGERATOR 22.0 CU. Refer to change.
... 5/8" with 3/8" rollers Water line inlet location (left bottom rear) 23 7/8" 29 5/8" Allow 45 1/2" min. (with doors 90° open) Power cord location (right bottom rear) INSTALLATION SPECIFICATIONS • Product Shipping Weight (approx.) - 325 Lbs. • Voltage Rating - 120V / 60 Hz • Connected Load (kW Rating) @ 120 Volts = 1.02 kW (For use on the web at frigidaire.com / frigidaire.ca. FFSC2323TS SIDE-BY-SIDE REFRIGERATOR 22.0 CU. Refer to change.


