
Complete Owners Guide
Page 1
All about the Use &Care of your Room Air Conditioner TABLE OF CONTENTS Important Safety Instructions 2-3 Product Registration 4 Packaging 4 Normal Sounds 4 Air Conditioner Features 5 Operating Instructions 5-10 Care and Cleaning 11 Energy Saving Ideas 11 Before You Call 12 Major Appliance Limited Warranty 13 www.frigidaire.com USA 1-800-944-9044 www.frigidaire.ca Canada 1-800-265-8352 66129926904 (June 2009)
All about the Use &Care of your Room Air Conditioner TABLE OF CONTENTS Important Safety Instructions 2-3 Product Registration 4 Packaging 4 Normal Sounds 4 Air Conditioner Features 5 Operating Instructions 5-10 Care and Cleaning 11 Energy Saving Ideas 11 Before You Call 12 Major Appliance Limited Warranty 13 www.frigidaire.com USA 1-800-944-9044 www.frigidaire.ca Canada 1-800-265-8352 66129926904 (June 2009)
Complete Owners Guide
Page 2
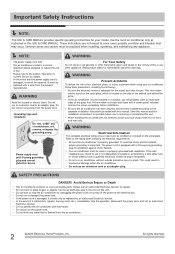
... gasoline or other flammable vapors and liquids in the front of a malfunction (sparks, burning smell, etc.), immediately stop the air conditioner by a time delay fuse or circuit breaker, have chosen. It must be practiced when installing, operating, and maintaining any water...warnings. WARNING Avoid fire hazard or electric shock. If the window is properly grounded. Be sure the air conditioner is a triple-track type with this air conditioner contains a current detection device designed to the separate installation instructions provided with a screen panel included, remove ...
... gasoline or other flammable vapors and liquids in the front of a malfunction (sparks, burning smell, etc.), immediately stop the air conditioner by a time delay fuse or circuit breaker, have chosen. It must be practiced when installing, operating, and maintaining any water...warnings. WARNING Avoid fire hazard or electric shock. If the window is properly grounded. Be sure the air conditioner is a triple-track type with this air conditioner contains a current detection device designed to the separate installation instructions provided with a screen panel included, remove ...

Complete Owners Guide
Page 3
...the unit on the unit. It MUST be upright for an extended period of time. Avoid Injury or damage to clean inside the air conditioner. Do not apply heavy pressure to possible electric shock. Do not use this could cause flare ups or make units run excessively. ...destroy the insulation, leading to the radiator fins of the unit's installation accessories for correct operation. READ THIS SECTION BEFORE ATTEMPTING TO OPERATE AIR CONDITIONER. Unit must be replaced if it cannot be repaired. Press the RESET button. The power supply cord is now supplying electricity to operating...
...the unit on the unit. It MUST be upright for an extended period of time. Avoid Injury or damage to clean inside the air conditioner. Do not apply heavy pressure to possible electric shock. Do not use this could cause flare ups or make units run excessively. ...destroy the insulation, leading to the radiator fins of the unit's installation accessories for correct operation. READ THIS SECTION BEFORE ATTEMPTING TO OPERATE AIR CONDITIONER. Unit must be replaced if it cannot be repaired. Press the RESET button. The power supply cord is now supplying electricity to operating...
Complete Owners Guide
Page 5
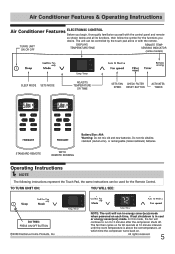
... last shutdown is in energy saver(eco) mode when powered on . The fan then cycles on for 3 minutes after the compressor shuts off. Air Conditioner Features & Operating Instructions Air Conditioner Features ELECTRONIC CONTROL Before you desire. WITH REMOTE SENSING Operating Instructions NOTE The following instructions represent the Touch Pad, the same instructions can be...
... last shutdown is in energy saver(eco) mode when powered on . The fan then cycles on for 3 minutes after the compressor shuts off. Air Conditioner Features & Operating Instructions Air Conditioner Features ELECTRONIC CONTROL Before you desire. WITH REMOTE SENSING Operating Instructions NOTE The following instructions represent the Touch Pad, the same instructions can be...
Complete Owners Guide
Page 10
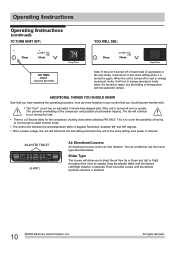
...on again. This is turned on again, but the setting of temperature and fan speed will remain. ADJUSTER TABLET (6-WAY) Air Directional Louvers Air directional louvers control air flow direction. Operating Instructions Operating Instructions (continued) TO TURN UNIT OFF: YOU WILL SEE: DO THIS: PRESS ON/OFF BUTTON... the operating procedure, here are more features in your control that you to direct the air flow Up or Down and Left or Right throughout the room as needed. The control will allow you should become familiar with. Your air conditioner has the louver type described below.
...on again. This is turned on again, but the setting of temperature and fan speed will remain. ADJUSTER TABLET (6-WAY) Air Directional Louvers Air directional louvers control air flow direction. Operating Instructions Operating Instructions (continued) TO TURN UNIT OFF: YOU WILL SEE: DO THIS: PRESS ON/OFF BUTTON... the operating procedure, here are more features in your control that you to direct the air flow Up or Down and Left or Right throughout the room as needed. The control will allow you should become familiar with. Your air conditioner has the louver type described below.
Complete Owners Guide
Page 11
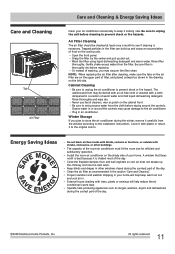
...is best because it carefully from the window according to the installation instructions. or outside with blinds, curtains or furniture; Install the room air conditioner on the cooling coils. Operate heat producing appliances such as shown in the drawing on the left side. Open the front panel. Gently ...shake excess water from the cloth before wiping around the controls may cause damage to the air conditioner. Never use harsh cleaners, wax or polish on the upper part of the day. Excess water in or around the controls. NOTE:...
...is best because it carefully from the window according to the installation instructions. or outside with blinds, curtains or furniture; Install the room air conditioner on the cooling coils. Operate heat producing appliances such as shown in the drawing on the left side. Open the front panel. Gently ...shake excess water from the cloth before wiping around the controls may cause damage to the air conditioner. Never use harsh cleaners, wax or polish on the upper part of the day. Excess water in or around the controls. NOTE:...
Complete Owners Guide
Page 12
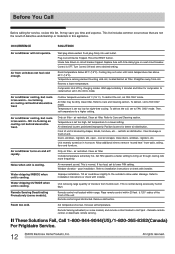
..., etc. Unit recently turned on cooling coil behind decorative front Air conditioner cooling, but room is blocked by changing modes. Outside temperature extremely hot. This is OFF. Improper installation. If These Solutions Fail, Call 1-800-944-9044(US)/1-800-265-8352(Canada) For Frigidaire Service. 12 2009 Electrolux Home Products, Inc. Cooling may...
..., etc. Unit recently turned on cooling coil behind decorative front Air conditioner cooling, but room is blocked by changing modes. Outside temperature extremely hot. This is OFF. Improper installation. If These Solutions Fail, Call 1-800-944-9044(US)/1-800-265-8352(Canada) For Frigidaire Service. 12 2009 Electrolux Home Products, Inc. Cooling may...
Installation Instructions
Page 1
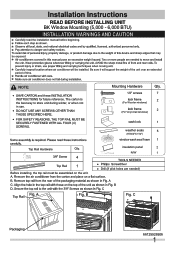
be exposed: Carefully inspect location where air conditioner will support the weight of the unit over an extended period of time. Top Rail Hardware Qty. 4 Top Rail 1 Before installing, the top rail must ...
be exposed: Carefully inspect location where air conditioner will support the weight of the unit over an extended period of time. Top Rail Hardware Qty. 4 Top Rail 1 Before installing, the top rail must ...
Installation Instructions
Page 2
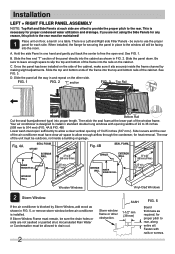
...to slip the top and bottom of the frame into the cabinet as shown in FIG. 2. Your air conditioner is installed. Side louvers and the rear of the air conditioner must have clear air space to allow enough airflow through the condenser, for proper condensed water utilization and drainage. Accumulated Rain... or Condensation must open end. SASH 1-1/2" min (38 mm) FIG. 5 Board thickness as shown in FIG. 5, or remove storm window before air conditioner is designed to install in one hand and gently pull back the center to the window sill will be outdoors, not inside the frame channel...
...to slip the top and bottom of the frame into the cabinet as shown in FIG. 2. Your air conditioner is installed. Side louvers and the rear of the air conditioner must have clear air space to allow enough airflow through the condenser, for proper condensed water utilization and drainage. Accumulated Rain... or Condensation must open end. SASH 1-1/2" min (38 mm) FIG. 5 Board thickness as shown in FIG. 5, or remove storm window before air conditioner is designed to install in one hand and gently pull back the center to the window sill will be outdoors, not inside the frame channel...

Installation Instructions
Page 3
Installation Keep a firm grip on the air conditioner, carefully place the unit into the window opening so the bottom of the unit. FIG. 8A FIG. 8B Wooden windows: Drive locking screws: A: For wooden ... window sill as shown (FIG. 8A for wooden windows), (FIG. 8B for Vinyl-Clad windows). Carefully close the window behind the top rail of the air conditioner frame is against the window frame (FIG. 7A for wooden windows), (FIG. 7B for Vinyl-Clad windows).
Installation Keep a firm grip on the air conditioner, carefully place the unit into the window opening so the bottom of the unit. FIG. 8A FIG. 8B Wooden windows: Drive locking screws: A: For wooden ... window sill as shown (FIG. 8A for wooden windows), (FIG. 8B for Vinyl-Clad windows). Carefully close the window behind the top rail of the air conditioner frame is against the window frame (FIG. 7A for wooden windows), (FIG. 7B for Vinyl-Clad windows).
Installation Instructions
Page 5
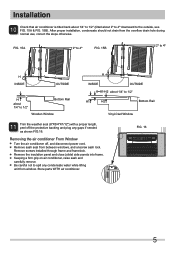
...FIG. 15A & FIG. 15B). Remove sash seal from the overflow drain hole during normal use, correct the slope otherwise. Installation 10 Check that air conditioner is tilted back about 1/4" to 1/2" (tilted about 1/4" to 1/2" H1 Bottom Rail Vinyl-Clad Window 11 Trim the weather seal with a ...proper length, peel off , and disconnect power cord. Keeping a firm grip on air conditioner, raise sash and carefully remove. Remove the insulation panel and close (slide) side panels into frame. FIG. 16 5 After proper installation, ...
...FIG. 15A & FIG. 15B). Remove sash seal from the overflow drain hole during normal use, correct the slope otherwise. Installation 10 Check that air conditioner is tilted back about 1/4" to 1/2" (tilted about 1/4" to 1/2" H1 Bottom Rail Vinyl-Clad Window 11 Trim the weather seal with a ...proper length, peel off , and disconnect power cord. Keeping a firm grip on air conditioner, raise sash and carefully remove. Remove the insulation panel and close (slide) side panels into frame. FIG. 16 5 After proper installation, ...


