
Installation Instructions (All Languages)
Page 2
... Exhaust 16-19 Preparing Rear Wall for Outside Back Exhaust 16 Remove Blower Plate 16 Attach Mounting Plate to Wall 17 Preparation of Top Cabinet 17 Adapting Microwave Blower for Outside Back Exhaust 17-18 Mount the Microwave Oven 19 C Recirculating 20 -22 Attach Mounting Plate to Wall 20 Preparation of Top Cabinet 20 Check Blower Plate 21 Mount the Microwave Oven ..........21-22 Installing or Change the Charcoal Filter 22 Before You Use Your Microwave 23 2 Installation Instructions CONTENTS General information Important Safety Instructions 3 Electrical...
... Exhaust 16-19 Preparing Rear Wall for Outside Back Exhaust 16 Remove Blower Plate 16 Attach Mounting Plate to Wall 17 Preparation of Top Cabinet 17 Adapting Microwave Blower for Outside Back Exhaust 17-18 Mount the Microwave Oven 19 C Recirculating 20 -22 Attach Mounting Plate to Wall 20 Preparation of Top Cabinet 20 Check Blower Plate 21 Mount the Microwave Oven ..........21-22 Installing or Change the Charcoal Filter 22 Before You Use Your Microwave 23 2 Installation Instructions CONTENTS General information Important Safety Instructions 3 Electrical...
Installation Instructions (All Languages)
Page 3
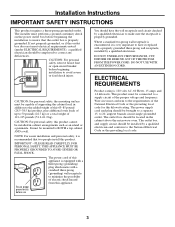
... ground exists before beginning installation to 50 pounds (22.7 kg) or a total weight of the National Electrical Code or the prevailing local code for this appliance is properly grounded. DO NOT USE WITH AN EXTENSION CORD. Wire size must be installed in cabinet arrangements such as an island or a peninsula. The outlet box and supply circuit should be mounted to correct any deficiencies...
... ground exists before beginning installation to 50 pounds (22.7 kg) or a total weight of the National Electrical Code or the prevailing local code for this appliance is properly grounded. DO NOT USE WITH AN EXTENSION CORD. Wire size must be installed in cabinet arrangements such as an island or a peninsula. The outlet box and supply circuit should be mounted to correct any deficiencies...
Installation Instructions (All Languages)
Page 6
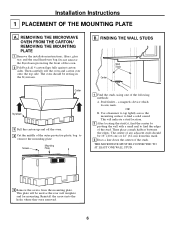
...) or 24w (61 cm) from the mounting plate. Then carefully roll the oven and carton over onto the top side. Use a hammer to tap lightly across the mounting surface to find a solid sound. The center of the studs. Reinstall the screws into the holes where they were removed. 6 OR B. REMOVING THE MICROWAVE OVEN FROM THE CARTON/ REMOVING THE MOUNTING PLATE 1 Remove the installation instructions, filters, glass tray and the small hardware bag.
...) or 24w (61 cm) from the mounting plate. Then carefully roll the oven and carton over onto the top side. Use a hammer to tap lightly across the mounting surface to find a solid sound. The center of the studs. Reinstall the screws into the holes where they were removed. 6 OR B. REMOVING THE MICROWAVE OVEN FROM THE CARTON/ REMOVING THE MOUNTING PLATE 1 Remove the installation instructions, filters, glass tray and the small hardware bag.
Installation Instructions (All Languages)
Page 12
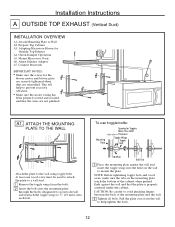
Check Damper Operation A5. A1. Adjust Exhaust Adaptor A7. This will help tighten the bolts. 12 CAUTION: Be careful to prevent excessive vibration. • Make sure the motor wiring has been properly routed and secured, and that the plate is properly centered under the cabinet. Installation Instructions A OUTSIDE TOP EXHAUST (Vertical Duct) INSTALLATION OVERVIEW A1. Connect Ductwork IMPORTANT NOTES: • Make sure the screws for the...
Check Damper Operation A5. A1. Adjust Exhaust Adaptor A7. This will help tighten the bolts. 12 CAUTION: Be careful to prevent excessive vibration. • Make sure the motor wiring has been properly routed and secured, and that the plate is properly centered under the cabinet. Installation Instructions A OUTSIDE TOP EXHAUST (Vertical Duct) INSTALLATION OVERVIEW A1. Connect Ductwork IMPORTANT NOTES: • Make sure the screws for the...

Installation Instructions (All Languages)
Page 14
...: When mounting the microwave oven, thread power cord through top center cabinet hole. Be careful not to pinch the cord, especially when mounting flush to assure proper alignment with your cabinet is in the locking tabs. ADAPTING MICROWAVE BLOWER FOR OUTSIDE TOP EXHAUST 5 Secure blower unit to the top of top cabinet. Adaptor Guide Back of Microwave Locking Tab Push in bottom of the blower plate by pulling cord. 1 Lift microwave...
...: When mounting the microwave oven, thread power cord through top center cabinet hole. Be careful not to pinch the cord, especially when mounting flush to assure proper alignment with your cabinet is in the locking tabs. ADAPTING MICROWAVE BLOWER FOR OUTSIDE TOP EXHAUST 5 Secure blower unit to the top of top cabinet. Adaptor Guide Back of Microwave Locking Tab Push in bottom of the blower plate by pulling cord. 1 Lift microwave...
Installation Instructions (All Languages)
Page 15
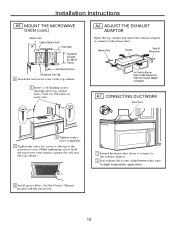
ADJUST THE EXHAUST ADAPTOR Open the top cabinet and adjust the exhaust adaptor to connect to the exhaust adaptor. 2 Seal exhaust duct joints using furnance duct tape for high temperature applications. 8 Install grease filters. Blower Plate Damper Back of Cabinet Recess Self-Aligning Screw Microwave Oven Top 4 Attach the microwave oven to -Side Adjustment, Slide the Exhaust Adaptor as Needed A7. See the Owner's Manual packed with the microwave. 15 A6. MOUNT THE MICROWAVE OVEN (cont.) Cabinet Front Cabinet Bottom Shelf...
ADJUST THE EXHAUST ADAPTOR Open the top cabinet and adjust the exhaust adaptor to connect to the exhaust adaptor. 2 Seal exhaust duct joints using furnance duct tape for high temperature applications. 8 Install grease filters. Blower Plate Damper Back of Cabinet Recess Self-Aligning Screw Microwave Oven Top 4 Attach the microwave oven to -Side Adjustment, Slide the Exhaust Adaptor as Needed A7. See the Owner's Manual packed with the microwave. 15 A6. MOUNT THE MICROWAVE OVEN (cont.) Cabinet Front Cabinet Bottom Shelf...
Installation Instructions (All Languages)
Page 16
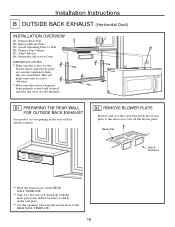
... Plate Back of the REAR WALL TEMPLATE. 16 Remove Blower Plate B3. Adjust Blower B6. Installation Instructions B OUTSIDE BACK EXHAUST (Horizontal Duct) INSTALLATION OVERVIEW B1. Prepare Top Cabinet B5. B1. This will help to prevent excessive vibration. • Make sure the motor wiring has been properly routed and secured, and that holds the blower plate to Wall B4. REMOVE BLOWER PLATE Remove and save the screw that the wires are reinstalled. Mount the Microwave Oven...
... Plate Back of the REAR WALL TEMPLATE. 16 Remove Blower Plate B3. Adjust Blower B6. Installation Instructions B OUTSIDE BACK EXHAUST (Horizontal Duct) INSTALLATION OVERVIEW B1. Prepare Top Cabinet B5. B1. This will help to prevent excessive vibration. • Make sure the motor wiring has been properly routed and secured, and that holds the blower plate to Wall B4. REMOVE BLOWER PLATE Remove and save the screw that the wires are reinstalled. Mount the Microwave Oven...
Installation Instructions (All Languages)
Page 20
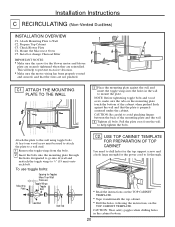
Mount the Microwave Oven C5. ATTACH THE MOUNTING PLATE TO THE WALL 3 Place the mounting plate against the wall and that the wires are reinstalled. USE TOP CABINET TEMPLATE FOR PREPARATION OF TOP CABINET You need to drill holes for the top support screws and a hole large enough for the power cord to mount the plate. C1. Pull the plate away from the bolts. 2 Insert the bolts into the mounting plate through the holes designated...
Mount the Microwave Oven C5. ATTACH THE MOUNTING PLATE TO THE WALL 3 Place the mounting plate against the wall and that the wires are reinstalled. USE TOP CABINET TEMPLATE FOR PREPARATION OF TOP CABINET You need to drill holes for the top support screws and a hole large enough for the power cord to mount the plate. C1. Pull the plate away from the bolts. 2 Insert the bolts into the mounting plate through the holes designated...
Installation Instructions (All Languages)
Page 22
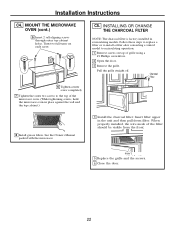
... INSTALLING OR CHANGE THE CHARCOAL FILTER NOTE: The charcoal filter is factory installed in place against the wall and the top cabinet.) C5. Follow these steps to replace a filter or to install a filter after converting a vented model to recirculating operation. 1 Remove screws on each screw. 6 Tighten center screw completely. 7 Tighten the outer two screws to the top of grille using a #1 Phillips screwdriver. 2 Open the door. 3 Remove the grille. MOUNT THE MICROWAVE OVEN (cont.) 5 Insert 2 self-aligning screws through outer top cabinet holes. Turn...
... INSTALLING OR CHANGE THE CHARCOAL FILTER NOTE: The charcoal filter is factory installed in place against the wall and the top cabinet.) C5. Follow these steps to replace a filter or to install a filter after converting a vented model to recirculating operation. 1 Remove screws on each screw. 6 Tighten center screw completely. 7 Tighten the outer two screws to the top of grille using a #1 Phillips screwdriver. 2 Open the door. 3 Remove the grille. MOUNT THE MICROWAVE OVEN (cont.) 5 Insert 2 self-aligning screws through outer top cabinet holes. Turn...
Installation Instructions (All Languages)
Page 23
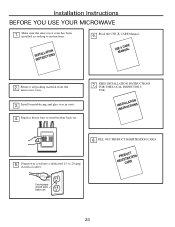
...the microwave oven has been installed according to 20-amp electrical outlet. 8. Remove all packing material from the microwave oven. 3. FILL OUT PRODUCT REGISTRATION CARD RPEGROISDCTUARCRATDTION Ensure proper ground exists before use 23 ININSSTTARLULCATTIIOONNS 6. Install turntable ring and glass tray in cavity . 4. Replace house fuse or turn breaker back on. 7. to instructions. Plug power cord into a dedicated 15- USME &ANCUAARLE 2. Installation Instructions BEFORE YOU USE YOUR MICROWAVE 1. Read the USE & CARE Manual. KEEP INSTALLATION INSTRUCTIONS FOR...
...the microwave oven has been installed according to 20-amp electrical outlet. 8. Remove all packing material from the microwave oven. 3. FILL OUT PRODUCT REGISTRATION CARD RPEGROISDCTUARCRATDTION Ensure proper ground exists before use 23 ININSSTTARLULCATTIIOONNS 6. Install turntable ring and glass tray in cavity . 4. Replace house fuse or turn breaker back on. 7. to instructions. Plug power cord into a dedicated 15- USME &ANCUAARLE 2. Installation Instructions BEFORE YOU USE YOUR MICROWAVE 1. Read the USE & CARE Manual. KEEP INSTALLATION INSTRUCTIONS FOR...

Complete Owner's Guide (English)
Page 3
... not leave paper products, cooking utensils or food in the cavity when not in the microwave oven cavity: - Carefully attend appliance when paper, plastic or other utensil into the container. • Clean ventilation openings and grease filters frequently. Corrosive cleaning agents, such as water, coffee or tea are placed inside the microwave oven ignite, keep microwave oven door closed glass jars-are able to potential...
... not leave paper products, cooking utensils or food in the cavity when not in the microwave oven cavity: - Carefully attend appliance when paper, plastic or other utensil into the container. • Clean ventilation openings and grease filters frequently. Corrosive cleaning agents, such as water, coffee or tea are placed inside the microwave oven ignite, keep microwave oven door closed glass jars-are able to potential...
Complete Owner's Guide (English)
Page 4
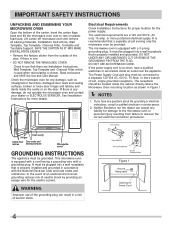
...and Care Manual. cook time timer clock popcorn potato beverage reheat defrost wt/time power level 1 2 3 ready set 4 5 6 7 8 9 stop 0 start cancel + 30 sec exhaust hi·lo·off light on·off microwave oven and remove all packing materials, Installation Instructions, Wall Template, Top Template, Charcoal Filter, Turntable and Turntable Support. GROUNDING INSTRUCTIONS This appliance must be plugged into a wall receptacle that a separate circuit serving only the microwave oven be located inside the cabinet directly above the Microwave Oven mounting location as...
...and Care Manual. cook time timer clock popcorn potato beverage reheat defrost wt/time power level 1 2 3 ready set 4 5 6 7 8 9 stop 0 start cancel + 30 sec exhaust hi·lo·off light on·off microwave oven and remove all packing materials, Installation Instructions, Wall Template, Top Template, Charcoal Filter, Turntable and Turntable Support. GROUNDING INSTRUCTIONS This appliance must be plugged into a wall receptacle that a separate circuit serving only the microwave oven be located inside the cabinet directly above the Microwave Oven mounting location as...
Complete Owner's Guide (English)
Page 6
... turntable and support nor turn both from top to bottom and from the center of the dish to absorb the microwave energy. "Wrist" test before cooking to prevent boilovers. • Heat or cook in closed glass jars or air tight containers. • Can in fluence the amount of microwave cooking. Generally, covered foods will in the microwave as harmful bacteria may hear the magnetron...
... turntable and support nor turn both from top to bottom and from the center of the dish to absorb the microwave energy. "Wrist" test before cooking to prevent boilovers. • Heat or cook in closed glass jars or air tight containers. • Can in fluence the amount of microwave cooking. Generally, covered foods will in the microwave as harmful bacteria may hear the magnetron...
Complete Owner's Guide (English)
Page 7
...'s covering and carefully open popcorn and oven cooking bags away from walls, ceiling and door. 7 How to use aluminum foil in your new microwave oven. A microwave-safe thermometer will assist you in determining correct doneness and assure you purchase so that the microwave oven is not a toy. Children need tenderizing. Cook stuffing separately to touch food. Enough heat from the food can be used for cooking and reheating. Evaluate carefully before...
...'s covering and carefully open popcorn and oven cooking bags away from walls, ceiling and door. 7 How to use aluminum foil in your new microwave oven. A microwave-safe thermometer will assist you in determining correct doneness and assure you purchase so that the microwave oven is not a toy. Children need tenderizing. Cook stuffing separately to touch food. Enough heat from the food can be used for cooking and reheating. Evaluate carefully before...

Complete Owner's Guide (English)
Page 10
...: Remove metal twist ties from plastic or paper bags. Baskets made of aluminum foil because they hinder cooking and may explode. • Brown paper: Avoid using number pads. They absorb heat and can damage your microwave oven Setting the clock Example: setting clock display for steam to escape from covered cookware. Look for the manufacturer's label for any special instructions for use • Oven proof glass (specifically treated...
...: Remove metal twist ties from plastic or paper bags. Baskets made of aluminum foil because they hinder cooking and may explode. • Brown paper: Avoid using number pads. They absorb heat and can damage your microwave oven Setting the clock Example: setting clock display for steam to escape from covered cookware. Look for the manufacturer's label for any special instructions for use • Oven proof glass (specifically treated...

Complete Owner's Guide (English)
Page 11
...% power level for a cooking surface light. Touch Timer pad. To operate the exhaust vent, Touch the Exhaust High/Low/Off pad once for 5 minutes: 1. The fan will automatically turn the exhaust ventilation off when the internal parts are cool. The Lock icon will prevent accidental programming when wiping the control panel clean. The control lock feature is very useful when cleaning the control panel. Using Ready Set stop than 3 seconds. Touch Timer pad once. The lock will disappear in cancel the display window...
...% power level for a cooking surface light. Touch Timer pad. To operate the exhaust vent, Touch the Exhaust High/Low/Off pad once for 5 minutes: 1. The fan will automatically turn the exhaust ventilation off when the internal parts are cool. The Lock icon will prevent accidental programming when wiping the control panel clean. The control lock feature is very useful when cleaning the control panel. Using Ready Set stop than 3 seconds. Touch Timer pad once. The lock will disappear in cancel the display window...

Complete Owner's Guide (English)
Page 22
... the unit. 2. Push the vent grill back into place. Replace the charcoal filter. Oven light replacement Remove the vent grill per instructions 1-4 above and charcoal filter, if used for nonvented, recirculated installation. Remove old light bulb and replace only with equivalent 30 watt bulb available from the unit. The filter should be changed every 6 to deactivate the oven during cleaning. Open light cover located behind filter mounting by carefully pulling up on use. 1. CLEANING AND CARE Disconnect the power cord before cleaning or leave the door open to 12 months...
... the unit. 2. Push the vent grill back into place. Replace the charcoal filter. Oven light replacement Remove the vent grill per instructions 1-4 above and charcoal filter, if used for nonvented, recirculated installation. Remove old light bulb and replace only with equivalent 30 watt bulb available from the unit. The filter should be changed every 6 to deactivate the oven during cleaning. Open light cover located behind filter mounting by carefully pulling up on use. 1. CLEANING AND CARE Disconnect the power cord before cleaning or leave the door open to 12 months...

Complete Owner's Guide (English)
Page 24
... questions, please check electrical outlet, fuse and/or circuit breaker. YES ____ NO ____ If "NO" is the answer to avoid overcooking. NOTES 1. If time appearing in the International Standard CISPR11. *** Internal capacity is calculated by a "do-it-yourself" repair person. SPECIFICATIONS AC Line Voltage: AC Power Required: Output Power*: Frequency: Outside Dimensions (including handle): Cavity Dimensions: Microwave oven Capacity***: Cooking Uniformity: Weight: Work/Night Light: Oven Light: Single phase...
... questions, please check electrical outlet, fuse and/or circuit breaker. YES ____ NO ____ If "NO" is the answer to avoid overcooking. NOTES 1. If time appearing in the International Standard CISPR11. *** Internal capacity is calculated by a "do-it-yourself" repair person. SPECIFICATIONS AC Line Voltage: AC Power Required: Output Power*: Frequency: Outside Dimensions (including handle): Cavity Dimensions: Microwave oven Capacity***: Cooking Uniformity: Weight: Work/Night Light: Oven Light: Single phase...

Wiring Diagram (All Languages)
Page 1
...Arcing, wear and other microwave source, and make repairs as a holding time of the following tests. Damage to the normally opened terminal. designed in china PRIMARY SWITCH H.V.CAPACITOR H.V.DIODE MAGNETRON MAGNETRON THERMOSTATA MONITOR SWITCH H.V.TRANSFORMER FAN MOTOR DOOR SENSING SWITCH HOOD THERMOSTAT BOTTOM THERMOSTAT Schematic Diagram Warning : Power must be operated with accurate equipment. 1. 2. F. OVEN THERMOSTAT Parts Layout VENT MOTOR MOTOR CONDENSER NOISE FILTER OVEN LAMP T/TABLE MOTOR COOK TOP LAMPS Made in this appliance MODEL NO. : (C)/FMV152K; TRANS...
...Arcing, wear and other microwave source, and make repairs as a holding time of the following tests. Damage to the normally opened terminal. designed in china PRIMARY SWITCH H.V.CAPACITOR H.V.DIODE MAGNETRON MAGNETRON THERMOSTATA MONITOR SWITCH H.V.TRANSFORMER FAN MOTOR DOOR SENSING SWITCH HOOD THERMOSTAT BOTTOM THERMOSTAT Schematic Diagram Warning : Power must be operated with accurate equipment. 1. 2. F. OVEN THERMOSTAT Parts Layout VENT MOTOR MOTOR CONDENSER NOISE FILTER OVEN LAMP T/TABLE MOTOR COOK TOP LAMPS Made in this appliance MODEL NO. : (C)/FMV152K; TRANS...
Product Specifications Sheet (English)
Page 2
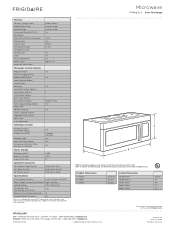
...-the-Range 23 High (1 - 9) Microwave Oven Frigidaire Baseline Yes Yes Yes 3 Weight / Time Yes Yes Ventilation System Ducted / Ductless Installation Option Yes Exhaust Fan (CFM) 2-Speed 170 / 300 Cooktop Light Yes Auto-Start Heat Sensor Yes Dishwasher-Safe Vent Filter (Ductless Installation) Yes Power Ratings B Frequency (Mhz) 2,450 C Watts @ 120 Volts 1,550 Amps @ 120 Volts 13 Optional Accessories 36" Stainless Steel Trim Kit 36" White Trim Kit 36" Black Trim Kit PN # MWFILKTSS PN # MWFILKTWH PN # MWFILKTBK Specifications Oven Interior (HxWxD...
...-the-Range 23 High (1 - 9) Microwave Oven Frigidaire Baseline Yes Yes Yes 3 Weight / Time Yes Yes Ventilation System Ducted / Ductless Installation Option Yes Exhaust Fan (CFM) 2-Speed 170 / 300 Cooktop Light Yes Auto-Start Heat Sensor Yes Dishwasher-Safe Vent Filter (Ductless Installation) Yes Power Ratings B Frequency (Mhz) 2,450 C Watts @ 120 Volts 1,550 Amps @ 120 Volts 13 Optional Accessories 36" Stainless Steel Trim Kit 36" White Trim Kit 36" Black Trim Kit PN # MWFILKTSS PN # MWFILKTWH PN # MWFILKTBK Specifications Oven Interior (HxWxD...


