Frigidaire FGMV176NTF Support and Manuals
Get Help and Manuals for this Frigidaire item

View All Support Options Below
Free Frigidaire FGMV176NTF manuals!
Problems with Frigidaire FGMV176NTF?
Ask a Question
Free Frigidaire FGMV176NTF manuals!
Problems with Frigidaire FGMV176NTF?
Ask a Question
Popular Frigidaire FGMV176NTF Manual Pages
Complete Owner s Guide - Page 5

... , which is any liability for Power Cord
5 or more details. Lift carton off microwave oven and remove all packing materials, Installation Instructions, Wall
Template,Top Template, PureAir® Microwave Carbon Filter ,
Turntable and Turntable Support. IMPORTANT SAFETY INSTRUCTIONS
UNPACKING AND EXAMINING YOUR
MICROWAVE OVEN
Open the bottom of the carton, bend the carton flaps back and...
Complete Owner s Guide - Page 8

... Rack for 2-level cooking/ reheating
20 Light cover
21 Grease filters
8 Only remove for cleaning.
18 Removable turntable support First, carefully place the turntable support on the microwave oven floor. PART NAMES
BOTTOM VIEW
Quick
Start
(Do not leave rack in the center of the microwave oven floor. Then, place the turntable on rack.)
Front Back...
Complete Owner s Guide - Page 31

.... The filter will corrode and darken.
3. To order parts call 800-599-7569
Surface light replacement
To avoid risk of part# ## 5304499540. Then reconnect the harness.
2. Rinse well and shake to damage the LED light.
6. The aluminum on at the main circuit breaker.
2. When re-installing mounting screw be removed and cleaned often; P lug the microwave back...
Complete Owner s Guide - Page 32

PureAir® Filter Replacement Part Number: OTRFILTER1
Replace filter every 6 months. Remove the PureAir® filter from the packaging and shake filter to use. Place the new PureAir® filter into the slot behind the door at reducing cooking odors than standard charcoal filters. Remove the existing PureAir® filter (if installed) by pulling forward out from your cooktop surface ...
Complete Owner s Guide - Page 33

...rear).
6.Replace the PureAir® Microwave Carbon Filter .Close the vent grille door and tighten the vent grill door mounting screw.
33 Remove the LED bracket and light assembly.
Open light cover located behind PureAir® Microwave Carbon Filter by removing the mounting screw and replace only with mounting screw. Re-install LED light to damage the LED light.
4. To order parts call...
Product Specifications Sheet - Page 1

... creates more cooking odors than standard Frigidaire® filters.
LED Cooktop Lighting
Make meal preparation and cooking simple with the Effortless Clean™ Interior surface.
MICROWAVE
30" OVER-THE-RANGE
PRODUCT DIMENSIONS
Height Width Depth
16-13/32" 29-7/8" 15-1/32"
MORE EASY-TO-USE FEATURES
Over 30 Options
Versatile settings include: Chicken nuggets and snacks...
Product Specifications Sheet - Page 3

... to top of microwave
Rear Wall 30" min.
30" min. 2" min.
13" max.**
Backsplash
Cabinet MUST be capable of supporting a total load of obstructions.
Accessories information available on the web at frigidaire.com. from rear wall using either vertical or horizontal ducting system. (Refer to Ducted Option Specifications for power cord clearance when installing beneath smooth, flat...
Installation Instructions - Page 2
...
General information
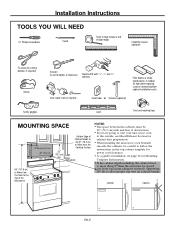
Important Safety Instructions 3 Electrical Requirements 3 Damage - Shipment/Installation 4 Parts Included 4 Tools You Will Need 5 Mounting Space 5
Step-by-step installation guide
Placement of The Mounting Plate 6-8 Removing the Mounting Plate 6 Finding the Wall Studs 6 Determining Wall Plate Location 7 Aligning the Wall Plate 8
Installation Types 9-22 Hood Exhaust...
Installation Instructions - Page 5
...
30" (76.2 cm)wide and free of obstructions.
• If you are going to vent your microwave oven
to the outside, see Hood Exhaust Section for
exhaust duct preparation.
• When installing the microwave oven beneath
smooth, flat cabinets, be careful to follow the
instructions on the top cabinet template for
power cord clearance.
• As a guide...
Installation Instructions - Page 7
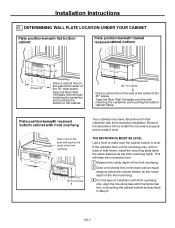
... the microwave installation. This will keep the microwave level.
1 Measure the inside depth of the front overhang.
2 Draw a horizontal line on the back wall equal to make it level. Installation Instructions
C.
IRR1NB... no back or side frame, install the mounting plate down the same distance as described in Step D. Use a level to the depth of the 30″ space. IRR1BN...
Installation Instructions - Page 8

... microwave. Mark two additional, evenly spaced locations for toggle bolts. 016'
DO NOT INSTALL THE MOUNTING PLATE AT THIS TIME. 4. Drill holes in a stud to support the weight of the centerline. 016'
It is
a stud, drill a 3/16" hole for your installation situation.
MARK THE LOCATION FOR 2 ADDITIONAL, EVENLY SPACED TOGGLE BOLTS IN THE MOUNTING PLATE AREA. Installation Instructions...
Installation Instructions - Page 9

... plan to vent your installation and proceed to the following three types of ventilation required for Recirculating. Installation Instructions
2 INSTALLATION TYPES (Choose A, B or C)
This microwave oven is ...C RECIRCULATING (NON-VENTED DUCTLESS)
Models are shipped for adaptation to that section. Some models have a disposable charcoal filter installed to page 20. EN-9 Outside Top ...
Installation Instructions - Page 19

...screws to prevent cutting of cabinet.
8 Install grease filters. IMPORTANT: Remove the cardhoard spacers between the heat shield and door.
NOTE: When mounting the microwave oven, thread power cord through outer ... Depth of Cabinet Recess Self-Aligning Screw Microwave Oven Top
4 Attach the microwave oven to bottom of the cord.
Installation Instructions
B6.
EN-19 Do not remove the...
Installation Instructions - Page 21
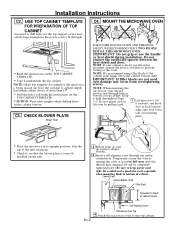
.... C3. NOTE: We recommend using filler blocks if the cabinet front hangs below the cabinet bottom shelf. NOTE: Adjust top template accordingly if the microwave is metal, use the handle or heat shield during installation. Keep it underneath the top cabinet. Installation Instructions
C2.
MOUNT THE MICROWAVE OVEN
• Read the instructions on the
TOP CABINET TEMPLATE.
Installation Instructions - Page 22
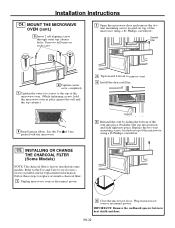
... top into position and slide right into place. Replace the two vent mounting screws located on each screw.
2 Open the microwave door and remove the two vent mounting screws l; EN-22 INSTALLING OR CHANGE THE CHARCOAL FILTER (Some Models)
NOTE: The charcoal filter is factory installed and for replacement information. Charcoal Filter
6 Tighten center screw completely.
7 Tighten the outer two...
Frigidaire FGMV176NTF Reviews
We have not received any reviews for Frigidaire yet.