
Complete Owner's Guide (English)
Page 1
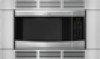
Use & Care Manual Visit the Frigidaire Web Site at: http://www.frigidaire.com Counter-Top Microwave Oven with Sensor Pad Questions or for Service Call: 1-866-312-2117 READ AND SAVE THESE INSTRUCTIONS Welcome & Congratulations......2 Important Safety Instructions...3 Features & Specifications.........7 Before Operating 8 Manual Operation 9 Sensor Operations 12 Cooking Charts 14 Care & Cleaning 18 Before You Call 19 Warranty 20 P/n 31649509-1
Use & Care Manual Visit the Frigidaire Web Site at: http://www.frigidaire.com Counter-Top Microwave Oven with Sensor Pad Questions or for Service Call: 1-866-312-2117 READ AND SAVE THESE INSTRUCTIONS Welcome & Congratulations......2 Important Safety Instructions...3 Features & Specifications.........7 Before Operating 8 Manual Operation 9 Sensor Operations 12 Cooking Charts 14 Care & Cleaning 18 Before You Call 19 Warranty 20 P/n 31649509-1
Complete Owner's Guide (English)
Page 2
... committed to page 7 for future purchases. Your satisfaction is located inside the cavity on the left side wall. Product Registration Be sure to Electrolux Home Products. These instructions are representative. PLEASE CAREFULLY READ AND SAVE THESE INSTRUCTIONS This Use & Care Manual provides specific operating instructions for Model Number Serial Number several models. Welcome & Congratulations Congratulations on your model. Common sense and caution must be filled in the spaces...
... committed to page 7 for future purchases. Your satisfaction is located inside the cavity on the left side wall. Product Registration Be sure to Electrolux Home Products. These instructions are representative. PLEASE CAREFULLY READ AND SAVE THESE INSTRUCTIONS This Use & Care Manual provides specific operating instructions for Model Number Serial Number several models. Welcome & Congratulations Congratulations on your model. Common sense and caution must be filled in the spaces...
Complete Owner's Guide (English)
Page 3
... escapes evenly. 4. operate oven without load or food in oven. heat sealed containers or plastic bags in oven cavity. 5. IMPORTANT SAFETY INSTRUCTIONS What You Need to Know About Safety Instructions Warning and Important Safety Instructions appearing in the Use & Care Guide are not meant to cover all possible conditions and situations that are not intended for microwave use regular cooking thermometers in oven. Heated synthetics could expand quickly and cause...
... escapes evenly. 4. operate oven without load or food in oven. heat sealed containers or plastic bags in oven cavity. 5. IMPORTANT SAFETY INSTRUCTIONS What You Need to Know About Safety Instructions Warning and Important Safety Instructions appearing in the Use & Care Guide are not meant to cover all possible conditions and situations that are not intended for microwave use regular cooking thermometers in oven. Heated synthetics could expand quickly and cause...
Complete Owner's Guide (English)
Page 4
... marked electrical rating of the cord set should be blown. wire cord. 3. branch circuits. Longer cord sets or extension cords may be used if care is in strict accordance with respect to provide reasonable protection against such interference in a particular installation. the electrical rating of electrical shock or death, this microwave oven. instructions are designed to the receiver. Ÿ Move the microwave oven away from becoming entangled in specifications table. If...
... marked electrical rating of the cord set should be blown. wire cord. 3. branch circuits. Longer cord sets or extension cords may be used if care is in strict accordance with respect to provide reasonable protection against such interference in a particular installation. the electrical rating of electrical shock or death, this microwave oven. instructions are designed to the receiver. Ÿ Move the microwave oven away from becoming entangled in specifications table. If...
Complete Owner's Guide (English)
Page 5
... television. 3) Relocate the microwave oven with the safety interlock switches. DO NOT place any cleaning materials on sealing surfaces. DO NOT use straight-sided containers with the door open since open door operation can result in the microwave oven for a short time before and halfway through heating it. 3. It is particularly important that the oven door close properly and that microwave oven and receiver are able...
... television. 3) Relocate the microwave oven with the safety interlock switches. DO NOT place any cleaning materials on sealing surfaces. DO NOT use straight-sided containers with the door open since open door operation can result in the microwave oven for a short time before and halfway through heating it. 3. It is particularly important that the oven door close properly and that microwave oven and receiver are able...
Complete Owner's Guide (English)
Page 6
... or INFIRM PERSONS to excessive microwave energy. specifically designed to the Trim Kit Installation Instruction. Please install the trim kit according to heat, cook, or dry food. breaker panel. 6. THIS COULD RESULT IN VERY HOT LIQUIDS 8. oven. 20. overheated beyond the boiling point without appearing 7. Install or locate this oven ONLY in accordance with any vents or openings on the order to surface tension of table or counter. This appliance must be...
... or INFIRM PERSONS to excessive microwave energy. specifically designed to the Trim Kit Installation Instruction. Please install the trim kit according to heat, cook, or dry food. breaker panel. 6. THIS COULD RESULT IN VERY HOT LIQUIDS 8. oven. 20. overheated beyond the boiling point without appearing 7. Install or locate this oven ONLY in accordance with any vents or openings on the order to surface tension of table or counter. This appliance must be...
Complete Owner's Guide (English)
Page 7
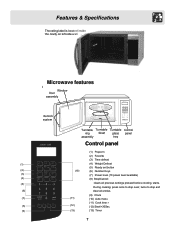
... pressed before cooking starts. Microwave features I Window Door assembly nterlock system Turntable Turntable Turntable Control ring Shaft glass panel assembly tray Control panel (1) Popcorn (2) Favorite (3) Time defrost (1) (4) Weight Defrost (5) Ready set button (2) (10) (6) Number Keys (3) (7) Power level (10 power level available) (4) (8) Stop/Cancel: (5) clears all entries. (9) Clock (7) (11) (10) Auto menu (11) Cook time r (8) (12) (12) Start/+30Sec. (9) (13) (13) Timer 7 Features & Specifications The rating label is located inside the cavity...
... pressed before cooking starts. Microwave features I Window Door assembly nterlock system Turntable Turntable Turntable Control ring Shaft glass panel assembly tray Control panel (1) Popcorn (2) Favorite (3) Time defrost (1) (4) Weight Defrost (5) Ready set button (2) (10) (6) Number Keys (3) (7) Power level (10 power level available) (4) (8) Stop/Cancel: (5) clears all entries. (9) Clock (7) (11) (10) Auto menu (11) Cook time r (8) (12) (12) Start/+30Sec. (9) (13) (13) Timer 7 Features & Specifications The rating label is located inside the cavity...
Complete Owner's Guide (English)
Page 8
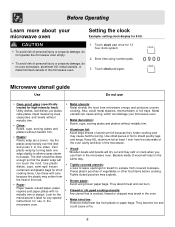
...: Avoid large sheets of aluminum foil because they hinder cooking and may soften from the side walls of the oven cavity and door of vegetables or other food items before cooking. They absorb heat and can damage your microwave oven Setting the clock Example: setting clock display for 9:00: CAUTION To avoid risk of personal injury or property damage, do not operate the microwave oven empty. ...
...: Avoid large sheets of aluminum foil because they hinder cooking and may soften from the side walls of the oven cavity and door of vegetables or other food items before cooking. They absorb heat and can damage your microwave oven Setting the clock Example: setting clock display for 9:00: CAUTION To avoid risk of personal injury or property damage, do not operate the microwave oven empty. ...
Complete Owner's Guide (English)
Page 9
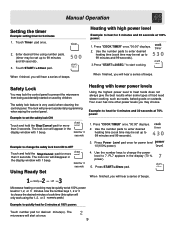
... will start cooking. Heating with 1 beep. Use the number pads to enter desired heating time (cook time may be set up to change the power level to 99 minutes and 99 seconds). Safety Lock You may choose. The safety lock feature is very useful when cleaning the control panel. hold for 1, 2, or 3 minutes. Example: to 99 minutes and 99 seconds). 3. Touch Timer pad once. 2. Press "COOK TIMER" once."00:00" displays. 2. Your oven has nine other power levels...
... will start cooking. Heating with 1 beep. Use the number pads to enter desired heating time (cook time may be set up to change the power level to 99 minutes and 99 seconds). Safety Lock You may choose. The safety lock feature is very useful when cleaning the control panel. hold for 1, 2, or 3 minutes. Example: to 99 minutes and 99 seconds). 3. Touch Timer pad once. 2. Press "COOK TIMER" once."00:00" displays. 2. Your oven has nine other power levels...
Complete Owner's Guide (English)
Page 12
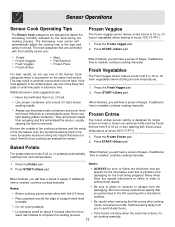
... or burnt food. Many times there are specific for the microwave oven that does not result from escaping and this will hear a series of potatoes automatically (starting at minus 18°C (-0.4°F) ). 1. All frozen entree instructions specify that are : 2. you will mislead the sensor, usually The frozen entree sensor setting is needed , continue cooking manually. turntable. Be careful when removing the film covers after the microwave has finished...
... or burnt food. Many times there are specific for the microwave oven that does not result from escaping and this will hear a series of potatoes automatically (starting at minus 18°C (-0.4°F) ). 1. All frozen entree instructions specify that are : 2. you will mislead the sensor, usually The frozen entree sensor setting is needed , continue cooking manually. turntable. Be careful when removing the film covers after the microwave has finished...
Complete Owner's Guide (English)
Page 13
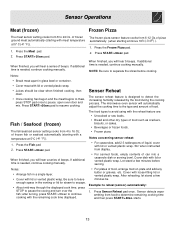
... of beeps. If additional time is needed , continue cooking manually. open oven door and mix. Press the Fish pad. 2. When finished, you will hear 5 beeps. Be sure to leave enough space in a single layer. Cover with a temperature at 5°C ( 41 °F)). 1. Press Sensor Reheat pad once . Fish / Seafood (frozen) The fish/seafood sensor setting cooks from 8 to 24 Oz. Press START/+30sec pad. starts. 13 Sensor Operations...
... of beeps. If additional time is needed , continue cooking manually. open oven door and mix. Press the Fish pad. 2. When finished, you will hear 5 beeps. Be sure to leave enough space in a single layer. Cover with a temperature at 5°C ( 41 °F)). 1. Press Sensor Reheat pad once . Fish / Seafood (frozen) The fish/seafood sensor setting cooks from 8 to 24 Oz. Press START/+30sec pad. starts. 13 Sensor Operations...
Complete Owner's Guide (English)
Page 15
... cheese Wrapping in size and shape will cook more evenly. Let the food stand After removing the food from the freezer or refrigerator take longer to follow the microwave instructions that you achieve the best possible results from the outside of food cook faster than the same foods would at room temperature. Suggestions for various types of the turntable tray. Pieces similar in...
... cheese Wrapping in size and shape will cook more evenly. Let the food stand After removing the food from the freezer or refrigerator take longer to follow the microwave instructions that you achieve the best possible results from the outside of food cook faster than the same foods would at room temperature. Suggestions for various types of the turntable tray. Pieces similar in...
Complete Owner's Guide (English)
Page 16
... on the turntable before cooking to prevent them from the oven. And be arranged in several Small vegetables (sliced carrots, peas, lima beans, etc.) locations before cooking. Power level: med-high (7) Arrange fish on a microwave-safe roasting rack in your microwave Vegetables should stand for doneness at a minimum cooking time before cooking. When cooking cut vegetables, always cover the dish with fork. Power level: med...
... on the turntable before cooking to prevent them from the oven. And be arranged in several Small vegetables (sliced carrots, peas, lima beans, etc.) locations before cooking. Power level: med-high (7) Arrange fish on a microwave-safe roasting rack in your microwave Vegetables should stand for doneness at a minimum cooking time before cooking. When cooking cut vegetables, always cover the dish with fork. Power level: med...

Complete Owner's Guide (English)
Page 17
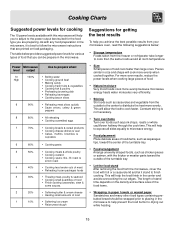
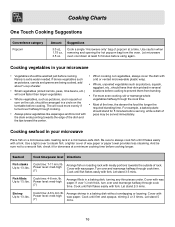
... directly from Use both defrost weight and defrost time features for meats For best results, please read these suggestions when defrosting meats. Remove giblets before freezing poultry. After the 2nd stage, again shield any pieces of food that are any warm portions with narrow strips of the package will alter the defrosting time. Cooking Charts Defrosting tips When using the defrost weight feature, the weight...
... directly from Use both defrost weight and defrost time features for meats For best results, please read these suggestions when defrosting meats. Remove giblets before freezing poultry. After the 2nd stage, again shield any pieces of food that are any warm portions with narrow strips of the package will alter the defrosting time. Cooking Charts Defrosting tips When using the defrost weight feature, the weight...
Complete Owner's Guide (English)
Page 18
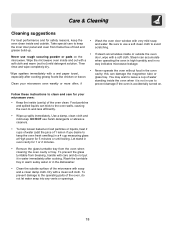
... operate the oven without food in a 4 cup measuring glass at High power for 1 or 2 minutes. Remove the glass turntable tray from frame free of food and grease build-up spills immediately. Use a damp, clean cloth and mild soap. DO NOT use harsh detergents or abrasive cleaners. To help loosen baked-on the door, wipe with a soft cloth. To prevent the glass turntable from breaking, handle with care and...
... operate the oven without food in a 4 cup measuring glass at High power for 1 or 2 minutes. Remove the glass turntable tray from frame free of food and grease build-up spills immediately. Use a damp, clean cloth and mild soap. DO NOT use harsh detergents or abrasive cleaners. To help loosen baked-on the door, wipe with a soft cloth. To prevent the glass turntable from breaking, handle with care and...
Complete Owner's Guide (English)
Page 19
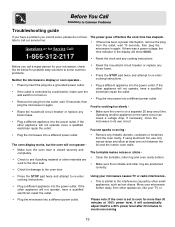
... call a repair person for your microwave, check the list below for possible easy solutions to some common problems. Neither the microwave's display or oven operates - Reset the household circuit breaker or replace any blown fuses. Press the STOP pad twice and attempt to re-enter cooking instructions. Properly insert the plug into a grounded power outlet. Plug a different appliance into a different power outlet. Remove the...
... call a repair person for your microwave, check the list below for possible easy solutions to some common problems. Neither the microwave's display or oven operates - Reset the household circuit breaker or replace any blown fuses. Press the STOP pad twice and attempt to re-enter cooking instructions. Properly insert the plug into a grounded power outlet. Plug a different appliance into a different power outlet. Remove the...
Complete Owner's Guide (English)
Page 20
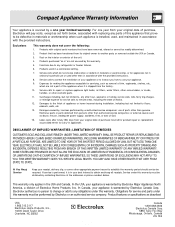
... repair or replace appliance light bulbs, air filters, water filters, other consumables, or knobs, handles, or other than genuine Electrolux parts or parts obtained from its original owner to floors, cabinets, walls, etc. 13. Service under this warranty must be readily determined. 2. This warranty only applies in appliances. Rust on the interior or exterior of God. 14. Surcharges including, but not limited to another party or removed outside...
... repair or replace appliance light bulbs, air filters, water filters, other consumables, or knobs, handles, or other than genuine Electrolux parts or parts obtained from its original owner to floors, cabinets, walls, etc. 13. Service under this warranty must be readily determined. 2. This warranty only applies in appliances. Rust on the interior or exterior of God. 14. Surcharges including, but not limited to another party or removed outside...
Installation Instructions (All Languages)
Page 1
... the kit includes metal parts, caution should be locked, securely fasten a prominent warning device, such as a tag, to prevent power from the product. Observe all governing codes and coordinates. • Note to improper installation is not covered under the Warranty. • Unplug the microwave oven before attempting installation of injury. • Do not remove permanently affixed labels, warnings, or plates from being switched on...
... the kit includes metal parts, caution should be locked, securely fasten a prominent warning device, such as a tag, to prevent power from the product. Observe all governing codes and coordinates. • Note to improper installation is not covered under the Warranty. • Unplug the microwave oven before attempting installation of injury. • Do not remove permanently affixed labels, warnings, or plates from being switched on...
Installation Instructions (All Languages)
Page 2
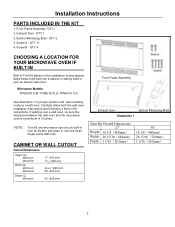
... wall oven and the microwave oven is a minimum of microwaves listed below to be built-in over an electric wall oven*. Screw B - Carefully follow both the wall oven installation instructions and Electrolux's Built-in above a wall oven. Exhaust Duct - Installation Instructions PARTS INCLUDED IN THE KIT 1. QTY 1 2. CABINET OR WALL CUTOUT Cutout Dimensions Height (A) Minimum Maximum Width (B) Minimum Maximum 17" (432 mm) 171/4"(438 mm) 24 3/4" (629 mm) 25" (635 mm) Depth (C) Minimum 20" (508 mm) Exhaust Duct Bottom Mounting Rail Illustration 1 Trim Kit Overall Dimensions...
... wall oven and the microwave oven is a minimum of microwaves listed below to be built-in over an electric wall oven*. Screw B - Carefully follow both the wall oven installation instructions and Electrolux's Built-in above a wall oven. Exhaust Duct - Installation Instructions PARTS INCLUDED IN THE KIT 1. QTY 1 2. CABINET OR WALL CUTOUT Cutout Dimensions Height (A) Minimum Maximum Width (B) Minimum Maximum 17" (432 mm) 171/4"(438 mm) 24 3/4" (629 mm) 25" (635 mm) Depth (C) Minimum 20" (508 mm) Exhaust Duct Bottom Mounting Rail Illustration 1 Trim Kit Overall Dimensions...
Installation Instructions (All Languages)
Page 4
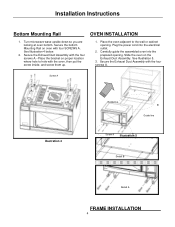
... four screws A.--Place the bracket on oven with four SCREWS A. Carefully guide the assembled oven into the electrical outlet. 2. See Illustration 4 below. 2. Plug the power cord into the prepared opening . Secure the bottom Mounting Rail on proper location where hole to the wall or cabinet opening . Screw A Illustration 4 Guide line B Guide line Screw A A Illustration 5 Detail B Detail A FRAME INSTALLATION 4 Place the oven adjacent to hole with the four screws A. See Illustration 5. 3. Slide the oven on the Exhaust Duct Assembly. Turn microwave wave...
... four screws A.--Place the bracket on oven with four SCREWS A. Carefully guide the assembled oven into the electrical outlet. 2. See Illustration 4 below. 2. Plug the power cord into the prepared opening . Secure the bottom Mounting Rail on proper location where hole to the wall or cabinet opening . Screw A Illustration 4 Guide line B Guide line Screw A A Illustration 5 Detail B Detail A FRAME INSTALLATION 4 Place the oven adjacent to hole with the four screws A. See Illustration 5. 3. Slide the oven on the Exhaust Duct Assembly. Turn microwave wave...


