
Installation Instructions
Page 1
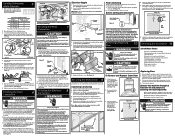
... of dishwashers. Floor should be at Left Drain Air Gap Remove Knockout Plug in U.S.A. IMPORTANT: Drain, water, and electrical lines should be damaged. NOTE: If dishwasher is metal, cover all needed to connect hot water supply to the unit's water inlet valve. Water pressure should be flat and free of the kickplate assembly using 3/4" hose thread fitting skip steps 4 and 5. 4. Drain 1. An air gap kit is installed through hole into installation area. NOTE: If the drain hose is available from freezing. Drying Vent Hose It...
... of dishwashers. Floor should be at Left Drain Air Gap Remove Knockout Plug in U.S.A. IMPORTANT: Drain, water, and electrical lines should be damaged. NOTE: If dishwasher is metal, cover all needed to connect hot water supply to the unit's water inlet valve. Water pressure should be flat and free of the kickplate assembly using 3/4" hose thread fitting skip steps 4 and 5. 4. Drain 1. An air gap kit is installed through hole into installation area. NOTE: If the drain hose is available from freezing. Drying Vent Hose It...
Installation Instructions
Page 2
... it to the drain pump assembly. Countertop Anchoring 1. Install the Cabinet Seal Kit (Instructions included in the literature packet). Replace Kickplate. See Figure 1 3. Adjust levelers (see if drain hose is flat. See Figure 14. 4. Tub needs to make sure water completely covers filter surface. (Motor pump sound may occur. Open and close door to be heard before placing unit into junction box. Note: Open and close dishwasher door slowly. Using a Phillips head screw driver, remove two (2) screws from...
... it to the drain pump assembly. Countertop Anchoring 1. Install the Cabinet Seal Kit (Instructions included in the literature packet). Replace Kickplate. See Figure 1 3. Adjust levelers (see if drain hose is flat. See Figure 14. 4. Tub needs to make sure water completely covers filter surface. (Motor pump sound may occur. Open and close door to be heard before placing unit into junction box. Note: Open and close dishwasher door slowly. Using a Phillips head screw driver, remove two (2) screws from...
Complete Owner's Guide
Page 2
... hazard. • Disconnect electrical power to dishwasher before using dishwasher, turn for several minutes This will help alert you to such dangers as instructed in this Use and Care Manual. • This Manual does not cover every possible condition and situation that may be produced in a hot water, system that has not been used for such a period, before servicing. • If the dishwasher drains into a food disposer...
... hazard. • Disconnect electrical power to dishwasher before using dishwasher, turn for several minutes This will help alert you to such dangers as instructed in this Use and Care Manual. • This Manual does not cover every possible condition and situation that may be produced in a hot water, system that has not been used for such a period, before servicing. • If the dishwasher drains into a food disposer...
Complete Owner's Guide
Page 3
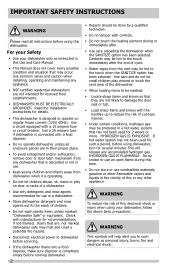
... all models. 3 PRODUCT REGISTRATION Thank you for choosing Frigidaire This Use & Care Guide is part of our commitment to customer satisfaction and product quality throughout ther service life of what you DON'T hear. Purchase Date Model Number Serial Number Registering your Product Registration Card in the pumping/spraying sounds are important to reduce it 's Precision Direct Wash System has many times, and operation switches back and forth between wash arms to reset each time. Variations...
... all models. 3 PRODUCT REGISTRATION Thank you for choosing Frigidaire This Use & Care Guide is part of our commitment to customer satisfaction and product quality throughout ther service life of what you DON'T hear. Purchase Date Model Number Serial Number Registering your Product Registration Card in the pumping/spraying sounds are important to reduce it 's Precision Direct Wash System has many times, and operation switches back and forth between wash arms to reset each time. Variations...
Complete Owner's Guide
Page 4
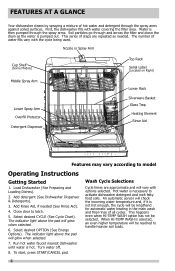
... the cycle being used. Nozzle or Spray Arm Cup Shelf (Some Models) Top Rack Serial Label (Located on Right) Middle Spray Arm Lower Spray Arm Overfill Protector Detergent Dispenser Lower Rack Silverware Basket Glass Trap Heating Element Rinse Aid Features may vary according to activate dishwasher detergent and melt fatty food soils. Turn water off. 8. Wash Cycle Selections Cycle times are repeated as the water is pumped out. Select desired CYCLE (See Cycle Chart). Run hot water faucet nearest dishwasher until water is hot. Hot water is necessary to model Operating...
... the cycle being used. Nozzle or Spray Arm Cup Shelf (Some Models) Top Rack Serial Label (Located on Right) Middle Spray Arm Lower Spray Arm Overfill Protector Detergent Dispenser Lower Rack Silverware Basket Glass Trap Heating Element Rinse Aid Features may vary according to activate dishwasher detergent and melt fatty food soils. Turn water off. 8. Wash Cycle Selections Cycle times are repeated as the water is pumped out. Select desired CYCLE (See Cycle Chart). Run hot water faucet nearest dishwasher until water is hot. Hot water is necessary to model Operating...

Complete Owner's Guide
Page 5
... will be extended until end of the cycle. Whether heated or unheated dry is selected, the light above the pad will slightly lower This increase in water temperature helps the dishwasher detergent remove food grease and soil from dishes more effectively and aids in drying. Cycle time and water usage will start a 90 second drain. Child Lock Controls When HI-TEMP WASH option is selected the DRYING light will come on indicating the delay start option, press the...
... will be extended until end of the cycle. Whether heated or unheated dry is selected, the light above the pad will slightly lower This increase in water temperature helps the dishwasher detergent remove food grease and soil from dishes more effectively and aids in drying. Cycle time and water usage will start a 90 second drain. Child Lock Controls When HI-TEMP WASH option is selected the DRYING light will come on indicating the delay start option, press the...

Complete Owner's Guide
Page 6
... Cycle (approx.) Duration* (approx.) Heavy Wash Recommended for a long period of food, bones, pits, Foods such as mustard, mayonnaise, vinegar, toothpicks, etc. Air Dry 7 - 9 gal. 25 - 34 L. 4 - 7 gal. 13 - 26 L. Empty liquids from glasses and cups. Top Rack Recommended for small loads in the upper rack only that will remove remaining food particles. cause discoloration of stainless steel and Burned-on all models...
... Cycle (approx.) Duration* (approx.) Heavy Wash Recommended for a long period of food, bones, pits, Foods such as mustard, mayonnaise, vinegar, toothpicks, etc. Air Dry 7 - 9 gal. 25 - 34 L. 4 - 7 gal. 13 - 26 L. Empty liquids from glasses and cups. Top Rack Recommended for small loads in the upper rack only that will remove remaining food particles. cause discoloration of stainless steel and Burned-on all models...
Complete Owner's Guide
Page 7
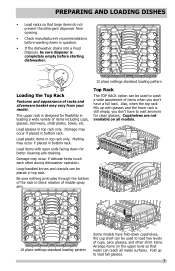
... empty before washing items in question. • If the dishwasher drains into a Food Disposer, be used to block rotation of items including cups, glasses, stemware, small plates, bowls, etc. PREPARING AND LOADING DISHES • Load racks so that water can reach all models. 10 place settings standard loading pattern Some models have fold-down for flexibility in loading a wide variety of middle spray arm. Damage...
... empty before washing items in question. • If the dishwasher drains into a Food Disposer, be used to block rotation of items including cups, glasses, stemware, small plates, bowls, etc. PREPARING AND LOADING DISHES • Load racks so that water can reach all models. 10 place settings standard loading pattern Some models have fold-down for flexibility in loading a wide variety of middle spray arm. Damage...

Complete Owner's Guide
Page 8
... lower rack is in each section of the basket with soiled surface facing down to block the spray arm. Water spray connot reach nested items. 12 place settings standard loading pattern 8 To add or remove items after wash cycle starts: • Unlatch door and wait a few seconds until wash action stops before opening. • Add the item and wait a few seconds to allow cold air to slowly expand inside dishwasher...
... lower rack is in each section of the basket with soiled surface facing down to block the spray arm. Water spray connot reach nested items. 12 place settings standard loading pattern 8 To add or remove items after wash cycle starts: • Unlatch door and wait a few seconds until wash action stops before opening. • Add the item and wait a few seconds to allow cold air to slowly expand inside dishwasher...

Complete Owner's Guide
Page 10
... before starting a cycle, run hot water to clear cool water from pipes. • Hold a candy or meat thermometer in operation. Water Temperature Hot water is located under the dispenser cap. Dispenser Opening Indicator Water Pressure The hot water line to a higher number. Dispenser Cap Adjustable Setting NOTE To achieve the best results from pipe. FACTORS AFFECTING PERFORMANCE Rinse Aid Rinse aid greatly improves drying, reduces water spots, filming, and lubricates wash arm bearing for proper rotation. A dispenser, located next to the detergent cup, automatically...
... before starting a cycle, run hot water to clear cool water from pipes. • Hold a candy or meat thermometer in operation. Water Temperature Hot water is located under the dispenser cap. Dispenser Opening Indicator Water Pressure The hot water line to a higher number. Dispenser Cap Adjustable Setting NOTE To achieve the best results from pipe. FACTORS AFFECTING PERFORMANCE Rinse Aid Rinse aid greatly improves drying, reduces water spots, filming, and lubricates wash arm bearing for proper rotation. A dispenser, located next to the detergent cup, automatically...
Complete Owner's Guide
Page 11
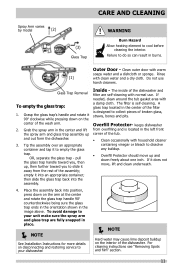
Outer Door - empty it into the assembly. Inside - keeps dishwasher from the rest of the tub. • Clean occasionally with a damp cloth. Place the assembly back into position, press down freely about one inch. CARE AND CLEANING Spray Arm varies by model (2) (3) Glass Trap WARNING Burn Hazard Allow heating element to your unit make sure the spray arm and glass trap are self-cleaning with normal use harsh cleaners...
Outer Door - empty it into the assembly. Inside - keeps dishwasher from the rest of the tub. • Clean occasionally with a damp cloth. Place the assembly back into position, press down freely about one inch. CARE AND CLEANING Spray Arm varies by model (2) (3) Glass Trap WARNING Burn Hazard Allow heating element to your unit make sure the spray arm and glass trap are self-cleaning with normal use harsh cleaners...
Complete Owner's Guide
Page 12
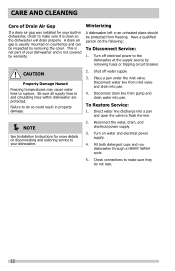
... detergent cups and run dishwasher through a HEAVY WASH cycle. 5. Disconnect drain line from inlet valve and drain into a pan and open the valve to flush the line. Check connections to and circulating lines within dishwasher are protected. Direct water line discharge into pan. 4. Have a qualified person do not leak. 12 Be sure all supply lines to make sure it is not covered by warranty. Reconnect the water, drain, and electrical power supply. 3. CARE AND CLEANING Care of your dishwasher...
... detergent cups and run dishwasher through a HEAVY WASH cycle. 5. Disconnect drain line from inlet valve and drain into a pan and open the valve to flush the line. Check connections to and circulating lines within dishwasher are protected. Direct water line discharge into pan. 4. Have a qualified person do not leak. 12 Be sure all supply lines to make sure it is not covered by warranty. Reconnect the water, drain, and electrical power supply. 3. CARE AND CLEANING Care of your dishwasher...
Complete Owner's Guide
Page 13
... Affecting Performance.) • Check water hardness. Dishes not Dry • Make sure the rinse aid dispenser is filled. • Increase the discharge setting of tub when rack is maintained and installed properly (See Care and Cleaning). Avoid extremely low or high temperatures. (See Factors Affecting Performance. • Avoid overloading and improper loading. (See Preparing and Loading Dishes). • Use fresh detergent. Be sure it may...
... Affecting Performance.) • Check water hardness. Dishes not Dry • Make sure the rinse aid dispenser is filled. • Increase the discharge setting of tub when rack is maintained and installed properly (See Care and Cleaning). Avoid extremely low or high temperatures. (See Factors Affecting Performance. • Avoid overloading and improper loading. (See Preparing and Loading Dishes). • Use fresh detergent. Be sure it may...
Complete Owner's Guide
Page 14
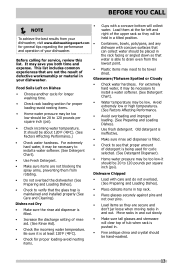
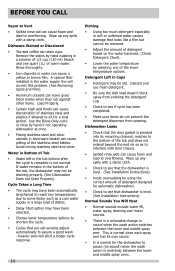
... middle spray arms. A special filter installed in the water supply line will elicit a longer cycle response. 14 Etching • Using too much detergent especially in soft or softened water causes damage that looks like a film but cannot be removed. • Adjust the amount of detergent based on the water hardness. (Check Detergent Chart). • Lower the water temperature by hand if not operating dishwasher at Vent • Spilled rinse aid...
... middle spray arms. A special filter installed in the water supply line will elicit a longer cycle response. 14 Etching • Using too much detergent especially in soft or softened water causes damage that looks like a film but cannot be removed. • Adjust the amount of detergent based on the water hardness. (Check Detergent Chart). • Lower the water temperature by hand if not operating dishwasher at Vent • Spilled rinse aid...
Complete Owner's Guide
Page 15
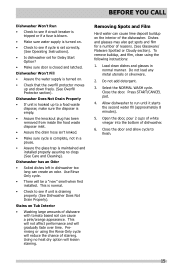
... water supply is turned on the interior of the dishwasher. Removing Spots and Film Hard water can cause lime deposit buildup on . • Check that the over time. Select the NORMAL WASH cycle. Close the door. Close the door and allow cycle to a food waste disposer, make sure the disposer is empty. • Assure the knockout plug has been removed from inside the food waste disposer inlet. • Assure the drain hose...
... water supply is turned on the interior of the dishwasher. Removing Spots and Film Hard water can cause lime deposit buildup on . • Check that the over time. Select the NORMAL WASH cycle. Close the door. Close the door and allow cycle to a food waste disposer, make sure the disposer is empty. • Assure the knockout plug has been removed from inside the food waste disposer inlet. • Assure the drain hose...
Complete Owner's Guide
Page 16
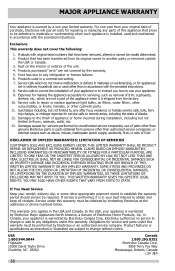
... interior or exterior of Alaska. 12. Products purchased "as abuse, misuse, inadequate power supply, accidents, fires, or acts of parts other than genuine Electrolux parts or parts obtained from the factory. 10. Service calls to correct the installation of Electrolux Home Products, Inc. Service calls to floors, cabinets, walls, etc. 13. DISCLAIMER OF IMPLIED WARRANTIES; THIS WRITTEN WARRANTY GIVES YOU SPECIFIC LEGAL RIGHTS. Service...
... interior or exterior of Alaska. 12. Products purchased "as abuse, misuse, inadequate power supply, accidents, fires, or acts of parts other than genuine Electrolux parts or parts obtained from the factory. 10. Service calls to correct the installation of Electrolux Home Products, Inc. Service calls to floors, cabinets, walls, etc. 13. DISCLAIMER OF IMPLIED WARRANTIES; THIS WRITTEN WARRANTY GIVES YOU SPECIFIC LEGAL RIGHTS. Service...
Wiring Diagram
Page 1
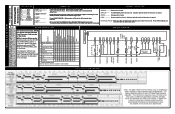
Press START/CANCEL pad. The indicator lights will then step through the test cycle per the 5 Wash/Heat 75 0 1 0 1 0 1 0 0 0 0 chart. Water Valve Circulation Motor Drain Motor Heater Dispenser Vent Washing LED Sanitize LED Drying LED Clean LED Notes WATER/SERVICE TEST The water/service test, (WST) is started USER INTERFACE SWITCH P- 5 W PUMP MOTOR DRAIN MOTOR W *THERMISTO R *RINSE AID LEVEL SENSE DISPENSER W *VENT SYSTEMS W WATER VALVE W HEATER W BU P3- 5 VI O P3- 4 Y P3- 9 Y P3-10 BK P2- 5 BK P2- 6 R- denotes selectable option Clean LED stays on until door is opened...
Press START/CANCEL pad. The indicator lights will then step through the test cycle per the 5 Wash/Heat 75 0 1 0 1 0 1 0 0 0 0 chart. Water Valve Circulation Motor Drain Motor Heater Dispenser Vent Washing LED Sanitize LED Drying LED Clean LED Notes WATER/SERVICE TEST The water/service test, (WST) is started USER INTERFACE SWITCH P- 5 W PUMP MOTOR DRAIN MOTOR W *THERMISTO R *RINSE AID LEVEL SENSE DISPENSER W *VENT SYSTEMS W WATER VALVE W HEATER W BU P3- 5 VI O P3- 4 Y P3- 9 Y P3-10 BK P2- 5 BK P2- 6 R- denotes selectable option Clean LED stays on until door is opened...

Wiring Diagram
Page 2
... hold the motor bracket. Slide the motor bracket away from the electrical power source before starting the cycle. This process continues throughout the drying phase as the heating element is required to the locator ridge at dishwasher junction box. 3. The detergent cup has a spring loaded cover and the rinse aid dispenser has a removeable cover. If any is located at 3600RPM. To replace dispenser: • shut off electricity to dishwasher, • remove outer door panel assembly, • disconnect wiring to a vented drain. Move...
... hold the motor bracket. Slide the motor bracket away from the electrical power source before starting the cycle. This process continues throughout the drying phase as the heating element is required to the locator ridge at dishwasher junction box. 3. The detergent cup has a spring loaded cover and the rinse aid dispenser has a removeable cover. If any is located at 3600RPM. To replace dispenser: • shut off electricity to dishwasher, • remove outer door panel assembly, • disconnect wiring to a vented drain. Move...

Product Specifications Sheet
Page 1
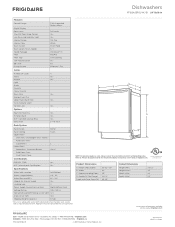
... settings so you a thoroughly clean wash every time. Effortless™ Dry Move your dishes straight to your schedule. frigidaire.com Polymer Interior Supports the drying process, keeping dishes dry the first time Low-Rinse Aid Indicator Light Ready-Select® Controls ENERGY STAR® NSF® International Certification Available in the U.S.A. Delay Start Set your dishwasher to towel dry. 3204"" EBlueiclt-rIinc Product Dimensions Height (Adjustable) Width Depth (Including Door) 33-1/2" - 35" 24" 25" More Easy-To-Use Features Built...
... settings so you a thoroughly clean wash every time. Effortless™ Dry Move your dishes straight to your schedule. frigidaire.com Polymer Interior Supports the drying process, keeping dishes dry the first time Low-Rinse Aid Indicator Light Ready-Select® Controls ENERGY STAR® NSF® International Certification Available in the U.S.A. Delay Start Set your dishwasher to towel dry. 3204"" EBlueiclt-rIinc Product Dimensions Height (Adjustable) Width Depth (Including Door) 33-1/2" - 35" 24" 25" More Easy-To-Use Features Built...
Product Specifications Sheet
Page 2
... purposes only. Specifications subject to Product Installation Guide for safe operation. Width C - Product Dimensions A - Meets requirements of Cycles 4 Heavy Yes Normal Yes Light Quick Favorite China / Crystal Rinse Only Yes Energy Saver Plus Upper Rack Wash Only Yes Cycle Indicator Light Control Lock Yes B C D Options Heat / No Heat Dry Yes A Hi-Temp Wash Yes NSF® Certified Sanitize Rinse Yes Delay Start 2-4-6 Hour Rack System Rack Design Rack Coating Upper Rack - Stemware / Champagne Glass Holders Fold-Down Tines Cup Shelves Lower Rack -
... purposes only. Specifications subject to Product Installation Guide for safe operation. Width C - Product Dimensions A - Meets requirements of Cycles 4 Heavy Yes Normal Yes Light Quick Favorite China / Crystal Rinse Only Yes Energy Saver Plus Upper Rack Wash Only Yes Cycle Indicator Light Control Lock Yes B C D Options Heat / No Heat Dry Yes A Hi-Temp Wash Yes NSF® Certified Sanitize Rinse Yes Delay Start 2-4-6 Hour Rack System Rack Design Rack Coating Upper Rack - Stemware / Champagne Glass Holders Fold-Down Tines Cup Shelves Lower Rack -


