
Installation Instructions (All Languages)
Page 1
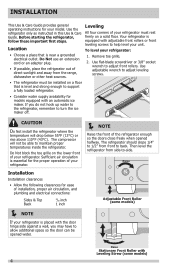
... of the refrigerator enough so the doors close freely when opened halfway. Your refrigerator is equipped with Leveling Screw (some models) Raise Stationary Front Roller with adjustable front rollers or front leveling screws to refrigerator No water leaks present at all corners...the following clearances for the door to swing open. 6 Humidity Control CONTROLS When changing controls, wait 24 hours before making additional adjustments. (For models with LED display, 3 to 5 is normal operating range.) 7 ICEMAKER Ensure icemaker is turned ON. 8 DOOR REMOVAL (IF NECESSARY) Cable If...
... of the refrigerator enough so the doors close freely when opened halfway. Your refrigerator is equipped with Leveling Screw (some models) Raise Stationary Front Roller with adjustable front rollers or front leveling screws to refrigerator No water leaks present at all corners...the following clearances for the door to swing open. 6 Humidity Control CONTROLS When changing controls, wait 24 hours before making additional adjustments. (For models with LED display, 3 to 5 is normal operating range.) 7 ICEMAKER Ensure icemaker is turned ON. 8 DOOR REMOVAL (IF NECESSARY) Cable If...
Use and Care Guide
Page 2
... wrapping material immediately after the refrigerator is turned ON Ice & water dispenser operates correctly Front filter must be flush with filter housing (select models) WARNING indicates a potentially hazardous situation which , if not avoided, may become airtight chambers, and can cause severe cuts, and also destroy finishes if they come...
... wrapping material immediately after the refrigerator is turned ON Ice & water dispenser operates correctly Front filter must be flush with filter housing (select models) WARNING indicates a potentially hazardous situation which , if not avoided, may become airtight chambers, and can cause severe cuts, and also destroy finishes if they come...
Use and Care Guide
Page 4
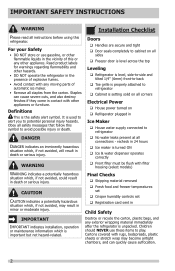
...installation, proper air circulation, and plumbing and electrical connections: Sides & Top 3/8 inch Back 1 inch Adjustable Front Roller (some models) 4 To level your model. If you may have to back. Do Not block the toe grille on a floor that is near a grounded electrical outlet...Guide provides general operating instructions for ease of your refrigerator. Location • Choose a place that is equipped with Leveling Screw (some models) NOTE If your unit. Leveling All four corners of your refrigerator must be opened halfway. Use flat-blade screwdriver or ...
...installation, proper air circulation, and plumbing and electrical connections: Sides & Top 3/8 inch Back 1 inch Adjustable Front Roller (some models) 4 To level your model. If you may have to back. Do Not block the toe grille on a floor that is near a grounded electrical outlet...Guide provides general operating instructions for ease of your refrigerator. Location • Choose a place that is equipped with Leveling Screw (some models) NOTE If your unit. Leveling All four corners of your refrigerator must be opened halfway. Use flat-blade screwdriver or ...
Use and Care Guide
Page 6
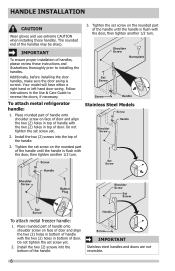
... the two (2) screws into the top of the handle until the handle is flush with the door, then tighten another 1/2 turn . Your model will have either a right hand or left hand door swing. Handle Screw IMPORTANT Stainless steel handles and doors are not reversible. 6 Do not... tighten the set screw yet. 2. Stainless Steel Models Screw Handle Shoulder Screw Screw Set Screw Handle Shoulder Screw Button Plug Shoulder Screw Set Screw Set Screw To attach metal freezer handle: 1. ...
... the two (2) screws into the top of the handle until the handle is flush with the door, then tighten another 1/2 turn . Your model will have either a right hand or left hand door swing. Handle Screw IMPORTANT Stainless steel handles and doors are not reversible. 6 Do not... tighten the set screw yet. 2. Stainless Steel Models Screw Handle Shoulder Screw Screw Set Screw Handle Shoulder Screw Button Plug Shoulder Screw Set Screw Set Screw To attach metal freezer handle: 1. ...
Use and Care Guide
Page 9
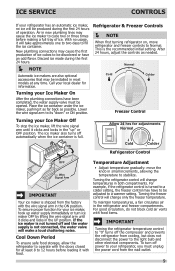
...; NOTE Automatic ice makers are also optional accessories that may cause the first production of operation. Call your refrigerator, you must be installed in most models at least 8 to 12 hours before making a full tray of ice. Place the ice container under the ice maker, pushing it will change only the...
...; NOTE Automatic ice makers are also optional accessories that may cause the first production of operation. Call your refrigerator, you must be installed in most models at least 8 to 12 hours before making a full tray of ice. Place the ice container under the ice maker, pushing it will change only the...
Use and Care Guide
Page 11
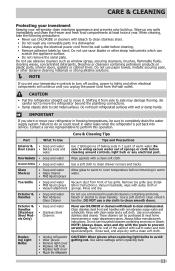
...; Soap and water • Non Abrasive Glass Cleaner Do not use CHLORIDE or cleaners with the grain to clean smooth handles. Exterior & Handles (Stainless Steel Models Only) • Soap and water • Stainless Steel Cleaners Never use paper towels, metallic scouring pads, or other abrasive cleaning materials or strong alkaline solutions...
...; Soap and water • Non Abrasive Glass Cleaner Do not use CHLORIDE or cleaners with the grain to clean smooth handles. Exterior & Handles (Stainless Steel Models Only) • Soap and water • Stainless Steel Cleaners Never use paper towels, metallic scouring pads, or other abrasive cleaning materials or strong alkaline solutions...
Use and Care Guide
Page 12
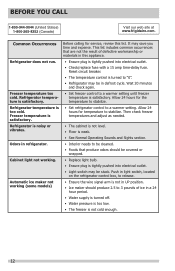
... fuse. BEFORE YOU CALL 1-800-944-9044 (United States) 1-800-265-8352 (Canada) Visit our web site at www.frigidaire.com. Common Occurrences Refrigerator does not run. Cabinet light not working (some models) Before calling for service, review this appliance. • Ensure plug is not cold enough. 12 It may be cleaned...
... fuse. BEFORE YOU CALL 1-800-944-9044 (United States) 1-800-265-8352 (Canada) Visit our web site at www.frigidaire.com. Common Occurrences Refrigerator does not run. Cabinet light not working (some models) Before calling for service, review this appliance. • Ensure plug is not cold enough. 12 It may be cleaned...


