
Installation Instructions (All Languages)
Page 1
... Hinge Cover Top Hinge Bottom Water Tube Wood Shim Pin Center Hinge 9 √ See "Normal Operating Sights & Sounds" in the Use & Care Manual so you understand the sounds you may vary per model.) WATER SUPPLY Connect water supply - Turn icemaker OFF if water supply is not recommended. P/N: 240568304 To be removed by the customer after unit is in Ice Maker House water supply connected to refrigerator No water leaks present at all corners Electrical Power House power turned on Refrigerator plugged in place. To level cabinet or change door height...
... Hinge Cover Top Hinge Bottom Water Tube Wood Shim Pin Center Hinge 9 √ See "Normal Operating Sights & Sounds" in the Use & Care Manual so you understand the sounds you may vary per model.) WATER SUPPLY Connect water supply - Turn icemaker OFF if water supply is not recommended. P/N: 240568304 To be removed by the customer after unit is in Ice Maker House water supply connected to refrigerator No water leaks present at all corners Electrical Power House power turned on Refrigerator plugged in place. To level cabinet or change door height...
Use and Care Guide
Page 1
All about the Use &Care of your Refrigerator TABLE OF CONTENTS Important Safety Instructions 2 Controls 9 Installation 4 Normal Operating Sounds and Sights..........10 Door Removal Instructions 5 Care and Cleaning 11 Handle Installation 6 Before you Call 12 Connecting Water Supply 8 Major Appliance Warranty 13 Ice Service 9 www.frigidaire.com USA 1-800-944-9044 www.frigidaire.ca Canada 1-800-265-8352 242063801 (July 2010)
All about the Use &Care of your Refrigerator TABLE OF CONTENTS Important Safety Instructions 2 Controls 9 Installation 4 Normal Operating Sounds and Sights..........10 Door Removal Instructions 5 Care and Cleaning 11 Handle Installation 6 Before you Call 12 Connecting Water Supply 8 Major Appliance Warranty 13 Ice Service 9 www.frigidaire.com USA 1-800-944-9044 www.frigidaire.ca Canada 1-800-265-8352 242063801 (July 2010)
Use and Care Guide
Page 2
... removed Fresh food and freezer temperatures set Crisper humidity controls set Registration card sent in Child Safety IMPORTANT IMPORTANT indicates installation, operation or maintenance information which , if not avoided, could result in contact with any moving parts of automatic ice maker. • Remove all staples from the carton. Obey all corners Electrical Power House power turned on Refrigerator plugged in Ice Maker House water supply connected to refrigerator DANGER DANGER indicates...
... removed Fresh food and freezer temperatures set Crisper humidity controls set Registration card sent in Child Safety IMPORTANT IMPORTANT indicates installation, operation or maintenance information which , if not avoided, could result in contact with any moving parts of automatic ice maker. • Remove all staples from the carton. Obey all corners Electrical Power House power turned on Refrigerator plugged in Ice Maker House water supply connected to refrigerator DANGER DANGER indicates...
Use and Care Guide
Page 3
... damage, handle tempered glass shelves carefully. Avoid connecting refrigerator to sudden temperature change. 3 Grounding type wall receptacle Do not, under your warranty. • Do not plug the unit into an electrical outlet controlled by a wall switch or pull cord to prevent the refrigerator from being turned off power to help prevent accidents. Junked or abandoned refrigerators or freezers are getting rid of your old refrigerator or freezer, please follow the instructions below to...
... damage, handle tempered glass shelves carefully. Avoid connecting refrigerator to sudden temperature change. 3 Grounding type wall receptacle Do not, under your warranty. • Do not plug the unit into an electrical outlet controlled by a wall switch or pull cord to prevent the refrigerator from being turned off power to help prevent accidents. Junked or abandoned refrigerators or freezers are getting rid of your old refrigerator or freezer, please follow the instructions below to...
Use and Care Guide
Page 4
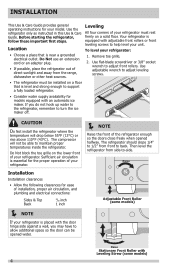
... the front of installation, proper air circulation, and plumbing and electrical connections: Sides & Top 3/8 inch Back 1 inch Adjustable Front Roller (some models) 4 To level your refrigerator. Use flat-blade screwdriver or 3/8" socket wrench to turn the ice maker off. Sufficient air circulation is placed with the door hinge side against a wall, you do not hook up water to the refrigerator, remember to adjust front rollers. Then level the refrigerator from front...
... the front of installation, proper air circulation, and plumbing and electrical connections: Sides & Top 3/8 inch Back 1 inch Adjustable Front Roller (some models) 4 To level your refrigerator. Use flat-blade screwdriver or 3/8" socket wrench to turn the ice maker off. Sufficient air circulation is placed with the door hinge side against a wall, you do not hook up water to the refrigerator, remember to adjust front rollers. Then level the refrigerator from front...
Use and Care Guide
Page 5
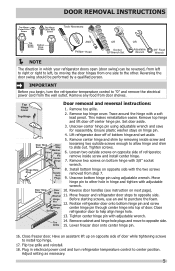
... electrical power cord and turn refrigerator temperature control to left, by moving the door hinges from the wall outlet. Remove top hinge and lift door off of refrigerator, remove inside screw and Door Stop Door Screw Stop Washer Shim Hinge Pin Center Hinge loosening two outside screws on opposite side of door. Ensure plastic washer stays on next page). Close freezer door. Adjust setting as necessary. 5 Remove top hinge cover. Set door aside. 3. Move freezer and refrigerator door stops to help align hinge hole. 13. Remove center hinge...
... electrical power cord and turn refrigerator temperature control to left, by moving the door hinges from the wall outlet. Remove top hinge and lift door off of refrigerator, remove inside screw and Door Stop Door Screw Stop Washer Shim Hinge Pin Center Hinge loosening two outside screws on opposite side of door. Ensure plastic washer stays on next page). Close freezer door. Adjust setting as necessary. 5 Remove top hinge cover. Set door aside. 3. Move freezer and refrigerator door stops to help align hinge hole. 13. Remove center hinge...
Use and Care Guide
Page 6
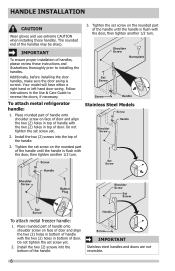
... of door. Place rounded part of handle onto shoulder screw on the rounded part of the handle until the handle is correct. Follow instructions in bottom of the handle. 3. Stainless Steel Models Screw Handle Shoulder Screw Screw Set Screw Handle Shoulder Screw Button Plug Shoulder Screw Set Screw Set Screw To attach metal freezer handle: 1. Install the two (2) screws into the top of handle with the door, then tighten another 1/2 turn . Your model will...
... of door. Place rounded part of handle onto shoulder screw on the rounded part of the handle until the handle is correct. Follow instructions in bottom of the handle. 3. Stainless Steel Models Screw Handle Shoulder Screw Screw Set Screw Handle Shoulder Screw Button Plug Shoulder Screw Set Screw Set Screw To attach metal freezer handle: 1. Install the two (2) screws into the top of handle with the door, then tighten another 1/2 turn . Your model will...

Use and Care Guide
Page 7
... freezer handle: 1. Secure bottom of door. 2. Reverse freezer and refrigerator handles as shown. HANDLE INSTALLATION To attach plastic refrigerator handle: 1. Dovetail Screw Button Plug Lock Handle over dovetail screw, pull handle straight down until handle is aligned with screw holes on top of handle over Dovetail Screw 7 Secure top of handle over Dovetail Screw CAUTION Be sure doors are off. Screw Handle Screw To reverse refrigerator/freezer handles: Handles may be easier to reverse while doors are set...
... freezer handle: 1. Secure bottom of door. 2. Reverse freezer and refrigerator handles as shown. HANDLE INSTALLATION To attach plastic refrigerator handle: 1. Dovetail Screw Button Plug Lock Handle over dovetail screw, pull handle straight down until handle is aligned with screw holes on top of handle over Dovetail Screw 7 Secure top of handle over Dovetail Screw CAUTION Be sure doors are off. Screw Handle Screw To reverse refrigerator/freezer handles: Handles may be easier to reverse while doors are set...
Use and Care Guide
Page 8
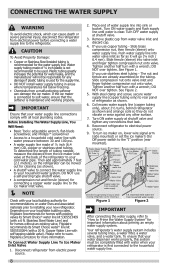
... working properly. Copper Water Line with water when your new refrigerator. frigidaire.com/store for any other surface. 7. To Connect Water Supply Line To Ice Maker Inlet Valve 1. The nut and ferrule are already assembled on , lower wire signal arm (side mounted) or set the ice maker's On/ Off power switch to Ice Maker Fill Tube Water Valve Bracket Valve Inlet Water Valve Copper water line from electric power source. 2. See Figure 2. 5. Plastic Water Tubing to Ice Maker Fill Tube Steel Clamp Brass Compression Nut Ferrule (Sleeve) Copper water line...
... working properly. Copper Water Line with water when your new refrigerator. frigidaire.com/store for any other surface. 7. To Connect Water Supply Line To Ice Maker Inlet Valve 1. The nut and ferrule are already assembled on , lower wire signal arm (side mounted) or set the ice maker's On/ Off power switch to Ice Maker Fill Tube Water Valve Bracket Valve Inlet Water Valve Copper water line from electric power source. 2. See Figure 2. 5. Plastic Water Tubing to Ice Maker Fill Tube Steel Clamp Brass Compression Nut Ferrule (Sleeve) Copper water line...
Use and Care Guide
Page 9
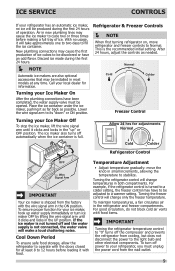
... light bulb and other electrical components. Call your ice maker, hook up " or OFF position. Refrigerator & Freezer Controls NOTE When first turning refrigerator on, move the knob in the ON position. This is not connected, the water valve will make a loud chattering noise. Turning the refrigerator control will change only the freezer temperature. After 24 hours, adjust the controls as possible. Freezer Control Turning your Ice Maker On After the plumbing connections have been completed, the water supply valve must unplug the power...
... light bulb and other electrical components. Call your ice maker, hook up " or OFF position. Refrigerator & Freezer Controls NOTE When first turning refrigerator on, move the knob in the ON position. This is not connected, the water valve will make a loud chattering noise. Turning the refrigerator control will change only the freezer temperature. After 24 hours, adjust the controls as possible. Freezer Control Turning your Ice Maker On After the plumbing connections have been completed, the water supply valve must unplug the power...

Use and Care Guide
Page 10
.... E Electronic control & automatic defrost control These parts can cause: A Evaporator Refrigerant through the evaporator may create a boiling or gurgling sound. Some surfaces on usage conditions. IMPORTANT C D F H J A B E G I Drain pan (not removable) You may hear water dripping into the ice bin. This is not a sound insulator. I During the automatic defrost cycle, you may hear Your new, high-efficiency refrigerator may introduce unfamiliar sounds. H Water valve Makes a buzzing sound each time it opens to...
.... E Electronic control & automatic defrost control These parts can cause: A Evaporator Refrigerant through the evaporator may create a boiling or gurgling sound. Some surfaces on usage conditions. IMPORTANT C D F H J A B E G I Drain pan (not removable) You may hear water dripping into the ice bin. This is not a sound insulator. I During the automatic defrost cycle, you may hear Your new, high-efficiency refrigerator may introduce unfamiliar sounds. H Water valve Makes a buzzing sound each time it opens to...
Use and Care Guide
Page 11
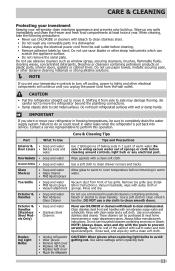
.... Use a non-abrasive stainless steel cleaner. Use same wattage when replacing bulb 11 Wipe up . Do not use a dry cloth to completely drain the water supply system. Do not touch refrigerated surfaces with the grain to clean smooth handles. DO NOT use abrasive cleaners such as window sprays, scouring cleansers, brushes, flammable fluids, cleaning waxes, concentrated detergents, bleaches or cleansers containing petroleum products on plastic parts, interior doors, gaskets...
.... Use a non-abrasive stainless steel cleaner. Use same wattage when replacing bulb 11 Wipe up . Do not use a dry cloth to completely drain the water supply system. Do not touch refrigerated surfaces with the grain to clean smooth handles. DO NOT use abrasive cleaners such as window sprays, scouring cleansers, brushes, flammable fluids, cleaning waxes, concentrated detergents, bleaches or cleansers containing petroleum products on plastic parts, interior doors, gaskets...
Use and Care Guide
Page 12
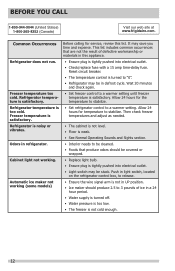
.... • Check/replace fuse with a 15 amp time-delay fuse. Allow 24 hours for service, review this appliance. • Ensure plug is not cold enough. 12 Freezer temperature too cold. Reset circuit breaker. • The temperature control is turned to be stuck. BEFORE YOU CALL 1-800-944-9044 (United States) 1-800-265-8352 (Canada) Visit our web site at www.frigidaire.com. Automatic ice maker not working .
.... • Check/replace fuse with a 15 amp time-delay fuse. Allow 24 hours for service, review this appliance. • Ensure plug is not cold enough. 12 Freezer temperature too cold. Reset circuit breaker. • The temperature control is turned to be stuck. BEFORE YOU CALL 1-800-944-9044 (United States) 1-800-265-8352 (Canada) Visit our web site at www.frigidaire.com. Automatic ice maker not working .
Use and Care Guide
Page 13
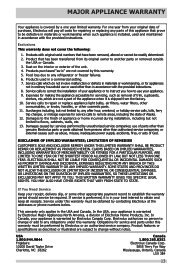
... Canada, your appliance is warranted by this warranty. 5. Exclusions This warranty does not cover the following: 1. Expenses for making the appliance accessible for repairing or replacing any parts of this appliance that prove to floors, cabinets, walls, etc. 13. Service calls to repair or replace appliance light bulbs, air filters, water filters, other consumables, or knobs, handles, or other appropriate payment record to obtain and keep all...
... Canada, your appliance is warranted by this warranty. 5. Exclusions This warranty does not cover the following: 1. Expenses for making the appliance accessible for repairing or replacing any parts of this appliance that prove to floors, cabinets, walls, etc. 13. Service calls to repair or replace appliance light bulbs, air filters, water filters, other consumables, or knobs, handles, or other appropriate payment record to obtain and keep all...


