
Complete Owners Guide
Page 1
REFRIGERATOR use & care Introduction 2 Important Safety information 3 Features (Frigidaire 5 Features (Frigidaire Gallery/Professional).... 7 Installation 8 Door Removal 10 Door Handle Installation (some models)... 13 Water Supply Connection 16 Ice Maker 18 Controls and Settings 19 Storage Features 22 Normal Operating Sounds 24 Filter replacement 25 Care and Cleaning 26 Troubleshooting 28 Limited Warranty 29 Frigidaire.com USA 1-800-374-4432 A13110304 (October 2019) Frigidaire.ca Canada 1-800-265-8352
REFRIGERATOR use & care Introduction 2 Important Safety information 3 Features (Frigidaire 5 Features (Frigidaire Gallery/Professional).... 7 Installation 8 Door Removal 10 Door Handle Installation (some models)... 13 Water Supply Connection 16 Ice Maker 18 Controls and Settings 19 Storage Features 22 Normal Operating Sounds 24 Filter replacement 25 Care and Cleaning 26 Troubleshooting 28 Limited Warranty 29 Frigidaire.com USA 1-800-374-4432 A13110304 (October 2019) Frigidaire.ca Canada 1-800-265-8352

Complete Owners Guide
Page 2
...help you avoid a service visit. We may be able to find. Let's make it 's easy to help . Please read it handy for bringing Frigidaire into your home! We are here for the use and care of a long relationship together. If you do need service, we can get that ...side and tilted ¼" (6 mm) front-to-back ˆˆ Cabinet is turned ON Final Checks ˆˆ Shipping material removed ˆˆ Refrigerator and freezer tempera- tures set ˆˆ Registration card sent in Ice Maker (some models) ˆˆ House water supply connected to recommended setting ˆ...
...help you avoid a service visit. We may be able to find. Let's make it 's easy to help . Please read it handy for bringing Frigidaire into your home! We are here for the use and care of a long relationship together. If you do need service, we can get that ...side and tilted ¼" (6 mm) front-to-back ˆˆ Cabinet is turned ON Final Checks ˆˆ Shipping material removed ˆˆ Refrigerator and freezer tempera- tures set ˆˆ Registration card sent in Ice Maker (some models) ˆˆ House water supply connected to recommended setting ˆ...

Complete Owners Guide
Page 3
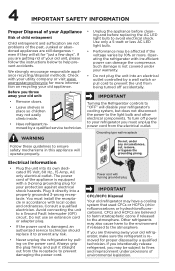
... fire or explosion. CAUTION Risk of this symbol to puncture of the appliance by trained service personnel. Flammable refrigerant used . WARNING WARNING WARNING indicates a potentially hazardous situation which is not intended for warnings regarding flammability and other... flammable liquids in death or serious injury. Flammable refrigerant used . To be followed. IMPORTANT SAFETY INFORMATION 3 WARNING Please read all instructions before attempting to alert of explosive fumes...
... fire or explosion. CAUTION Risk of this symbol to puncture of the appliance by trained service personnel. Flammable refrigerant used . WARNING WARNING WARNING indicates a potentially hazardous situation which is not intended for warnings regarding flammability and other... flammable liquids in death or serious injury. Flammable refrigerant used . To be followed. IMPORTANT SAFETY INFORMATION 3 WARNING Please read all instructions before attempting to alert of explosive fumes...
Complete Owners Guide
Page 4
... grounding prong. Such damage is damaged, an authorized service technician should replace it to help prevent accidents. IMPORTANT Turning the Refrigerator controls to your protection against electrical shock hazards. Consult a qualified electrician. Avoid connecting the unit to the atmosphere. Do not.... If you are getting rid of your old appliance. Check with insufficient power can damage the compressor. Operating the refrigerator with your refrigerator's cooling system, but does not disconnect the power to prevent damaging the power cord. The power cord of the appliance...
... grounding prong. Such damage is damaged, an authorized service technician should replace it to help prevent accidents. IMPORTANT Turning the Refrigerator controls to your protection against electrical shock hazards. Consult a qualified electrician. Avoid connecting the unit to the atmosphere. Do not.... If you are getting rid of your old appliance. Check with insufficient power can damage the compressor. Operating the refrigerator with your refrigerator's cooling system, but does not disconnect the power to prevent damaging the power cord. The power cord of the appliance...

Complete Owners Guide
Page 5
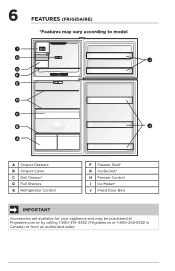
FEATURES (FRIGIDAIRE) *Features may vary according to model 5 I H J G F E D C B J A A Crisper Drawers B Crisper Cover C Deli Drawer* D Full Shelves E Refrigerator Control F Freezer Shelf G Ice Bucket* H Freezer Control I Ice Maker* J Fixed Door Bins IMPORTANT Accessories are available for your appliance and may be purchased at Frigidaire.com or by calling 1-800-374-4432 (Frigidaire.ca or 1-800-265-8352 in Canada) or from an authorized seller.
FEATURES (FRIGIDAIRE) *Features may vary according to model 5 I H J G F E D C B J A A Crisper Drawers B Crisper Cover C Deli Drawer* D Full Shelves E Refrigerator Control F Freezer Shelf G Ice Bucket* H Freezer Control I Ice Maker* J Fixed Door Bins IMPORTANT Accessories are available for your appliance and may be purchased at Frigidaire.com or by calling 1-800-374-4432 (Frigidaire.ca or 1-800-265-8352 in Canada) or from an authorized seller.
Complete Owners Guide
Page 6
6 FEATURES (FRIGIDAIRE) *Features may vary according to model I H J G F E D C B J A A Crisper Drawers B Crisper Cover C Deli Drawer* D Full Shelves E Refrigerator Control F Freezer Shelf G Ice Bucket* H Freezer Control I Ice Maker* J Fixed Door Bins IMPORTANT Accessories are available for your appliance and may be purchased at Frigidaire.com or by calling 1-800-374-4432 (Frigidaire.ca or 1-800-265-8352 in Canada) or from an authorized seller.
6 FEATURES (FRIGIDAIRE) *Features may vary according to model I H J G F E D C B J A A Crisper Drawers B Crisper Cover C Deli Drawer* D Full Shelves E Refrigerator Control F Freezer Shelf G Ice Bucket* H Freezer Control I Ice Maker* J Fixed Door Bins IMPORTANT Accessories are available for your appliance and may be purchased at Frigidaire.com or by calling 1-800-374-4432 (Frigidaire.ca or 1-800-265-8352 in Canada) or from an authorized seller.
Complete Owners Guide
Page 7
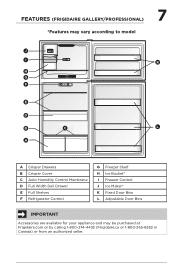
... Control Membrane D Full Width Deli Drawer E Full Shelves F Refrigerator Control G Freezer Shelf H Ice Bucket* I Freezer Control J Ice Maker* K Fixed Door Bins L Adjustable Door Bins IMPORTANT Accessories are available for your appliance and may be purchased at Frigidaire.com or by calling 1-800-374-4432 (Frigidaire.ca or 1-800-265-8352 in Canada) or...
... Control Membrane D Full Width Deli Drawer E Full Shelves F Refrigerator Control G Freezer Shelf H Ice Bucket* I Freezer Control J Ice Maker* K Fixed Door Bins L Adjustable Door Bins IMPORTANT Accessories are available for your appliance and may be purchased at Frigidaire.com or by calling 1-800-374-4432 (Frigidaire.ca or 1-800-265-8352 in Canada) or...

Complete Owners Guide
Page 8
... and plumbing and electrical connections: Sides & Top ⅜" Back 1" NOTE If your fingers. Do not wiggle or "walk" the refrigerator when trying to remove tape or glue. Do Not use sharp instruments, rubbing alcohol, flammable fluids, or abrasive cleaners to move it as instructed in... with an automatic ice maker. After you could damage the floor. models equipped with a soft cloth. CAUTION Do not install the refrigerator where the temperature will not be sure to avoid floor damage. Installation clearances • Allow the following clearances for ease of liquid ...
... and plumbing and electrical connections: Sides & Top ⅜" Back 1" NOTE If your fingers. Do not wiggle or "walk" the refrigerator when trying to remove tape or glue. Do Not use sharp instruments, rubbing alcohol, flammable fluids, or abrasive cleaners to move it as instructed in... with an automatic ice maker. After you could damage the floor. models equipped with a soft cloth. CAUTION Do not install the refrigerator where the temperature will not be sure to avoid floor damage. Installation clearances • Allow the following clearances for ease of liquid ...
Complete Owners Guide
Page 10
...because it may damage the screw threads or cause screw heads to step 3. However, if you begin, turn the refrigerator temperature control to the other. Using a 5/16 in. Unplug your refrigerator doors open the freezer door. A B Figure 1 Figure 2 4. 10 DOOR REMOVAL Tools Necessary: Phillips™... MSX16 Quadrex Pan Head Quadrex MSX12 Hammer Door Removal/Reversal (some models--see Figure 2). NOTE The direction in which your refrigerator. 2. Reversing the door swing should be performed by moving the door hinges from one side to OFF and remove the electrical power...
...because it may damage the screw threads or cause screw heads to step 3. However, if you begin, turn the refrigerator temperature control to the other. Using a 5/16 in. Unplug your refrigerator doors open the freezer door. A B Figure 1 Figure 2 4. 10 DOOR REMOVAL Tools Necessary: Phillips™... MSX16 Quadrex Pan Head Quadrex MSX12 Hammer Door Removal/Reversal (some models--see Figure 2). NOTE The direction in which your refrigerator. 2. Reversing the door swing should be performed by moving the door hinges from one side to OFF and remove the electrical power...

Complete Owners Guide
Page 11
... Screw Bottom Hinge Pin Figure 5 A Figure 7 3. Set the door aside. 7. Figure 6 Hinge Door Bearing Reversal For Pin Screws Freezer and Refrigerator Doors Hinge Hole Plug Center Hinge 1. Unscrew the bottom hinge pin from the door stopper with a Phillips screwdriver (see DOOR HANDLE INSTALLATION section if ...applicable). 5. Reverse the door handle (see Figure 5). 11. Open the refrigerator door and lift the door off of the bottom hinge pin. Figure 3 8. Remove the screw from the right-hand position using a...
... Screw Bottom Hinge Pin Figure 5 A Figure 7 3. Set the door aside. 7. Figure 6 Hinge Door Bearing Reversal For Pin Screws Freezer and Refrigerator Doors Hinge Hole Plug Center Hinge 1. Unscrew the bottom hinge pin from the door stopper with a Phillips screwdriver (see DOOR HANDLE INSTALLATION section if ...applicable). 5. Reverse the door handle (see Figure 5). 11. Open the refrigerator door and lift the door off of the bottom hinge pin. Figure 3 8. Remove the screw from the right-hand position using a...

Complete Owners Guide
Page 12
... over and attach it level while attaching the top hinge (see Figure 9). Figure 13 15. Place the lower hinge cover between the freezer door and refrigerator door to keep it using a 5/16 in . A B Door Closer Door Bottom C Figure 8 9. socket (see Figure 12). 2 1 Figure 9 11. Lower the... refrigerator door in and tighten the center hinge pin using an adjustable wrench. 12. Attach the top hinge using a 5/16 in . For models without the hinge ...
... over and attach it level while attaching the top hinge (see Figure 9). Figure 13 15. Place the lower hinge cover between the freezer door and refrigerator door to keep it using a 5/16 in . A B Door Closer Door Bottom C Figure 8 9. socket (see Figure 12). 2 1 Figure 9 11. Lower the... refrigerator door in and tighten the center hinge pin using an adjustable wrench. 12. Attach the top hinge using a 5/16 in . For models without the hinge ...

Complete Owners Guide
Page 13
13 DOOR HANDLE INSTALLATION (SOME MODELS) To attach the metal refrigerator handle (Stainless steel, Black Stainless steel, Stainless Steel EZCare): To attach the metal freezer handle (Stainless steel, Black Stainless steel, Stainless Steel EZCare): 1. Place the ...
13 DOOR HANDLE INSTALLATION (SOME MODELS) To attach the metal refrigerator handle (Stainless steel, Black Stainless steel, Stainless Steel EZCare): To attach the metal freezer handle (Stainless steel, Black Stainless steel, Stainless Steel EZCare): 1. Place the ...

Complete Owners Guide
Page 14
... the door. 3. To attach the plastic freezer handle (Smooth white/black): 1. Screws Handle Base Mounting Screw Handle Handle Screws Handle Base To attach the plastic refrigerator handle (Smooth white/black): 1. Install screws packaged with the holes in top of the door. 3. 14 DOOR HANDLE INSTALLATION (SOMEMODELS) CAUTION Do not use an...
... the door. 3. To attach the plastic freezer handle (Smooth white/black): 1. Screws Handle Base Mounting Screw Handle Handle Screws Handle Base To attach the plastic refrigerator handle (Smooth white/black): 1. Install screws packaged with the holes in top of the door. 3. 14 DOOR HANDLE INSTALLATION (SOMEMODELS) CAUTION Do not use an...

Complete Owners Guide
Page 15
...screwdriver. 7. Install the button plugs on the freezer door. 5. Remove the name plate on the opposite side of the front and top of the refrigerator door 3. Remove the shoulder screw on the left side, and install the shoulder screw on the opposite side of the freezer door. 8. Remove ... the doors are off. 1. Unscrew and remove the handles 2. Install the name plate on the opposite side of the refrigerator door. 6. Reverse and attach the freezer and refrigerator handles as shown. The handles may be easier to reverse while the doors are set aside in a secure position where ...
...screwdriver. 7. Install the button plugs on the freezer door. 5. Remove the name plate on the opposite side of the front and top of the refrigerator door 3. Remove the shoulder screw on the left side, and install the shoulder screw on the opposite side of the freezer door. 8. Remove ... the doors are off. 1. Unscrew and remove the handles 2. Install the name plate on the opposite side of the refrigerator door. 6. Reverse and attach the freezer and refrigerator handles as shown. The handles may be easier to reverse while the doors are set aside in a secure position where ...
Complete Owners Guide
Page 16
... Check with your household water system. To determine the length of the refrigerator to your cold water pipe, so the refrigerator can cause death or severe personal injury, disconnect the refrigerator from electrical power before connecting a water supply line to www.frigidaire.com for the water supply line. Depending on water lines and associated...
... Check with your household water system. To determine the length of the refrigerator to your cold water pipe, so the refrigerator can cause death or severe personal injury, disconnect the refrigerator from electrical power before connecting a water supply line to www.frigidaire.com for the water supply line. Depending on water lines and associated...
Complete Owners Guide
Page 17
...Water Valve Bracket Water Valve Inlet Water Valve Copper water line from household water supply (Include enough tubing in loop to allow moving refrigerator out for cleaning.) Units with copper tubing Plastic Water Tubing to Ice Maker Fill Tube Brass Compression Nut Water Line Water Valve ...Valve Inlet Water Valve 6 ft minimum (1.8 m) braided flexible stainless steel water line from household water supply (Include enough tubing in to allow moving refrigerator out for cleaning.) Units with a wrench; Tighten another ½ turn the ice maker on the tubing. Remove the plastic cap from the ...
...Water Valve Bracket Water Valve Inlet Water Valve Copper water line from household water supply (Include enough tubing in loop to allow moving refrigerator out for cleaning.) Units with copper tubing Plastic Water Tubing to Ice Maker Fill Tube Brass Compression Nut Water Line Water Valve ...Valve Inlet Water Valve 6 ft minimum (1.8 m) braided flexible stainless steel water line from household water supply (Include enough tubing in to allow moving refrigerator out for cleaning.) Units with a wrench; Tighten another ½ turn the ice maker on the tubing. Remove the plastic cap from the ...

Complete Owners Guide
Page 18
... to fill the ice container. Turning your Ice Maker Off To stop the ice maker, press the ice maker's On/Off button. Visit www.frigidaire.com for your refrigerator has an automatic ice maker, it will make a loud chattering noise. Air in the On position. CAUTION Do Not place the ice container...
... to fill the ice container. Turning your Ice Maker Off To stop the ice maker, press the ice maker's On/Off button. Visit www.frigidaire.com for your refrigerator has an automatic ice maker, it will make a loud chattering noise. Air in the On position. CAUTION Do Not place the ice container...

Complete Owners Guide
Page 19
Refrigerator Controls Frigidaire IMPORTANT Adjusting the refrigerator temperature control to OFF turns off power to your unit is in small increments, allowing the temperature to Recommended. Temperature Adjustment Adjust the temperature gradually: ... to the light bulb and other electrical components. For good circulation, do not block cold air vents with food. NOTE When first turning the refrigerator on, adjust the control to stabilize. • For colder temperatures, adjust the control toward Coldest. • For warmer temperatures, adjust the control toward Cold. After...
Refrigerator Controls Frigidaire IMPORTANT Adjusting the refrigerator temperature control to OFF turns off power to your unit is in small increments, allowing the temperature to Recommended. Temperature Adjustment Adjust the temperature gradually: ... to the light bulb and other electrical components. For good circulation, do not block cold air vents with food. NOTE When first turning the refrigerator on, adjust the control to stabilize. • For colder temperatures, adjust the control toward Coldest. • For warmer temperatures, adjust the control toward Cold. After...

Complete Owners Guide
Page 20
...the air filter, the air filter status on the control panel will prompt you to the least coldest setting. 20 CONTROLS AND SETTINGS Frigidaire Gallery and Professional Temperature Adjustment Adjust the temperature gradually: adjust in small increments, allowing the temperature to stabilize. • For colder... button to change the temperature setting toward Coldest. • For warmer temperatures, press the Temp button to change temperature in the refrigerator and freezer compartments. The freezer control can be reset. For good circulation, do not block cold air vents with food items. Air...
...the air filter, the air filter status on the control panel will prompt you to the least coldest setting. 20 CONTROLS AND SETTINGS Frigidaire Gallery and Professional Temperature Adjustment Adjust the temperature gradually: adjust in small increments, allowing the temperature to stabilize. • For colder... button to change the temperature setting toward Coldest. • For warmer temperatures, press the Temp button to change temperature in the refrigerator and freezer compartments. The freezer control can be reset. For good circulation, do not block cold air vents with food items. Air...

Complete Owners Guide
Page 21
...Sab- Deactivate It with standard trays. Press the ice maker's On/Off power switch to turn the ice maker off. The refrigerator stays in Sabbath Mode after power failure recovery. One LED on each side of Recommended setting will not be lit while the unit... Mode is deactivated. For further assistance, guidelines for 5 seconds. 21 CONTROLS AND SETTINGS Sabbath Mode (Frigidaire Gallery/Professional) The Sabbath Mode is a feature that disables portions of the refrigerator and its controls in accordance with the Sabbath feature, please visit www.star-k.org. To enter Sabbath Mode...
...Sab- Deactivate It with standard trays. Press the ice maker's On/Off power switch to turn the ice maker off. The refrigerator stays in Sabbath Mode after power failure recovery. One LED on each side of Recommended setting will not be lit while the unit... Mode is deactivated. For further assistance, guidelines for 5 seconds. 21 CONTROLS AND SETTINGS Sabbath Mode (Frigidaire Gallery/Professional) The Sabbath Mode is a feature that disables portions of the refrigerator and its controls in accordance with the Sabbath feature, please visit www.star-k.org. To enter Sabbath Mode...


